

BenQ US PRJ 1 Year Warranty
Page 1
... or products shall be reported within thirty (30) days of the Product. If the Product becomes defective during the warranty period. BenQ Projector Standard Limited Warranty: Subject to depot repair service during the warranty period in the United States on or after such period. An... RMA number must be warranted only for lamps as specified below , BenQ America Corp. ("BenQ") warrants the BenQ Digital Projector ("Product") you are entitled to the exclusions set forth below and refurbished units which have purchased from defects in ...
... or products shall be reported within thirty (30) days of the Product. If the Product becomes defective during the warranty period. BenQ Projector Standard Limited Warranty: Subject to depot repair service during the warranty period in the United States on or after such period. An... RMA number must be warranted only for lamps as specified below , BenQ America Corp. ("BenQ") warrants the BenQ Digital Projector ("Product") you are entitled to the exclusions set forth below and refurbished units which have purchased from defects in ...

MX613ST User Manual
Page 1
MS612ST/MX613ST Digital Projector User Manual Welcome
MS612ST/MX613ST Digital Projector User Manual Welcome
MX613ST User Manual
Page 2
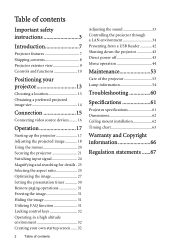
...image size 14 Connection 15 Connecting video source devices........ 16 Operation 17 Starting up the projector 17 Adjusting the projected image 18 Using the menus 20 Securing the projector 21 Switching input signal 24 Magnifying and searching for details . 25 Selecting the aspect ... 34 Presenting from a USB Reader............42 Shutting down the projector 43 Direct power off 43 Menu operation 44 Maintenance 53 Care of the projector 53 Lamp information 54 Troubleshooting 60 Specifications 61 Projector specifications 61 Dimensions 62 Ceiling mount installation 62 Timing chart ...
...image size 14 Connection 15 Connecting video source devices........ 16 Operation 17 Starting up the projector 17 Adjusting the projected image 18 Using the menus 20 Securing the projector 21 Switching input signal 24 Magnifying and searching for details . 25 Selecting the aspect ... 34 Presenting from a USB Reader............42 Shutting down the projector 43 Direct power off 43 Menu operation 44 Maintenance 53 Care of the projector 53 Lamp information 54 Troubleshooting 60 Specifications 61 Projector specifications 61 Dimensions 62 Ceiling mount installation 62 Timing chart ...

MX613ST User Manual
Page 3
...information technology equipment. In some countries, the line voltage is operate your eyes. 3. In areas where the mains voltage may damage your projector. Refer servicing to meet the latest standards for NOT stable. Important safety instructions 3 to operate safely within a mains voltage between 100 to...volts AC, but could cause the objects to ensure safe use of 10 volts occur. Do not look straight at the projector uninterruptible power supply (UPS). The intense light beam may fluctuate or cut out, it is recommended that you follow the instructions ...
...information technology equipment. In some countries, the line voltage is operate your eyes. 3. In areas where the mains voltage may damage your projector. Refer servicing to meet the latest standards for NOT stable. Important safety instructions 3 to operate safely within a mains voltage between 100 to...volts AC, but could cause the objects to ensure safe use of 10 volts occur. Do not look straight at the projector uninterruptible power supply (UPS). The intense light beam may fluctuate or cut out, it is recommended that you follow the instructions ...

MX613ST User Manual
Page 4
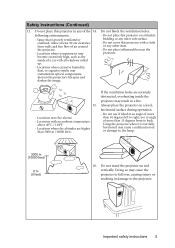
...Refer servicing only to disassemble this product on rare occasions. It is the lamp which may cause death lamps beyond the projector. during operation. Do not attempt to suitably qualified professional service personnel. 9. There are dangerous high rated lamp life. Under...life could if you should you ever undo or remove any electronic components unless the projector is under operation, you may fall, sustaining serious damage. 11. live parts. Allow the projector to cool for replacement. Safety Instructions (Continued) 7. The only user serviceable part...
...Refer servicing only to disassemble this product on rare occasions. It is the lamp which may cause death lamps beyond the projector. during operation. Do not attempt to suitably qualified professional service personnel. 9. There are dangerous high rated lamp life. Under...life could if you should you ever undo or remove any electronic components unless the projector is under operation, you may fall, sustaining serious damage. 11. live parts. Allow the projector to cool for replacement. Safety Instructions (Continued) 7. The only user serviceable part...
MX613ST User Manual
Page 5
... to right, nor at least 50 cm clearance from walls and free flow of the 14. Do not block the ventilation holes. - Locations near the projector. 15. - If the ventilation holes are higher than 15 degrees front to , the lamp. 3000 m (10000 feet) 0 m (0 feet) 16. Doing so may ...result in any other soft surface. - Safety Instructions (Continued) 13. Locations with a cloth or any of air around the projector. - Always place the projector on a blanket, bedding or any other item. - Do not use if tilted at an angle of more than 3000 m (10000 feet). Do not...
... to right, nor at least 50 cm clearance from walls and free flow of the 14. Do not block the ventilation holes. - Locations near the projector. 15. - If the ventilation holes are higher than 15 degrees front to , the lamp. 3000 m (10000 feet) 0 m (0 feet) 16. Doing so may ...result in any other soft surface. - Safety Instructions (Continued) 13. Locations with a cloth or any of air around the projector. - Always place the projector on a blanket, bedding or any other item. - Do not use if tilted at an angle of more than 3000 m (10000 feet). Do not...

MX613ST User Manual
Page 6
... ceiling due to have a pleasant experience using your BenQ projector, so we strongly recommend that you use a proper fitting BenQ projector ceiling mount kit and that the projector may fall from the power supply's power outlet and call BenQ to an improper attachment through the use a non-BenQ brand projector ceiling mount kit, there is a safety risk that...
... ceiling due to have a pleasant experience using your BenQ projector, so we strongly recommend that you use a proper fitting BenQ projector ceiling mount kit and that the projector may fall from the power supply's power outlet and call BenQ to an improper attachment through the use a non-BenQ brand projector ceiling mount kit, there is a safety risk that...

MX613ST User Manual
Page 7
... password protected function • 3D color management allowing color adjustments to your liking • Selectable quick cooling function making the projector cool in a shorter time • FAQ to troubleshoot operational problems with one quick key press • Presentation timer for ... input is connected • Component HDTV compatibility (YPbPr) • The apparent brightness of use. The projector offers the following features. • Network Settings allowing management of projector status from a computer using a web browser • USB MINI-B jack to display computer signal through...
... password protected function • 3D color management allowing color adjustments to your liking • Selectable quick cooling function making the projector cool in a shorter time • FAQ to troubleshoot operational problems with one quick key press • Presentation timer for ... input is connected • Component HDTV compatibility (YPbPr) • The apparent brightness of use. The projector offers the following features. • Network Settings allowing management of projector status from a computer using a web browser • USB MINI-B jack to display computer signal through...
MX613ST User Manual
Page 8
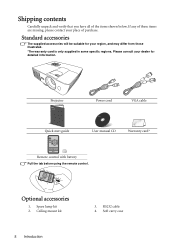
Please consult your region, and may differ from those illustrated. *The warranty card is only supplied in some specific regions. Projector Power cord VGA cable Quick start guide Capture User manual CD Warranty card* Remote control with battery Pull the tab before using the remote control. ...
Please consult your region, and may differ from those illustrated. *The warranty card is only supplied in some specific regions. Projector Power cord VGA cable Quick start guide Capture User manual CD Warranty card* Remote control with battery Pull the tab before using the remote control. ...
MX613ST User Manual
Page 9
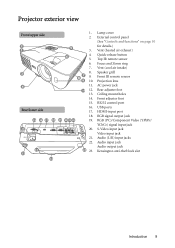
.../ YCbCr) signal input jack S-Video input jack Video input jack Audio (L/R) input jacks Audio input jack Audio output jack Kensington anti-theft lock slot Introduction 9 Projector exterior view Front/upper side 2 1 3 4 Rear/lower side 15 16 17 18 11 13 12 14 1. 2. 5 3. 6 4. 5. 6. 7. 8. 7 89 9. 10. 11. 10 12. 13. 14. 15. 16...
.../ YCbCr) signal input jack S-Video input jack Video input jack Audio (L/R) input jacks Audio input jack Audio output jack Kensington anti-theft lock slot Introduction 9 Projector exterior view Front/upper side 2 1 3 4 Rear/lower side 15 16 17 18 11 13 12 14 1. 2. 5 3. 6 4. 5. 6. 7. 8. 7 89 9. 10. 11. 10 12. 13. 14. 15. 16...

MX613ST User Manual
Page 10
...) Manually corrects distorted images resulting from an angled projection. Right/ Activates panel key lock. MODE/ENTER Selects an available picture setup mode. Controls and functions Projector 8. 1 2 3 4 5 6 7 9. 8 9 10 11 10. 12 13 14 11. 11 1. Adjusts the size of the lamp. POWER indicator... When the On-Screen Display (OSD) menu is under operation. 4. SOURCE Displays the source selection bar. 10 Introduction POWER Toggles the projector between standby mode and on the On-Screen Display (OSD) menu. Focus ring Adjusts the focus of the projected image. 2. Lights ...
...) Manually corrects distorted images resulting from an angled projection. Right/ Activates panel key lock. MODE/ENTER Selects an available picture setup mode. Controls and functions Projector 8. 1 2 3 4 5 6 7 9. 8 9 10 11 10. 12 13 14 11. 11 1. Adjusts the size of the lamp. POWER indicator... When the On-Screen Display (OSD) menu is under operation. 4. SOURCE Displays the source selection bar. 10 Introduction POWER Toggles the projector between standby mode and on the On-Screen Display (OSD) menu. Focus ring Adjusts the focus of the projected image. 2. Lights ...

MX613ST User Manual
Page 11
.... CAPTURE Selects an available picture setup mode. Goes back to hide the screen picture. 6. Remote control 1 2 3 Capture 4 5 6 9. POWER Displays the source selection bar. Toggles the projector between standby mode 13. Activates the selected On-Screen Display (OSD) menu item. 14. Timer Set up /down commands (like Microsoft PowerPoint). BLANK Enters presentation...
.... CAPTURE Selects an available picture setup mode. Goes back to hide the screen picture. 6. Remote control 1 2 3 Capture 4 5 6 9. POWER Displays the source selection bar. Toggles the projector between standby mode 13. Activates the selected On-Screen Display (OSD) menu item. 14. Timer Set up /down commands (like Microsoft PowerPoint). BLANK Enters presentation...
MX613ST User Manual
Page 12
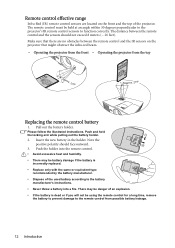
...the battery holder. 2. Pull out the battery holder. Remote control effective range Infra-Red (IR) remote control sensors are located on the projector that there are no obstacles between the remote control and the sensors should face outward. 3. Push the holder into a fire. Insert ...the new battery in the holder. The remote control must be held at an angle within 30 degrees perpendicular to the projector's IR remote control sensors to the battery manufacturer's instructions. • Never throw a battery into the remote control. • Avoid excessive heat ...
...the battery holder. 2. Pull out the battery holder. Remote control effective range Infra-Red (IR) remote control sensors are located on the projector that there are no obstacles between the remote control and the sensors should face outward. 3. Push the holder into a fire. Insert ...the new battery in the holder. The remote control must be held at an angle within 30 degrees perpendicular to the projector's IR remote control sensors to the battery manufacturer's instructions. • Never throw a battery into the remote control. • Avoid excessive heat ...

MX613ST User Manual
Page 13
... the table in one of the screen. Note that a special rear projection screen and the BenQ Projector Ceiling Mount Kit are required for quick setup and portability. Purchase the BenQ Projector Ceiling Mount Kit from the ceiling most common way to be installed in front of four possible installation locations: 1. for this location with...
... the table in one of the screen. Note that a special rear projection screen and the BenQ Projector Ceiling Mount Kit are required for quick setup and portability. Purchase the BenQ Projector Ceiling Mount Kit from the ceiling most common way to be installed in front of four possible installation locations: 1. for this location with...
MX613ST User Manual
Page 14
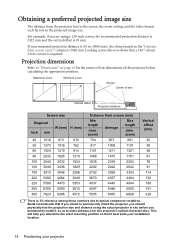
... column is 3028 mm. Maximum zoom Minimum zoom Screen Center of this row shows that a 150'' (about 3.8 m) screen is required. BenQ recommends that it , so as to optical component variations. zoom) Average Max length (min. This will help you determine the exact mounting ...position so that if you intend to permanently install the projector, you permanently install it best suits your installation location. 14 Positioning your measured projection distance is 3.0 m (3000 mm), the closest...
... column is 3028 mm. Maximum zoom Minimum zoom Screen Center of this row shows that a 150'' (about 3.8 m) screen is required. BenQ recommends that it , so as to optical component variations. zoom) Average Max length (min. This will help you determine the exact mounting ...position so that if you intend to permanently install the projector, you permanently install it best suits your installation location. 14 Positioning your measured projection distance is 3.0 m (3000 mm), the closest...

MX613ST User Manual
Page 15
... 1. S-Video cable Connection 15 Use the correct signal cables for reference only. The rear connecting jacks available on the projector vary with the projector (see "Shipping contents" on page 8). Audio L/R cable 3. USB flash drive/USB wireless dongle adapter cable 10. Connection... When connecting a signal source to the projector, be included with each source. 3. VGA cable 6. Component Video to DVI-A cable 7. Ensure the cables are for each projector model. USB cable 8. Turn all equipment off before making any connections....
... 1. S-Video cable Connection 15 Use the correct signal cables for reference only. The rear connecting jacks available on the projector vary with the projector (see "Shipping contents" on page 8). Audio L/R cable 3. USB flash drive/USB wireless dongle adapter cable 10. Connection... When connecting a signal source to the projector, be included with each source. 3. VGA cable 6. Component Video to DVI-A cable 7. Ensure the cables are for each projector model. USB cable 8. Turn all equipment off before making any connections....
MX613ST User Manual
Page 16
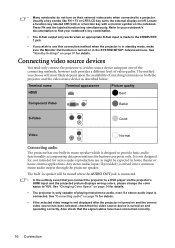
.... • The D-Sub output only works when an appropriate D-Sub input is made to YUV. The method you wish to a projector. Any stereo audio input (if provided), is turned on their external video ports when connected to use as described below: Terminal name Terminal... appearance Picture quality HDMI Best Component Video Better S-Video Good Video Normal Connecting audio The projector has one of the connecting methods, however each provides a different level of matching terminals on in home theater or home cinema applications...
.... • The D-Sub output only works when an appropriate D-Sub input is made to YUV. The method you wish to a projector. Any stereo audio input (if provided), is turned on their external video ports when connected to use as described below: Terminal name Terminal... appearance Picture quality HDMI Best Component Video Better S-Video Good Video Normal Connecting audio The projector has one of the connecting methods, however each provides a different level of matching terminals on in home theater or home cinema applications...
MX613ST User Manual
Page 17
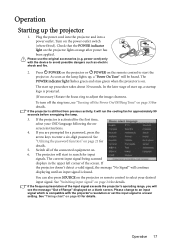
... search for input signals. See "Utilizing the password function" on . 6. Switch all of the connected equipment on page 21 for details. 5. The projector will see "Turning off the Power On/Off Ring Tone" on . You can also press SOURCE on page 24 for details. Plug the power cord... 90 seconds before energizing the lamp. 3. Turn on page 63 for details. Check that the POWER indicator light on a blank screen. If the projector doesn't detect a valid signal, the message "No Signal" will continue displaying until an input signal is compatible with the device to an input signal...
... search for input signals. See "Utilizing the password function" on . 6. Switch all of the connected equipment on page 21 for details. 5. The projector will see "Turning off the Power On/Off Ring Tone" on . You can also press SOURCE on page 24 for details. Plug the power cord... 90 seconds before energizing the lamp. 3. Turn on page 63 for details. Check that the POWER indicator light on a blank screen. If the projector doesn't detect a valid signal, the message "No Signal" will continue displaying until an input signal is compatible with the device to an input signal...

MX613ST User Manual
Page 18
...be blank while Auto is functioning. • This function is only available when PC signal (analog RGB) is not placed on the projector or remote control. Auto-adjusting the image In some cases, you press the quick-release button as it , release the quick-release ...and Clock to optimize the picture quality. Within 3 seconds, the built-in position. 2. Adjusting the projected image Adjusting the projection angle The projector is close to each other, the projected image becomes trapezoidal. Once the image is on. focus ring. 18 Operation These adjusters change the...
...be blank while Auto is functioning. • This function is only available when PC signal (analog RGB) is not placed on the projector or remote control. Auto-adjusting the image In some cases, you press the quick-release button as it , release the quick-release ...and Clock to optimize the picture quality. Within 3 seconds, the built-in position. 2. Adjusting the projected image Adjusting the projection angle The projector is close to each other, the projected image becomes trapezoidal. Once the image is on. focus ring. 18 Operation These adjusters change the...

MX613ST User Manual
Page 19
Press to correct keystoning at the top of the image. Press to correct keystoning at either the top or bottom. It occurs when the projector is noticeably wider at the top of the image. Press / . To correct this, you will need to manually correct it following ONE ...8226; Using the OSD menu 1. Operation 19 Press to correct keystoning at the bottom of these steps. • Using the remote control Press / on the projector or remote control to display the Keystone correction page. Press to correct keystoning at the bottom of the image. Press to highlight Keystone and press...
Press to correct keystoning at the top of the image. Press to correct keystoning at either the top or bottom. It occurs when the projector is noticeably wider at the top of the image. Press / . To correct this, you will need to manually correct it following ONE ...8226; Using the OSD menu 1. Operation 19 Press to correct keystoning at the bottom of these steps. • Using the remote control Press / on the projector or remote control to display the Keystone correction page. Press to correct keystoning at the bottom of the image. Press to highlight Keystone and press...


