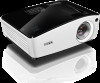

MX723 Data Sheet
Page 1
... SmartEco™ Power Saving Technology 2D Keystone with Corner Fit LAN Control and Display Optional Wireless Display Input and Output Terminals 1 23 4 5 6 7 8 9 10 11 12 1 Audio In & Out (Mini Jack) 7 RS232 (DB-9pin) 2 Audio in (L/R) 8 USB (TypeA) 3 S-Video (Mini DIN 4-pin) 9 LAN 4 Computer In -1 / 2 (D-sub 15pin) 10 USB (Type mini-B) 5 Monitor Out (D-sub 15pin) 11 Mic 6 HDMI 12 CompositeVideo in (RCA) Specifications Projection System DLP Native Resolution XGA (1024x768) Brightness...
... SmartEco™ Power Saving Technology 2D Keystone with Corner Fit LAN Control and Display Optional Wireless Display Input and Output Terminals 1 23 4 5 6 7 8 9 10 11 12 1 Audio In & Out (Mini Jack) 7 RS232 (DB-9pin) 2 Audio in (L/R) 8 USB (TypeA) 3 S-Video (Mini DIN 4-pin) 9 LAN 4 Computer In -1 / 2 (D-sub 15pin) 10 USB (Type mini-B) 5 Monitor Out (D-sub 15pin) 11 Mic 6 HDMI 12 CompositeVideo in (RCA) Specifications Projection System DLP Native Resolution XGA (1024x768) Brightness...
MX723 and MW724 Quick Start Guide
Page 12
...-232 serial control 9 pin x 1 LAN control Wired (RJ45) USB Mini B Supports firmware upgrade Type A 1.5A output Input terminals Computer input RGB input D-Sub 15-pin (female) x 2 Video signal input S-VIDEO Mini DIN 4-pin port x 1 VIDEO RCA jack x 1 SD/HDTV signal input Analog - Optical Resolution (MX723) 1024 x 768 XGA (MW724) 1280 x 800 WXGA Display system 1-CHIP DMD Lens F/Number (MX723) F= 2.5~3.12 f= 16mm~25.46mm (MW724) F= 2.41~2.78 f= 15.76mm~21.11mm Offset (MX723)130% (MW724)125% Zoom ratio (MX723)1.6X (MW724)1.36X Lamp (MX723...
...-232 serial control 9 pin x 1 LAN control Wired (RJ45) USB Mini B Supports firmware upgrade Type A 1.5A output Input terminals Computer input RGB input D-Sub 15-pin (female) x 2 Video signal input S-VIDEO Mini DIN 4-pin port x 1 VIDEO RCA jack x 1 SD/HDTV signal input Analog - Optical Resolution (MX723) 1024 x 768 XGA (MW724) 1280 x 800 WXGA Display system 1-CHIP DMD Lens F/Number (MX723) F= 2.5~3.12 f= 16mm~25.46mm (MW724) F= 2.41~2.78 f= 15.76mm~21.11mm Offset (MX723)130% (MW724)125% Zoom ratio (MX723)1.6X (MW724)1.36X Lamp (MX723...

MX723, MW724 User Manual
Page 3
Always open the lens shutter or remove the lens cap when the projector lamp is designed and tested to ensure safe use of this manual and marked on . 5. Do not look straight at the projector lens during operation. The intense light beam may fluctuate or cut out, it is recommended that you connect your projector through a power stabilizer, surge protector or uninterruptible power supply (UPS). 3. In areas where...
Always open the lens shutter or remove the lens cap when the projector lamp is designed and tested to ensure safe use of this manual and marked on . 5. Do not look straight at the projector lens during operation. The intense light beam may fluctuate or cut out, it is recommended that you connect your projector through a power stabilizer, surge protector or uninterruptible power supply (UPS). 3. In areas where...
MX723, MW724 User Manual
Page 11
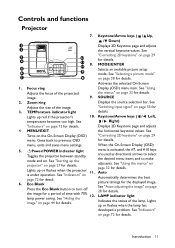
... the projector between standby are used as directional arrows to turn off 28 for detail. Zoom ring Adjusts the size of the projected image. 2. See "Using the menus" on page 29 for details. Goes back to make projector" on page 38 for the displayed image. See "Starting up or flashes when the projector 11. Focus ring Adjusts the focus of the image. 3. MENU/EXIT the horizontal keystone values. Eco Blank picture timings for details. LAMP indicator light lamp power...
... the projector between standby are used as directional arrows to turn off 28 for detail. Zoom ring Adjusts the size of the projected image. 2. See "Using the menus" on page 29 for details. Goes back to make projector" on page 38 for the displayed image. See "Starting up or flashes when the projector 11. Focus ring Adjusts the focus of the image. 3. MENU/EXIT the horizontal keystone values. Eco Blank picture timings for details. LAMP indicator light lamp power...
MX723, MW724 User Manual
Page 13
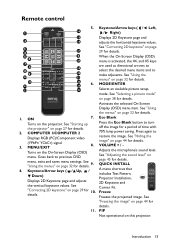
... used as directional arrows to select the desired menu items and to restore the image. See "Adjusting the sound level" on menu settings. Remote control 1 2 3 4 5 6 7 4 8 9 10 11 12 13 5. 14 15 16 17 5 18 19 20 21 22 23 6. 24 1. details. 11. Activates the selected On-Screen Display (OSD) menu item. Freeze Freezes the projected image. Introduction 13 ON 7. See "Correcting 2D keystone" on the projector. Turns...
... used as directional arrows to select the desired menu items and to restore the image. See "Adjusting the sound level" on menu settings. Remote control 1 2 3 4 5 6 7 4 8 9 10 11 12 13 5. 14 15 16 17 5 18 19 20 21 22 23 6. 24 1. details. 11. Activates the selected On-Screen Display (OSD) menu item. Freeze Freezes the projected image. Introduction 13 ON 7. See "Correcting 2D keystone" on the projector. Turns...
MX723, MW724 User Manual
Page 14
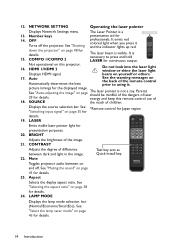
... the image. 21. See *Remote control for details. 19. LAMP MODE Displays the lamp mode selection bar (Normal/Economic/SmartEco). HDMI 1/HDMI 2 Do not look into the laser light window or shine the laser light Displays HDMI signal. BRIGHT Adjusts the brightness of children. 12. Displays the source selection bar. OFF professionals. Auto Automatically determines the best See the warning messages on page 35 for Japan region "Switching input signal" on the back of the remote control...
... the image. 21. See *Remote control for details. 19. LAMP MODE Displays the lamp mode selection bar (Normal/Economic/SmartEco). HDMI 1/HDMI 2 Do not look into the laser light window or shine the laser light Displays HDMI signal. BRIGHT Adjusts the brightness of children. 12. Displays the source selection bar. OFF professionals. Auto Automatically determines the best See the warning messages on page 35 for Japan region "Switching input signal" on the back of the remote control...

MX723, MW724 User Manual
Page 17
... screen. Set Rear Ceiling in one of the screen. Purchase the BenQ Projector Ceiling Mounting Kit from your dealer to be installed in the SYSTEM SETUP: Basic > Projector Installation menu after you turn the projector on the remote control to position the projector for this installation location. Set Rear Table in the SYSTEM SETUP: Basic > Projector Installation menu after you turn the projector on the ceiling. Set Front Ceiling in the SYSTEM SETUP: Basic > Projector Installation menu after you select. Note that a special rear projection screen...
... screen. Set Rear Ceiling in one of the screen. Purchase the BenQ Projector Ceiling Mounting Kit from your dealer to be installed in the SYSTEM SETUP: Basic > Projector Installation menu after you turn the projector on the remote control to position the projector for this installation location. Set Rear Table in the SYSTEM SETUP: Basic > Projector Installation menu after you turn the projector on the ceiling. Set Front Ceiling in the SYSTEM SETUP: Basic > Projector Installation menu after you select. Note that a special rear projection screen...
MX723, MW724 User Manual
Page 27
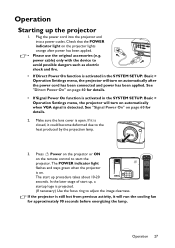
... POWER indicator light on . The POWER indicator light flashes and stays green when the projector is projected. (If necessary) Use the focus ring to adjust the image clearness. The start up, a startup logo is on the projector lights orange after the power cord has been connected and power has been applied. Operation 27 Press II Power on the projector or ON on automatically when VGA signal is activated in the SYSTEM SETUP: Basic > Operation Settings menu, the projector will run the cooling fan...
... POWER indicator light on . The POWER indicator light flashes and stays green when the projector is projected. (If necessary) Use the focus ring to adjust the image clearness. The start up, a startup logo is on the projector lights orange after the power cord has been connected and power has been applied. Operation 27 Press II Power on the projector or ON on automatically when VGA signal is activated in the SYSTEM SETUP: Basic > Operation Settings menu, the projector will run the cooling fan...
MX723, MW724 User Manual
Page 34
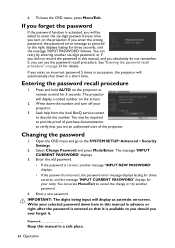
... Change Password and press Mode/Enter. Enter the old password. • If the password is correct, another six-digit password, or if you did not record the password in advance or right after the password is entered so that you enter the wrong password, the password error message as asterisks on-screen. You can use the password recall procedure. IMPORTANT: The digits being input will display a coded number on the projector or remote control...
... Change Password and press Mode/Enter. Enter the old password. • If the password is correct, another six-digit password, or if you did not record the password in advance or right after the password is entered so that you enter the wrong password, the password error message as asterisks on-screen. You can use the password recall procedure. IMPORTANT: The digits being input will display a coded number on the projector or remote control...
MX723, MW724 User Manual
Page 35
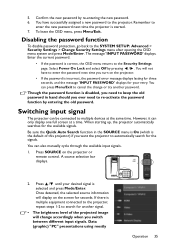
... screen at the same time. Switching input signal The projector can also manually cycle through the available input signals. 1. If there is disabled, you need to keep the old password in the SOURCE menu is On (which is selected and press Mode/Enter. You will display on the projector or remote control. Once detected, the selected source information will not have successfully assigned a new password to the SYSTEM SETUP: Advanced > Security Settings > Change Security Settings menu...
... screen at the same time. Switching input signal The projector can also manually cycle through the available input signals. 1. If there is disabled, you need to keep the old password in the SOURCE menu is On (which is selected and press Mode/Enter. You will display on the projector or remote control. Once detected, the selected source information will not have successfully assigned a new password to the SYSTEM SETUP: Advanced > Security Settings > Change Security Settings menu...

MX723, MW724 User Manual
Page 60
... will be set period of time. See "Starting up the projector" on page 44 for details. See "Hiding the image" on page 27 for details. SYSTEM SETUP: Basic menu FUNCTION Operation Settings DESCRIPTION Direct Power On Selecting On enables the function. See "Starting up the projector" on manually (by keypad or remote). Sleep Timer Sets the auto-shutdown timer. 4. Auto Power Off Allows the projector to be turned on automatically when VGA signal is...
... will be set period of time. See "Starting up the projector" on page 44 for details. See "Hiding the image" on page 27 for details. SYSTEM SETUP: Basic menu FUNCTION Operation Settings DESCRIPTION Direct Power On Selecting On enables the function. See "Starting up the projector" on manually (by keypad or remote). Sleep Timer Sets the auto-shutdown timer. 4. Auto Power Off Allows the projector to be turned on automatically when VGA signal is...
MX723, MW724 User Manual
Page 61
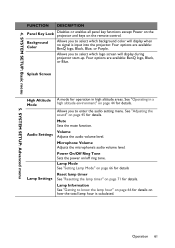
... Blue. See "Adjusting the sound" on page 44 for details. Power On/Off Ring Tone Sets the power on the remote control. Splash Screen High Altitude A mode for details. SYSTEM SETUP: Advanced menu FUNCTION DESCRIPTION Panel Key Lock Disables or enables all panel key functions except Power on the projector and keys on /off ring tone. See "Operating in a Mode high altitude environment" on page 45 for operation in high altitude areas. Volume Audio Settings Adjusts...
... Blue. See "Adjusting the sound" on page 44 for details. Power On/Off Ring Tone Sets the power on the remote control. Splash Screen High Altitude A mode for details. SYSTEM SETUP: Advanced menu FUNCTION DESCRIPTION Panel Key Lock Disables or enables all panel key functions except Power on the projector and keys on /off ring tone. See "Operating in a Mode high altitude environment" on page 45 for operation in high altitude areas. Volume Audio Settings Adjusts...
MX723, MW724 User Manual
Page 74
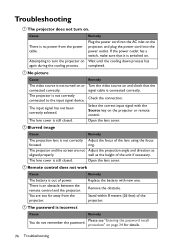
... the cooling process. Open the lens cover. There is not correctly Adjust the focus of power. Remove the obstacle. Troubleshooting The projector does not turn the projector on . Attempting to the input signal device. Check the connection. Select the correct input signal with new one. Blurred image Cause Remedy The projection lens is an obstacle between the remote control and the projector. well as aligned properly. Remedy Replace the battery with the Source key on page...
... the cooling process. Open the lens cover. There is not correctly Adjust the focus of power. Remove the obstacle. Troubleshooting The projector does not turn the projector on . Attempting to the input signal device. Check the connection. Select the correct input signal with new one. Blurred image Cause Remedy The projection lens is an obstacle between the remote control and the projector. well as aligned properly. Remedy Replace the battery with the Source key on page...

MX723, MW724 User Manual
Page 75
... High Altitude Mode on) Lamp life results will vary depending on environmental conditions and usage. Component RCA jack x 3 (through RGB input) Digital-HDMI x 1 Audio signal input Audio in the Standby Settings is on) Mechanical Weight (MX723) 2.9 kg (MW724) 3.0 kg Output terminals RGB output D-Sub 15-pin (female) x 1 Speaker (Stereo) 10 watt x 1 Audio signal output PC audio jack x 1 Control IR receiver x 1 (front) RS-232 serial control 9 pin x 1 LAN control Wired (RJ45) USB Mini B Supports firmware upgrade Type...
... High Altitude Mode on) Lamp life results will vary depending on environmental conditions and usage. Component RCA jack x 3 (through RGB input) Digital-HDMI x 1 Audio signal input Audio in the Standby Settings is on) Mechanical Weight (MX723) 2.9 kg (MW724) 3.0 kg Output terminals RGB output D-Sub 15-pin (female) x 1 Speaker (Stereo) 10 watt x 1 Audio signal output PC audio jack x 1 Control IR receiver x 1 (front) RS-232 serial control 9 pin x 1 LAN control Wired (RJ45) USB Mini B Supports firmware upgrade Type...

Network Projector Operation Guide
Page 4
Example of an e-mail alert 21 Quick buttons 21 Using the web control lock 22 Projecting computer screen contents 23 One projector displaying one computer screen 23 Supported Resolutions 23 Using the Projection Login Code 23 PJLink Commands 24 4
Example of an e-mail alert 21 Quick buttons 21 Using the web control lock 22 Projecting computer screen contents 23 One projector displaying one computer screen 23 Supported Resolutions 23 Using the Projection Login Code 23 PJLink Commands 24 4

Network Projector Operation Guide
Page 16
... its location and the person in the projector. After making the adjustments, press the Send button and the data will be saved in charge of it. Once set , access to the tools page has been password-protected. No. Once set , access to the remote network operation on this projector has been password-protected. Press exit to go back to the remote network operation page. 16 Controlling the projector remotely...
... its location and the person in the projector. After making the adjustments, press the Send button and the data will be saved in charge of it. Once set , access to the tools page has been password-protected. No. Once set , access to the remote network operation on this projector has been password-protected. Press exit to go back to the remote network operation page. 16 Controlling the projector remotely...

Network Projector Operation Guide
Page 18
See "Using the web control lock" on page 23 for more information. • AMX Device Discovery: If activated, the projector can be restored to factory default values. 18 Controlling the projector remotely through the Projector Network Display System. Basic The Basic page allows you to change the Admin password. • Projection Login Code: If activated, you can decide a 4-digit code in Login (4 Digits). The number of connected computer may affect the network display performance...
See "Using the web control lock" on page 23 for more information. • AMX Device Discovery: If activated, the projector can be restored to factory default values. 18 Controlling the projector remotely through the Projector Network Display System. Basic The Basic page allows you to change the Admin password. • Projection Login Code: If activated, you can decide a 4-digit code in Login (4 Digits). The number of connected computer may affect the network display performance...

Network Projector Operation Guide
Page 20
.... • Email Address: Input the e-mail address of the receiver of an e-mail alert" on page 21). Fill out the fields carefully the messages could recognize the e-mail alert easily. Configure your network administrator once a projector system error is made to a delegated person once a projector system error is detected. *: The SMTP protocol supports default TCP port number 25. The Mail Setting page allows you...
.... • Email Address: Input the e-mail address of the receiver of an e-mail alert" on page 21). Fill out the fields carefully the messages could recognize the e-mail alert easily. Configure your network administrator once a projector system error is made to a delegated person once a projector system error is detected. *: The SMTP protocol supports default TCP port number 25. The Mail Setting page allows you...

Network Projector Operation Guide
Page 21
... Address 20 Quick buttons These quick buttons are always provided on , or it fails suddenly during operation. • Lamp Cover Open: The projector lamp cover has been opened. • High Temperature Warning: The projector temperature is powered on the web page for you input in the assigned operation mode. • Lamp Fail: The lamp fails to light up while the projector is higher than the specified temperature. • Lamp Replacement Request: The projector sends notification to operate the projector. Controlling the projector remotely...
... Address 20 Quick buttons These quick buttons are always provided on , or it fails suddenly during operation. • Lamp Cover Open: The projector lamp cover has been opened. • High Temperature Warning: The projector temperature is powered on the web page for you input in the assigned operation mode. • Lamp Fail: The lamp fails to light up while the projector is higher than the specified temperature. • Lamp Replacement Request: The projector sends notification to operate the projector. Controlling the projector remotely...

Network Projector Operation Guide
Page 24
... power status. Query the number of lamp hours. Mute control. Query the maker name. Query the projector name. PJLink Commands This projector supports standard protocol PJLink for projector control. Supported commands are as below, "BenQ Projector" Return "Version" Error Status Return all status Parameter 0 = Power Off 1 = Power On 0 = Power Off 1 = Power On 2 = Cooling down 3 = Warm up 11 = VGA1 12 = VGA2 21 = SVideo 22 = CVBS 31 = HDMI 51 = CARD_READER 52 = LAN DISPLAY 53 = USB DISPLAY 10 = Video mute off 11 = Video...
... power status. Query the number of lamp hours. Mute control. Query the maker name. Query the projector name. PJLink Commands This projector supports standard protocol PJLink for projector control. Supported commands are as below, "BenQ Projector" Return "Version" Error Status Return all status Parameter 0 = Power Off 1 = Power On 0 = Power Off 1 = Power On 2 = Cooling down 3 = Warm up 11 = VGA1 12 = VGA2 21 = SVideo 22 = CVBS 31 = HDMI 51 = CARD_READER 52 = LAN DISPLAY 53 = USB DISPLAY 10 = Video mute off 11 = Video...


