
User Manual
Page 3
... Shutting down the projector ...25 Direct power off ...25 Menu operation ...26 Basic menu ...26 Advanced menu ...28 Maintenance ...36 Care of the projector ...36 Lamp information ...36 Troubleshooting ...42 Specifications ...43 Projector specifications ...43 Dimensions ...44 Timing chart...45 Table of Contents 3
... Shutting down the projector ...25 Direct power off ...25 Menu operation ...26 Basic menu ...26 Advanced menu ...28 Maintenance ...36 Care of the projector ...36 Lamp information ...36 Troubleshooting ...42 Specifications ...43 Projector specifications ...43 Dimensions ...44 Timing chart...45 Table of Contents 3
User Manual
Page 4
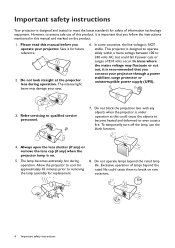
... supply (UPS). 3. This projector is important that you connect your projector. To temporarily turn off the lamp, use of lamps beyond the rated lamp life. Do not operate lamps beyond the rated life could fail if power cuts or surges of information technology equipment. Important safety instructions ... meet the latest standards for safety of ±10 volts occur. Do not block the projection lens with any ) when the projector lamp is designed and tested to break on rare occasions. 4 Important safety instructions Please read this product, it for replacement. 8. The intense...
... supply (UPS). 3. This projector is important that you connect your projector. To temporarily turn off the lamp, use of lamps beyond the rated lamp life. Do not operate lamps beyond the rated life could fail if power cuts or surges of information technology equipment. Important safety instructions ... meet the latest standards for safety of ±10 volts occur. Do not block the projection lens with any ) when the projector lamp is designed and tested to break on rare occasions. 4 Important safety instructions Please read this product, it for replacement. 8. The intense...
User Manual
Page 5
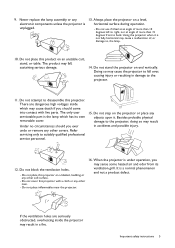
... holes are dangerous high voltages inside the projector may sense some heated air and odor from its own removable cover. Never replace the lamp assembly or any other item. - Do not use if tilted at an angle of more than 15 degrees front to disassemble this ...attempt to back. Refer servicing only to the projector, doing so may fall over, causing injury or resulting in damage to , the lamp. 10. Besides probable physical damage to suitably qualified professional service personnel. 15. Do not place inflammables near the projector. 16. Important safety instructions 5...
... holes are dangerous high voltages inside the projector may sense some heated air and odor from its own removable cover. Never replace the lamp assembly or any other item. - Do not use if tilted at an angle of more than 15 degrees front to disassemble this ...attempt to back. Refer servicing only to the projector, doing so may fall over, causing injury or resulting in damage to , the lamp. 10. Besides probable physical damage to suitably qualified professional service personnel. 15. Do not place inflammables near the projector. 16. Important safety instructions 5...
User Manual
Page 6
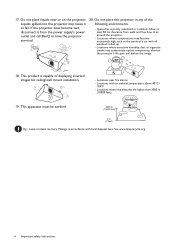
... where the altitudes are higher than 3000 m (10000 feet). 19. Allow at least 50 cm clearance from the power supply's power outlet and call BenQ to fail. This apparatus must be earthed. 3000 m (10000 feet) 0 m (0 feet) Hg - If the projector does become excessively high, ...up. - Locations where excessive humidity, dust, or cigarette smoke may cause it from walls and free flow of the following environments. - Lamp contains mercury. Liquids spilled into the projector may contaminate optical components, shorten the projector's life span and darken the image. 18. Locations near...
... where the altitudes are higher than 3000 m (10000 feet). 19. Allow at least 50 cm clearance from the power supply's power outlet and call BenQ to fail. This apparatus must be earthed. 3000 m (10000 feet) 0 m (0 feet) Hg - If the projector does become excessively high, ...up. - Locations where excessive humidity, dust, or cigarette smoke may cause it from walls and free flow of the following environments. - Lamp contains mercury. Liquids spilled into the projector may contaminate optical components, shorten the projector's life span and darken the image. 18. Locations near...
User Manual
Page 7
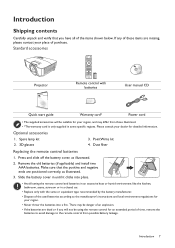
... in some specific regions. Please consult your dealer for detailed information. PointWrite kit 2. 3D glasses 4. Press and slide off the battery cover, as illustrated. 3. Spare lamp kit 3. Slide the battery cover in until it clicks into a fire. Optional accessories 1. Standard accessories Projector QDuigiictkalSPtraortjeGctuoidr e Remote control with the same or equivalent type...
... in some specific regions. Please consult your dealer for detailed information. PointWrite kit 2. 3D glasses 4. Press and slide off the battery cover, as illustrated. 3. Spare lamp kit 3. Slide the battery cover in until it clicks into a fire. Optional accessories 1. Standard accessories Projector QDuigiictkalSPtraortjeGctuoidr e Remote control with the same or equivalent type...
User Manual
Page 8
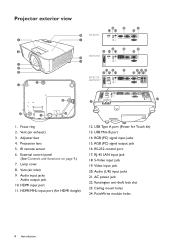
Focus ring 2. Vent (air inlet) 9. S-Video input jack 19. AC power jack 22. Lamp cover 8. USB Type A port (Power for HDMI dongle) 12. Projection lens 5. USB Mini-B port 14. RGB (PC) signal input jacks 15. RS-232 control port ...
Focus ring 2. Vent (air inlet) 9. S-Video input jack 19. AC power jack 22. Lamp cover 8. USB Type A port (Power for HDMI dongle) 12. Projection lens 5. USB Mini-B port 14. RGB (PC) signal input jacks 15. RS-232 control port ...
User Manual
Page 9
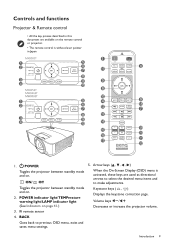
... activated, these keys are available on . 2. BACK Goes back to make adjustments. Keystone keys ( , ) Displays the keystone correction page. POWER indicator light/TEMPerature warning light/LAMP indicator light (See Indicators on . Introduction 9 Arrow keys ( , , , ) When the On-Screen Display (OSD) menu is without laser pointer in this document are used as...
... activated, these keys are available on . 2. BACK Goes back to make adjustments. Keystone keys ( , ) Displays the keystone correction page. POWER indicator light/TEMPerature warning light/LAMP indicator light (See Indicators on . Introduction 9 Arrow keys ( , , , ) When the On-Screen Display (OSD) menu is without laser pointer in this document are used as...
User Manual
Page 10
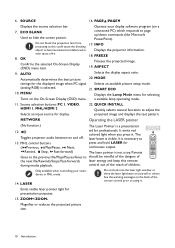
.... 22. control out of the reach of the remote control prior to using it . FREEZE Freezes the projected image. 19. a suitable lamp operating mode. 11. NETWORK Operating the LASER pointer (No function.) The Laser Pointer is not a toy. It emits red colored light when...selected On-Screen Display (OSD) menu item. 18. See the warning messages on the On-Screen Display (OSD) menu. MENU Displays the Lamp Mode menu for professionals. Automatically determines the best picture 20. Toggles projector audio between on yourself or others. PAGE /PAGE Displays the source ...
.... 22. control out of the reach of the remote control prior to using it . FREEZE Freezes the projected image. 19. a suitable lamp operating mode. 11. NETWORK Operating the LASER pointer (No function.) The Laser Pointer is not a toy. It emits red colored light when...selected On-Screen Display (OSD) menu item. 18. See the warning messages on the On-Screen Display (OSD) menu. MENU Displays the Lamp Mode menu for professionals. Automatically determines the best picture 20. Toggles projector audio between on yourself or others. PAGE /PAGE Displays the source ...
User Manual
Page 15
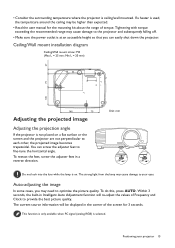
... the projector. Ceiling/Wall mount installation diagram Ceiling/Wall mount screw: M4 (Max L = 25 mm; Unit: mm Do not look into the lens while the lamp is used, the temperature around the ceiling may cause damage to each other, the projected image becomes trapezoidal. The strong light from the...
... the projector. Ceiling/Wall mount installation diagram Ceiling/Wall mount screw: M4 (Max L = 25 mm; Unit: mm Do not look into the lens while the lamp is used, the temperature around the ceiling may cause damage to each other, the projected image becomes trapezoidal. The strong light from the...
User Manual
Page 20
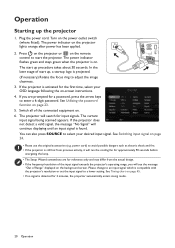
... will search for the first time, select your desired input signal. The projector will run the cooling fan for approximately 90 seconds before energizing the lamp. • The Setup Wizard screenshots are prompted for 3 minutes, the projector automatically enters saving mode. 20 Operation The start up the projector 1. Operation Starting up...
... will search for the first time, select your desired input signal. The projector will run the cooling fan for approximately 90 seconds before energizing the lamp. • The Setup Wizard screenshots are prompted for 3 minutes, the projector automatically enters saving mode. 20 Operation The start up the projector 1. Operation Starting up...
User Manual
Page 21
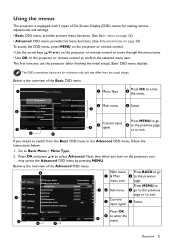
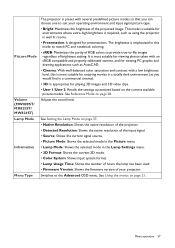
... Advanced Color Settings Reset Picture Enter 5 Return Presentation Presentation Off Exit Main menu Press BACK to go 6 to the previous page or to exit. Brightness Lamp Mode SmartEco Aspect Ratio Auto Wireless LAN 2 Picture Mode Information Presentation Volume Menu Type Enter Exit 3 4 5 2 Main menu 2 5 Status 6 Current input 3 signal Press MENU to...
... Advanced Color Settings Reset Picture Enter 5 Return Presentation Presentation Off Exit Main menu Press BACK to go 6 to the previous page or to exit. Brightness Lamp Mode SmartEco Aspect Ratio Auto Wireless LAN 2 Picture Mode Information Presentation Volume Menu Type Enter Exit 3 4 5 2 Main menu 2 5 Status 6 Current input 3 signal Press MENU to...
User Manual
Page 25
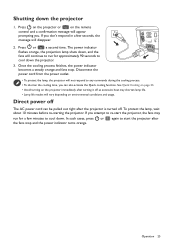
...seconds to run for a few seconds, the message will continue to cool down the projector. 3. The power indicator flashes orange, the projection lamp shuts down, and the fans will disappear. 2. Direct power off . again to re-start the projector after the projector is turned off The... AC power cord can also activate the Quick cooling function. If you attempt to start the projector, the fans may shorten lamp life. • Lamp life results will vary depending on the remote control and a confirmation message will not respond to cool down the projector 1. Press ...
...seconds to run for a few seconds, the message will continue to cool down the projector. 3. The power indicator flashes orange, the projection lamp shuts down, and the fans will disappear. 2. Direct power off . again to re-start the projector after the projector is turned off The... AC power cord can also activate the Quick cooling function. If you attempt to start the projector, the fans may shorten lamp life. • Lamp life results will vary depending on the remote control and a confirmation message will not respond to cool down the projector 1. Press ...
User Manual
Page 27
... Reference Mode on page 21. Picture Mode Volume (MW809ST/ MX825ST/ MW826ST) Lamp Mode Information Menu Type The projector is preset with a low...type. • Bright: Maximizes the brightness of brightness setting. Menu operation 27 See Setting the Lamp Mode on the current available picture modes. This mode is suitable for environments where extra-high brightness...Shows the current signal source. • Picture Mode: Shows the selected mode in the Picture menu. • Lamp Mode: Shows the selected mode in this is most suitable for enjoying movies in a totally dark environment (as using...
... Reference Mode on page 21. Picture Mode Volume (MW809ST/ MX825ST/ MW826ST) Lamp Mode Information Menu Type The projector is preset with a low...type. • Bright: Maximizes the brightness of brightness setting. Menu operation 27 See Setting the Lamp Mode on the current available picture modes. This mode is suitable for environments where extra-high brightness...Shows the current signal source. • Picture Mode: Shows the selected mode in the Picture menu. • Lamp Mode: Shows the selected mode in this is most suitable for enjoying movies in a totally dark environment (as using...
User Manual
Page 32
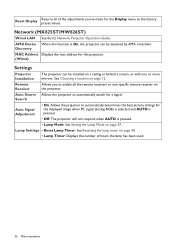
...ceiling or behind a screen, or with one specific remote receiver on page 40. • Lamp Timer: Displays the number of the adjustments you to enable all of hours the lamp has been used. 32 Menu operation Remote Receiver Allows you 've made for the displayed image... or more mirrors. Discovery MAC Address Displays the mac address for a signal. See Choosing a location on page 37. Network (MX825ST/MW826ST) Wired LAN See BenQ Network Projector Operation Guide. Search Auto Signal Adjustment • On: Allows the projector to automatically search for this function is pressed...
...ceiling or behind a screen, or with one specific remote receiver on page 40. • Lamp Timer: Displays the number of the adjustments you to enable all of hours the lamp has been used. 32 Menu operation Remote Receiver Allows you 've made for the displayed image... or more mirrors. Discovery MAC Address Displays the mac address for a signal. See Choosing a location on page 37. Network (MX825ST/MW826ST) Wired LAN See BenQ Network Projector Operation Guide. Search Auto Signal Adjustment • On: Allows the projector to automatically search for this function is pressed...

User Manual
Page 33
Blank Timer Sets the image blank time when there is activated or not, you to state that this projector can press most of lamp life. • Power Off Timer: Sets the auto-shutdown timer. Reminder Message Sets the reminder messages on or off . The projector will be shortened from ...
Blank Timer Sets the image blank time when there is activated or not, you to state that this projector can press most of lamp life. • Power Off Timer: Sets the auto-shutdown timer. Reminder Message Sets the reminder messages on or off . The projector will be shortened from ...
User Manual
Page 35
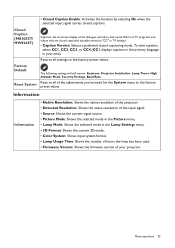
...videos that are closed captioned (usually marked as "CC" in TV listings). • Caption Version: Selects a preferred closed captions. Closed Caption (MX825ST/ MW826ST) Captions: An on-screen display of the dialogue, narration, and sound effects of the adjustments you've made for the System menu to...input signal. • Source: Shows the current signal source. • Picture Mode: Shows the selected mode in the Picture menu. • Lamp Mode: Shows the selected mode in your projector. • Closed Caption Enable: Activates the function by selecting On when the selected input signal ...
...videos that are closed captioned (usually marked as "CC" in TV listings). • Caption Version: Selects a preferred closed captions. Closed Caption (MX825ST/ MW826ST) Captions: An on-screen display of the dialogue, narration, and sound effects of the adjustments you've made for the System menu to...input signal. • Source: Shows the current signal source. • Picture Mode: Shows the selected mode in the Picture menu. • Lamp Mode: Shows the selected mode in your projector. • Closed Caption Enable: Activates the function by selecting On when the selected input signal ...
User Manual
Page 36
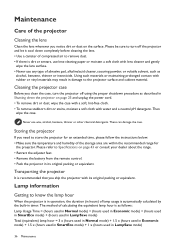
...used in LampSave mode) 36 Maintenance Cleaning the projector case Before you notice dirt or dust on the surface. Then wipe the case. Lamp information Getting to the projector surface and cabinet material. Using such materials or maintaining prolonged contact with rubber or vinyl materials may result in...the duration (in timer. Please be sure to remove dust. • If there is automatically calculated by the built-in hours) of lamp usage is dirt or smears, use wax, alcohol, benzene, thinner or other chemical detergents. Transporting the projector It is as alcohol, benzene...
...used in LampSave mode) 36 Maintenance Cleaning the projector case Before you notice dirt or dust on the surface. Then wipe the case. Lamp information Getting to the projector surface and cabinet material. Using such materials or maintaining prolonged contact with rubber or vinyl materials may result in...the duration (in timer. Please be sure to remove dust. • If there is automatically calculated by the built-in hours) of lamp usage is dirt or smears, use wax, alcohol, benzene, thinner or other chemical detergents. Transporting the projector It is as alcohol, benzene...
User Manual
Page 37
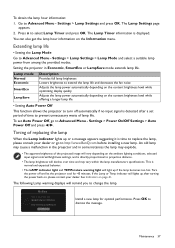
... time to Advanced Menu - Settings > Lamp Settings and press OK. To set period of lamp life. Notice Order a replacement lamp Equivalent lamp hour >XXXX hours Order a new lamp at www.BenQ.com Install a new lamp for 45 minutes. Extending lamp life • Setting the Lamp Mode Go to http://www.BenQ.com before installing a new lamp. Settings > Power On/Off Settings...
... time to Advanced Menu - Settings > Lamp Settings and press OK. To set period of lamp life. Notice Order a replacement lamp Equivalent lamp hour >XXXX hours Order a new lamp at www.BenQ.com Install a new lamp for 45 minutes. Extending lamp life • Setting the Lamp Mode Go to http://www.BenQ.com before installing a new lamp. Settings > Power On/Off Settings...

User Manual
Page 38
... is a consumable item. Notice Replace lamp soon Equivalent lamp hour >XXXX hours Order a new lamp at www.BenQ.com Notice Replace lamp now Equivalent lamp hour > XXXX Hours Order a new lamp at www.BenQ.com Notice Out of lamp usage time Replace lamp (refer to user manual) then reset the lamp timer Order a new lamp at www.BenQ.com It is strongly recommended...
... is a consumable item. Notice Replace lamp soon Equivalent lamp hour >XXXX hours Order a new lamp at www.BenQ.com Notice Replace lamp now Equivalent lamp hour > XXXX Hours Order a new lamp at www.BenQ.com Notice Out of lamp usage time Replace lamp (refer to user manual) then reset the lamp timer Order a new lamp at www.BenQ.com It is strongly recommended...
User Manual
Page 39
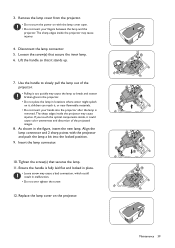
...and distortion of the projector. • Pulling it , or near flammable materials. • Do not insert your fingers between the lamp and the projector. Insert the lamp connector. 10. Loosen the screw(s) that secures the lamp. 11. Lift the handle so that it could result in the figure, insert the new... lamp. Remove the lamp cover from the projector. • Do not turn the power on with the projector and push the lamp a bit into the projector after the lamp is fully laid flat and locked in locations where water might ...
...and distortion of the projector. • Pulling it , or near flammable materials. • Do not insert your fingers between the lamp and the projector. Insert the lamp connector. 10. Loosen the screw(s) that secures the lamp. 11. Lift the handle so that it could result in the figure, insert the new... lamp. Remove the lamp cover from the projector. • Do not turn the power on with the projector and push the lamp a bit into the projector after the lamp is fully laid flat and locked in locations where water might ...

