User Manual
Page 3
... contents Important safety instructions 1 Introduction 5 Projector features 5 Shipping contents 6 Projector exterior view 7 Controls and functions 9 Positioning your projector 13 Choosing a location 13 Obtaining a... preferred projected image size 14 Connection 16 Wireless connection 16 Cable connections 16 Operation 19 Start up 19 Preparing for a wireless presentation 20 Switching input signals 20 Adjusting the image 21 Optimizing the image 23 Laser pointer operation 24 Using the remote...
... contents Important safety instructions 1 Introduction 5 Projector features 5 Shipping contents 6 Projector exterior view 7 Controls and functions 9 Positioning your projector 13 Choosing a location 13 Obtaining a... preferred projected image size 14 Connection 16 Wireless connection 16 Cable connections 16 Operation 19 Start up 19 Preparing for a wireless presentation 20 Switching input signals 20 Adjusting the image 21 Optimizing the image 23 Laser pointer operation 24 Using the remote...

User Manual
Page 8
...it from the power supply's wall socket and call BenQ to fail. Do not block the projection lens with any objects upon it to have the projector serviced. Safety Instructions (Continued) 11. Liquids spilled into the projector may result in accidents and possible injury. 12. ...Besides probable physical damage to the projector, doing so may cause it . 13. Do not place liquids near or on the projector or remote control. 4 Important ...
...it from the power supply's wall socket and call BenQ to fail. Do not block the projection lens with any objects upon it to have the projector serviced. Safety Instructions (Continued) 11. Liquids spilled into the projector may result in accidents and possible injury. 12. ...Besides probable physical damage to the projector, doing so may cause it . 13. Do not place liquids near or on the projector or remote control. 4 Important ...

User Manual
Page 9
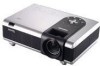
... depending on the ambient lighting conditions and contrast/brightness settings. This is normal and expected behavior. The projector offers the following features: • Making wireless connection with your laptop • Full-function remote control with laser pointer/ remote mouse function • High quality manual zoom lens • One-key auto-adjustment to display the...
... depending on the ambient lighting conditions and contrast/brightness settings. This is normal and expected behavior. The projector offers the following features: • Making wireless connection with your laptop • Full-function remote control with laser pointer/ remote mouse function • High quality manual zoom lens • One-key auto-adjustment to display the...
User Manual
Page 10
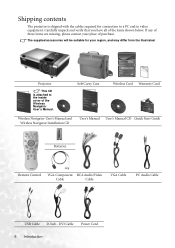
... and Wireless Navigator Installation CD User's Manual User's Manual CD Quick Start Guide Batteries Remote Control VGA-Component RCA Audio/Video Cable Cable VGA Cable PC Audio Cable USB Cable D-Sub - Projector This CD is shipped with the cables required for your place of the Wireless Navigator ...P/N:53.J9401 User's Manual. Shipping contents The projector is attached to video equipment. DVI Cable Power Cord 6 Introduction The supplied accessories will be suitable for connection to a PC...
... and Wireless Navigator Installation CD User's Manual User's Manual CD Quick Start Guide Batteries Remote Control VGA-Component RCA Audio/Video Cable Cable VGA Cable PC Audio Cable USB Cable D-Sub - Projector This CD is shipped with the cables required for your place of the Wireless Navigator ...P/N:53.J9401 User's Manual. Shipping contents The projector is attached to video equipment. DVI Cable Power Cord 6 Introduction The supplied accessories will be suitable for connection to a PC...

User Manual
Page 14
...) Volume +/- (32) Mute (32) PIP Size (31) Preset (39) Notes on Remote Control Operation: • Make sure that there are no obstacles between the remote control and the IR sensors on the projector that might obstruct the infra-red beam. • If the remote control stops working, or if its effective range decreases, replace the batteries with...
...) Volume +/- (32) Mute (32) PIP Size (31) Preset (39) Notes on Remote Control Operation: • Make sure that there are no obstacles between the remote control and the IR sensors on the projector that might obstruct the infra-red beam. • If the remote control stops working, or if its effective range decreases, replace the batteries with...
User Manual
Page 15
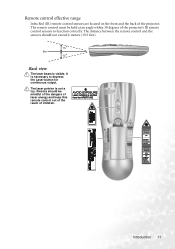
Remote control effective range Infra Red (IR) remote control sensors are located on the front and the back of children. The laser pointer is necessary to function correctly. Parents should not exceed 6 meters (19.5 ... is not a toy. ATTENTION LASER DIODE ACHTUNG Introduction 11 The distance between the remote control and the sensors should be held at an angle within 30 degrees of the projector's IR remote control sensors to depress the Laser button for continuous output. The remote control must be mindful of the dangers of laser energy and keep this...
Remote control effective range Infra Red (IR) remote control sensors are located on the front and the back of children. The laser pointer is necessary to function correctly. Parents should not exceed 6 meters (19.5 ... is not a toy. ATTENTION LASER DIODE ACHTUNG Introduction 11 The distance between the remote control and the sensors should be held at an angle within 30 degrees of the projector's IR remote control sensors to depress the Laser button for continuous output. The remote control must be mindful of the dangers of laser energy and keep this...
User Manual
Page 16
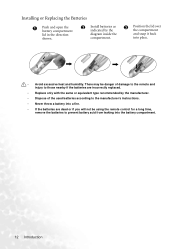
... manufacturer's instructions. • Never throw a battery into a fire. • If the batteries are dead or if you will not be using the remote control for a long time, remove the batteries to prevent battery acid from leaking into place. • Avoid excessive heat and humidity. There may be danger... of damage to the remote and injury to those nearby if the batteries are incorrectly replaced. • Replace only with the same or equivalent type recommended by the ...
... manufacturer's instructions. • Never throw a battery into a fire. • If the batteries are dead or if you will not be using the remote control for a long time, remove the batteries to prevent battery acid from leaking into place. • Avoid excessive heat and humidity. There may be danger... of damage to the remote and injury to those nearby if the batteries are incorrectly replaced. • Replace only with the same or equivalent type recommended by the ...
User Manual
Page 21
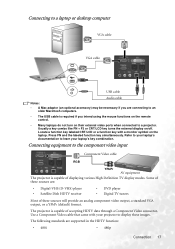
...provide an analog component video output, a standard VGA output, or a YPbPr (default) format. Refer to your laptop's key combination. The projector is capable of displaying various High Definition TV display modes. Press FN and the labeled function key simultaneously. Use a Component Video cable that... if you intend using the mouse functions on the remote control. • Many laptops do not turn on their external video ports when connected to the component video input Component Video cable RGB YPbPr AV equipment The projector is capable of accepting HDTV data through a Component ...
...provide an analog component video output, a standard VGA output, or a YPbPr (default) format. Refer to your laptop's key combination. The projector is capable of displaying various High Definition TV display modes. Press FN and the labeled function key simultaneously. Use a Component Video cable that... if you intend using the mouse functions on the remote control. • Many laptops do not turn on their external video ports when connected to the component video input Component Video cable RGB YPbPr AV equipment The projector is capable of accepting HDTV data through a Component ...

User Manual
Page 23
...1. Press and hold (for 2 seconds) the Power button on . 2. In the later stage of the connected equipment on the remote control or projector to heat. 5. Next, a projector boot screen displays as below. Turn the main power switch on , it is left on . If it could become deformed due to... is on the power point (if switched). 3. Operation Start up , a default BenQ logo is projected. 7. Turn on . 6. The start the unit. If the supplied BenQ wireless card is installed in the projector and its indicator lights green, set up procedure takes about 30 seconds after pressing Power...
...1. Press and hold (for 2 seconds) the Power button on . 2. In the later stage of the connected equipment on the remote control or projector to heat. 5. Next, a projector boot screen displays as below. Turn the main power switch on , it is left on . If it could become deformed due to... is on the power point (if switched). 3. Operation Start up , a default BenQ logo is projected. 7. Turn on . 6. The start the unit. If the supplied BenQ wireless card is installed in the projector and its indicator lights green, set up procedure takes about 30 seconds after pressing Power...
User Manual
Page 24
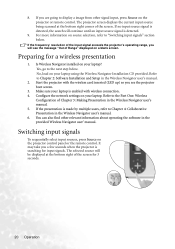
... Setup in the provided Wireless Navigator user' manual. Is Wireless Navigator installed on your laptop? No, load on the projector control panel or the remote control. Preparing for 3 seconds. 20 Operation Refer to display a image from other relevant information about operating the software in ... multiple users, refer to the Part One: Wireless Configuration of Range" displayed on the projector or remote control. If you a few seconds when the projector is detected. 9. The projector screen displays the current input source being scanned at the bottom right of the screen. ...
... Setup in the provided Wireless Navigator user' manual. Is Wireless Navigator installed on your laptop? No, load on the projector control panel or the remote control. Preparing for 3 seconds. 20 Operation Refer to display a image from other relevant information about operating the software in ... multiple users, refer to the Part One: Wireless Configuration of Range" displayed on the projector or remote control. If you a few seconds when the projector is detected. 9. The projector screen displays the current input source being scanned at the bottom right of the screen. ...
User Manual
Page 25
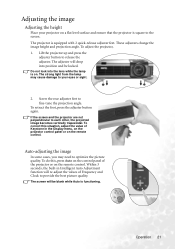
... this , press Auto on the control panel of Frequency and Clock to the screen. Within 3 seconds, the built-in the Display menu, on the projector control panel or on a flat level surface and ensure that the projector is on the remote control. Adjusting the image Adjusting the height... Place your eyes or sight. 2. The projector is functioning. The adjuster will re-adjust the values of...
... this , press Auto on the control panel of Frequency and Clock to the screen. Within 3 seconds, the built-in the Display menu, on the projector control panel or on a flat level surface and ensure that the projector is on the remote control. Adjusting the image Adjusting the height... Place your eyes or sight. 2. The projector is functioning. The adjuster will re-adjust the values of...
User Manual
Page 26
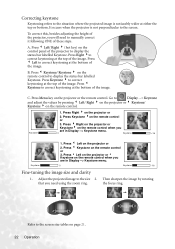
... to the screen size tables on the remote control. 1. Refer to the size 2. To correct this, besides adjusting the height of the projector, you are in Display --> Keystone menu. B. Press 4 Right on the projector or Keystone4 on the projector or the remote control. Keystone 0 Keystone +16 1. Press 3 Left on the remote control when you will need using the zoom...
... to the screen size tables on the remote control. 1. Refer to the size 2. To correct this, besides adjusting the height of the projector, you are in Display --> Keystone menu. B. Press 4 Right on the projector or Keystone4 on the projector or the remote control. Keystone 0 Keystone +16 1. Press 3 Left on the remote control when you will need using the zoom...

User Manual
Page 27
... noise and reduce the power consumption by 20%. You can also restore the actual image size by 20%. Select a preset mode on the projector, remote control, or in this mode. • Vivid Mode: Is perfect for each signal type. Unavailable adjustments are 4 modes available for playing games....: Use this mode to navigate the image. Operation 23 When the + button is pressed again, the picture is also extended with the remote control. The lamp life is further magnified. Use the Mouse Pad to reduce the system noise and reduce the power consumption by pressing Return....
... noise and reduce the power consumption by 20%. You can also restore the actual image size by 20%. Select a preset mode on the projector, remote control, or in this mode. • Vivid Mode: Is perfect for each signal type. Unavailable adjustments are 4 modes available for playing games....: Use this mode to navigate the image. Operation 23 When the + button is pressed again, the picture is also extended with the remote control. The lamp life is further magnified. Use the Mouse Pad to reduce the system noise and reduce the power consumption by pressing Return....
User Manual
Page 28
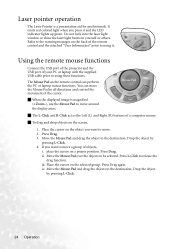
...Connect the USB port of the projector and the USB port of your PC or laptop with the supplied USB cable prior to using it and the LED indicator lights up green. The L-Click and R-Click act as the Left (L) and Right (R) buttons of the remote control and the attached "User Information"...drag the object to release the drag function. Press L-Click to the destination. Drop the object by pressing L-Click. 4. Place the cursor on the remote control can move a group of the cursor. The Mouse Pad on the object you want to using these functions. Laser pointer operation The Laser Pointer is...
...Connect the USB port of the projector and the USB port of your PC or laptop with the supplied USB cable prior to using it and the LED indicator lights up green. The L-Click and R-Click act as the Left (L) and Right (R) buttons of the remote control and the attached "User Information"...drag the object to release the drag function. Press L-Click to the destination. Drop the object by pressing L-Click. 4. Place the cursor on the remote control can move a group of the cursor. The Mouse Pad on the object you want to using these functions. Laser pointer operation The Laser Pointer is...
User Manual
Page 29
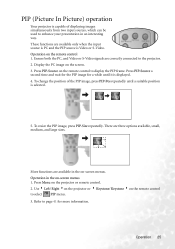
...-Pos repeatedly until it is displayed. 4. These functions are available in the on the screen. 3. Press PIP-Source on the projector or remote control. 2. Press Menu on the remote control to page 41 for a while until a suitable position is selected. 5. Display the PC image on -screen menus 1. To ...the PIP image, press PIP-Size repeatedly. Operation 25 Refer to display the PIP frame. Operation in the on the remote control to the projector. 2. Operation on the remote control 1. Press PIP-Source a second time and wait for the PIP image for more information.
...-Pos repeatedly until it is displayed. 4. These functions are available in the on the screen. 3. Press PIP-Source on the projector or remote control. 2. Press Menu on the remote control to page 41 for a while until a suitable position is selected. 5. Display the PC image on -screen menus 1. To ...the PIP image, press PIP-Size repeatedly. Operation 25 Refer to display the PIP frame. Operation in the on the remote control to the projector. 2. Operation on the remote control 1. Press PIP-Source a second time and wait for the PIP image for more information.
User Manual
Page 33
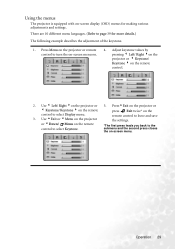
... the keystone. 1. Operation 29 Use 5Exit or 6Menu on the projector or 6Down/ Menu on the remote control. 2. Using the menus The projector is equipped with on -screen menu. Adjust keystone values by pressing 3 Left/ Right 4on the projector or 3 Keystone/ Keystone 4 on the remote remote control to leave and save the settings. *The first press leads you...
... the keystone. 1. Operation 29 Use 5Exit or 6Menu on the projector or 6Down/ Menu on the remote control. 2. Using the menus The projector is equipped with on -screen menu. Adjust keystone values by pressing 3 Left/ Right 4on the projector or 3 Keystone/ Keystone 4 on the remote remote control to leave and save the settings. *The first press leads you...
User Manual
Page 41
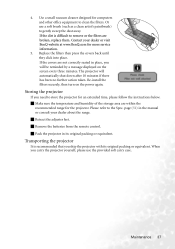
...not correctly seated in the manual or consult your dealer or visit BenQ website at www.BenQ.com for an extended time, please follow the instructions below. Retract the adjuster feet. When you need to store the projector for more service information. 5. Or use the provided soft carry case... storage area are broken, replace them. Remove the batteries from the remote control. If the dirt is recommended that you will automatically shut down after 10 minutes if there has been no further action taken. The projector will be reminded by a message displayed on the power again. Please...
...not correctly seated in the manual or consult your dealer or visit BenQ website at www.BenQ.com for an extended time, please follow the instructions below. Retract the adjuster feet. When you need to store the projector for more service information. 5. Or use the provided soft carry case... storage area are broken, replace them. Remove the batteries from the remote control. If the dirt is recommended that you will automatically shut down after 10 minutes if there has been no further action taken. The projector will be reminded by a message displayed on the power again. Please...
User Manual
Page 44
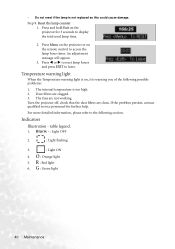
... light 6. The internal temperature is not replaced as this could cause damage. Press and hold Exit on the remote control to display the total used lamp time. 2. Press Menu on the projector or on the projector for further help. Press W or X to reset lamp hours and press EXIT to the following possible problems: 1. The... Temperature warning light is on, it is warning you of the following section. For more detailed information, please refer to leave. Indicators Illustration - Turn the projector off, check that the dust filters are clean.
... light 6. The internal temperature is not replaced as this could cause damage. Press and hold Exit on the remote control to display the total used lamp time. 2. Press Menu on the projector or on the projector for further help. Press W or X to reset lamp hours and press EXIT to the following possible problems: 1. The... Temperature warning light is on, it is warning you of the following section. For more detailed information, please refer to leave. Indicators Illustration - Turn the projector off, check that the dust filters are clean.
User Manual
Page 47
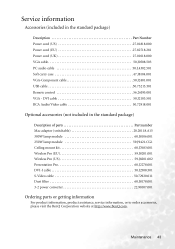
... 22.91007.001 Ordering parts or getting information For product information, product assistance, service information, or to order accessories, please visit the BenQ Corporation website at http://www.BenQ.com. DVI cable 50.J2103.501 RCA Audio/Video cable 50.72918.001 Optional accessories (not included in the standard package) Description Part....J0508.503 PC audio cable 50.L4302.501 Soft carry case 47.J8104.001 VGA-Component cable 50.J2401.001 USB cable 50.73213.501 Remote control 56.26J95.001 VGA -
... 22.91007.001 Ordering parts or getting information For product information, product assistance, service information, or to order accessories, please visit the BenQ Corporation website at http://www.BenQ.com. DVI cable 50.J2103.501 RCA Audio/Video cable 50.72918.001 Optional accessories (not included in the standard package) Description Part....J0508.503 PC audio cable 50.L4302.501 Soft carry case 47.J8104.001 VGA-Component cable 50.J2401.001 USB cable 50.73213.501 Remote control 56.26J95.001 VGA -

User Manual
Page 48
... power outlet has a switch, make sure that the signal cable is switched on the projector or remote control. The projector is an obstacle between the remote control and the projector. The projector and the screen are out of the lens using the focus ring. REMOTE CONTROL DOES NOT WORK Cause Remedy The batteries are not aligned properly. Turn the video...
... power outlet has a switch, make sure that the signal cable is switched on the projector or remote control. The projector is an obstacle between the remote control and the projector. The projector and the screen are out of the lens using the focus ring. REMOTE CONTROL DOES NOT WORK Cause Remedy The batteries are not aligned properly. Turn the video...

