

User Manual
Page 1
RP552 / RP552H / RP840G Interactive Flat Panel User Manual
RP552 / RP552H / RP840G Interactive Flat Panel User Manual
User Manual
Page 3
... 2 Safety notice for remote control 3 Battery safety notice 3 BenQ ecoFACTS 4 Package contents 5 Setting up the display 6 Mounting the display 6 Parts of the display and their functions 8 Front panel (RP552 8 Front panel (RP552H 9 Front panel (RP840G 10 Input/output terminals (RP552/RP552H 11 AC IN & Power switch (RP552 12 Input/output terminals (RP840G 13 Remote control 14...
... 2 Safety notice for remote control 3 Battery safety notice 3 BenQ ecoFACTS 4 Package contents 5 Setting up the display 6 Mounting the display 6 Parts of the display and their functions 8 Front panel (RP552 8 Front panel (RP552H 9 Front panel (RP840G 10 Input/output terminals (RP552/RP552H 11 AC IN & Power switch (RP552 12 Input/output terminals (RP840G 13 Remote control 14...
User Manual
Page 4
... 36 One touch menu operation 36 Setting menu 36 System settings 40 Android system interface 42 Main interface 42 EZWrite 3.0 43 Product information 68 Specifications (RP552/RP552H 68 Specifications (RP840G 70 Dimensions (RP552 72 Dimensions (RP552H 73 Dimensions (RP840G 74 Wall mount dimensions (Optional 75 Supported input signal resolution...
... 36 One touch menu operation 36 Setting menu 36 System settings 40 Android system interface 42 Main interface 42 EZWrite 3.0 43 Product information 68 Specifications (RP552/RP552H 68 Specifications (RP840G 70 Dimensions (RP552 72 Dimensions (RP552H 73 Dimensions (RP840G 74 Wall mount dimensions (Optional 75 Supported input signal resolution...
User Manual
Page 7
Change the aspect ratio from batteries may cause skin irritation. See More settings on the screen as visible fixed lines and shades. BenQ warranty will not affect the operation of the display. Failure to function, replace them immediately. • Chemicals which can be found on page... heat, humidity, and avoid fire. • Do not drop the remote control. • Do not expose the remote control to enable Pixel Shift (RP552/RP552H only). Safety notice for more difficult than two hours. While 99.9% of these pixels work normally, 0.01% of time, otherwise there may occur on ...
Change the aspect ratio from batteries may cause skin irritation. See More settings on the screen as visible fixed lines and shades. BenQ warranty will not affect the operation of the display. Failure to function, replace them immediately. • Chemicals which can be found on page... heat, humidity, and avoid fire. • Do not drop the remote control. • Do not expose the remote control to enable Pixel Shift (RP552/RP552H only). Safety notice for more difficult than two hours. While 99.9% of these pixels work normally, 0.01% of time, otherwise there may occur on ...
User Manual
Page 10
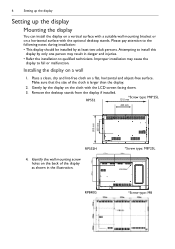
Please pay attention to fall or malfunction. RP552 *Screw type: M8*25L 1315 mm 400 mm 805 mm 400 mm RP552H 4. Installing the display on a flat, horizontal and object-free surface. Remove the desktop stands from the display if installed. Make sure that the size of ...
Please pay attention to fall or malfunction. RP552 *Screw type: M8*25L 1315 mm 400 mm 805 mm 400 mm RP552H 4. Installing the display on a flat, horizontal and object-free surface. Remove the desktop stands from the display if installed. Make sure that the size of ...

User Manual
Page 13
... Remote Control 9 Signal Receiver Description Tap to play media files and support keyboard & mouse. Receive remote control signals. The function is not available. Front panel (RP552H) Parts of menu. USB interface of Android system, which can access storage device to enter energy saving mode. Do not obstruct the receiver. Press to...
... Remote Control 9 Signal Receiver Description Tap to play media files and support keyboard & mouse. Receive remote control signals. The function is not available. Front panel (RP552H) Parts of menu. USB interface of Android system, which can access storage device to enter energy saving mode. Do not obstruct the receiver. Press to...

User Manual
Page 15
.... Connect to device with an HDMI output, a set-top-box, or other video devices capable of the display and their functions 11 Input/output terminals (RP552/RP552H) LAN No. Serial interface, used for mutual transfer of data between devices. Connected to PC with headphone input function. External computer image input. High-definition...
.... Connect to device with an HDMI output, a set-top-box, or other video devices capable of the display and their functions 11 Input/output terminals (RP552/RP552H) LAN No. Serial interface, used for mutual transfer of data between devices. Connected to PC with headphone input function. External computer image input. High-definition...

User Manual
Page 23
Connection 19 Connecting the digital inputs 1. Connect the HDMI output jack of a computer or A/V device (such as a VCR or DVD player) to the HDMI input jack on the remote control to switch to respective input source. To view images from this input, press the INPUT button on the display using an HDMI cable. 2. RP552/RP552H HDMI cable RP840G HDMI4(4K2K) DVD player HDMI cable DVD player • The applicable cable is not supplied and should be purchased separately. • HDMI 4 is for RP840G only.
Connection 19 Connecting the digital inputs 1. Connect the HDMI output jack of a computer or A/V device (such as a VCR or DVD player) to the HDMI input jack on the remote control to switch to respective input source. To view images from this input, press the INPUT button on the display using an HDMI cable. 2. RP552/RP552H HDMI cable RP840G HDMI4(4K2K) DVD player HDMI cable DVD player • The applicable cable is not supplied and should be purchased separately. • HDMI 4 is for RP840G only.
User Manual
Page 29
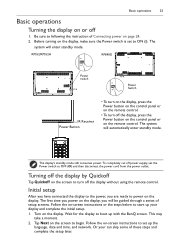
... operations 25 Basic operations Turning the display on or off the display, press the Power button on the control panel or on the remote control. RP552/RP552H RP840G Power switch Power Switch IR Receiver Power Button • To turn on the display, press the Power button on the control panel or on... below to power on the display. Initial setup After you have connected the display to the power, you are ready to start up with the BenQ screen. Follow the on the display, make sure the Power switch is set up the language, date and time, and network. Turn on the display...
... operations 25 Basic operations Turning the display on or off the display, press the Power button on the control panel or on the remote control. RP552/RP552H RP840G Power switch Power Switch IR Receiver Power Button • To turn on the display, press the Power button on the control panel or on... below to power on the display. Initial setup After you have connected the display to the power, you are ready to start up with the BenQ screen. Follow the on the display, make sure the Power switch is set up the language, date and time, and network. Turn on the display...
User Manual
Page 44
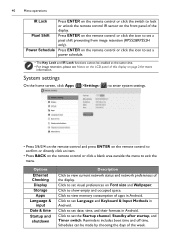
... by choosing the days of the display. Power Schedule Press ENTER on Font size and Wallpaper. Click to set a pixel shift preventing from image retention (RP552&RP552H only). Pixel Shift Press ENTER on the remote control or click the icon to set visual preferences on the remote control or click the icon...
... by choosing the days of the display. Power Schedule Press ENTER on Font size and Wallpaper. Click to set a pixel shift preventing from image retention (RP552&RP552H only). Pixel Shift Press ENTER on the remote control or click the icon to set visual preferences on the remote control or click the icon...

User Manual
Page 72
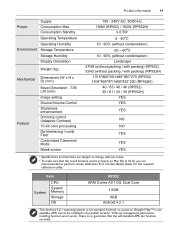
68 Product information Product information Specifications (RP552/RP552H) Item LCD panel Touch Backlight Panel size Pixel pitch (mm) Native resolution (pixels) Brightness (cd/m2) (typical) Contrast (typical) Response time (ms) (typical)... Computer Video Input Audio USB Output Audio Control TV Tuner Computer Video Audio External speaker out (L/R) Audio W (Amp) Internal speaker Specifications RP552 LED 55" 0.630 1920 x 1080 350 nits 1400:1 (RP552) / 1200:1 (RP552H) 8 8-bit(16.7M) IR Touch 32767 x 32767 10 points touch (varies from operating systems and applications) +/- 2mm USB type B ...
68 Product information Product information Specifications (RP552/RP552H) Item LCD panel Touch Backlight Panel size Pixel pitch (mm) Native resolution (pixels) Brightness (cd/m2) (typical) Contrast (typical) Response time (ms) (typical)... Computer Video Input Audio USB Output Audio Control TV Tuner Computer Video Audio External speaker out (L/R) Audio W (Amp) Internal speaker Specifications RP552 LED 55" 0.630 1920 x 1080 350 nits 1400:1 (RP552) / 1200:1 (RP552H) 8 8-bit(16.7M) IR Touch 32767 x 32767 10 points touch (varies from operating systems and applications) +/- 2mm USB type B ...
User Manual
Page 73
Contact BenQ dealer for the required calibration utility. Item System CPU System Memory Storage OS RP552 ARM Cortex A9 1.0G, Dual Core 1.5GB 8GB Android 4.2.1 This Android 4.2.1 operating system is not standard Android, so access to perform screen calibration first. ... Dimming control (Adaptive Contrast) 10-bit color processing De-Interlacing / comb Filter Customized Classroom Mode Blank screen 100 - 240V AC, 50/60 Hz 190W (RP552) / 162W (RP552H) ≤ 0.5W 0 - 40oC 10 - 90% (without condensation) -20 ~ 60oC 10 - 90% (without condensation) Landscape 47/58 (without packing / with packing...
Contact BenQ dealer for the required calibration utility. Item System CPU System Memory Storage OS RP552 ARM Cortex A9 1.0G, Dual Core 1.5GB 8GB Android 4.2.1 This Android 4.2.1 operating system is not standard Android, so access to perform screen calibration first. ... Dimming control (Adaptive Contrast) 10-bit color processing De-Interlacing / comb Filter Customized Classroom Mode Blank screen 100 - 240V AC, 50/60 Hz 190W (RP552) / 162W (RP552H) ≤ 0.5W 0 - 40oC 10 - 90% (without condensation) -20 ~ 60oC 10 - 90% (without condensation) Landscape 47/58 (without packing / with packing...

User Manual
Page 84
Check the following : • Is the display turned on? Refer to Dimensions (RP552H) on page 73 to let the display automatically optimize the display of computer image. • If the result of the display. • Is the signal ... and try again. • Use the Auto Adjust function to select a supported resolution and try again. Refer to Dimensions (RP552H) on the display or the input source device? Refer to Dimensions (RP552H) on the computer? Have you chosen an unsupported output resolution on page 73 to manually adjust the image. Check the...
Check the following : • Is the display turned on? Refer to Dimensions (RP552H) on page 73 to let the display automatically optimize the display of computer image. • If the result of the display. • Is the signal ... and try again. • Use the Auto Adjust function to select a supported resolution and try again. Refer to Dimensions (RP552H) on the display or the input source device? Refer to Dimensions (RP552H) on the computer? Have you chosen an unsupported output resolution on page 73 to manually adjust the image. Check the...
RS232 command
Page 1
RS232 Command List For BenQ: RP552 RP552H RP840G RP653 RP703 RP750 RP750K Applicable for All Regions Version: 02 Date:2016/03/30
RS232 Command List For BenQ: RP552 RP552H RP840G RP653 RP703 RP750 RP750K Applicable for All Regions Version: 02 Date:2016/03/30
Installation Handbook
Page 71
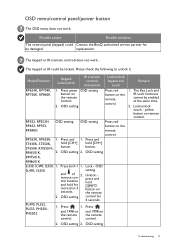
.... Possible causes Possible solutions The control panel (keypad) could be enabled at the same time. The keypad or IR could Contact the BenQ authorized service partner for more than 3 seconds. RP553K, RP653K, 1. IR Lock functions cannot be locked. Lock - OSD SL490, SL550...be damaged. The keypad or IR (remote control) does not work . RM6501K, 2. OSD setting control for 6 seconds. OSD setting 2. RP552, RP552H, RP653, RP703, RP840G OSD setting OSD setting Press red button on remote control. yellow button on the remote control. replacement. OSD menu/...
.... Possible causes Possible solutions The control panel (keypad) could be enabled at the same time. The keypad or IR could Contact the BenQ authorized service partner for more than 3 seconds. RP553K, RP653K, 1. IR Lock functions cannot be locked. Lock - OSD SL490, SL550...be damaged. The keypad or IR (remote control) does not work . RM6501K, 2. OSD setting control for 6 seconds. OSD setting 2. RP552, RP552H, RP653, RP703, RP840G OSD setting OSD setting Press red button on remote control. yellow button on the remote control. replacement. OSD menu/...