

User Manual
Page 5
... prevent personal injuries, mounting the display or installing desktop stands is effectively grounded through normal household wiring. Wrongly wired extension cords are strong enough to sustain the weight of the display. • To reduce the risk of electric shock, do not remove covers. To completely disconnect this equipment from the AC mains, disconnect the power cord plug from the AC receptacle...
... prevent personal injuries, mounting the display or installing desktop stands is effectively grounded through normal household wiring. Wrongly wired extension cords are strong enough to sustain the weight of the display. • To reduce the risk of electric shock, do not remove covers. To completely disconnect this equipment from the AC mains, disconnect the power cord plug from the AC receptacle...
User Manual
Page 7
... cover glass, it is not a defect. • LCD screens, like On-Screen Display menus, TV station logos, fixed/inactive text or icons) for more information, please refer to the screen, avoid displaying still images (like plasma (PDP) and conventional CRT (Cathode Ray Tube) screens, are inserted with the image and eliminate the black bars whenever possible. To avoid such damage to installation guide. Avoid displaying images in red, blue...
... cover glass, it is not a defect. • LCD screens, like On-Screen Display menus, TV station logos, fixed/inactive text or icons) for more information, please refer to the screen, avoid displaying still images (like plasma (PDP) and conventional CRT (Cathode Ray Tube) screens, are inserted with the image and eliminate the black bars whenever possible. To avoid such damage to installation guide. Avoid displaying images in red, blue...
User Manual
Page 29
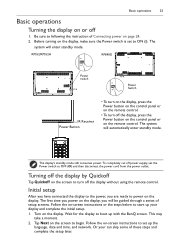
... the display to following the instruction of Connecting power on page 24. 2. This may take a moment. 2. Be sure to boot up with the BenQ screen. RP552/RP552H RP840G Power switch Power Switch IR Receiver Power Button • To turn on the display, press the Power button on the control panel or on the remote control. • To turn off power supply, set up your can skip some of setup screens. The display's standby mode still consumes power. Turn on the display, you...
... the display to following the instruction of Connecting power on page 24. 2. This may take a moment. 2. Be sure to boot up with the BenQ screen. RP552/RP552H RP840G Power switch Power Switch IR Receiver Power Button • To turn on the display, press the Power button on the control panel or on the remote control. • To turn off power supply, set up your can skip some of setup screens. The display's standby mode still consumes power. Turn on the display, you...

User Manual
Page 43
... on the remote control and press ENTER on the remote control to confirm or directly click an item. • Press BACK on the remote control or click a blank area outside the menu to exit the menu. Menu Brightness Contrast Hue Sharpness Color Temp. Menu Key Lock Description Press ENTER on the remote control or click the switch to lock or unlock the buttons on the front panel of the display. Press VOL...
... on the remote control and press ENTER on the remote control to confirm or directly click an item. • Press BACK on the remote control or click a blank area outside the menu to exit the menu. Menu Brightness Contrast Hue Sharpness Color Temp. Menu Key Lock Description Press ENTER on the remote control or click the switch to lock or unlock the buttons on the front panel of the display. Press VOL...

User Manual
Page 84
... you locked the control panel buttons? Check the following : • Is the display turned on the display or the input source device? functions to select a supported resolution and try again. Unlock the buttons and try again. • Are there any loose cable connections? Turn off the mute function or increase the audio volume level and try again. 80 Troubleshooting Troubleshooting Problem No picture No sound The computer input image looks strange The control panel buttons do not work Solution Check the...
... you locked the control panel buttons? Check the following : • Is the display turned on the display or the input source device? functions to select a supported resolution and try again. Unlock the buttons and try again. • Are there any loose cable connections? Turn off the mute function or increase the audio volume level and try again. 80 Troubleshooting Troubleshooting Problem No picture No sound The computer input image looks strange The control panel buttons do not work Solution Check the...

User Manual
Page 85
...; Check whether driver is properly installed and make correction. • Check whether touch pen is not supported. Troubleshooting 81 The remote control does not work Remote control failure Machine automatically shutdown Signal out of range Background has vertical lines or streaks Image lack of color, color is incorrect Display format that transmit infrared signals which may cause interference to replace battery. • Whether set sleep or not. • Check whether there is sudden power outage. • Check...
...; Check whether driver is properly installed and make correction. • Check whether touch pen is not supported. Troubleshooting 81 The remote control does not work Remote control failure Machine automatically shutdown Signal out of range Background has vertical lines or streaks Image lack of color, color is incorrect Display format that transmit infrared signals which may cause interference to replace battery. • Whether set sleep or not. • Check whether there is sudden power outage. • Check...
Installation Handbook
Page 3
... 44 Special signage installation guide 46 D series Full HD 55-inch dual-side display 46 Mounting installation ...49 Ceiling Mount ...49 Notice ...52 U-Mount ...54 H-mount ...58 Digital Signage Bar-Type Series 59 Installation notice ...59 Adjusting the OSD setting: For BH280/BH281/BH380 59 BH series HDMI connetion (EXCEPT BH280/BH281/BH380 60 Troubleshooting ...62 Connections...62 Picture/video ...65 Audio...68 Remote control...68 Touch function (selected models only 69 OSD menu/control panel/power button 71 LED indicators...73 Power ...73 System...
... 44 Special signage installation guide 46 D series Full HD 55-inch dual-side display 46 Mounting installation ...49 Ceiling Mount ...49 Notice ...52 U-Mount ...54 H-mount ...58 Digital Signage Bar-Type Series 59 Installation notice ...59 Adjusting the OSD setting: For BH280/BH281/BH380 59 BH series HDMI connetion (EXCEPT BH280/BH281/BH380 60 Troubleshooting ...62 Connections...62 Picture/video ...65 Audio...68 Remote control...68 Touch function (selected models only 69 OSD menu/control panel/power button 71 LED indicators...73 Power ...73 System...

Installation Handbook
Page 29
... DVI support daisy chaining. Audio cable IR cable Page 35 RS-232C cable. Refer to the user manual or BenQ service for the available connections. • For cables that are available for digital signals Reference Audio signal transmission (selected models only) OSD control or advanced control of all displays via remote control (selected models only) Control of all models. Check the specifications of the purchased model for more information. Page 36 Use an appropriate RS-232C cable. If the video output is HDMI...
... DVI support daisy chaining. Audio cable IR cable Page 35 RS-232C cable. Refer to the user manual or BenQ service for the available connections. • For cables that are available for digital signals Reference Audio signal transmission (selected models only) OSD control or advanced control of all displays via remote control (selected models only) Control of all models. Check the specifications of the purchased model for more information. Page 36 Use an appropriate RS-232C cable. If the video output is HDMI...
Installation Handbook
Page 36
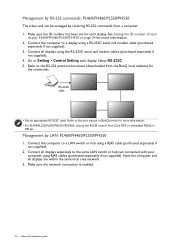
... user manual or BenQ service for more information. 2. Go to the RS-232 protocol document (downloaded from a computer. 1. Select RS-232C. 5. Connect all displays are within the same local area network. 3. Make sure the network connection is enabled. 36 Video wall installation guide Connect the computer to a LAN switch or hub using RJ45 cables (purchased separately if not supplied). Refer to Setting > Control Setting each display. Connect the computer to a display using the RS-232C serial...
... user manual or BenQ service for more information. 2. Go to the RS-232 protocol document (downloaded from a computer. 1. Select RS-232C. 5. Connect all displays are within the same local area network. 3. Make sure the network connection is enabled. 36 Video wall installation guide Connect the computer to a LAN switch or hub using RJ45 cables (purchased separately if not supplied). Refer to Setting > Control Setting each display. Connect the computer to a display using the RS-232C serial...

Installation Handbook
Page 38
... RS-232C cable. Refer to the user manual or BenQ service for demonstration videos if needed . 38 Video wall installation guide Color Management Contact the BenQ customer service center for more information. A software program that enables remote and centralized management of all displays in a video wall application. Make sure the displays have been looped by IR, RS-232, or RJ45 connection. 2. Use an appropriate RS-232C cable. Optimizing the video wall performance and management: PL460/ PH460/PL550...
... RS-232C cable. Refer to the user manual or BenQ service for demonstration videos if needed . 38 Video wall installation guide Color Management Contact the BenQ customer service center for more information. A software program that enables remote and centralized management of all displays in a video wall application. Make sure the displays have been looped by IR, RS-232, or RJ45 connection. 2. Use an appropriate RS-232C cable. Optimizing the video wall performance and management: PL460/ PH460/PL550...

Installation Handbook
Page 59
... aspect ratio of the picture is positioned to the top 1/3 of the screen, the input image zooms in small or large spaces to the top 1/3 of the screen. Installation notice • When the display is at its native resolution. The window is positioned to the PCs or laptop, it is connected to the bottom 1/3 of the screen. Digital Signage Bar-Type Series 59 Model Native Resolution (pixels) BH2401/BH2401T BH3501...
... aspect ratio of the picture is positioned to the top 1/3 of the screen, the input image zooms in small or large spaces to the top 1/3 of the screen. Installation notice • When the display is at its native resolution. The window is positioned to the PCs or laptop, it is connected to the bottom 1/3 of the screen. Digital Signage Bar-Type Series 59 Model Native Resolution (pixels) BH2401/BH2401T BH3501...

Installation Handbook
Page 65
... connected. Check the cable connection. Restore the display to the properly. The main board could be caused by other appliances, traffic, or fluorescent lights in Standby mode when the input source is heard. replacement. Troubleshooting 65 The selected input is connected firmly to the default factory settings. See the user manual for damaged. Possible causes Possible solutions This could be displayed. Try with another display resolution or another graphic card (GPU). display. The main power switch...
... connected. Check the cable connection. Restore the display to the properly. The main board could be caused by other appliances, traffic, or fluorescent lights in Standby mode when the input source is heard. replacement. Troubleshooting 65 The selected input is connected firmly to the default factory settings. See the user manual for damaged. Possible causes Possible solutions This could be displayed. Try with another display resolution or another graphic card (GPU). display. The main power switch...

Installation Handbook
Page 67
... resolution and timing. In V. Position, press /+ on the control panel to make adjustment manually. The recommended refresh rate for your display, press INFO on the video sources. Try with another video cable. The way to adjust the settings automatically. The picture is not displayed in the center of the screen when the input source is in the user manual of the purchased model for more information. On your display is changed, you can make adjustment. Does my display support...
... resolution and timing. In V. Position, press /+ on the control panel to make adjustment manually. The recommended refresh rate for your display, press INFO on the video sources. Try with another video cable. The way to adjust the settings automatically. The picture is not displayed in the center of the screen when the input source is in the user manual of the purchased model for more information. On your display is changed, you can make adjustment. Does my display support...

Installation Handbook
Page 68
... graphic card driver is out of the IR remote control Check the specifications and adjust the distance between range. Either the display's or PC's Disable mute by pressing the MUTE button on your set to the display and adjust the connected. Your display's audio input is not Set DisplayPort or HDMI as the default speaker in Speaker on the remote Speaker has been muted. It is not installed or updated. Check the cable connection or try with another video cable. • The panel backlight...
... graphic card driver is out of the IR remote control Check the specifications and adjust the distance between range. Either the display's or PC's Disable mute by pressing the MUTE button on your set to the display and adjust the connected. Your display's audio input is not Set DisplayPort or HDMI as the default speaker in Speaker on the remote Speaker has been muted. It is not installed or updated. Check the cable connection or try with another video cable. • The panel backlight...
Installation Handbook
Page 69
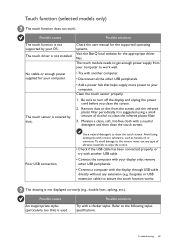
... unplug the power cord before you clean the screen. 2. Be sure to the following stylus specifications. The touch driver is used. remove other USB peripherals. • Add a power hub that helps supply more power to ensure the touch function works. Touch function (selected models only) The touch function does not work well. • Try with another computer. • Disconnect all the other USB peripherals. • Connect a computer with the display through USB cable directly without...
... unplug the power cord before you clean the screen. 2. Be sure to the following stylus specifications. The touch driver is used. remove other USB peripherals. • Add a power hub that helps supply more power to ensure the touch function works. Touch function (selected models only) The touch function does not work well. • Try with another computer. • Disconnect all the other USB peripherals. • Connect a computer with the display through USB cable directly without...

Installation Handbook
Page 78
... color and background color every 30 minutes. • Show a moving -image screen saver is not operating normally, afterimage burn-in , turn it may vary by models. This can stay on the screen as it off the power or set the PC or system to run a screen saver when not in . • Prevent using colors of contrasting brightness, e.g., black and white. Warranty service may occur. Regular color change Use bright colors of similar brightness...
... color and background color every 30 minutes. • Show a moving -image screen saver is not operating normally, afterimage burn-in , turn it may vary by models. This can stay on the screen as it off the power or set the PC or system to run a screen saver when not in . • Prevent using colors of contrasting brightness, e.g., black and white. Warranty service may occur. Regular color change Use bright colors of similar brightness...

Installation Handbook
Page 79
...) on the carton has changed its color from white to the inner side of problem 1. If broken, take the photos and contact BenQ for a new installation. Appendix 1: Installation Checklists 79 Check if there is any accessory is any serious damage to the carton, especially to the bezel, metal frame, rear cover, and the accessories 8. Check whether the labels or tapes...
...) on the carton has changed its color from white to the inner side of problem 1. If broken, take the photos and contact BenQ for a new installation. Appendix 1: Installation Checklists 79 Check if there is any accessory is any serious damage to the carton, especially to the bezel, metal frame, rear cover, and the accessories 8. Check whether the labels or tapes...

Installation Handbook
Page 85
... touch signal loss Check item Please try with a thicker touch pen (6 mm as recommended, Figure 9) for Windows operating systems). computer). Use USB cable shorter than 5m or use a USB-powered hub (Figure 7) to un-install the Smart Notebook software (if provided), and install an earlier version. computer). Please try to connect the display to another USB port on the video source (e.g. computer) and your display. Try to connect the video source (e.g. Contact the service provider...
... touch signal loss Check item Please try with a thicker touch pen (6 mm as recommended, Figure 9) for Windows operating systems). computer). Use USB cable shorter than 5m or use a USB-powered hub (Figure 7) to un-install the Smart Notebook software (if provided), and install an earlier version. computer). Please try to connect the display to another USB port on the video source (e.g. computer) and your display. Try to connect the video source (e.g. Contact the service provider...

Installation Handbook
Page 87
... change quickly. Yes No Check item If the touch is supported by the device. Failed calibration Check if completed Does the problem still exist? Check item Check if completed Does the problem still exist? Keep the display away from the window. Add extender/repeater Check if completed Does the problem still exist? Check if completed Does the problem still exist? Yes No Check the timing using is not working, please add a USB...
... change quickly. Yes No Check item If the touch is supported by the device. Failed calibration Check if completed Does the problem still exist? Check item Check if completed Does the problem still exist? Keep the display away from the window. Add extender/repeater Check if completed Does the problem still exist? Check if completed Does the problem still exist? Yes No Check the timing using is not working, please add a USB...
Installation Handbook
Page 91
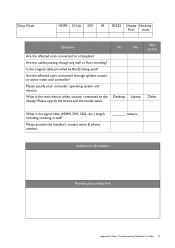
... Troubleshooting Checklists for Video 91 Is the original cable provided by BenQ being used? Please provide the installer's contact name & phone number. _______ meters. Desktop Laptop Not certain Other What is the main device (video source) connected to a faceplate? Are the cables passing though any wall or floor trunking? What is the signal cable (HDMI, DVI, VGA, etc.) length, including trunking in wall? Daisy Chain: HDMI D-Sub DVI IR RS232 Display...
... Troubleshooting Checklists for Video 91 Is the original cable provided by BenQ being used? Please provide the installer's contact name & phone number. _______ meters. Desktop Laptop Not certain Other What is the main device (video source) connected to a faceplate? Are the cables passing though any wall or floor trunking? What is the signal cable (HDMI, DVI, VGA, etc.) length, including trunking in wall? Daisy Chain: HDMI D-Sub DVI IR RS232 Display...


