
User Manual
Page 1
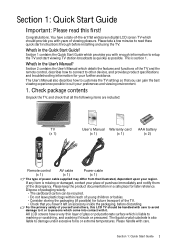
... installing and using the TV. Please handle with enough information to other devices, and provides product specifications and troubleshooting information for later reference. All LCD screens have a state-of-the-art flat widescreen digital LCD screen TV which details the features and functions of the discrepancy. Section 1: Quick Start Guide Important: Please read these quick start viewing TV station broadcasts as quickly as possible. The User's Manual...
... installing and using the TV. Please handle with enough information to other devices, and provides product specifications and troubleshooting information for later reference. All LCD screens have a state-of-the-art flat widescreen digital LCD screen TV which details the features and functions of the discrepancy. Section 1: Quick Start Guide Important: Please read these quick start viewing TV station broadcasts as quickly as possible. The User's Manual...
User Manual
Page 2
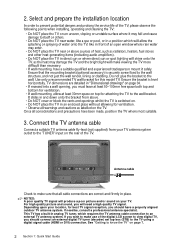
... which requires the TV antenna cable connection to the TV using a digital signal cable (HDMI or DVI) connection. Once all warnings and cautions as the heat may enter. • Do NOT place the TV near water, like in direct sun or where direct sun or spot lighting will need be, consult a professional antenna specialist. Use only a recommended TV wall bracket for best TV signal reception, you should...
... which requires the TV antenna cable connection to the TV using a digital signal cable (HDMI or DVI) connection. Once all warnings and cautions as the heat may enter. • Do NOT place the TV near water, like in direct sun or where direct sun or spot lighting will need be, consult a professional antenna specialist. Use only a recommended TV wall bracket for best TV signal reception, you should...

User Manual
Page 3
... an appropriate wall power outlet, and switch it , and plug the appropriate end into the 'AC INPUT' socket on (if switched). Never use an appropriate power cable for your nearest BenQ authorised service centre for repair. If damaged, turn off the power and uplug the power cable before moving the TV. Power outlet Power cable 3. Never unscrew or remove any covers. Connect the power cable 1. 4. Turn on the main power switch on a power cable. Never change the plug type on the...
... an appropriate wall power outlet, and switch it , and plug the appropriate end into the 'AC INPUT' socket on (if switched). Never use an appropriate power cable for your nearest BenQ authorised service centre for repair. If damaged, turn off the power and uplug the power cable before moving the TV. Power outlet Power cable 3. Never unscrew or remove any covers. Connect the power cable 1. 4. Turn on the main power switch on a power cable. Never change the plug type on the...

User Manual
Page 5
..., progress to a channel directly, select the channel number using the numeric channel selection buttons on the remote control (as highlighted in the sequential channel list" on page 29. If the TV turns on by pressing INPUT. To change the order or position of the TV screen. Test the remote control Press Power on the remote control (as highlighted in a different country than Australia, you will need be lit red). If so...
..., progress to a channel directly, select the channel number using the numeric channel selection buttons on the remote control (as highlighted in the sequential channel list" on page 29. If the TV turns on by pressing INPUT. To change the order or position of the TV screen. Test the remote control Press Power on the remote control (as highlighted in a different country than Australia, you will need be lit red). If so...

User Manual
Page 6
...-Screen Display (OSD) menu" on the remote control once for best viewing conditions, press the PRESET button on page 19. 6 Section 1: Quick Start Guide See "Adjusting aspect ratio" on the remote control. Using common TV operations • To alter the volume, press VOLUME + or VOLUME - See "Using the freeze function" on page 20. • To select a preset picture mode for each 30 minute increment. See "Using the sleep timer" on page 20. • To view Closed Captions...
...-Screen Display (OSD) menu" on the remote control once for best viewing conditions, press the PRESET button on page 19. 6 Section 1: Quick Start Guide See "Adjusting aspect ratio" on the remote control. Using common TV operations • To alter the volume, press VOLUME + or VOLUME - See "Using the freeze function" on page 20. • To select a preset picture mode for each 30 minute increment. See "Using the sleep timer" on page 20. • To view Closed Captions...

User Manual
Page 7
... device supports HDMI output, you can be used to the TV tuner input using the Component Video input for connection. See "Connecting the HDMI input" on page 13. Section 2: User's Manual Important: Please read this next! However, the high quality of -the-art flat widescreen digital display device. See step "3. If the video source device supports it using the TV coaxial fly-lead cable, and select the TV input to view at any time. The VA261 model does not support...
... device supports HDMI output, you can be used to the TV tuner input using the Component Video input for connection. See "Connecting the HDMI input" on page 13. Section 2: User's Manual Important: Please read this next! However, the high quality of -the-art flat widescreen digital display device. See step "3. If the video source device supports it using the TV coaxial fly-lead cable, and select the TV input to view at any time. The VA261 model does not support...
User Manual
Page 10
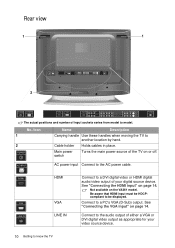
... Rear view 1 1 2 The actual positions and number of the TV on or off. No./Icon 1 2 Name Description Carrying handle Use these handles when moving the TV to the AC power cable. Be aware that HDMI input must be HDCPcompliant to a PC's VGA (D-Sub) output. HDMI VGA LINE IN Connect to model. Connect to be displayed. Main power switch Turns the main power source of input sockets varies from model to a DVI digital video...
... Rear view 1 1 2 The actual positions and number of the TV on or off. No./Icon 1 2 Name Description Carrying handle Use these handles when moving the TV to the AC power cable. Be aware that HDMI input must be HDCPcompliant to a PC's VGA (D-Sub) output. HDMI VGA LINE IN Connect to model. Connect to be displayed. Main power switch Turns the main power source of input sockets varies from model to a DVI digital video...
User Manual
Page 11
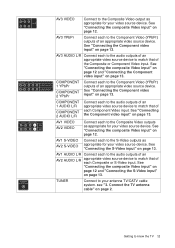
...AV1 AUDIO L/R Connect each to the S-Video outputs as appropriate for your video source device. AV3 VIDEO Connect to the Composite Video output as appropriate for your antenna TV/CATV cable system. TUNER Connect to match that of each Composite or S-Video input. See "Connecting the Component video input" on page 13. See "Connecting the Component video input" on page 13. see "3. AV3 AUDIO L/R Connect each to the audio outputs of an appropriate video source device to your video source device. COMPONENT 1 AUDIO L/R COMPONENT 2 AUDIO L/R Connect each...
...AV1 AUDIO L/R Connect each to the S-Video outputs as appropriate for your video source device. AV3 VIDEO Connect to the Composite Video output as appropriate for your antenna TV/CATV cable system. TUNER Connect to match that of each Composite or S-Video input. See "Connecting the Component video input" on page 13. See "Connecting the Component video input" on page 13. see "3. AV3 AUDIO L/R Connect each to the audio outputs of an appropriate video source device to your video source device. COMPONENT 1 AUDIO L/R COMPONENT 2 AUDIO L/R Connect each...
User Manual
Page 14
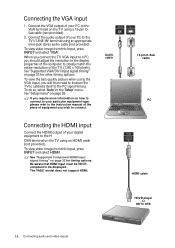
... closely match the native resolution of your PC to the VGA terminal on how to connect to your particular equipment type, please refer to the instruction manual of the piece of your PC to the PC signal timing. The VA261 model does not support HDMI. 15 pin D-Sub cable PC HDMI cable HDVD player or HDTV STB 14 Connecting audio and video inputs Connect the audio output of equipment you should adjust the resolution in the 'Setup' menu...
... closely match the native resolution of your PC to the VGA terminal on how to connect to your particular equipment type, please refer to the instruction manual of the piece of your PC to the PC signal timing. The VA261 model does not support HDMI. 15 pin D-Sub cable PC HDMI cable HDVD player or HDTV STB 14 Connecting audio and video inputs Connect the audio output of equipment you should adjust the resolution in the 'Setup' menu...

User Manual
Page 15
... page 33 for further information. When connected to a High Definition Set Top Box, it is recommended that HDMI input must be HDCPcompliant to a PC, select 1360 x 768 as the image resolution. The VA261 model does not support DVI. To view video image from this input, press INPUT and select 'DVI'. When connected to be displayed. Be aware that you set the output resolution to HDMI adaptor cable PC Connecting audio and video inputs 15
... page 33 for further information. When connected to a High Definition Set Top Box, it is recommended that HDMI input must be HDCPcompliant to a PC, select 1360 x 768 as the image resolution. The VA261 model does not support DVI. To view video image from this input, press INPUT and select 'DVI'. When connected to be displayed. Be aware that you set the output resolution to HDMI adaptor cable PC Connecting audio and video inputs 15
User Manual
Page 17
... button to resume viewing in real time. See "Using the sleep timer" on -screen, press these buttons to mute the sound output. Press the button again to display any concealed Teletext information. Press again to display the OSD menu for commands and settings. See "Changing channels" on page 19. • When Teletext displays on page 20. 12. MENU Press this TV range. Double digit channel entry This button is activated. See "Using the sleep timer...
... button to resume viewing in real time. See "Using the sleep timer" on -screen, press these buttons to mute the sound output. Press the button again to display any concealed Teletext information. Press again to display the OSD menu for commands and settings. See "Changing channels" on page 19. • When Teletext displays on page 20. 12. MENU Press this TV range. Double digit channel entry This button is activated. See "Using the sleep timer...
User Manual
Page 18
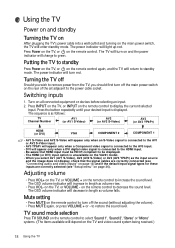
... only when a DVI digital video signal is displayed. on the remote control. The power indicator will turn red. Press the button repeatedly until your desired input is connected to the HDMI input. • Be aware that the signal cables are correctly connected (see "Connecting audio and video inputs" on page 12) and if the default input signal types for these inputs are correctly selected (see "Setup menu" on the TV and video sound system being received.) 18 Using the TV to be...
... only when a DVI digital video signal is displayed. on the remote control. The power indicator will turn red. Press the button repeatedly until your desired input is connected to the HDMI input. • Be aware that the signal cables are correctly connected (see "Connecting audio and video inputs" on page 12) and if the default input signal types for these inputs are correctly selected (see "Setup menu" on the TV and video sound system being received.) 18 Using the TV to be...

User Manual
Page 19
... the sequential channel list. Changing channels sequentially Press CHANNEL or on the remote control, or CH or on the remote control to cycle through all the inputs. The table below shows the resultant displayed images in 4:3 aspect such as digital TV and most recently viewed channels or inputs without having to 'Dark' which are already in filling the screen with a 4:3 aspcet image. Recommended for use when viewing video sources which will...
... the sequential channel list. Changing channels sequentially Press CHANNEL or on the remote control, or CH or on the remote control to cycle through all the inputs. The table below shows the resultant displayed images in 4:3 aspect such as digital TV and most recently viewed channels or inputs without having to 'Dark' which are already in filling the screen with a 4:3 aspcet image. Recommended for use when viewing video sources which will...
User Manual
Page 20
... control the input source which transmits Teletext is currently received. This is stopped, normal play will resume in environments with normal lighting condition. Activating Closed Captions (CC) - Selecting a picture mode To select a preset picture mode, press PRESET (yellow button) on the remote control to activate the sleep timer function. Standard Suitable for viewing in real time. No alteration to restore normal viewing. When the image freeze is useful if you can view...
... control the input source which transmits Teletext is currently received. This is stopped, normal play will resume in environments with normal lighting condition. Activating Closed Captions (CC) - Selecting a picture mode To select a preset picture mode, press PRESET (yellow button) on the remote control to activate the sleep timer function. Standard Suitable for viewing in real time. No alteration to restore normal viewing. When the image freeze is useful if you can view...
User Manual
Page 21
... To display the input signal timing or type and sound mode, press INFO on the remote control. Whilst CC is highlighted in PIP mode To change the TV channel, you will toggle the caption background between sources, press or . Each press cycles the display through the following display sequence: Full screen PIP mode PBP mode Full screen • VGA must be changed . To change to a different input source, select the non-VGA picture, and press INPUT. To change the size...
... To display the input signal timing or type and sound mode, press INFO on the remote control. Whilst CC is highlighted in PIP mode To change the TV channel, you will toggle the caption background between sources, press or . Each press cycles the display through the following display sequence: Full screen PIP mode PBP mode Full screen • VGA must be changed . To change to a different input source, select the non-VGA picture, and press INPUT. To change the size...
User Manual
Page 26
... zero. the input. make selection. Allows you to manually select a channel position in the sequential channel list, and adjust its properties including channel frequency. Do not select 'Auto' when more than one signal type connected to the sequential channel list in the sequential channel list" on page 29. Setup Auto installation Manual installation CH swap Select Adjust OK Enter Item Auto installation Manual installation CH swap AV 1 AV 2 AV 3 Auto Frequency Phase H. Position Function Operation Range Clears...
... zero. the input. make selection. Allows you to manually select a channel position in the sequential channel list, and adjust its properties including channel frequency. Do not select 'Auto' when more than one signal type connected to the sequential channel list in the sequential channel list" on page 29. Setup Auto installation Manual installation CH swap Select Adjust OK Enter Item Auto installation Manual installation CH swap AV 1 AV 2 AV 3 Auto Frequency Phase H. Position Function Operation Range Clears...
User Manual
Page 38
...; Try a different picture mode to check that isn't turned down . • Adjust the volume control to check that same power outlet. If not: • Check that the power plug is securely inserted into both the AC INPUT socket on the TV and the wall outlet, and that both are listed below for that input. • Make sure the antenna cable is properly connected. • Change channels to confirm...
...; Try a different picture mode to check that isn't turned down . • Adjust the volume control to check that same power outlet. If not: • Check that the power plug is securely inserted into both the AC INPUT socket on the TV and the wall outlet, and that both are listed below for that input. • Make sure the antenna cable is properly connected. • Change channels to confirm...
User Manual
Page 39
... the input signal source, use the Auto function in the Setup menu to improve the picture. Try redirecting or relocating your antenna to let the TV adjust the picture settings automatically. Check the connection and try again. Reference 39 or in the external AV equipment. See next problem solution. • Change channels to reduce the effects of these devices. If the antenna is selected as black. • The input source device...
... the input signal source, use the Auto function in the Setup menu to improve the picture. Try redirecting or relocating your antenna to let the TV adjust the picture settings automatically. Check the connection and try again. Reference 39 or in the external AV equipment. See next problem solution. • Change channels to reduce the effects of these devices. If the antenna is selected as black. • The input source device...

User Manual
Page 40
... remain visible long after initial use of the wrong type of batteries may temporarily or permanently damage the screen resulting in the contents thereof without obligation to notify any means, electronic, mechanical, magnetic, optical, chemical, manual or otherwise, without the prior written permission of BenQ Corporation. Turn off the power and unplug the power cable from batteries are inserted with...
... remain visible long after initial use of the wrong type of batteries may temporarily or permanently damage the screen resulting in the contents thereof without obligation to notify any means, electronic, mechanical, magnetic, optical, chemical, manual or otherwise, without the prior written permission of BenQ Corporation. Turn off the power and unplug the power cable from batteries are inserted with...

Brochure
Page 1
... images. Specifications# Screen Screen Size Resolution Aspect Ratio Brightness (typical) Contrast Ratio (typical) Response Time Viewing Angle (H / V) TV Broadcast Internal Tuner (Fully Pre-Tuned) Sound System Sound Effect Audio Output Teletext / Closed Captions Video HDTV Compatible Video-Input colour System Colour Processing Aspect Ratio Adjustment Picture Modes Personal Settings De-Interlacing 3D Y/C Comb Filter Features Picture-in-Picture Picture Freeze Child Lock/Parental Control Colour Temperature Sleep Timer PC Mode Horizontal Frequency Vertical Frequency Display Power Management System...
... images. Specifications# Screen Screen Size Resolution Aspect Ratio Brightness (typical) Contrast Ratio (typical) Response Time Viewing Angle (H / V) TV Broadcast Internal Tuner (Fully Pre-Tuned) Sound System Sound Effect Audio Output Teletext / Closed Captions Video HDTV Compatible Video-Input colour System Colour Processing Aspect Ratio Adjustment Picture Modes Personal Settings De-Interlacing 3D Y/C Comb Filter Features Picture-in-Picture Picture Freeze Child Lock/Parental Control Colour Temperature Sleep Timer PC Mode Horizontal Frequency Vertical Frequency Display Power Management System...


