
W6000 User Manual
Page 2
... Shipping contents 6 Remote control batteries 7 Remote control operation 7 Projector features 8 Projector exterior view 9 Controls and functions 10 Control panel 10 Remote control 11 Positioning your projector........ 12 Choosing a location 12 Obtaining a preferred projected image size 13 How to determine the position of the projector for a given...component-video devices ....18 Connecting S-Video or video devices ......18 Connecting a computer 19 Using the projector 20 Turning the projector on 20 Selecting an input source 21 Fine-tuning the image size and clarity 21 Using the menus ...
... Shipping contents 6 Remote control batteries 7 Remote control operation 7 Projector features 8 Projector exterior view 9 Controls and functions 10 Control panel 10 Remote control 11 Positioning your projector........ 12 Choosing a location 12 Obtaining a preferred projected image size 13 How to determine the position of the projector for a given...component-video devices ....18 Connecting S-Video or video devices ......18 Connecting a computer 19 Using the projector 20 Turning the projector on 20 Selecting an input source 21 Fine-tuning the image size and clarity 21 Using the menus ...

W6000 User Manual
Page 6
Some of the accessories may not be available depending on your region of purchase. Please check with your dealer for detailed information. Please consult your place of the items may vary from region to region. English Overview Shipping contents Carefully unpack and verify that you have the items below. The warranty card is only supplied in some specific regions. Some of purchase. Projector Remote control Batteries Component Video cable Warranty card User manual CD Quick start guide Power cable VGA cable 6 Overview
Some of the accessories may not be available depending on your region of purchase. Please check with your dealer for detailed information. Please consult your place of the items may vary from region to region. English Overview Shipping contents Carefully unpack and verify that you have the items below. The warranty card is only supplied in some specific regions. Some of purchase. Projector Remote control Batteries Component Video cable Warranty card User manual CD Quick start guide Power cable VGA cable 6 Overview

W6000 User Manual
Page 7
... as illustrated. Notes on the cover and slide it clicks into position. Overview 7 If you purchased your region. • If the remote control will slide off. 2. You can purchase a BenQ projector ceiling mount kit from possible battery leakage. Always aim straight at an angle within 45 degrees of time, remove the batteries to...
... as illustrated. Notes on the cover and slide it clicks into position. Overview 7 If you purchased your region. • If the remote control will slide off. 2. You can purchase a BenQ projector ceiling mount kit from possible battery leakage. Always aim straight at an angle within 45 degrees of time, remove the batteries to...

W6000 User Manual
Page 10
... 48 4. II POWER Performs the same action as the source selection keys (COMP, VIDEO, S-VIDEO, HDMI1, HDMI2, PC) on the remote control. Toggles the projector between standby and on page 21 10. SOURCE Performs the same action as POWER ON/OFF on page 20, "Turning the... each input. LAMP indicator light Lights up or flashes if the projector's temperature becomes too high. TEMPerature warning light Lights up or flashes when the projector lamp has developed a problem. "Turning the projector on" on the remote control. Switches sequentially through input sources. "Using the menus" on...
... 48 4. II POWER Performs the same action as the source selection keys (COMP, VIDEO, S-VIDEO, HDMI1, HDMI2, PC) on the remote control. Toggles the projector between standby and on page 21 10. SOURCE Performs the same action as POWER ON/OFF on page 20, "Turning the... each input. LAMP indicator light Lights up or flashes if the projector's temperature becomes too high. TEMPerature warning light Lights up or flashes when the projector lamp has developed a problem. "Turning the projector on" on the remote control. Switches sequentially through input sources. "Using the menus" on...

W6000 User Manual
Page 11
... toggles between standby and on page 41 5. "Selecting a preset mode" on page 26 "Test Pattern" on . POWER ON/OFF Toggles the projector between the main window and subwindow with ACTIVE, and adjusts the size and position of the arrow 4 being pressed when the OSD menu is on...the menus" on page 32 "Displaying more than one image source 4. "Selecting the aspect ratio" on page 22 1. "Information menu" on page 28 2. Remote control English For details, see the info provided behind the hand sign . 1 7. "Fine-tuning the picture quality" on page 42 14. PRESET MODE ...
... toggles between standby and on page 41 5. "Selecting a preset mode" on page 26 "Test Pattern" on . POWER ON/OFF Toggles the projector between the main window and subwindow with ACTIVE, and adjusts the size and position of the arrow 4 being pressed when the OSD menu is on...the menus" on page 32 "Displaying more than one image source 4. "Selecting the aspect ratio" on page 22 1. "Information menu" on page 28 2. Remote control English For details, see the info provided behind the hand sign . 1 7. "Fine-tuning the picture quality" on page 42 14. PRESET MODE ...

W6000 User Manual
Page 12
... screen. Your room layout or personal preference will dictate which installation location you turn the projector on the projector or remote control and then press / until the correct position is highlighted. 2. Note that a special rear projection screen and the BenQ Projector Ceiling Mount Kit are required for quick setup and portability. 3. Note that a special rear...
... screen. Your room layout or personal preference will dictate which installation location you turn the projector on the projector or remote control and then press / until the correct position is highlighted. 2. Note that a special rear projection screen and the BenQ Projector Ceiling Mount Kit are required for quick setup and portability. 3. Note that a special rear...
W6000 User Manual
Page 20
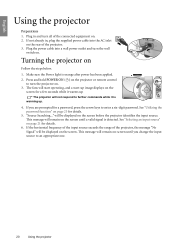
...-screen until a valid signal is detected. "Source Searching..." This message will remain on . 3. Press and hold POWER ON ( II ) on the projector or remote control to further commands while it warms up . 4. This message will remain on page 21 for a password, press the arrow keys to an appropriate one.... 20 Using the projector Plug the power cable into the AC inlet on the screen for details. 5. If you change the input ...
...-screen until a valid signal is detected. "Source Searching..." This message will remain on . 3. Press and hold POWER ON ( II ) on the projector or remote control to further commands while it warms up . 4. This message will remain on page 21 for a password, press the arrow keys to an appropriate one.... 20 Using the projector Plug the power cable into the AC inlet on the screen for details. 5. If you change the input ...
W6000 User Manual
Page 21
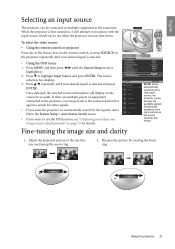
...and press ENTER. The source selection bar displays. 3. If there are multiple pieces of the Source keys on the remote control, or press SOURCE on the projector repeatedly until your desired signal is selected. • Using the OSD menu 1. Sharpen the picture by rotating the focus...Source Auto Source Search S-Video Fine-tuning the image size and clarity English BenQ Floor Front Disable Disable Blue ENTER On EXIT Back NOTE: When automatically searching for seconds. Using the projector 21 When the projector is highlighted. 2. Press / repeatedly until the System Setup menu is first...
...and press ENTER. The source selection bar displays. 3. If there are multiple pieces of the Source keys on the remote control, or press SOURCE on the projector repeatedly until your desired signal is selected. • Using the OSD menu 1. Sharpen the picture by rotating the focus...Source Auto Source Search S-Video Fine-tuning the image size and clarity English BenQ Floor Front Disable Disable Blue ENTER On EXIT Back NOTE: When automatically searching for seconds. Using the projector 21 When the projector is highlighted. 2. Press / repeatedly until the System Setup menu is first...
W6000 User Manual
Page 22
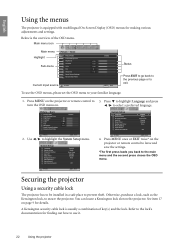
...safe place to exit. Below is the overview of key(s) and the lock. You can locate a Kensington lock slot on the projector or remote control to leave and save the settings. *The first press leads you back to 3. Basic Picture Mode Load Settings From Brightness ...adjustments and settings. System Setup Language Splash Screen Projector Position Auto Off Sleep Timer Background Color Menu Settings Input Source Auto Source Search English BenQ Floor Front Disable Disable Blue Off System Setup Language Splash Screen Projector Position Auto Off Sleep Timer Background Color Menu ...
...safe place to exit. Below is the overview of key(s) and the lock. You can locate a Kensington lock slot on the projector or remote control to leave and save the settings. *The first press leads you back to 3. Basic Picture Mode Load Settings From Brightness ...adjustments and settings. System Setup Language Splash Screen Projector Position Auto Off Sleep Timer Background Color Menu Settings Input Source Auto Source Search English BenQ Floor Front Disable Disable Blue Off System Setup Language Splash Screen Projector Position Auto Off Sleep Timer Background Color Menu ...

W6000 User Manual
Page 23
...recall. Write your selected password down in this manual, and you ever forget it. See "Entering the password recall procedure" on the projector or remote control and then press / until the Advanced Setup menu is available to select On. You will automatically shut down here in a short ... or right after the password is activated, you turn on the remote control or projector to help prevent unauthorized use the projector. Press MENU on page 24 for details. If the function is started. 1. Using the projector 23 To leave the OSD menu, press MENU. English Utilizing the...
...recall. Write your selected password down in this manual, and you ever forget it. See "Entering the password recall procedure" on the projector or remote control and then press / until the Advanced Setup menu is available to select On. You will automatically shut down here in a short ... or right after the password is activated, you turn on the remote control or projector to help prevent unauthorized use the projector. Press MENU on page 24 for details. If the function is started. 1. Using the projector 23 To leave the OSD menu, press MENU. English Utilizing the...

W6000 User Manual
Page 24
...Change Password Off pressing / . Note that you ever need to cancel the change or try another password. 5. The projector will display as asterisks on the projector or remote control and then press / until the Advanced Setup menu is started. 8. Write down here in this manual in ... the password error message displays lasting for three seconds, and the message "Input Password" displays for 3 seconds. Seek help from the local BenQ service center to highlight Password and press ENTER. Press / to decode the number. Enter the current password. • If the password is...
...Change Password Off pressing / . Note that you ever need to cancel the change or try another password. 5. The projector will display as asterisks on the projector or remote control and then press / until the Advanced Setup menu is started. 8. Write down here in this manual in ... the password error message displays lasting for three seconds, and the message "Input Password" displays for 3 seconds. Seek help from the local BenQ service center to highlight Password and press ENTER. Press / to decode the number. Enter the current password. • If the password is...

W6000 User Manual
Page 25
...Press MENU and then press / until you are four adjuster feet on the remote control or projector (Left / , Up / , Right / , Down / ) to display the Keystone page. Press /. The values on either of the projector. You will need to aim and level the projection angle. iii. iv...be in or out as described above, you can be positioned as appropriate to manually correct the picture. • Using the remote control or projector i. Continue pressing the same key or press the other , the projected image becomes vertical trapezoidal. Display Aspect Ratio Keystone Position ...
...Press MENU and then press / until you are four adjuster feet on the remote control or projector (Left / , Up / , Right / , Down / ) to display the Keystone page. Press /. The values on either of the projector. You will need to aim and level the projection angle. iii. iv...be in or out as described above, you can be positioned as appropriate to manually correct the picture. • Using the remote control or projector i. Continue pressing the same key or press the other , the projected image becomes vertical trapezoidal. Display Aspect Ratio Keystone Position ...

W6000 User Manual
Page 26
...suits your desired value. Basic menu is highlighted. 2. Advanced menus. Your selection is selected. Each time you change the picture mode, the projector also changes the setting to the one to set for details. To select a picture mode that input and resolution will be altered via ... 2/ISF NIGHT, USER 3/ISF DAY, DEFAULT on the remote control, or PRESET MODE on page 29 for details. Basic and Picture -- See "Fine-tuning the picture quality" on page 28 and "Advanced picture quality controls" on the projector repeatedly until your desired mode is automatically stored in the ...
...suits your desired value. Basic menu is highlighted. 2. Advanced menus. Your selection is selected. Each time you change the picture mode, the projector also changes the setting to the one to set for details. To select a picture mode that input and resolution will be altered via ... 2/ISF NIGHT, USER 3/ISF DAY, DEFAULT on the remote control, or PRESET MODE on page 29 for details. Basic and Picture -- See "Fine-tuning the picture quality" on page 28 and "Advanced picture quality controls" on the projector repeatedly until your desired mode is automatically stored in the ...

W6000 User Manual
Page 28
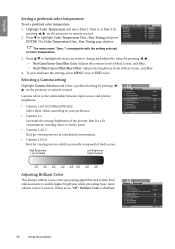
... high, colors on the image will be accessible by pressing / on the projector or remote control. Adjusting Sharpness Highlight Sharpness and adjust the values by pressing BRIGHTNESS, COLOR, CONTRAST, TINT on the projector or remote control. And the lower 30 50 70 the setting, the darker the picture... Brightness Highlight Brightness in the dark areas is visible. Basic menu and adjust the values by pressing / on the projector or remote control. The higher the value, the brighter the picture. Adjusting Contrast Highlight Contrast in the Picture -- English Fine-tuning...
... high, colors on the image will be accessible by pressing / on the projector or remote control. Adjusting Sharpness Highlight Sharpness and adjust the values by pressing BRIGHTNESS, COLOR, CONTRAST, TINT on the projector or remote control. And the lower 30 50 70 the setting, the darker the picture... Brightness Highlight Brightness in the dark areas is visible. Basic menu and adjust the values by pressing / on the projector or remote control. The higher the value, the brighter the picture. Adjusting Contrast Highlight Contrast in the Picture -- English Fine-tuning...

W6000 User Manual
Page 29
...accordingly. English Advanced picture quality controls There are more advanced functions in IRE units. Highlight Clarity Control and press ENTER on the projector or remote control. The higher the setting, the more distinct the effect. The higher the setting, the more distinct the effect. •... and press / to set the desired value. • Noise Reduction: Reduces electrical image noise caused by pressing / on the projector or remote control to have static or noisy projected pictures. A white color with a high color temperature appears to display the Clarity Control page...
...accordingly. English Advanced picture quality controls There are more advanced functions in IRE units. Highlight Clarity Control and press ENTER on the projector or remote control. The higher the setting, the more distinct the effect. The higher the setting, the more distinct the effect. •... and press / to set the desired value. • Noise Reduction: Reduces electrical image noise caused by pressing / on the projector or remote control to have static or noisy projected pictures. A white color with a high color temperature appears to display the Clarity Control page...
W6000 User Manual
Page 30
... the setting selected in picture. Press / to highlight the item you want to change and adjust the values by pressing / on the projector or remote control. 2. To save and leave the settings, press MENU once or EXIT twice. Highlight Color Temperature and select User 1, User 2,... or User 3 by pressing / on the projector or remote control. When set a preferred color temperature: 1. Press to your preference. • Gamma 2.2 Increases the average brightness of dark scenes. Picture --...
... the setting selected in picture. Press / to highlight the item you want to change and adjust the values by pressing / on the projector or remote control. 2. To save and leave the settings, press MENU once or EXIT twice. Highlight Color Temperature and select User 1, User 2,... or User 3 by pressing / on the projector or remote control. When set a preferred color temperature: 1. Press to your preference. • Gamma 2.2 Increases the average brightness of dark scenes. Picture --...

W6000 User Manual
Page 32
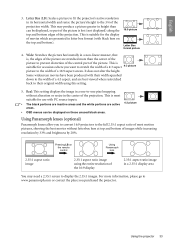
... it reaches the full projected height, and stretches the width of the source image until the Display menu is ): • Using the remote control Press one of the aspect ratio keys to suit the format of the video signal and your display requirements. • Using the OSD...Anamorphic (ANA): Scales an image so that it displays them without aspect alteration. 2. 4:3: Scales a picture so that it is the default for this projector can dynamically stretch and scale the image output to highlight Aspect Ratio. 3. This is most analog TV signals and DVDs are already in a 16:9 aspect...
... it reaches the full projected height, and stretches the width of the source image until the Display menu is ): • Using the remote control Press one of the aspect ratio keys to suit the format of the video signal and your display requirements. • Using the OSD...Anamorphic (ANA): Scales an image so that it displays them without aspect alteration. 2. 4:3: Scales a picture so that it is the default for this projector can dynamically stretch and scale the image output to highlight Aspect Ratio. 3. This is most analog TV signals and DVDs are already in a 16:9 aspect...
W6000 User Manual
Page 33
..., so part of the picture is , the edges of the picture are active areas. • OSD menus can be displayed on the remote control Using Panamorph lens 2.35:1 aspect ratio image 2.35:1 aspect ratio image using this setting. 5. Pressing LB on those unused black areas.... 4:3 picture Using Panamorph lenses (optional) Panamorph lenses allow you to convert 16:9 projectors to the 3/4 of the projection. English 3. Some widescreen movies have been produced with PC source inputs. • The black portions are inactive...
..., so part of the picture is , the edges of the picture are active areas. • OSD menus can be displayed on the remote control Using Panamorph lens 2.35:1 aspect ratio image 2.35:1 aspect ratio image using this setting. 5. Pressing LB on those unused black areas.... 4:3 picture Using Panamorph lenses (optional) Panamorph lenses allow you to convert 16:9 projectors to the 3/4 of the projection. English 3. Some widescreen movies have been produced with PC source inputs. • The black portions are inactive...
W6000 User Manual
Page 35
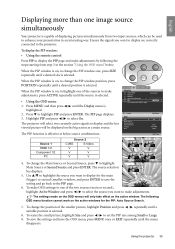
To display the PIP window: • Using the remote control Press PIP to display the PIP page and make ...or Large. 9. To make adjustments by following OSD menu function cannot work on the active window. The projector will select two currently active signals to display and the last viewed picture will only take effect on the... active windows for the main (bigger) or second (smaller) window, and press ENTER to the projector. EXIT Back Source 1 HDMI 1/2 Component 1/2 PC Source 2 CVBS S-Video V V V V V V 4. Use / to highlight ...
To display the PIP window: • Using the remote control Press PIP to display the PIP page and make ...or Large. 9. To make adjustments by following OSD menu function cannot work on the active window. The projector will select two currently active signals to display and the last viewed picture will only take effect on the... active windows for the main (bigger) or second (smaller) window, and press ENTER to the projector. EXIT Back Source 1 HDMI 1/2 Component 1/2 PC Source 2 CVBS S-Video V V V V V V 4. Use / to highlight ...

W6000 User Manual
Page 36
...• The Power indicator light flashes orange and the fans run for 5 seconds. Locking control keys With the control keys on the remote control and projector locked, you can press II on page 22 for details. • Splash Screen in the System Setup > Menu Settings menu sets... Altitude Mode Password Key Lock Reset All Settings ISF S-Video 115200 Off ENTER EXIT Back Turning the projector off To turn the projector off, press POWER OFF on the remote control and projector will remain active after your preferences. The following settings do not affect the projection settings, operation,...
...• The Power indicator light flashes orange and the fans run for 5 seconds. Locking control keys With the control keys on the remote control and projector locked, you can press II on page 22 for details. • Splash Screen in the System Setup > Menu Settings menu sets... Altitude Mode Password Key Lock Reset All Settings ISF S-Video 115200 Off ENTER EXIT Back Turning the projector off To turn the projector off, press POWER OFF on the remote control and projector will remain active after your preferences. The following settings do not affect the projection settings, operation,...

