
User Manual
Page 1
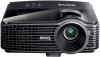
MP776/MP777 Digital Projector User Manual Welcome
MP776/MP777 Digital Projector User Manual Welcome
User Manual
Page 2
...computer or monitor... 19 Connecting video source devices........ 20 Operation 23 Starting up the projector 23 Adjusting the projected image 24 Using the menus 25 Securing the projector 26 Switching input signal 29 Magnifying and searching for details . 30 Selecting the ... the sound 39 Personalizing the projector menu display 39 Controlling the projector through a Lan environment 40 Shutting down the projector 43 Menu operation 44 Maintenance 52 Care of the projector 52 Lamp information 53 Troubleshooting 59 Specifications 60 Projector specifications 60 Dimensions 61 Ceiling...
...computer or monitor... 19 Connecting video source devices........ 20 Operation 23 Starting up the projector 23 Adjusting the projected image 24 Using the menus 25 Securing the projector 26 Switching input signal 29 Magnifying and searching for details . 30 Selecting the ... the sound 39 Personalizing the projector menu display 39 Controlling the projector through a Lan environment 40 Shutting down the projector 43 Menu operation 44 Maintenance 52 Care of the projector 52 Lamp information 53 Troubleshooting 59 Specifications 60 Projector specifications 60 Dimensions 61 Ceiling...

User Manual
Page 3
... designed and tested to become heated and deformed or even cause a fire. Do not look straight at the projector uninterruptible power supply (UPS). To temporarily turn off the lamp, press BLANK on . In areas where the mains voltage may damage... information technology equipment. Always open the lens shutter or remove the lens cap when the projector lamp is important that you connect your projector. Important safety instructions 3 Important safety instructions Your projector is designed future reference. Save it for safety of this manual and marked on the ...
... designed and tested to become heated and deformed or even cause a fire. Do not look straight at the projector uninterruptible power supply (UPS). To temporarily turn off the lamp, press BLANK on . In areas where the mains voltage may damage... information technology equipment. Always open the lens shutter or remove the lens cap when the projector lamp is important that you connect your projector. Important safety instructions 3 Important safety instructions Your projector is designed future reference. Save it for safety of this manual and marked on the ...

User Manual
Page 4
.... Do not operate lamps beyond the rated life could cause them to disassemble this product on rare occasions. When the projector is unplugged. 12. It is the lamp which may fall, sustaining serious damage. 11. during operation. Excessive operation ... defect. 4 Important safety instructions Refer servicing only to removing the lamp assembly for replacement. Safety Instructions (Continued) 7. Allow the projector to cool for approximately 45 minutes prior to suitably qualified professional service personnel. 9. The product may cause death if you may sense...
.... Do not operate lamps beyond the rated life could cause them to disassemble this product on rare occasions. When the projector is unplugged. 12. It is the lamp which may fall, sustaining serious damage. 11. during operation. Excessive operation ... defect. 4 Important safety instructions Refer servicing only to removing the lamp assembly for replacement. Safety Instructions (Continued) 7. Allow the projector to cool for approximately 45 minutes prior to suitably qualified professional service personnel. 9. The product may cause death if you may sense...

User Manual
Page 5
...walls and free flow of more than 15 degrees front to , the lamp. 3000 m (10000 feet) 0 m (0 feet) 16. Using the projector when it is poorly ventilated or confined. Important safety instructions 5 Do not block the ventilation holes. - Do not use if tilted at an angle... of air around the projector. - Do not place this projector with an ambient temperature above 40°C / 104°F - Locations where temperatures may cause a malfunction of the 14. Locations with...
...walls and free flow of more than 15 degrees front to , the lamp. 3000 m (10000 feet) 0 m (0 feet) 16. Using the projector when it is poorly ventilated or confined. Important safety instructions 5 Do not block the ventilation holes. - Do not use if tilted at an angle... of air around the projector. - Do not place this projector with an ambient temperature above 40°C / 104°F - Locations where temperatures may cause a malfunction of the 14. Locations with...

User Manual
Page 6
...upon it from the power supply's power outlet and call BenQ to an improper attachment through the use a proper fitting BenQ projector ceiling mount kit and that the projector may fall from the place you to have the projector serviced. 19. This product is capable of displaying inverted images...need to bring this safety matter to your projector on the projector and the base of the wrong gauge or length screws. You can purchase a BenQ projector ceiling mount kit from the ceiling due to have a pleasant experience using your BenQ projector, so we strongly recommend that you use of...
...upon it from the power supply's power outlet and call BenQ to an improper attachment through the use a proper fitting BenQ projector ceiling mount kit and that the projector may fall from the place you to have the projector serviced. 19. This product is capable of displaying inverted images...need to bring this safety matter to your projector on the projector and the base of the wrong gauge or length screws. You can purchase a BenQ projector ceiling mount kit from the ceiling due to have a pleasant experience using your BenQ projector, so we strongly recommend that you use of...

User Manual
Page 7
... password protected function • 3D color management allowing color adjustments to your liking • Selectable quick cooling function making the projector cool in a shorter time • FAQ to troubleshoot operational problems with one quick key press • Presentation timer for ... distance. • The lamp brightness will decline over time and may vary within the lamp manufacturers specifications. Introduction Projector features The projector integrates high-performance optical engine projection and a user-friendly design to deliver high reliability and ease of the projected ...
... password protected function • 3D color management allowing color adjustments to your liking • Selectable quick cooling function making the projector cool in a shorter time • FAQ to troubleshoot operational problems with one quick key press • Presentation timer for ... distance. • The lamp brightness will decline over time and may vary within the lamp manufacturers specifications. Introduction Projector features The projector integrates high-performance optical engine projection and a user-friendly design to deliver high reliability and ease of the projected ...

User Manual
Page 8
Projector Power cord VGA cable Quick start guide User manual CD Warranty card* Remote control with batteries Optional accessories 1. RS232 cable 8 Introduction If any of these ...
Projector Power cord VGA cable Quick start guide User manual CD Warranty card* Remote control with batteries Optional accessories 1. RS232 cable 8 Introduction If any of these ...

User Manual
Page 9
.... Ceiling mount holes 14. Rear IR remote sensor 15. Consult your dealer for details.) 2. Speaker grill Introduction 9 Vent (cool air intake) 8. RS232 control port 17. Projector exterior view Front/upper side 1 6 2 3 7 8 4 9 5 Rear/lower side 14 15 16 17 18 19 20 21 22 10 11 12 13 4 1. RGB signal output jack...
.... Ceiling mount holes 14. Rear IR remote sensor 15. Consult your dealer for details.) 2. Speaker grill Introduction 9 Vent (cool air intake) 8. RS232 control port 17. Projector exterior view Front/upper side 1 6 2 3 7 8 4 9 5 Rear/lower side 14 15 16 17 18 19 20 21 22 10 11 12 13 4 1. RGB signal output jack...

User Manual
Page 10
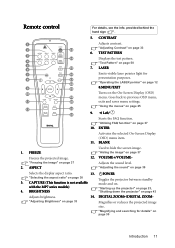
... LAMP indicator light 11 Indicates the status of the image. AUTO Automatically determines the best picture 1. Goes back to make adjustments. Toggles the projector between standby mode and on page 32 14. "Starting up 5 12 or flashes when the lamp has developed a 6 13 problem. 14...page 58 4 10 9. "Fine-tuning the image size and clarity" on page 24 "Correcting keystone" on 11. Right/ Lights up red if the projector's 9 temperature becomes too high. 3 "Indicators" on page 58 When the On-Screen Display (OSD) menu is Activates panel key lock. "Hiding ...
... LAMP indicator light 11 Indicates the status of the image. AUTO Automatically determines the best picture 1. Goes back to make adjustments. Toggles the projector between standby mode and on page 32 14. "Starting up 5 12 or flashes when the lamp has developed a 6 13 problem. 14...page 58 4 10 9. "Fine-tuning the image size and clarity" on page 24 "Correcting keystone" on 11. Right/ Lights up red if the projector's 9 temperature becomes too high. 3 "Indicators" on page 58 When the On-Screen Display (OSD) menu is Activates panel key lock. "Hiding ...
User Manual
Page 11
... projected image. ASPECT Used to previous OSD menu, 11 20 exits and saves menu settings. BRIGHTNESS "Starting up the projector" on page 23, "Shutting down the projector" on page 25 12 21 22 9. "Adjusting the sound" on page 33 Magnifies or reduces the projected image size...EXIT 10 Turns on page 30 3. with the MP7 series models) 4. "Hiding the image" on . CAPTURE (This function is not available Toggles the projector between standby mode and on page 37 12. TEST PATTERN 3 14 Displays the test pattern. 4 "Test Pattern" on page 33 6. DIGITAL ZOOM+/DIGITAL...
... projected image. ASPECT Used to previous OSD menu, 11 20 exits and saves menu settings. BRIGHTNESS "Starting up the projector" on page 23, "Shutting down the projector" on page 25 12 21 22 9. "Adjusting the sound" on page 33 Magnifies or reduces the projected image size...EXIT 10 Turns on page 30 3. with the MP7 series models) 4. "Hiding the image" on . CAPTURE (This function is not available Toggles the projector between standby mode and on page 37 12. TEST PATTERN 3 14 Displays the test pattern. 4 "Test Pattern" on page 33 6. DIGITAL ZOOM+/DIGITAL...

User Manual
Page 12
... select the desired menu items and to using it and the indicator lights up red. adjustments. TIMER ON 20. See the warning messages on the projector. 15. TIMER SET UP Toggles projector audio between on and Enters presentation timer setting directly. MODE Automatically determines the best picture timings for continuous output.
... select the desired menu items and to using it and the indicator lights up red. adjustments. TIMER ON 20. See the warning messages on the projector. 15. TIMER SET UP Toggles projector audio between on and Enters presentation timer setting directly. MODE Automatically determines the best picture timings for continuous output.
User Manual
Page 13
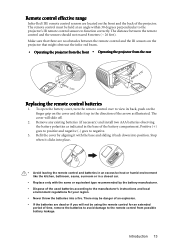
...Positive (+) goes to positive and negative (-) goes to function correctly. Introduction 13 The distance between the remote control and the IR sensors on the projector that there are located on the front and the back of an explosion. • If the batteries are dead or if you will slide off...; Replace only with the base and sliding it back down into a fire. Make sure that might obstruct the infra-red beam. • Operating the projector from the front • Operating the projector from possible battery leakage. There may be held at an angle within 30 degrees perpendicular to the...
...Positive (+) goes to positive and negative (-) goes to function correctly. Introduction 13 The distance between the remote control and the IR sensors on the projector that there are located on the front and the back of an explosion. • If the batteries are dead or if you will slide off...; Replace only with the base and sliding it back down into a fire. Make sure that might obstruct the infra-red beam. • Operating the projector from the front • Operating the projector from possible battery leakage. There may be held at an angle within 30 degrees perpendicular to the...

User Manual
Page 14
... a special rear projection screen and the BenQ Projector Ceiling Mount Kit are required for quick setup and portability. Your room layout or personal preference will dictate which installation location you select. Purchase the BenQ Projector Ceiling Mount Kit from the ceiling in ...the SYSTEM SETUP: Basic > Projector Position menu after you turn the projector on. 2. Front Table 3. Rear Table Select this location with the projector placed Select this installation location. ...
... a special rear projection screen and the BenQ Projector Ceiling Mount Kit are required for quick setup and portability. Your room layout or personal preference will dictate which installation location you select. Purchase the BenQ Projector Ceiling Mount Kit from the ceiling in ...the SYSTEM SETUP: Basic > Projector Position menu after you turn the projector on. 2. Front Table 3. Rear Table Select this location with the projector placed Select this installation location. ...
User Manual
Page 15
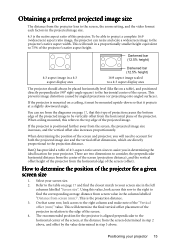
...; right-angle square) to project a complete 16:9 (widescreen) aspect ratio image, the projector can see from the diagrams on page 17 and find the corresponding average distance from screen value in the column labelled "Distance from screen (mm)". BenQ has provided a table of 4:3-aspect-ratio screen sizes to assist you will need...
...; right-angle square) to project a complete 16:9 (widescreen) aspect ratio image, the projector can see from the diagrams on page 17 and find the corresponding average distance from screen value in the column labelled "Distance from screen (mm)". BenQ has provided a table of 4:3-aspect-ratio screen sizes to assist you will need...

User Manual
Page 16
...a 120'' (about 3.0 m) screen is 137 mm. See "Correcting keystone" on page 17 and find the corresponding "Screen size" listed in your projector The maximum screen size is 4246 mm. In these situations, some image distortion will determine the final placement of the "Vertical offset (mm)" value. Use... the Keystone function to the horizontal plane of the projector at that recommended), you have to tilt it down or up to center the image on the screen. This is the projection distance. 3....
...a 120'' (about 3.0 m) screen is 137 mm. See "Correcting keystone" on page 17 and find the corresponding "Screen size" listed in your projector The maximum screen size is 4246 mm. In these situations, some image distortion will determine the final placement of the "Vertical offset (mm)" value. Use... the Keystone function to the horizontal plane of the projector at that recommended), you have to tilt it down or up to center the image on the screen. This is the projection distance. 3....
User Manual
Page 17
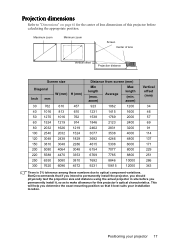
... situ before calculating the appropriate position. Positioning your installation location. Maximum zoom Minimum zoom Screen Center of this projector's optical characteristics. zoom) 923 1062 1200 1231 1415 1600 1538 1769 2000 1846 2123 2400 2462 2831 3200 3077 3538 4000 3692 4246 4800 4615 ... 250 6350 5080 300 7620 6096 457 610 762 914 1219 1524 1829 2286 3048 3353 3810 4572 Distance from screen (mm) Min length (max. BenQ recommends that it , so as to optical component variations.
... situ before calculating the appropriate position. Positioning your installation location. Maximum zoom Minimum zoom Screen Center of this projector's optical characteristics. zoom) 923 1062 1200 1231 1415 1600 1538 1769 2000 1846 2123 2400 2462 2831 3200 3077 3538 4000 3692 4246 4800 4615 ... 250 6350 5080 300 7620 6096 457 610 762 914 1219 1524 1829 2286 3048 3353 3810 4572 Distance from screen (mm) Min length (max. BenQ recommends that it , so as to optical component variations.

User Manual
Page 18
... connections shown below, some cables may not be sure to VGA (D-Sub) 7. Audio cable adapter cable 8. Connection When connecting a signal source to the projector, be included with the projector (see pages 19-22. Use the correct signal cables for each source. 3. Component Video to : 1. Ensure the cables are commercially available from electronics...
... connections shown below, some cables may not be sure to VGA (D-Sub) 7. Audio cable adapter cable 8. Connection When connecting a signal source to the projector, be included with the projector (see pages 19-22. Use the correct signal cables for each source. 3. Component Video to : 1. Ensure the cables are commercially available from electronics...

User Manual
Page 19
...key turns the external display on page 50 for details. Press FN and the labeled function key simultaneously. Connection 19 Connect the projector to the AUDIO or AUDIO (L/R) jack of the video monitor. 3. Connecting a monitor If you are connecting legacy version Macintosh... computers. Connecting a computer or monitor Connecting a computer The projector can connect to a notebook or desktop computer: 1. Locate a function key labeled CRT/LCD or a function key with a DVI input jack, ...
...key turns the external display on page 50 for details. Press FN and the labeled function key simultaneously. Connection 19 Connect the projector to the AUDIO or AUDIO (L/R) jack of the video monitor. 3. Connecting a monitor If you are connecting legacy version Macintosh... computers. Connecting a computer or monitor Connecting a computer The projector can connect to a notebook or desktop computer: 1. Locate a function key labeled CRT/LCD or a function key with a DVI input jack, ...

User Manual
Page 20
...Any stereo audio input (if provided), is not required. 20 Connection The audio connections illustrated on page 22 Good Normal Connecting audio The projector has two built-in home theater or home cinema applications. They are not designed for, nor intended for stereo audio reproduction use as ... you have a separate sound system, you choose will most likely depend upon the availability of video quality. You need only connect the projector to a video source device using just one of the connecting methods, however each provides a different level of matching terminals on both the...
...Any stereo audio input (if provided), is not required. 20 Connection The audio connections illustrated on page 22 Good Normal Connecting audio The projector has two built-in home theater or home cinema applications. They are not designed for, nor intended for stereo audio reproduction use as ... you have a separate sound system, you choose will most likely depend upon the availability of video quality. You need only connect the projector to a video source device using just one of the connecting methods, however each provides a different level of matching terminals on both the...


