
User Guide
Page 2
... adjustment. 4. Close attention is necessary when this sewing computer is not in this manual. 2. Children must be left unattended when plugged in this manual. it to be followed, including the following: Read all moving parts. Do not use the BERNINA original stitch plate. Always use the sewing computer outdoors. 8. The sewing computer should...
... adjustment. 4. Close attention is necessary when this sewing computer is not in this manual. 2. Children must be left unattended when plugged in this manual. it to be followed, including the following: Read all moving parts. Do not use the BERNINA original stitch plate. Always use the sewing computer outdoors. 8. The sewing computer should...
User Guide
Page 3
... This sewing computer is intended for a double-insulated product must be done by continuously improving product design and our technology of this manual. 15. We strive to the protection of grounding. Do not throw away this product in the needle area, such as changing the... product requires extreme care and knowledge of the system and should a means for any possible damage which arises from the outlet. Environmental Protection BERNINA is provided on the servicing of our products by qualified service personnel. To disconnect, turn power switch to «0» (off ) ...
... This sewing computer is intended for a double-insulated product must be done by continuously improving product design and our technology of this manual. 15. We strive to the protection of grounding. Do not throw away this product in the needle area, such as changing the... product requires extreme care and knowledge of the system and should a means for any possible damage which arises from the outlet. Environmental Protection BERNINA is provided on the servicing of our products by qualified service personnel. To disconnect, turn power switch to «0» (off ) ...
User Guide
Page 7
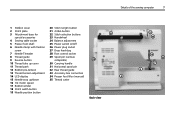
... spool pin 12 Bobbin pre-tension 32 Rear thread guide 13 Thread tension adjustment 33 Accessory box connection 14 LCD display 34 Presser foot lifter (manual) 15 Needle stop up/down 35 Thread cutter 16 1/2 motor speed 17 Bobbin winder 18 Stitch width button 19 Needle position button 31 30 4 Back...
... spool pin 12 Bobbin pre-tension 32 Rear thread guide 13 Thread tension adjustment 33 Accessory box connection 14 LCD display 34 Presser foot lifter (manual) 15 Needle stop up/down 35 Thread cutter 16 1/2 motor speed 17 Bobbin winder 18 Stitch width button 19 Needle position button 31 30 4 Back...

User Guide
Page 9
Standard snap-on soles Presser foot shaft for snap-on soles 1 Reverse pattern sole for practical and decorative stitches 4 Zipper sole for sewing in zippers 2 Overlock sole Overlock seams, hems, oversewing edges, narrow satin stitches 5 Blind stitch sole Blind hems, edge stitching Feet selection 9 3 Buttonhole sole for manual buttonholes Note that all presser feet are available as stable feet as well.
Standard snap-on soles Presser foot shaft for snap-on soles 1 Reverse pattern sole for practical and decorative stitches 4 Zipper sole for sewing in zippers 2 Overlock sole Overlock seams, hems, oversewing edges, narrow satin stitches 5 Blind stitch sole Blind hems, edge stitching Feet selection 9 3 Buttonhole sole for manual buttonholes Note that all presser feet are available as stable feet as well.

User Guide
Page 22
... on the LCD display. activated when the symbol appears on the LCD display. stitch length 3 mm) Applications: • programming buttonholes • programming darning program • manual securing (seam begin and end) continous reverse: • press button quickly twice • the sewing computer sews the chosen stitch in reverse • press button...
... on the LCD display. activated when the symbol appears on the LCD display. stitch length 3 mm) Applications: • programming buttonholes • programming darning program • manual securing (seam begin and end) continous reverse: • press button quickly twice • the sewing computer sews the chosen stitch in reverse • press button...
User Guide
Page 29
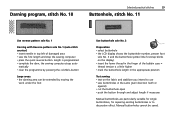
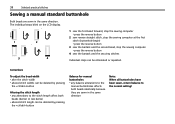
... the sewing computer • press the quick reverse button: length is programmed • complete the darn; the sewing computer stops auto- Manual buttonholes cannot be extended by pressing the «clr/del»-button Large areas: • the darning area can be saved. Darning ...sole No. 1 Darning with or against) • cut the buttonhole open • push the button through and adjust length if necessary Manual buttonholes are particularly suitable for single buttonholes, for repairing existing buttonholes or to use • sew buttonholes in the same grain direction (with ...
... the sewing computer • press the quick reverse button: length is programmed • complete the darn; the sewing computer stops auto- Manual buttonholes cannot be extended by pressing the «clr/del»-button Large areas: • the darning area can be saved. Darning ...sole No. 1 Darning with or against) • cut the buttonhole open • push the button through and adjust length if necessary Manual buttonholes are particularly suitable for single buttonholes, for repairing existing buttonholes or to use • sew buttonholes in the same grain direction (with ...
User Guide
Page 30
... altered stitch widths can be deleted by pressing the «clr/del»-button Altering the stitch length • any balance alterations to the manual buttonholes affects both beads (denser or less dense) • altered stitch length can be deleted by pressing the «clr/del»-button ...Balance for manual buttonholes • any alterations to the stitch length affect both beads identically because they are sewn in the same direction Note: When all ...
... altered stitch widths can be deleted by pressing the «clr/del»-button Altering the stitch length • any balance alterations to the manual buttonholes affects both beads (denser or less dense) • altered stitch length can be deleted by pressing the «clr/del»-button ...Balance for manual buttonholes • any alterations to the stitch length affect both beads identically because they are sewn in the same direction Note: When all ...


