
User Guide
Page 3
... EC on threads and needles Stitch plate, Feed dog and Fabric feed Presser foot pressure, Balance Cleaning / Trouble shooting Display Display Function buttons Memory 5-7 8-9 10-17 17 18-19 20-21 22 57-58 23 24-25 26-29 Applications Stitch selection 430 / 440 QE / 450 Temporary altered stitch memory Application of buttonholes / Eyelets / Button sew - Your sewing computer Accessories Details aurora 430 / 440 QE / 450 Setting up the embroidery computer Important embroidery information Embroidery operating requirements Bernina embroidery software Software -
... EC on threads and needles Stitch plate, Feed dog and Fabric feed Presser foot pressure, Balance Cleaning / Trouble shooting Display Display Function buttons Memory 5-7 8-9 10-17 17 18-19 20-21 22 57-58 23 24-25 26-29 Applications Stitch selection 430 / 440 QE / 450 Temporary altered stitch memory Application of buttonholes / Eyelets / Button sew - Your sewing computer Accessories Details aurora 430 / 440 QE / 450 Setting up the embroidery computer Important embroidery information Embroidery operating requirements Bernina embroidery software Software -

User Guide
Page 4
Please refer to unannounced changes and alterations at any time. In order to improve the product, and for our customers' benefit, all of the sewing and embroidery computer's features, parts, and accessories are subject to the safety instructions! Risk of damage! Text Herbert Stolz Drawings Müller-Melzer ID, Kreuzlingen Design concept Susanne Ribi Copyright 2008 BERNINA International AG, Steckborn...
Please refer to unannounced changes and alterations at any time. In order to improve the product, and for our customers' benefit, all of the sewing and embroidery computer's features, parts, and accessories are subject to the safety instructions! Risk of damage! Text Herbert Stolz Drawings Müller-Melzer ID, Kreuzlingen Design concept Susanne Ribi Copyright 2008 BERNINA International AG, Steckborn...

User Guide
Page 5
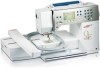
...; sewing difficult fabrics, e.g. Accessories 9 7 35 4 8 6 10 Standard accessories: 1 5 bobbins (one in bobbin case) 2 Needle selection 130/705H 3 Seam ripper 4 Brush 5 Seam guide 6 Height compensating tool 7 3 spool discs 8 Small screwdriver 9 Angular torx key 10 Foam pad 11 Oiler filled Accessories 5 Accessories • foot control • instruction manual • power cable • warranty card • Free Hand System presser foot lifter • slide-on table • seam guide for slide-on table • Instructional presentation CD-ROM • Stitch-pattern card 1 A aurora...
...; sewing difficult fabrics, e.g. Accessories 9 7 35 4 8 6 10 Standard accessories: 1 5 bobbins (one in bobbin case) 2 Needle selection 130/705H 3 Seam ripper 4 Brush 5 Seam guide 6 Height compensating tool 7 3 spool discs 8 Small screwdriver 9 Angular torx key 10 Foam pad 11 Oiler filled Accessories 5 Accessories • foot control • instruction manual • power cable • warranty card • Free Hand System presser foot lifter • slide-on table • seam guide for slide-on table • Instructional presentation CD-ROM • Stitch-pattern card 1 A aurora...

User Guide
Page 9
... special accessories 4 Darning hoop connection 5 Presser foot 6 Needle clamp 7 Thread guide 8 Needle threader 9 Thread take-up cover 10 Thread path 11 Thread take-up 12 Holder for stitch card 13 Bobbin winder with on /off switch and thread cutter 14 Stitch selection buttons 15 «clr» (clear) button 16 #-button (hash) 17 Stitch width buttons 18 Stitch length buttons 19 «mem» (Memory / Operating buttons) 20 Alphabet / Motif scroll buttons 21 Balance / BSR button 22 Securing function button 23 Pattern begin button 24 Display 25 Needle position buttons 26 Needle...
... special accessories 4 Darning hoop connection 5 Presser foot 6 Needle clamp 7 Thread guide 8 Needle threader 9 Thread take-up cover 10 Thread path 11 Thread take-up 12 Holder for stitch card 13 Bobbin winder with on /off switch and thread cutter 14 Stitch selection buttons 15 «clr» (clear) button 16 #-button (hash) 17 Stitch width buttons 18 Stitch length buttons 19 «mem» (Memory / Operating buttons) 20 Alphabet / Motif scroll buttons 21 Balance / BSR button 22 Securing function button 23 Pattern begin button 24 Display 25 Needle position buttons 26 Needle...

User Guide
Page 11
... remain free to the right • the feed dog is lowered simultaneously • the feed dog is raised as soon as the first stitch is sewn Attaching the presser foot lifter • insert the lever into extension table guides from left Seam guide • slide into respective opening - Larger sewing surface • the slide-on table! to slide it engages To remove • raise needle and presser foot • use slight pressure - with your normal sitting position...
... remain free to the right • the feed dog is lowered simultaneously • the feed dog is raised as soon as the first stitch is sewn Attaching the presser foot lifter • insert the lever into extension table guides from left Seam guide • slide into respective opening - Larger sewing surface • the slide-on table! to slide it engages To remove • raise needle and presser foot • use slight pressure - with your normal sitting position...

User Guide
Page 13
... thread spool on horizontal spool pin • place second thread spool and the bobbin, separated by guiding two threads on the left needle • threads must not be twisted together & By using the Supplementary thread guide (special accessories), thread winds off the spool much easier. Threading the Double Needle Setting up the sewing computer 13 A Threading the First Thread • place thread spool on horizontal spool pin and thread • guide the thread to the front in the slit and past the tension...
... thread spool on horizontal spool pin • place second thread spool and the bobbin, separated by guiding two threads on the left needle • threads must not be twisted together & By using the Supplementary thread guide (special accessories), thread winds off the spool much easier. Threading the Double Needle Setting up the sewing computer 13 A Threading the First Thread • place thread spool on horizontal spool pin and thread • guide the thread to the front in the slit and past the tension...
User Guide
Page 16
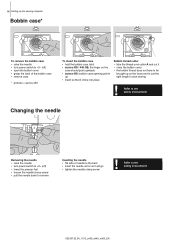
... presser foot • loosen the needle clamp screw • pull the needle down to remove Inserting the needle • flat side of the bobbin case • remove case * pictures = aurora 450 To insert the bobbin case • hold the bobbin case latch • aurora 430 / 440 QE: the finger on the case should point upwards • aurora 450: bobbin case opening points up as the loose end is just the right length to start sewing ! Refer to the safety instructions...
... presser foot • loosen the needle clamp screw • pull the needle down to remove Inserting the needle • flat side of the bobbin case • remove case * pictures = aurora 450 To insert the bobbin case • hold the bobbin case latch • aurora 430 / 440 QE: the finger on the case should point upwards • aurora 450: bobbin case opening points up as the loose end is just the right length to start sewing ! Refer to the safety instructions...
User Guide
Page 18
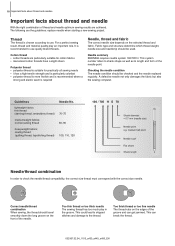
... and elastic seam is required Needle, thread and fabric The correct needle size depends on the edges of the needle point. A defective needle not only damages the fabric but also the sewing computer. Guidelines lightweight fabrics: thin thread (darning thread, embroidery thread) mediumweight fabrics: normal sewing thread heavyweight fabrics: sewing thread (quilting thread, topstitching thread) Needle No. 70-75 80-90 100, 110, 120 130 / 705 H S 70 Shank diameter = 0.7 mm (needle size) Needle point e.g. medium ball point Needle scarf Flat shank Shank length Needle/thread combination In...
... and elastic seam is required Needle, thread and fabric The correct needle size depends on the edges of the needle point. A defective needle not only damages the fabric but also the sewing computer. Guidelines lightweight fabrics: thin thread (darning thread, embroidery thread) mediumweight fabrics: normal sewing thread heavyweight fabrics: sewing thread (quilting thread, topstitching thread) Needle No. 70-75 80-90 100, 110, 120 130 / 705 H S 70 Shank diameter = 0.7 mm (needle size) Needle point e.g. medium ball point Needle scarf Flat shank Shank length Needle/thread combination In...

User Guide
Page 27
... of saving an hourglass is visible on the display hourglass is visible on single fabric • always use an appropriate stabilizer as a backing • remove after sewing • thread the lower thread in the finger of the bobbin case for best results (430 / 440 QE) 032907.52.04_1103_a430_a440_a450_EN Memory 27 aurora 430 / 440 QE aurora 450 Example A: Example A: Sewing a stitch combination conti- Functions -
... of saving an hourglass is visible on the display hourglass is visible on single fabric • always use an appropriate stabilizer as a backing • remove after sewing • thread the lower thread in the finger of the bobbin case for best results (430 / 440 QE) 032907.52.04_1103_a430_a440_a450_EN Memory 27 aurora 430 / 440 QE aurora 450 Example A: Example A: Sewing a stitch combination conti- Functions -
User Guide
Page 28
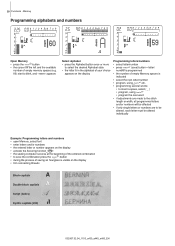
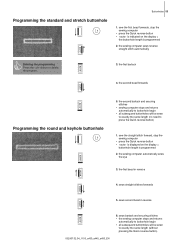
... Programming letters/numbers • select letter/number • press (save) button = letter/ number is programmed • the number of empty Memory spaces is indicated • select the next letter/number • program, using etc. • programming several words: • to insert a space, select ( _ ) • program, using • program the next word • if adjustments are made to the stitch length or width...
... Programming letters/numbers • select letter/number • press (save) button = letter/ number is programmed • the number of empty Memory spaces is indicated • select the next letter/number • program, using etc. • programming several words: • to insert a space, select ( _ ) • program, using • program the next word • if adjustments are made to the stitch length or width...

User Guide
Page 36
... the quick reverse button on head frame (length is complete Seam begin • the sewing computer secures seam automatically (5 stitches forward, 5 stitches reverse) • continue with the grain in all fabrics. 36 Practical stitches - Application Securing stitch (straight stitch) 5 Stitch: Securing stitch No. 5 Needle: size and type suitable for the fabric selected Thread: cotton or polyester Feed dog: up Automatic buttonhole foot No. 3A 430 / 440 QE: Reverse pattern foot No. 1 450: Reverse pattern foot No. 1C Quick darning of holes or worn areas Replaces threads...
... the quick reverse button on head frame (length is complete Seam begin • the sewing computer secures seam automatically (5 stitches forward, 5 stitches reverse) • continue with the grain in all fabrics. 36 Practical stitches - Application Securing stitch (straight stitch) 5 Stitch: Securing stitch No. 5 Needle: size and type suitable for the fabric selected Thread: cotton or polyester Feed dog: up Automatic buttonhole foot No. 3A 430 / 440 QE: Reverse pattern foot No. 1 450: Reverse pattern foot No. 1C Quick darning of holes or worn areas Replaces threads...

User Guide
Page 46
...; select straight stitch first • lower the feed dog • presser foot pressure must be reduced depending on the fabric type and thickness • attach the desired presser foot sole to restart the BSR mode and continue the quilting Securing function (only mode 2) • press the «Securing function» button • press the foot control or Start - stitch length = maximum movement of fabric under presser foot, then lower presser foot • press needle stop button twice to...
...; select straight stitch first • lower the feed dog • presser foot pressure must be reduced depending on the fabric type and thickness • attach the desired presser foot sole to restart the BSR mode and continue the quilting Securing function (only mode 2) • press the «Securing function» button • press the foot control or Start - stitch length = maximum movement of fabric under presser foot, then lower presser foot • press needle stop button twice to...
User Guide
Page 53
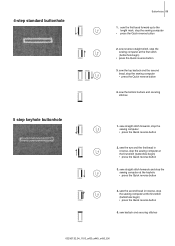
... in reverse, stop the sewing computer at the first stitch (buttonhole begin) • press the Quick reverse button 5. sew the top bartack and the second bead, stop the sewing computer • press the Quick reverse button 2. sew straight stitch forwards and stop the sewing computer at the first stitch (buttonhole begin ) • press the Quick reverse button 3. sew reverse straight stitch, stop the sewing computer • press the Quick reverse button 2. sew the first bead forward up to the length mark...
... in reverse, stop the sewing computer at the first stitch (buttonhole begin) • press the Quick reverse button 5. sew the top bartack and the second bead, stop the sewing computer • press the Quick reverse button 2. sew straight stitch forwards and stop the sewing computer at the first stitch (buttonhole begin ) • press the Quick reverse button 3. sew reverse straight stitch, stop the sewing computer • press the Quick reverse button 2. sew the first bead forward up to the length mark...
User Guide
Page 55
... the program. 3. Programming the standard and stretch buttonhole Buttonholes 55 1. the first bead in reverse 032907.52.04_1103_a430_a440_a450_EN 6. the sewing computer automatically sews the eye 3. sews straight stitches forwards 5. the second bartack and securing stitches • sewing computer stops and returns automatically to buttonhole begin • all subsequent buttonholes will be sewn to exactly the same length (no need to press the Quick reverse button) 1. the second bead forwards Programming...
... the program. 3. Programming the standard and stretch buttonhole Buttonholes 55 1. the first bead in reverse 032907.52.04_1103_a430_a440_a450_EN 6. the sewing computer automatically sews the eye 3. sews straight stitches forwards 5. the second bartack and securing stitches • sewing computer stops and returns automatically to buttonhole begin • all subsequent buttonholes will be sewn to exactly the same length (no need to press the Quick reverse button) 1. the second bead forwards Programming...

User Guide
Page 56
56 Eyelet / Button sew-on program Eyelets Stitch: Needle: Thread: Feed dog: Presser foot: 430: Straight stitch eyelet No. 17 440 QE: Straight stitch eyelet No. 19 450: Straight stitch eyelet No. 21 440 QE: Narrow zig-zag eyelet No. 18 450: Narrow zig-zag eyelet No. 20 size and type suitable for the fabric selected cotton / polyester up 430 / 440 QE: Reverse pattern foot No. 1 450: Reverse pattern foot No. 1C Sewn eyelet • opening for ties etc. hold...
56 Eyelet / Button sew-on program Eyelets Stitch: Needle: Thread: Feed dog: Presser foot: 430: Straight stitch eyelet No. 17 440 QE: Straight stitch eyelet No. 19 450: Straight stitch eyelet No. 21 440 QE: Narrow zig-zag eyelet No. 18 450: Narrow zig-zag eyelet No. 20 size and type suitable for the fabric selected cotton / polyester up 430 / 440 QE: Reverse pattern foot No. 1 450: Reverse pattern foot No. 1C Sewn eyelet • opening for ties etc. hold...

User Guide
Page 60
pull over upper thread spool for even spooling Embroidery software BERNINA / mouse pad USB connecting cable for upper thread spools - 60 Standard accessories Standard accessories Large oval embroidery hoop (145x255mm) Template for embroidery hoop Embroidery presser foot No. 26 Embroidery needle range Art Design V1 Embroidery Software Net for PC embroidery software Carrying bag 032907.52.04_1103_a430_a440_a450_EN
pull over upper thread spool for even spooling Embroidery software BERNINA / mouse pad USB connecting cable for upper thread spools - 60 Standard accessories Standard accessories Large oval embroidery hoop (145x255mm) Template for embroidery hoop Embroidery presser foot No. 26 Embroidery needle range Art Design V1 Embroidery Software Net for PC embroidery software Carrying bag 032907.52.04_1103_a430_a440_a450_EN
User Guide
Page 63
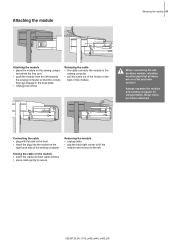
... in the base plate • Unplug foot control Releasing the cable • the cable connects the module to the sewing computer • pull the cable out of the holder on the back of the module When connecting the embroidery module, attention must be paid that all items are on the sewing compu- Attaching the module Attaching the module 63...
... in the base plate • Unplug foot control Releasing the cable • the cable connects the module to the sewing computer • pull the cable out of the holder on the back of the module When connecting the embroidery module, attention must be paid that all items are on the sewing compu- Attaching the module Attaching the module 63...

User Guide
Page 73
... be started directly with the now visible right scroll arrow Color information / Color selection • place the cursor on the desired color; the spool will be enlarged and the following information will be displayed: • thread brand / thread number / color number • position of the current color / total number of all colors • embroidery time of this color • total stitch count...
... be started directly with the now visible right scroll arrow Color information / Color selection • place the cursor on the desired color; the spool will be enlarged and the following information will be displayed: • thread brand / thread number / color number • position of the current color / total number of all colors • embroidery time of this color • total stitch count...

User Guide
Page 75
...the starting position • user defined viewing: • place the cursor on the computer keyboard Positioning of motif within the hoop • this procedure can also be moved until the needle is exactly in the center of Mega-Hoop position 3 2. Move the embroidery motif first until the frame changes from... and drag the motif to the desired position • release mouse button and drop the motif in place • if the motif is positioned outside the embroidery area the color of the icon 3. the hoop will be embroidered in the selected position. ning mode is active • place...
...the starting position • user defined viewing: • place the cursor on the computer keyboard Positioning of motif within the hoop • this procedure can also be moved until the needle is exactly in the center of Mega-Hoop position 3 2. Move the embroidery motif first until the frame changes from... and drag the motif to the desired position • release mouse button and drop the motif in place • if the motif is positioned outside the embroidery area the color of the icon 3. the hoop will be embroidered in the selected position. ning mode is active • place...

User Guide
Page 85
...(CFL light) 11 Sewing-on elastic 38 Sewing speed Foot control 10 Speed control 24 Slide-on table 11 Spool discs 5 Spool pin Horizontal spool pin 12 Supplementary spool pin 13, 14 Stabilizer Stitch patterns Display Overview Selecting Stitch plate Attaching/removing Cleaning Optional accessories 49 23 81-83 29 20 57 7, 61 T Thread Embroidery related 69 Information 18 Threading Lower thread 15, 64 Twin and tripple needle 13 Upper thread 12, 64 Thread cutter 9, 14, 15, 16 Thread guide 8 Thread take-up 8 Thread take-up cover 8 Thread tension Buttonholes 48...
...(CFL light) 11 Sewing-on elastic 38 Sewing speed Foot control 10 Speed control 24 Slide-on table 11 Spool discs 5 Spool pin Horizontal spool pin 12 Supplementary spool pin 13, 14 Stabilizer Stitch patterns Display Overview Selecting Stitch plate Attaching/removing Cleaning Optional accessories 49 23 81-83 29 20 57 7, 61 T Thread Embroidery related 69 Information 18 Threading Lower thread 15, 64 Twin and tripple needle 13 Upper thread 12, 64 Thread cutter 9, 14, 15, 16 Thread guide 8 Thread take-up 8 Thread take-up cover 8 Thread tension Buttonholes 48...


