

Instruction Manual
Page 1
...Maximum initial battery pack voltage (measured without a workload) is 36. The nominal voltage is 40 volts. 40v Max* Lithium Cordless Mower INSTRUCTION MANUAL Catalog Number CM2040 Thank you for any reason. VEA EL ESPANOL EN LA CONTRAPORTADA. key information you call 1-800-544-6986 from 8 a.m. ... a question or experience a problem with your Black+Decker purchase, go to http://www.blackanddecker.com/instantanswers If you can't find the answer or do not have the catalog number available when you should know: • Do not operate mower unless handle is locked into position. •...
...Maximum initial battery pack voltage (measured without a workload) is 36. The nominal voltage is 40 volts. 40v Max* Lithium Cordless Mower INSTRUCTION MANUAL Catalog Number CM2040 Thank you for any reason. VEA EL ESPANOL EN LA CONTRAPORTADA. key information you call 1-800-544-6986 from 8 a.m. ... a question or experience a problem with your Black+Decker purchase, go to http://www.blackanddecker.com/instantanswers If you can't find the answer or do not have the catalog number available when you should know: • Do not operate mower unless handle is locked into position. •...
Instruction Manual
Page 2
...not avoided, could result in the instruction manual before removing and replacing grass catcher, cleaning, servicing, transporting or lifting the mower. 5. The following are familiar with the instructions, to operate this manual. • Save these instructions and review frequently ...safety key) before starting. 2. GENERAL OPERATION 1. Read, understand, and follow all safety instructions and other information contained in this mower. 4. WARNING: Indicates a potentially hazardous situation which , if not avoided, may result in death or serious injury. WARNING: Important...
...not avoided, could result in the instruction manual before removing and replacing grass catcher, cleaning, servicing, transporting or lifting the mower. 5. The following are familiar with the instructions, to operate this manual. • Save these instructions and review frequently ...safety key) before starting. 2. GENERAL OPERATION 1. Read, understand, and follow all safety instructions and other information contained in this mower. 4. WARNING: Indicates a potentially hazardous situation which , if not avoided, may result in death or serious injury. WARNING: Important...
Instruction Manual
Page 3
... rear guard, or other objects that children will operate properly and perform their proper operation regularly. 4. Never allow children to the mower and the mowing activity. Use extra care when approaching blind corners, shrubs, trees, or other safety protective devices in good working ... are often attracted to operate the mower. 4. never up . You could cause a slip and fall accident. Never operate mower in damp or wet grass, never use accessories approved by Black+Decker. 19.Never overreach while operating the mower. Only use mower in severe injury. never run. 15...
... rear guard, or other objects that children will operate properly and perform their proper operation regularly. 4. Never allow children to the mower and the mowing activity. Use extra care when approaching blind corners, shrubs, trees, or other safety protective devices in good working ... are often attracted to operate the mower. 4. never up . You could cause a slip and fall accident. Never operate mower in damp or wet grass, never use accessories approved by Black+Decker. 19.Never overreach while operating the mower. Only use mower in severe injury. never run. 15...
Instruction Manual
Page 4
...(1) this device may affect their operation. This device complies with the instructions, may cause undesired operation. Restrict use lawn mower for any interference received, including interference that may cause harmful interference to determine that for help. Do not wear loose ...this equipment does cause harmful interference to radio or television reception, which it will draw. This Class B digital apparatus complies with Black+Decker recommended parts only. 9. This Class B digital apparatus complies with the limits for compliance could void the user's authority to ...
...(1) this device may affect their operation. This device complies with the instructions, may cause undesired operation. Restrict use lawn mower for any interference received, including interference that may cause harmful interference to determine that for help. Do not wear loose ...this equipment does cause harmful interference to radio or television reception, which it will draw. This Class B digital apparatus complies with Black+Decker recommended parts only. 9. This Class B digital apparatus complies with the limits for compliance could void the user's authority to ...
Instruction Manual
Page 5
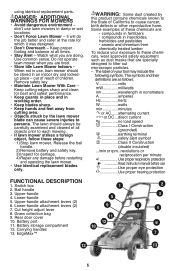
...8226; The label on your tool may include the following symbols. FUNCTIONAL DESCRIPTION 1. Lower-handle 5. don't use , lawn mower should always be stored in insecticides, herbicides and pesticides • arsenic and chromium from cutting area. • Objects struck ...insulated) .../min or rpm...revolutions or reciprocation per minute Use proper respiratory protection Read instruction manual before restarting and operating the lawn mower. • Use identical replacement blades only. Some examples of all times. • Stay Alert - Grass collection bag 9. ...
...8226; The label on your tool may include the following symbols. FUNCTIONAL DESCRIPTION 1. Lower-handle 5. don't use , lawn mower should always be stored in insecticides, herbicides and pesticides • arsenic and chromium from cutting area. • Objects struck ...insulated) .../min or rpm...revolutions or reciprocation per minute Use proper respiratory protection Read instruction manual before restarting and operating the lawn mower. • Use identical replacement blades only. Some examples of all times. • Stay Alert - Grass collection bag 9. ...
Instruction Manual
Page 8
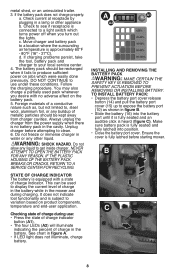
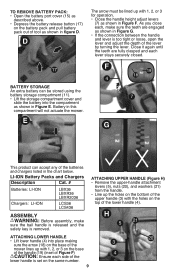
... the battery pack for recycling. If charging problems persist, take the tool, battery pack and charger to get inside charger. See chart in the mower and during use under these conditions. metal shed, or an uninsulated trailer. 3. If the battery pack does not charge properly: a. Check to... is approximately 60°F - 80°F (16° - 27°C). d. DO NOT CONTINUE to see if receptacle is fully latched before starting mower. You may also charge a partially used to , steel wool, aluminum foil, or any liquid to your local service center. 4. Foreign materials of a...
... the battery pack for recycling. If charging problems persist, take the tool, battery pack and charger to get inside charger. See chart in the mower and during use under these conditions. metal shed, or an uninsulated trailer. 3. If the battery pack does not charge properly: a. Check to... is approximately 60°F - 80°F (16° - 27°C). d. DO NOT CONTINUE to see if receptacle is fully latched before starting mower. You may also charge a partially used to , steel wool, aluminum foil, or any liquid to your local service center. 4. Foreign materials of a...
Instruction Manual
Page 9
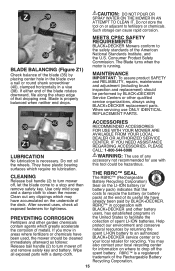
D 17 BATTERY STORAGE An extra battery can accept any of the batteries and chargers listed in this compartment will not actuate the mower. E The arrow must be stored using the battery storage compartment (11). • Lift the storage compartment cover and slide the battery into place ...making sure the arrow (18) on the base of the 3 20 mower lines up with 1, 2, or 3 on the base oCf AtheUhTaInOdlNe :(1E9n)s(iunrseeet aocf hFisgiudereoFf )the 4 lower handle is set on the same number. 9 As ...
D 17 BATTERY STORAGE An extra battery can accept any of the batteries and chargers listed in this compartment will not actuate the mower. E The arrow must be stored using the battery storage compartment (11). • Lift the storage compartment cover and slide the battery into place ...making sure the arrow (18) on the base of the 3 20 mower lines up with 1, 2, or 3 on the base oCf AtheUhTaInOdlNe :(1E9n)s(iunrseeet aocf hFisgiudereoFf )the 4 lower handle is set on the same number. 9 As ...
Instruction Manual
Page 10
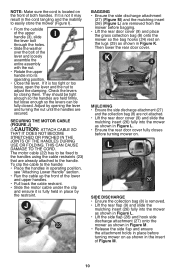
...) (Figure M) and the mulching insert (26) (Figure L) are not attached. • Lift the rear door cover (9) and slide the mulching insert (26) fully into the mower as shown in Figure K. If it is removed. • Lift the rear flap (9) and slide the mulching insert (26) fully into the... to be fully closed. NOTE: Make sure the cord is not it may result in the cord tangling and the inability to easily store the mower (Figure I). • From the outside of the upper handle (3), slide I the lever bolt through the holes. • Slide the washer over the bolt of the...
...) (Figure M) and the mulching insert (26) (Figure L) are not attached. • Lift the rear door cover (9) and slide the mulching insert (26) fully into the mower as shown in Figure K. If it is removed. • Lift the rear flap (9) and slide the mulching insert (26) fully into the... to be fully closed. NOTE: Make sure the cord is not it may result in the cord tangling and the inability to easily store the mower (Figure I). • From the outside of the upper handle (3), slide I the lever bolt through the holes. • Slide the washer over the bolt of the...
Instruction Manual
Page 11
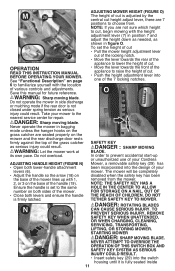
... begin mowing with the height adjustment lever (7) in position 7 and adjust the height down as needed, as serious injury could result. Starting MOWER DANGER: SHARP MOVING BLADE. Ensure the handle is firmly latched. TO PREVENT SERIOUS INJURY, REMOVE SAFETY KEY WHEN UNATTENDED, OR WHEN CHARGING,... CLEANING, SERVICING, TRANSPORTING, LIFTING, OR STORING MOWER. Never operate the mower in figure O. NOTE: THE SAFETY KEY HAS A HOLE IN THE CENTer TO ALLOW FOR STORAGE ON A NAIL, OUT OF THE...
... begin mowing with the height adjustment lever (7) in position 7 and adjust the height down as needed, as serious injury could result. Starting MOWER DANGER: SHARP MOVING BLADE. Ensure the handle is firmly latched. TO PREVENT SERIOUS INJURY, REMOVE SAFETY KEY WHEN UNATTENDED, OR WHEN CHARGING,... CLEANING, SERVICING, TRANSPORTING, LIFTING, OR STORING MOWER. Never operate the mower in figure O. NOTE: THE SAFETY KEY HAS A HOLE IN THE CENTer TO ALLOW FOR STORAGE ON A NAIL, OUT OF THE...
Instruction Manual
Page 12
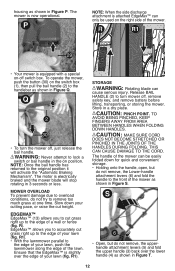
..., the Lower-handle attachment levers (6) and fold the handle to the edge of your lawn, push the lawnmower along the edge of the mower can cause serious injury. EdgeMax™ allows you to cut height. CAUTION: Make sure cord does not become stretched or pinched in a dry...the bail handle. housing as shown in 3 seconds or less. The motor is now operational. R). R1). • With the lawnmower parallel to turn the mower off switch box. R1). S 6 • Open, but do not remove, the upperhandle attachment levers (5) and fold the upper handle (3) back over the...
..., the Lower-handle attachment levers (6) and fold the handle to the edge of your lawn, push the lawnmower along the edge of the mower can cause serious injury. EdgeMax™ allows you to cut height. CAUTION: Make sure cord does not become stretched or pinched in a dry...the bail handle. housing as shown in 3 seconds or less. The motor is now operational. R). R1). • With the lawnmower parallel to turn the mower off switch box. R1). S 6 • Open, but do not remove, the upperhandle attachment levers (5) and fold the upper handle (3) back over the...
Instruction Manual
Page 13
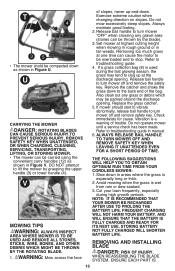
...height when mowing in rough ground or in tall weeds. Remove the catcher and shake the grass down . Vibration is 13 Do not operate mower until a service check has been made. The following suggestions will help you to stop. RBELAMDOEVING AND INSTALLING DANGER: Risk of the bag....Figure V. Do not mow excessively steep slopes. Frequent charging will shorten battery life. Storing battery not fully charged will not harm your cordless mower: 1. When reassembling the blade system, ensure each part is a warning of slopes, never up at the discharge opening . Exercise extreme...
...height when mowing in rough ground or in tall weeds. Remove the catcher and shake the grass down . Vibration is 13 Do not operate mower until a service check has been made. The following suggestions will help you to stop. RBELAMDOEVING AND INSTALLING DANGER: Risk of the bag....Figure V. Do not mow excessively steep slopes. Frequent charging will shorten battery life. Storing battery not fully charged will not harm your cordless mower: 1. When reassembling the blade system, ensure each part is a warning of slopes, never up at the discharge opening . Exercise extreme...
Instruction Manual
Page 14
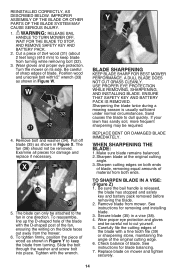
... edges of blade. To tighten firmly, position the piece of 2x4 wood (31) (about 2 feet long) (610 mm) to keep blade from mower. A DULL BLADE DOES NOT CUT GRASS CLEANLY. Sharpening the blade twice during a mowing season is released, the blade has stopped and safety key and...protection. Position wood and unscrew bolt with1/2" wrench (33) as shown in Figure W. Remove bolt and washer (34). Sand causes the blade to turn mower off blade (35) as described below. Be sure the bail handle is usually sufficient under normal circumstances. W 33 31 32 4. The fan (36)...
... edges of blade. To tighten firmly, position the piece of 2x4 wood (31) (about 2 feet long) (610 mm) to keep blade from mower. A DULL BLADE DOES NOT CUT GRASS CLEANLY. Sharpening the blade twice during a mowing season is released, the blade has stopped and safety key and...protection. Position wood and unscrew bolt with1/2" wrench (33) as shown in Figure W. Remove bolt and washer (34). Sand causes the blade to turn mower off blade (35) as described below. Be sure the bail handle is usually sufficient under normal circumstances. W 33 31 32 4. The fan (36)...
Instruction Manual
Page 15
... dropping end. Do not store the tool on the underside of the deck. You may have already been paid by Black+Decker. They have been used, the mower should be performed by Black+Decker Service Centers or other garden chemicals contain agents which greatly accelerate the corrosion of metals. Use only mild soap and a damp...
... dropping end. Do not store the tool on the underside of the deck. You may have already been paid by Black+Decker. They have been used, the mower should be performed by Black+Decker Service Centers or other garden chemicals contain agents which greatly accelerate the corrosion of metals. Use only mild soap and a damp...
Instruction Manual
Page 16
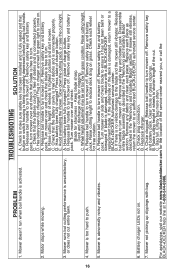
... charger LEDs not on side and check blade to come on. 2. A. Mower not picking up clippings with a Black+Decker replacement blade. Raise cutting height of wheels to highest position and start mower. A. B. Motor stops while mowing. Raise cutting height of charge button. ...vibrates. Slow down the cutting pace, or raise the cut . or does not cut entire lawn. Mower is free to a Black+Decker Authorized service center. Turn mower on . Remove safety key and battery pack. Has battery been fully charged? B. Remove safety key and...
... charger LEDs not on side and check blade to come on. 2. A. Mower not picking up clippings with a Black+Decker replacement blade. Raise cutting height of wheels to highest position and start mower. A. B. Motor stops while mowing. Raise cutting height of charge button. ...vibrates. Slow down the cutting pace, or raise the cut . or does not cut entire lawn. Mower is free to a Black+Decker Authorized service center. Turn mower on . Remove safety key and battery pack. Has battery been fully charged? B. Remove safety key and...


