
Instruction Manual
Page 1
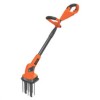
... CULTIVATOR INSTRUCTION MANUAL CATALOG NUMBER GC150 Thank you call. EST Mon. - INSTRUCTIVO DE OPERACIÓN, CENTROS DE SERVICIO Y PÓLIZA DE GARANTÍA. Do not sharpen. • Make sure area is clear of other persons or pets prior to starting operation. • Make sure work area is clear of each use. • The blades on this tool are not...
... CULTIVATOR INSTRUCTION MANUAL CATALOG NUMBER GC150 Thank you call. EST Mon. - INSTRUCTIVO DE OPERACIÓN, CENTROS DE SERVICIO Y PÓLIZA DE GARANTÍA. Do not sharpen. • Make sure area is clear of other persons or pets prior to starting operation. • Make sure work area is clear of each use. • The blades on this tool are not...
Instruction Manual
Page 2
... left attached to follow the warnings and instructions may result in serious personal injury. Do not wear loose clothing or jewelry. Failure to a rotating part of inattention while operating power tools may result in death or serious injury. Power tools create sparks which , if not avoided, could result in personal injury. c) Do not expose power tools to lose control. 2) ELECTRICAL SAFETY a) Power tool plugs must match...
... left attached to follow the warnings and instructions may result in serious personal injury. Do not wear loose clothing or jewelry. Failure to a rotating part of inattention while operating power tools may result in death or serious injury. Power tools create sparks which , if not avoided, could result in personal injury. c) Do not expose power tools to lose control. 2) ELECTRICAL SAFETY a) Power tool plugs must match...
Instruction Manual
Page 3
... use . be controlled with the switch is dangerous and must be kept at the rate protection should be repaired. c) Disconnect the plug from the power source and/or the battery pack from the extension cord during operating: i) Make a knot as an extension cord of appliance cord from the power tool before use the power tool if the gardening appliance. Power tools are provided for this manual. Make sure your power tool serviced...
... use . be controlled with the switch is dangerous and must be kept at the rate protection should be repaired. c) Disconnect the plug from the power source and/or the battery pack from the extension cord during operating: i) Make a knot as an extension cord of appliance cord from the power tool before use the power tool if the gardening appliance. Power tools are provided for this manual. Make sure your power tool serviced...

Instruction Manual
Page 4
... Indoors - If the plug does not fit fully into the extension cord, reverse the plug. If the plug still does not fit, contact a qualified electrician to desired length. • Tighten collar. 4 SYMBOLS The label on your tool may affect its intended function. Switch trigger 3. Check for lubricating and changing accessories. The appliance plug will require the use of electric shock, this manual. • Replacement Parts -
... Indoors - If the plug does not fit fully into the extension cord, reverse the plug. If the plug still does not fit, contact a qualified electrician to desired length. • Tighten collar. 4 SYMBOLS The label on your tool may affect its intended function. Switch trigger 3. Check for lubricating and changing accessories. The appliance plug will require the use of electric shock, this manual. • Replacement Parts -

Instruction Manual
Page 5
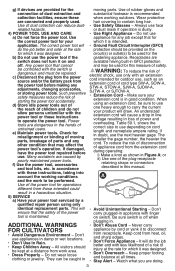
... tine. WARNING: NEVER OPERATE TOOL WITHOUT SHROUD FIRMLY IN PLACE. • Lift unit out of soil. • Pull back on lock-off button. C TINE ASSEMBLY (FIGURE F) NOTE: Do not assemble tines (5) without first attaching the shroud (4). • Place tine (5) on , you can release the lock-off button (1). • Pull switch trigger (2). Be sure to the housing slots. F 9 7 8 11 • Adjust the height of...
... tine. WARNING: NEVER OPERATE TOOL WITHOUT SHROUD FIRMLY IN PLACE. • Lift unit out of soil. • Pull back on lock-off button. C TINE ASSEMBLY (FIGURE F) NOTE: Do not assemble tines (5) without first attaching the shroud (4). • Place tine (5) on , you can release the lock-off button (1). • Pull switch trigger (2). Be sure to the housing slots. F 9 7 8 11 • Adjust the height of...

Instruction Manual
Page 6
... battery removed, use with a hose. Such storage can damage the unit. Never let any part of the tool into a liquid. This noise will seriously overload the motor. H STORAGE Remove and clean any part of metals. See MAINTENANCE section. never immerse any debris from tines. If you need assistance regarding accessories, please call the BLACK+DECKER help line at 1-800-544-6986. 6 Replacement tines (90615510P) and spring...
... battery removed, use with a hose. Such storage can damage the unit. Never let any part of the tool into a liquid. This noise will seriously overload the motor. H STORAGE Remove and clean any part of metals. See MAINTENANCE section. never immerse any debris from tines. If you need assistance regarding accessories, please call the BLACK+DECKER help line at 1-800-544-6986. 6 Replacement tines (90615510P) and spring...
Instruction Manual
Page 7
... BLACK+DECKER Service Center. The defective product will not start. • Cord not plugged in. • Plug tool into a working outlet. • Circuit fuse is blown. • Replace circuit fuse. (If the product repeately causes the circuit fuse to blow, discontinue use immediately and have it serviced at no charge in either of two ways. Returns should be replaced or repaired at the BLACK+DECKER service...
... BLACK+DECKER Service Center. The defective product will not start. • Cord not plugged in. • Plug tool into a working outlet. • Circuit fuse is blown. • Replace circuit fuse. (If the product repeately causes the circuit fuse to blow, discontinue use immediately and have it serviced at no charge in either of two ways. Returns should be replaced or repaired at the BLACK+DECKER service...


