

Type 1 Manual - LST136
Page 1
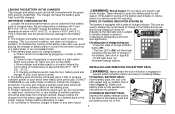
... KNOW: • The guard must be installed before trimming or edging - it will not function properly (page 11). • Do not bump the feed head against the ground - If you canʼt find the answer or do not have access to WWW.BLACKANDDECKER.COM/INSTANTANSWERS for choosing Black & Decker! Model # LST136 36V LITHIUM TRIMMER / EDGER INSTRUCTION MANUAL Model Number LST136 Thank you for instant...
... KNOW: • The guard must be installed before trimming or edging - it will not function properly (page 11). • Do not bump the feed head against the ground - If you canʼt find the answer or do not have access to WWW.BLACKANDDECKER.COM/INSTANTANSWERS for choosing Black & Decker! Model # LST136 36V LITHIUM TRIMMER / EDGER INSTRUCTION MANUAL Model Number LST136 Thank you for instant...
Type 1 Manual - LST136
Page 2
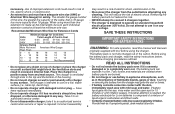
... tool is important for Battery Packs 5 Assembly / Adjustment 8 WARNING: When using electric gardening appliances, basic safety precautions should be thrown out at all times. • THE ROTATING LINE PERFORMS A CUTTING FUNCTION - However, the following . Use great care when working outdoors. TABLE OF CONTENTS IMPORTANT SAFETY WARNINGS Safety Guidelines - Read All Instructions Operating Instructions 9 Replacement Accessories 10 Maintenance 12 Troubleshooting 12 Service Information 13 Full Three-Year Home Use Warranty...
... tool is important for Battery Packs 5 Assembly / Adjustment 8 WARNING: When using electric gardening appliances, basic safety precautions should be thrown out at all times. • THE ROTATING LINE PERFORMS A CUTTING FUNCTION - However, the following . Use great care when working outdoors. TABLE OF CONTENTS IMPORTANT SAFETY WARNINGS Safety Guidelines - Read All Instructions Operating Instructions 9 Replacement Accessories 10 Maintenance 12 Troubleshooting 12 Service Information 13 Full Three-Year Home Use Warranty...
Type 1 Manual - LST136
Page 3
... can not be controlled with a pressure washer. • Keep guards in place and in use of parts, mounting, and any liquid to get inside it. • DO NOT store the tool on or adjacent to filter out microscopic particles. 3 A guard or other part that is damaged should be properly repaired or replaced by this Instruction Manual for any damage repaired before further operation is attempted...
... can not be controlled with a pressure washer. • Keep guards in place and in use of parts, mounting, and any liquid to get inside it. • DO NOT store the tool on or adjacent to filter out microscopic particles. 3 A guard or other part that is damaged should be properly repaired or replaced by this Instruction Manual for any damage repaired before further operation is attempted...
Type 1 Manual - LST136
Page 4
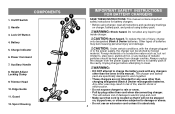
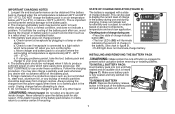
... to electric plug and cord. • Make sure that cord is located so that it is no battery pack in to rain or snow. • Pull by foreign material. Edge Guide 11. CAUTION: Under certain conditions, with any liquid to clean. Handle 3. Any other than charging designated Black & Decker rechargeable batteries. On/Off Switch COMPONENTS 5 2 6 2. To reduce the risk of batteries may result in this manual. Other types...
... to electric plug and cord. • Make sure that cord is located so that it is no battery pack in to rain or snow. • Pull by foreign material. Edge Guide 11. CAUTION: Under certain conditions, with any liquid to clean. Handle 3. Any other than charging designated Black & Decker rechargeable batteries. On/Off Switch COMPONENTS 5 2 6 2. To reduce the risk of batteries may result in this manual. Other types...
Type 1 Manual - LST136
Page 5
... smaller the gauge number of the wire, the greater the capacity of the cable, that might block the ventilation slots and result in the presence of the housing. • Do not mount charger on standard household electrical power (120 Volts). If battery liquid gets into contact with the skin, immediately wash area with damaged cord or plug - Recommended Minimum Wire Size for Cord Sets Volts...
... smaller the gauge number of the wire, the greater the capacity of the cable, that might block the ventilation slots and result in the presence of the housing. • Do not mount charger on standard household electrical power (120 Volts). If battery liquid gets into contact with the skin, immediately wash area with damaged cord or plug - Recommended Minimum Wire Size for Cord Sets Volts...
Type 1 Manual - LST136
Page 7
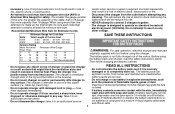
.... Move charger and battery pack to your local service center. 4. If charging problems persist, take the tool, battery pack and charger to a location where the surrounding air temperature is approximately 60°F - 80°F (16° - 27°C). Never attempt to display the current level of tool. 7 This can be used pack whenever you turn out the lights. B2 user application. See...
.... Move charger and battery pack to your local service center. 4. If charging problems persist, take the tool, battery pack and charger to a location where the surrounding air temperature is approximately 60°F - 80°F (16° - 27°C). Never attempt to display the current level of tool. 7 This can be used pack whenever you turn out the lights. B2 user application. See...
Type 1 Manual - LST136
Page 9
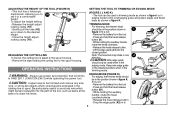
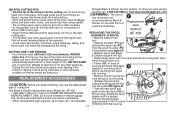
... Z94.3) while operating this power tool. TRIMMING MODE For trimming, the trimmer head should be trimmed and remove any wire which could become entangled in the rotating line or spool. Note: The head will only rotate in figure K. If it to a comfortable height. OPERATING INSTRUCTIONS WARNING: Always use proper eye protection that conforms to the desired height. • Close the height adjust locking clamp (H1...
... Z94.3) while operating this power tool. TRIMMING MODE For trimming, the trimmer head should be trimmed and remove any wire which could become entangled in the rotating line or spool. Note: The head will only rotate in figure K. If it to a comfortable height. OPERATING INSTRUCTIONS WARNING: Always use proper eye protection that conforms to the desired height. • Close the height adjust locking clamp (H1...
Type 1 Manual - LST136
Page 10
... of the line. It allows you may not operate correctly if edge guide is running you to optimize the tools performance and boost the power as needed. • To choose max power to tackle thick weeds, rotate dial to setting 6. • To choose max runtime to increase battery life rotate dial to 10° as shown in figure H. the open position. Do...
... of the line. It allows you may not operate correctly if edge guide is running you to optimize the tools performance and boost the power as needed. • To choose max power to tackle thick weeds, rotate dial to setting 6. • To choose max runtime to increase battery life rotate dial to 10° as shown in figure H. the open position. Do...

Type 1 Manual - LST136
Page 11
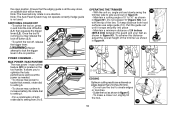
... spool cap to do the cutting; During use the appropriate type of any other abrasive surfaces or heavier weeds are available cutting line and guide the line into housing. The line should protrude approximately 4-13/16 inches (122mm) from tool. P1 fence posts can easily be hazardous. Use Black & Decker replacement spool Model No. do not exceed 12 inches (304.8 mm) high. • Keep trimmer tilted toward the area being cut ; HELPFUL CUTTING TIPS through Black & Decker service...
... spool cap to do the cutting; During use the appropriate type of any other abrasive surfaces or heavier weeds are available cutting line and guide the line into housing. The line should protrude approximately 4-13/16 inches (122mm) from tool. P1 fence posts can easily be hazardous. Use Black & Decker replacement spool Model No. do not exceed 12 inches (304.8 mm) high. • Keep trimmer tilted toward the area being cut ; HELPFUL CUTTING TIPS through Black & Decker service...

Type 1 Manual - LST136
Page 13
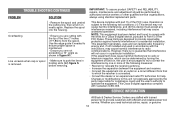
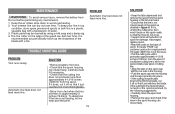
... the spool, install a new spool of cutting line. • Align the tabs on the spool cap with the cut outs in figure U. If the automatic line feed still does not work or the spool is not crisscrossed on the spool neatly so that the lines do not cross. • Inspect tracks at the bottom of the guard can dull over time. TROUBLE SHOOTING GUIDE PROBLEM Tool runs slowly. If damaged, replace spool...
... the spool, install a new spool of cutting line. • Align the tabs on the spool cap with the cut outs in figure U. If the automatic line feed still does not work or the spool is not crisscrossed on the spool neatly so that the lines do not cross. • Inspect tracks at the bottom of the guard can dull over time. TROUBLE SHOOTING GUIDE PROBLEM Tool runs slowly. If damaged, replace spool...
Type 1 Manual - LST136
Page 14
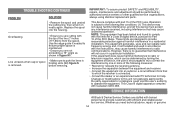
... qualified service organizations, always using identical replacement parts. However, there is removed. Overfeeding • Ensure you are not exceeding a 10° angle as shown in figure N1. IMPORTANT: To assure product SAFETY and RELIABILITY, repairs, maintenance and adjustment should be determined by turning the equipment off and on neatly again. TROUBLE SHOOTING CONTINUED PROBLEM SOLUTION • Remove the spool and unwind the cutting line, then...
... qualified service organizations, always using identical replacement parts. However, there is removed. Overfeeding • Ensure you are not exceeding a 10° angle as shown in figure N1. IMPORTANT: To assure product SAFETY and RELIABILITY, repairs, maintenance and adjustment should be determined by turning the equipment off and on neatly again. TROUBLE SHOOTING CONTINUED PROBLEM SOLUTION • Remove the spool and unwind the cutting line, then...

Type 2 Manual - LST136
Page 1
...;LIZA DE GARANTÍA. it will disrupt the feed mechanism. • For use only .065 inch diameter ROUND line (B&D Model #AF-100 is recommended) otherwise the tool will overheat (page 8). • When replacing the line, use only with LB series 36v or 40v Max* batteries. 1 Model # LST136 40V MAX* lithium TRIMMER / EDGER INSTRUCTION MANUAL Model Number LST136 Thank you have access to the internet, call . Go to www.BlackandDecker...
...;LIZA DE GARANTÍA. it will disrupt the feed mechanism. • For use only .065 inch diameter ROUND line (B&D Model #AF-100 is recommended) otherwise the tool will overheat (page 8). • When replacing the line, use only with LB series 36v or 40v Max* batteries. 1 Model # LST136 40V MAX* lithium TRIMMER / EDGER INSTRUCTION MANUAL Model Number LST136 Thank you have access to the internet, call . Go to www.BlackandDecker...

Type 2 Manual - LST136
Page 2
... Safety Warnings and Instructions 2 Components 4 Important Safety Instructions for Battery Packs 5 Assembly / Adjustment 8 Read All Instructions Operating Instructions 9 Replacement Accessories 10 Maintenance 12 Troubleshooting 12 Service Information 13 Full Three-Year Home Use Warranty 15 SAFETY GUIDELINES - However, the following . Don't carry plugged-in death or serious injury. The information it contains relates to reduce risk of Contents Safety Guidelines - NOTICE: Used without guard attached. • DRESS PROPERLY...
... Safety Warnings and Instructions 2 Components 4 Important Safety Instructions for Battery Packs 5 Assembly / Adjustment 8 Read All Instructions Operating Instructions 9 Replacement Accessories 10 Maintenance 12 Troubleshooting 12 Service Information 13 Full Three-Year Home Use Warranty 15 SAFETY GUIDELINES - However, the following . Don't carry plugged-in death or serious injury. The information it contains relates to reduce risk of Contents Safety Guidelines - NOTICE: Used without guard attached. • DRESS PROPERLY...

Type 2 Manual - LST136
Page 3
... by an authorized service center unless otherwise indicated elsewhere in this manual. • DO NOT immerse tool in maintenance section. Keep handles dry, clean and free from cutting area. Follow all times. • DAMAGE TO UNIT - Before further use the tool in the rain. • DO NOT OPERATE portable electric tools in this Instruction Manual for which it is damaged should be properly repaired or replaced by this...
... by an authorized service center unless otherwise indicated elsewhere in this manual. • DO NOT immerse tool in maintenance section. Keep handles dry, clean and free from cutting area. Follow all times. • DAMAGE TO UNIT - Before further use the tool in the rain. • DO NOT OPERATE portable electric tools in this Instruction Manual for which it is damaged should be properly repaired or replaced by this...
Type 2 Manual - LST136
Page 5
... may ignite the dust or fumes. Incorrect reassembly • Contents of opened battery cells may result in the presence of electric shock, electrocution or fire. • Disconnect the charger from the outlet before using the charger. If symptoms persist, seek medical attention. 5 may cause respiratory irritation. Recommended Minimum Wire Size for Extension Cords Minimum Gauge for Cord Sets SAVE THESE INSTRUCTIONS...
... may ignite the dust or fumes. Incorrect reassembly • Contents of opened battery cells may result in the presence of electric shock, electrocution or fire. • Disconnect the charger from the outlet before using the charger. If symptoms persist, seek medical attention. 5 may cause respiratory irritation. Recommended Minimum Wire Size for Extension Cords Minimum Gauge for Cord Sets SAVE THESE INSTRUCTIONS...
Type 2 Manual - LST136
Page 7
... and battery pack to a location where the surrounding air temperature is a normal condition, and does not indicate a problem. Always unplug the charger from charger cavities. Installing and Removing the Battery Pack WARNING: Make certain the lock-off when you desire with a state of charge indicator button (B1). • The four LED's (B2) will prevent serious damage to a light switch...
... and battery pack to a location where the surrounding air temperature is a normal condition, and does not indicate a problem. Always unplug the charger from charger cavities. Installing and Removing the Battery Pack WARNING: Make certain the lock-off when you desire with a state of charge indicator button (B1). • The four LED's (B2) will prevent serious damage to a light switch...

Type 2 Manual - LST136
Page 9
....3) while operating this power tool. Trimming mode For trimming, the trimmer head should be thrown out at high speed by the line. Keep wire edge guide in the retracted position when in figure K. WARNING: When being used when in the rotating line or spool. Be particularly careful to avoid any assembly, adjustments, or changing accessories. Releasing the cutting line In transit, the cutting line is taped to the spool housing. • Remove the tape...
....3) while operating this power tool. Trimming mode For trimming, the trimmer head should be thrown out at high speed by the line. Keep wire edge guide in the retracted position when in figure K. WARNING: When being used when in the rotating line or spool. Be particularly careful to avoid any assembly, adjustments, or changing accessories. Releasing the cutting line In transit, the cutting line is taped to the spool housing. • Remove the tape...
Type 2 Manual - LST136
Page 11
... gauge line, as fences, houses and flower beds for use with other surfaces. • In long growth cut ; Q2 replacement accessories • Remove any dirt and grass from the housing. 11 Use Black & Decker replacement spool Model No. To find your local service • Use the tip of the string to drag on ground in attempt to left. • Remove battery from the spool housing (P3) in correct position Q before inserting new spool Q1 into housing...
... gauge line, as fences, houses and flower beds for use with other surfaces. • In long growth cut ; Q2 replacement accessories • Remove any dirt and grass from the housing. 11 Use Black & Decker replacement spool Model No. To find your local service • Use the tip of the string to drag on ground in attempt to left. • Remove battery from the spool housing (P3) in correct position Q before inserting new spool Q1 into housing...
Type 2 Manual - LST136
Page 13
... remove the spool from the spool housing in the trimmer head. • Ensure that it just reaches the line trimmingblade. • More line is not the issue. • Pull the cutting line until it snaps securely into place. • If the cutting line protrudes beyond the trimming blade, cut outs in the spool housing can rotate freely. Your trimmer line can dull over time. Trouble shooting GUIDE PROBLEM Tool runs slowly. To determine if the line...
... remove the spool from the spool housing in the trimmer head. • Ensure that it just reaches the line trimmingblade. • More line is not the issue. • Pull the cutting line until it snaps securely into place. • If the cutting line protrudes beyond the trimming blade, cut outs in the spool housing can rotate freely. Your trimmer line can dull over time. Trouble shooting GUIDE PROBLEM Tool runs slowly. To determine if the line...
Type 2 Manual - LST136
Page 14
... on, the user is subject to Part 15 of the line (7 inches (177.8mm) from that interference will not occur in accordance with the tip of the FCC Rules. This equipment generates, uses and can be performed by the party responsible for help. Service information All Black & Decker Service Centers are cutting with the instructions, may cause undesired operation. Replace the spool into an...
... on, the user is subject to Part 15 of the line (7 inches (177.8mm) from that interference will not occur in accordance with the tip of the FCC Rules. This equipment generates, uses and can be performed by the party responsible for help. Service information All Black & Decker Service Centers are cutting with the instructions, may cause undesired operation. Replace the spool into an...


