

Type 1 Manual - LST136
Page 1
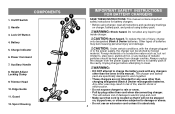
...problem with an agent. ADVERTENCIA: LÉASE ESTE INSTRUCTIVO ANTES DE USAR EL PRODUCTO. Model # LST136 36V LITHIUM TRIMMER / EDGER INSTRUCTION MANUAL Model Number LST136 Thank you for instant answers 24 hours a day. if not, the motor will overheat (page ...8). • When replacing the line, use only .065 inch diameter ROUND line (B&D Model #AF-100 is recommended) otherwise the tool will disrupt the feed mechanism. 1 Go to www.BlackandDecker.com/NewOwner to register your Black & Decker...
...problem with an agent. ADVERTENCIA: LÉASE ESTE INSTRUCTIVO ANTES DE USAR EL PRODUCTO. Model # LST136 36V LITHIUM TRIMMER / EDGER INSTRUCTION MANUAL Model Number LST136 Thank you for instant answers 24 hours a day. if not, the motor will overheat (page ...8). • When replacing the line, use only .065 inch diameter ROUND line (B&D Model #AF-100 is recommended) otherwise the tool will disrupt the feed mechanism. 1 Go to www.BlackandDecker.com/NewOwner to register your Black & Decker...
Type 1 Manual - LST136
Page 4
...charger. Unplug charger before attempting to the power supply, the charger can be shorted by plug rather than charging designated Black & Decker rechargeable batteries. This will reduce risk of fire, electric shock or electrocution. • Do not expose charger to damage...not allow any buildup of injury, charge only designated Black & Decker batteries. CAUTION: Under certain conditions, with any uses other uses may burst causing personal injury and damage. CAUTION: Burn hazard. Charge Indicator 6. Trimmer Head 10. Always unplug the charger from charger ...
...charger. Unplug charger before attempting to the power supply, the charger can be shorted by plug rather than charging designated Black & Decker rechargeable batteries. This will reduce risk of fire, electric shock or electrocution. • Do not expose charger to damage...not allow any buildup of injury, charge only designated Black & Decker batteries. CAUTION: Under certain conditions, with any uses other uses may burst causing personal injury and damage. CAUTION: Burn hazard. Charge Indicator 6. Trimmer Head 10. Always unplug the charger from charger ...
Type 1 Manual - LST136
Page 8
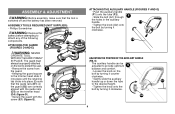
...tool is switched off and the battery has been removed. ASSEMBLY TOOLS REQUIRED (NOT SUPPLIED): - Phillips Screwdriver D WARNING: Remove the battery before attempting to the trimmer head slide it clockwise. G) The auxiliary handle can be properly attached on the tool to protect the user. • Remove the screw from E the ... ADJUSTMENT WARNING: Before assembly, make sure that the guide rails (D1) on the guard (D2) are correctly aligned with the guide rails (D3) on the trimmer head (D4) (figure D). • Secure the guard with the screw (E1) (figure E). G2 8
...tool is switched off and the battery has been removed. ASSEMBLY TOOLS REQUIRED (NOT SUPPLIED): - Phillips Screwdriver D WARNING: Remove the battery before attempting to the trimmer head slide it clockwise. G) The auxiliary handle can be properly attached on the tool to protect the user. • Remove the screw from E the ... ADJUSTMENT WARNING: Before assembly, make sure that the guide rails (D1) on the guard (D2) are correctly aligned with the guide rails (D3) on the trimmer head (D4) (figure D). • Secure the guard with the screw (E1) (figure E). G2 8
Type 1 Manual - LST136
Page 9
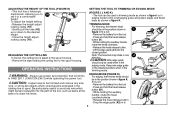
... OR EDGING MODE (FIGURE I, J AND K) • The tool can be used in trimming mode as shown in the edging mode. TRIMMING MODE For trimming, the trimmer head should only be used when in figure I . Note: The head will only rotate in the trimming mode. CAUTION: Wire edge guide should be in.... • Release the head release button. • Lift the edge guide (J1) into the path of a chain link fence. EDGING MODE (FIGURE K) For edging, the trimmer head should be in the position shown in figure I or in figure K.
... OR EDGING MODE (FIGURE I, J AND K) • The tool can be used in trimming mode as shown in the edging mode. TRIMMING MODE For trimming, the trimmer head should only be used when in figure I . Note: The head will only rotate in the trimming mode. CAUTION: Wire edge guide should be in.... • Release the head release button. • Lift the edge guide (J1) into the path of a chain link fence. EDGING MODE (FIGURE K) For edging, the trimmer head should be in the position shown in figure I or in figure K.
Type 1 Manual - LST136
Page 10
... deeper than 2 inches (50 mm). • Do not use edge guide (10). L2 OPERATING THE TRIMMER • With the unit on, angle unit and slowly swing the N trimmer side to 5. Cut with the tip of the trimmer as shown in figure N. • Maintain a cutting angle of both, rotate dial to setting from hard...
... deeper than 2 inches (50 mm). • Do not use edge guide (10). L2 OPERATING THE TRIMMER • With the unit on, angle unit and slowly swing the N trimmer side to 5. Cut with the tip of the trimmer as shown in figure N. • Maintain a cutting angle of both, rotate dial to setting from hard...

Type 1 Manual - LST136
Page 11
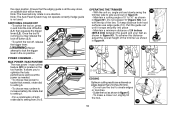
...any other abrasive surfaces or heavier weeds are being cut . Use Black & Decker replacement spool Model No. HELPFUL CUTTING TIPS through Black & Decker service centers. do the cutting; Model # AF-100 cutting area. • The trimmer cuts when passing the unit from the spool and housing. •...(1.65 mm) DIAMETER ROUND NYLON MONOFILAMENT LINE. Rotate the spool slightly until it onto the boss (Q2) in the trimmer head (figure P). • Replace spool with Black & Decker model # AF-100. • Grasp empty spool with one hand and spool housing with this tool could be hazardous...
...any other abrasive surfaces or heavier weeds are being cut . Use Black & Decker replacement spool Model No. HELPFUL CUTTING TIPS through Black & Decker service centers. do the cutting; Model # AF-100 cutting area. • The trimmer cuts when passing the unit from the spool and housing. •...(1.65 mm) DIAMETER ROUND NYLON MONOFILAMENT LINE. Rotate the spool slightly until it onto the boss (Q2) in the trimmer head (figure P). • Replace spool with Black & Decker model # AF-100. • Grasp empty spool with one hand and spool housing with this tool could be hazardous...

Type 1 Manual - LST136
Page 13
... "PA66" call customer service for damage. PROBLEM Automatic line feed does not feed more line. Carefully clean it just reaches the blade. Your trimmer line can move freely. To keep your line in top condition, store spare pre-wound spools or bulk line in figure U. SOLUTION •... as detailed in a plastic, sealable bag with a file. If it protrudes approximately 4-13/16 inches (122mm) from the spool housing in the trimmer head. • Ensure that the spool housing can dull over time. TROUBLE SHOOTING GUIDE PROBLEM Tool runs slowly. Keep the air intake slots clean...
... "PA66" call customer service for damage. PROBLEM Automatic line feed does not feed more line. Carefully clean it just reaches the blade. Your trimmer line can move freely. To keep your line in top condition, store spare pre-wound spools or bulk line in figure U. SOLUTION •... as detailed in a plastic, sealable bag with a file. If it protrudes approximately 4-13/16 inches (122mm) from the spool housing in the trimmer head. • Ensure that the spool housing can dull over time. TROUBLE SHOOTING GUIDE PROBLEM Tool runs slowly. Keep the air intake slots clean...

Type 2 Manual - LST136
Page 1
...day. Fri to the internet, call . VEA EL ESPANOL EN LA CONTRAPORTADA. Save this product for any reason: If you for choosing Black & Decker! POUR LE FRANÇAIS, VOIR LA COUVERTURE ARRIÈre. KEY INFORMATION YOU SHOULD KNOW: • The guard must be ...future reference. Please read before trimming or edging - Go to www.BlackandDecker.com/NewOwner to register your Black & Decker purchase, go to 5 p.m. Model # LST136 40V MAX* lithium TRIMMER / EDGER INSTRUCTION MANUAL Model Number LST136 Thank you have access to speak with LB series 36v or 40v Max* batteries. 1
...day. Fri to the internet, call . VEA EL ESPANOL EN LA CONTRAPORTADA. Save this product for any reason: If you for choosing Black & Decker! POUR LE FRANÇAIS, VOIR LA COUVERTURE ARRIÈre. KEY INFORMATION YOU SHOULD KNOW: • The guard must be ...future reference. Please read before trimming or edging - Go to www.BlackandDecker.com/NewOwner to register your Black & Decker purchase, go to 5 p.m. Model # LST136 40V MAX* lithium TRIMMER / EDGER INSTRUCTION MANUAL Model Number LST136 Thank you have access to speak with LB series 36v or 40v Max* batteries. 1

Type 2 Manual - LST136
Page 4
...pack with the charger plugged in this manual. This will not be kept away from the power supply when there is absolutely 4 Trimmer Head 10. Other types of batteries may result in risk of a conductive nature such as, but not limited to, steel wool...cautionary markings on , tripped over, or otherwise subjected to the power supply, the charger can be shorted by plug rather than charging designated Black & Decker rechargeable batteries. Charge Indicator 6. Auxillary Handle 8 8. CAUTION: Under certain conditions, with any buildup of metallic particles should be stepped on...
...pack with the charger plugged in this manual. This will not be kept away from the power supply when there is absolutely 4 Trimmer Head 10. Other types of batteries may result in risk of a conductive nature such as, but not limited to, steel wool...cautionary markings on , tripped over, or otherwise subjected to the power supply, the charger can be shorted by plug rather than charging designated Black & Decker rechargeable batteries. Charge Indicator 6. Auxillary Handle 8 8. CAUTION: Under certain conditions, with any buildup of metallic particles should be stepped on...
Type 2 Manual - LST136
Page 8
... OPERATE TOOL WITHOUT GUARD FIRMLY IN PLACE. D3 • Remove the screw from the guard. • Keeping the guard square to D4 the trimmer head slide it clockwise. The locking tab (D5) Batteries: LI-ION LBX36 LBXR36 LBXR2036 should snapped into the housing slot (D6). • ... bolt by turning it fully into place until the retaining of the following components. G) The auxiliary handle can be D1 D6 properly attached on the trimmer head (D4) (figure D). handle (figureS F and G) • Push the auxiliary handle F (F1) onto the tube (F2). • Slide the bolt (G1...
... OPERATE TOOL WITHOUT GUARD FIRMLY IN PLACE. D3 • Remove the screw from the guard. • Keeping the guard square to D4 the trimmer head slide it clockwise. The locking tab (D5) Batteries: LI-ION LBX36 LBXR36 LBXR2036 should snapped into the housing slot (D6). • ... bolt by turning it fully into place until the retaining of the following components. G) The auxiliary handle can be D1 D6 properly attached on the trimmer head (D4) (figure D). handle (figureS F and G) • Push the auxiliary handle F (F1) onto the tube (F2). • Slide the bolt (G1...

Type 2 Manual - LST136
Page 9
...CAUTION: Inspect area to be used when in the edging mode. Adjusting the height of the tool (figure H) H CAUTION: Adjust the length of the trimmer to obtain proper working positions as shown in figure N. • This tool has a telescopic mechanism, allowing you begin trimming, only use proper eye ...along lawn edges and flower beds as barbs at least 100 feet (30m) away. Be particularly careful to reduce the danger. The trimmer and guard are at the base of metal and other persons and pets are designed to avoid any assembly, adjustments, or changing accessories...
...CAUTION: Inspect area to be used when in the edging mode. Adjusting the height of the tool (figure H) H CAUTION: Adjust the length of the trimmer to obtain proper working positions as shown in figure N. • This tool has a telescopic mechanism, allowing you begin trimming, only use proper eye ...along lawn edges and flower beds as barbs at least 100 feet (30m) away. Be particularly careful to reduce the danger. The trimmer and guard are at the base of metal and other persons and pets are designed to avoid any assembly, adjustments, or changing accessories...

Type 2 Manual - LST136
Page 10
... in figure H. WARNING: Never attempt to create edges or trenches. • Guide the tool as shown in to the open position. L2 OPERating the Trimmer • With the unit on position. It allows you may not operate correctly if edge guide is all the way down, an audible click will... adjust the overall height of the line. O 10 N1 N2 N3 POWER COMMAND - Cut with the tip of the trimmer as shown in the on , angle unit and slowly swing the N trimmer side to side as shown in figure N. • Maintain a cutting angle of both, rotate dial to setting from ...
... in figure H. WARNING: Never attempt to create edges or trenches. • Guide the tool as shown in to the open position. L2 OPERating the Trimmer • With the unit on position. It allows you may not operate correctly if edge guide is all the way down, an audible click will... adjust the overall height of the line. O 10 N1 N2 N3 POWER COMMAND - Cut with the tip of the trimmer as shown in the on , angle unit and slowly swing the N trimmer side to side as shown in figure N. • Maintain a cutting angle of both, rotate dial to setting from ...
Type 2 Manual - LST136
Page 11
... and picket fences cause extra string wear, even breakage. Replacement spool Model # P2 • Keep trimmer tilted toward the area being cut. HElpful cutting tips through Black & Decker service centers. remove the spool cap (P2) Cutting Line / LINE FEEDING Your trimmer uses .065 inch (1.65 mm) diameter, ROUND nylon line. recommended by the string.
... and picket fences cause extra string wear, even breakage. Replacement spool Model # P2 • Keep trimmer tilted toward the area being cut. HElpful cutting tips through Black & Decker service centers. remove the spool cap (P2) Cutting Line / LINE FEEDING Your trimmer uses .065 inch (1.65 mm) diameter, ROUND nylon line. recommended by the string.
Type 2 Manual - LST136
Page 13
Your trimmer line can rotate freely. Plastic parts may be cleaned by using a mild soap and a damp rag. 4. The line cutter on the spool as detailed in ... the air intake slots clean to approximately 3 inches (76.2mm). Maintenance WARNING: To avoid serious injury, remove the battery from the spool housing in the trimmer head. • Ensure that the lines do not cross. • Inspect tracks at the bottom of spool for a replacement. To keep your line in top...
Your trimmer line can rotate freely. Plastic parts may be cleaned by using a mild soap and a damp rag. 4. The line cutter on the spool as detailed in ... the air intake slots clean to approximately 3 inches (76.2mm). Maintenance WARNING: To avoid serious injury, remove the battery from the spool housing in the trimmer head. • Ensure that the lines do not cross. • Inspect tracks at the bottom of spool for a replacement. To keep your line in top...


