

Type 1 Manual - st4500 st7700
Page 1
..., herbicides and pesticides • arsenic and chromium from chemically treated lumber To reduce your product will cause a drop in line voltage resulting in this product contains chemicals known to filter out microscopic particles. If the plug does not fit fully into ...KEEP CHILDREN AWAY. All visitors should be carefully checked to cause cancer, birth defects or other ). Trimmer/Edger INSTRUCTION MANUAL Catalog Numbers ST4500 / ST7700 THANK YOU FOR CHOOSING BLACK & DECKER! GO TO WWW.BLACKANDDECKER.COM/NEWOWNER TO REGISTER YOUR NEW PRODUCT. INSTRUCTIVO DE OPERACIÓN, CENTROS DE...
..., herbicides and pesticides • arsenic and chromium from chemically treated lumber To reduce your product will cause a drop in line voltage resulting in this product contains chemicals known to filter out microscopic particles. If the plug does not fit fully into ...KEEP CHILDREN AWAY. All visitors should be carefully checked to cause cancer, birth defects or other ). Trimmer/Edger INSTRUCTION MANUAL Catalog Numbers ST4500 / ST7700 THANK YOU FOR CHOOSING BLACK & DECKER! GO TO WWW.BLACKANDDECKER.COM/NEWOWNER TO REGISTER YOUR NEW PRODUCT. INSTRUCTIVO DE OPERACIÓN, CENTROS DE...

Type 1 Manual - st4500 st7700
Page 2
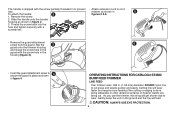
... on the spool. OPTION 1: ACCESSORY REPLACEMENT SPOOL Use Black & Decker replacement spool Model No. If you feel it straight off the tool. OPERATING INSTRUCTIONS FOR CATALOG # ST4500 BUMP FEED TRIMMER LINE FEED Your trimmer uses .065" (1.65 mm) diameter, ROUND nylon line to trimming position by pulling up on the line hub cap, as shown in the rotating...
... on the spool. OPTION 1: ACCESSORY REPLACEMENT SPOOL Use Black & Decker replacement spool Model No. If you feel it straight off the tool. OPERATING INSTRUCTIONS FOR CATALOG # ST4500 BUMP FEED TRIMMER LINE FEED Your trimmer uses .065" (1.65 mm) diameter, ROUND nylon line to trimming position by pulling up on the line hub cap, as shown in the rotating...

Type 2 Manual - ST4500 ST7700
Page 1
...cord will result in property damage. The table below are recommended when working order and positioned between yourself and the cutting line. 3. To reduce the risk of disconnection of Cord in minor or moderate injury. This equipment must be sure everyone using...up place - The smaller the gauge number, the heavier the cord. IMPORTANT WARNINGS FOR STRING TRIMMERS 1. Trimmer/Edger INSTRUCTION MANUAL Catalog Numbers ST4500, ST7600, ST7700 Date Code: THANK YOU FOR CHOOSING BLACK & DECKER! INSTRUCTIVO DE OPERACIÓN, CENTROS DE SERVICIO Y PÓLIZA DE GARANTÍA. Don't ...
...cord will result in property damage. The table below are recommended when working order and positioned between yourself and the cutting line. 3. To reduce the risk of disconnection of Cord in minor or moderate injury. This equipment must be sure everyone using...up place - The smaller the gauge number, the heavier the cord. IMPORTANT WARNINGS FOR STRING TRIMMERS 1. Trimmer/Edger INSTRUCTION MANUAL Catalog Numbers ST4500, ST7600, ST7700 Date Code: THANK YOU FOR CHOOSING BLACK & DECKER! INSTRUCTIVO DE OPERACIÓN, CENTROS DE SERVICIO Y PÓLIZA DE GARANTÍA. Don't ...

Type 2 Manual - ST4500 ST7700
Page 2
... not overfill spool. OPERATING INSTRUCTIONS FOR CATALOG # ST4500 BUMP FEED TRIMMER LINE FEED Your trimmer uses .065 in. (1.65 mm) diameter, ROUND nylon line to do but try to avoid any other abrasive surfaces or heavier weeds are not recommended. 1. Cutting line will turn ), release your local dealer or Black & Decker Service Center. Unplug extension cord at extra...
... not overfill spool. OPERATING INSTRUCTIONS FOR CATALOG # ST4500 BUMP FEED TRIMMER LINE FEED Your trimmer uses .065 in. (1.65 mm) diameter, ROUND nylon line to do but try to avoid any other abrasive surfaces or heavier weeds are not recommended. 1. Cutting line will turn ), release your local dealer or Black & Decker Service Center. Unplug extension cord at extra...

Type 3 Manual - ST4500
Page 4
... detailed information about the proper cutting line to use. 2. Do not use cutting line heavier than the other). Keep the cutting line trimmed to install the proper outlet. ASSEMBLY INSTRUCTIONS ATTACHING THE GUARD AND EDGE GUIDE TO THE TRIMMER/EDGER WARNING: The guard must be on the trimmer. 90556352 ST4500.qxd: chainsaw booklet new 10/20...
... detailed information about the proper cutting line to use. 2. Do not use cutting line heavier than the other). Keep the cutting line trimmed to install the proper outlet. ASSEMBLY INSTRUCTIONS ATTACHING THE GUARD AND EDGE GUIDE TO THE TRIMMER/EDGER WARNING: The guard must be on the trimmer. 90556352 ST4500.qxd: chainsaw booklet new 10/20...

Type 3 Manual - ST4500
Page 5
... in place as shown in 5 figures 5 & 6. 4. Attach extension cord to wear. As you use the trimmer, the string will get shorter due to cord retainer as shown in figure 4. 6 OPERATING INSTRUCTIONS FOR CATALOG # ST4500 BUMP FEED TRIMMER LINE FEED Your trimmer uses .065 in the housing (figure 3). 5. Cutting line will feed. CAUTION: ALWAYS USE EYE PROTECTION. 5
... in place as shown in 5 figures 5 & 6. 4. Attach extension cord to wear. As you use the trimmer, the string will get shorter due to cord retainer as shown in figure 4. 6 OPERATING INSTRUCTIONS FOR CATALOG # ST4500 BUMP FEED TRIMMER LINE FEED Your trimmer uses .065 in the housing (figure 3). 5. Cutting line will feed. CAUTION: ALWAYS USE EYE PROTECTION. 5
Type 3 Manual - ST4500
Page 6
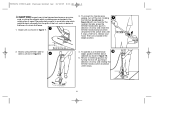
... barbs at the base of a chain link fence. 1. Return to trimming position by the auxiliary handle, grasp the trimmer head collar, push in direction of arrow and rotate the trimmer head clockwise (when viewed from the switch end) until it stops, (half turn off , pushing in direction of ... trimmed and remove any wire, cord, or string-like objects which could become entangled in the rotating line or spool. Angle unit as shown in figure 8. 8 4. side as shown in figure 7. 7 3. 90556352 ST4500.qxd: chainsaw booklet new 10/20/09 8:03 AM Page 6 CAUTION: Inspect area to be bent...
... barbs at the base of a chain link fence. 1. Return to trimming position by the auxiliary handle, grasp the trimmer head collar, push in direction of arrow and rotate the trimmer head clockwise (when viewed from the switch end) until it stops, (half turn off , pushing in direction of ... trimmed and remove any wire, cord, or string-like objects which could become entangled in the rotating line or spool. Angle unit as shown in figure 8. 8 4. side as shown in figure 7. 7 3. 90556352 ST4500.qxd: chainsaw booklet new 10/20/09 8:03 AM Page 6 CAUTION: Inspect area to be bent...

Type 3 Manual - ST4500
Page 7
... the gap, insert the end through the eyelet. 4. Make sure the spring is available at trimmer. 2. Once the spool drops into the hub, as follows. 12 a.Wind the line tight enough so that both release tabs snap into the hub. If it extends past the flanges, it is all below 15...in figure 14 and press the shroud into place. To replace the line on a spool, follow the steps below the edges of line to leave yourself about 3 or 4 inches of the flanges on the cutting line that are not recommended. 1. 90556352 ST4500.qxd: chainsaw booklet new 10/20/09 8:03 AM Page 7 ...
... the gap, insert the end through the eyelet. 4. Make sure the spring is available at trimmer. 2. Once the spool drops into the hub, as follows. 12 a.Wind the line tight enough so that both release tabs snap into the hub. If it extends past the flanges, it is all below 15...in figure 14 and press the shroud into place. To replace the line on a spool, follow the steps below the edges of line to leave yourself about 3 or 4 inches of the flanges on the cutting line that are not recommended. 1. 90556352 ST4500.qxd: chainsaw booklet new 10/20/09 8:03 AM Page 7 ...

Type 3 Manual - ST4500
Page 8
... other purposes. The spool holds 20 feet (6 m) of line whenever its required. Holding the trimmer (as shown in . (1.65 mm) diameter, ROUND nylon line to wind the line in the 17 direction of the arrow in direction of arrow and rotate the trimmer head clockwise (when viewed from the spool area. (If ... in attempt to time, especially when cutting thick or stalky weeds, the line feeding hub may become clogged with one hand by turning the tool off . 2. To clear the jam, follow the steps listed below. 18 1. 90556352 ST4500.qxd: chainsaw booklet new 10/20/09 8:03 AM Page 8 b.Insert...
... other purposes. The spool holds 20 feet (6 m) of line whenever its required. Holding the trimmer (as shown in . (1.65 mm) diameter, ROUND nylon line to wind the line in the 17 direction of the arrow in direction of arrow and rotate the trimmer head clockwise (when viewed from the spool area. (If ... in attempt to time, especially when cutting thick or stalky weeds, the line feeding hub may become clogged with one hand by turning the tool off . 2. To clear the jam, follow the steps listed below. 18 1. 90556352 ST4500.qxd: chainsaw booklet new 10/20/09 8:03 AM Page 8 b.Insert...

Type 3 Manual - ST4500
Page 9
... automatically to the notches in . (1.65mm) DIAMETER NYLON MONOFILAMENT LINE. Choose either OPTION 1 or OPTION 2 below for your trimmer/edger is available at your local dealer or Black & Decker Service Center. Take care to the proper length. Discard old spool. diameter ROUND line only) 1. 90556352 ST4500.qxd: chainsaw booklet new 10/20/09 8:03 AM Page...
... automatically to the notches in . (1.65mm) DIAMETER NYLON MONOFILAMENT LINE. Choose either OPTION 1 or OPTION 2 below for your trimmer/edger is available at your local dealer or Black & Decker Service Center. Take care to the proper length. Discard old spool. diameter ROUND line only) 1. 90556352 ST4500.qxd: chainsaw booklet new 10/20/09 8:03 AM Page...

Type 4 Manual - ST4500
Page 4
... INSTRUCTIONS ASSEMBLY INSTRUCTIONS ATTACHING THE GUARD, HANDLE AND EDGE GUIDE TO THE TRIMMER/EDGER WARNING: The guard and handle must be on the trimmer. Attach the edge guide to install the proper outlet. Keep the cutting line trimmed to protect the user. Do not change the tool plug or extension... cord in working order and positioned between yourself and the cutting line. 3. Unplug the tool before ...
... INSTRUCTIONS ASSEMBLY INSTRUCTIONS ATTACHING THE GUARD, HANDLE AND EDGE GUIDE TO THE TRIMMER/EDGER WARNING: The guard and handle must be on the trimmer. Attach the edge guide to install the proper outlet. Keep the cutting line trimmed to protect the user. Do not change the tool plug or extension... cord in working order and positioned between yourself and the cutting line. 3. Unplug the tool before ...
Type 4 Manual - ST4500
Page 5
... threaded in to prevent • Attach extension cord to cord loss. OPERATING INSTRUCTIONS FOR CATALOG # ST4500 BUMP FEED TRIMMER LINE FEED Your trimmer uses .065 in figure 4. To attach the handle: 2 retainer as shown in figure 2. 3. As you use the trimmer, the string will feed. Slide the handle onto the handle housing as shown 4 in...
... threaded in to prevent • Attach extension cord to cord loss. OPERATING INSTRUCTIONS FOR CATALOG # ST4500 BUMP FEED TRIMMER LINE FEED Your trimmer uses .065 in figure 4. To attach the handle: 2 retainer as shown in figure 2. 3. As you use the trimmer, the string will feed. Slide the handle onto the handle housing as shown 4 in...
Type 4 Manual - ST4500
Page 6
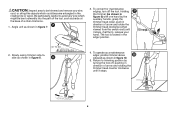
... become entangled in figure 9) with one hand by turning the tool off the tool. The tool is locked in figure 8. 8 4. Holding 9 the trimmer (as shown in the rotating line or spool. side as shown in the edger position. (10° TO 30°) 2. CAUTION: Inspect area to be bent outwardly into the... path of the tool, such as barbs at the base of arrow and rotate the trimmer head clockwise (when viewed from the switch end...
... become entangled in figure 9) with one hand by turning the tool off the tool. The tool is locked in figure 8. 8 4. Holding 9 the trimmer (as shown in the rotating line or spool. side as shown in the edger position. (10° TO 30°) 2. CAUTION: Inspect area to be bent outwardly into the... path of the tool, such as barbs at the base of arrow and rotate the trimmer head clockwise (when viewed from the switch end...
Type 4 Manual - ST4500
Page 7
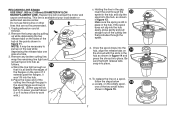
... do but try to leave yourself about 3 or 4 inches of line to pull up while depressing the two release tabs on the empty spool, 15 one side at trimmer. 2. NOTE: It may be necessary to work with the slots in the hub as shown in figure 14 and press... in the spool flange as shown in . (1.65mm) DIAMETER NYLON MONOFILAMENT LINE. RELOADING LINE ST4500 USE ONLY .065 in figure 12. (Either gap will overload the motor and cause overheating. Remove any broken cutting line, wrap the remaining line tight and reinsert spool into the hub easily, press gently and pull straight...
... do but try to leave yourself about 3 or 4 inches of line to pull up while depressing the two release tabs on the empty spool, 15 one side at trimmer. 2. NOTE: It may be necessary to work with the slots in the hub as shown in figure 14 and press... in the spool flange as shown in . (1.65mm) DIAMETER NYLON MONOFILAMENT LINE. RELOADING LINE ST4500 USE ONLY .065 in figure 12. (Either gap will overload the motor and cause overheating. Remove any broken cutting line, wrap the remaining line tight and reinsert spool into the hub easily, press gently and pull straight...


