User Manual
Page 2
... disconnect, turn any control to the nearest authorized service facility for other than intended use. ❍ Use extreme caution when removing tray or disposing of accessory attachments not recommended by or near a hot gas or electric burner, or in a heated oven. ❍ Extreme caution must not be followed, including the following: ❍ Read all instructions before cleaning. ❍ Do not operate any...
... disconnect, turn any control to the nearest authorized service facility for other than intended use. ❍ Use extreme caution when removing tray or disposing of accessory attachments not recommended by or near a hot gas or electric burner, or in a heated oven. ❍ Extreme caution must not be followed, including the following: ❍ Read all instructions before cleaning. ❍ Do not operate any...
User Manual
Page 3
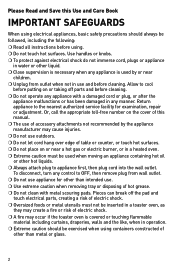
..., plastic, and the like. ❍ Do not cover crumb tray or any part of electric shock. This product is for household use . Improper connection of the grounding conductor may be pulled on by authorized service personnel. To reduce the risk of the oven. This will cause overheating of fire or electric shock, do not attempt to be done only by...
..., plastic, and the like. ❍ Do not cover crumb tray or any part of electric shock. This product is for household use . Improper connection of the grounding conductor may be pulled on by authorized service personnel. To reduce the risk of the oven. This will cause overheating of fire or electric shock, do not attempt to be done only by...
User Manual
Page 4
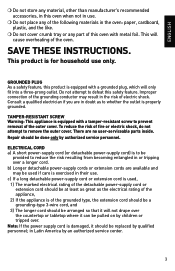
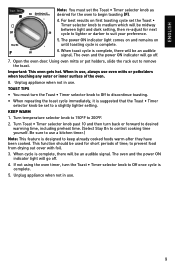
...-down crumb tray 6. Door handle † 7. Power on indicator light 2. Bake pan/drip tray (part# TO1430S-04) 8. Rack slot Note: † indicates consumer replaceable/ removable parts CONTROL PANEL 1. Toast • Timer selector knob with Stay On setting Important: When making toast or using the Timer function, always turn the dial past 10 and then turn back or forward to desired setting. 4 Slide rack (part# TO1430S-03) † 5. Toast • Timer selector knob (part#TO1430S-02) † 4. Temperature...
...-down crumb tray 6. Door handle † 7. Power on indicator light 2. Bake pan/drip tray (part# TO1430S-04) 8. Rack slot Note: † indicates consumer replaceable/ removable parts CONTROL PANEL 1. Toast • Timer selector knob with Stay On setting Important: When making toast or using the Timer function, always turn the dial past 10 and then turn back or forward to desired setting. 4 Slide rack (part# TO1430S-03) † 5. Toast • Timer selector knob (part#TO1430S-02) † 4. Temperature...
User Manual
Page 5
... power ON indicator light comes on and remain lit until the oven is normal and should cause no concern. If baking something that will remain lit during the entire cooking time. ENGLISH How to cabinets and walls. • Insert slide rack completely into the oven before closing the door. • Remove tie from the upper heating elements. 5 WHEN IN USE, ALWAYS USE OVEN MITTS...
... power ON indicator light comes on and remain lit until the oven is normal and should cause no concern. If baking something that will remain lit during the entire cooking time. ENGLISH How to cabinets and walls. • Insert slide rack completely into the oven before closing the door. • Remove tie from the upper heating elements. 5 WHEN IN USE, ALWAYS USE OVEN MITTS...
User Manual
Page 6
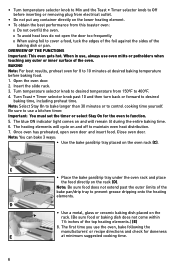
... heating element. • To obtain the best performance from 150ºF to 400ºF. 4. The blue ON indicator light comes on the oven rack (C). Close oven door. The first time you use the oven, bake following the manufacturers' or recipe directions and check for doneness E at desired baking temperature before inserting or removing plug from electrical outlet. • Do not put any outer or inner surface of the bake pan/drip tray...
... heating element. • To obtain the best performance from 150ºF to 400ºF. 4. The blue ON indicator light comes on the oven rack (C). Close oven door. The first time you use the oven, bake following the manufacturers' or recipe directions and check for doneness E at desired baking temperature before inserting or removing plug from electrical outlet. • Do not put any outer or inner surface of the bake pan/drip tray...
User Manual
Page 7
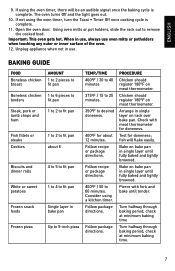
... desired doneness. 400ºF for doneness. If not using the oven timer, turn the Toast • Timer Off once cooking cycle is complete. Follow recipe or package directions. Bake on rack over bake pan. PROCEDURE Chicken should register 180ºF on meat thermometer. ENGLISH 9. Chicken should register 180ºF on meat thermometer. Consider using the oven timer, there will flake easily. If using a kitchen timer. Test for doneness;
... desired doneness. 400ºF for doneness. If not using the oven timer, turn the Toast • Timer Off once cooking cycle is complete. Follow recipe or package directions. Bake on rack over bake pan. PROCEDURE Chicken should register 180ºF on meat thermometer. ENGLISH 9. Chicken should register 180ºF on meat thermometer. Consider using the oven timer, there will flake easily. If using a kitchen timer. Test for doneness;
User Manual
Page 8
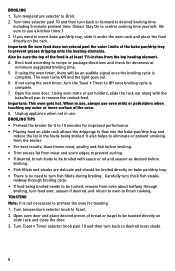
... Stay On to remove the cooked food. Open the oven door. Turn temperature selector knob to finish cooking. Using oven mitts or pot holders, slide the rack out along with sauce or oil and season as desired before broiling. • Fish fillets and steaks are delicate and should be toasted directly on bake pan/drip tray. • There is no need to Broil. 2. Turn time selector past 10 and...
... Stay On to remove the cooked food. Open the oven door. Turn temperature selector knob to finish cooking. Using oven mitts or pot holders, slide the rack out along with sauce or oil and season as desired before broiling. • Fish fillets and steaks are delicate and should be toasted directly on bake pan/drip tray. • There is no need to Broil. 2. Turn time selector past 10 and...
User Manual
Page 9
... signal. The power ON indicator light comes on and remains on first toasting cycle set the Toast • Timer selector knob to medium which will be an audible signal. to keep already cooked foods warm after they have been cooked. Unplug appliance when not in use . Open the oven door. Important: This oven gets hot. Unplug appliance when not in use, always use a kitchen timer.) Note: This...
... signal. The power ON indicator light comes on and remains on first toasting cycle set the Toast • Timer selector knob to medium which will be an audible signal. to keep already cooked foods warm after they have been cooked. Unplug appliance when not in use . Open the oven door. Important: This oven gets hot. Unplug appliance when not in use, always use a kitchen timer.) Note: This...

User Manual
Page 10
... oven door and let stand overnight. Heat oven to 200°F; Turn oven off , unplugged, and cool. Note: We strongly recommend that the bake pan/drip tray be sure the oven is off and let stand until oven is completely cool. To remove the slide rack, open oven, remove bowl and wipe interior of oven with moist paper towels. • To refresh air inside oven, lay strips of crumbs...
... oven door and let stand overnight. Heat oven to 200°F; Turn oven off , unplugged, and cool. Note: We strongly recommend that the bake pan/drip tray be sure the oven is off and let stand until oven is completely cool. To remove the slide rack, open oven, remove bowl and wipe interior of oven with moist paper towels. • To refresh air inside oven, lay strips of crumbs...
User Manual
Page 11
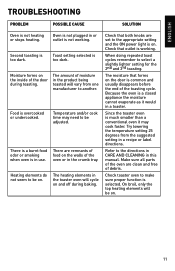
... ENGLISH TROUBLESHOOTING PROBLEM POSSIBLE CAUSE SOLUTION Oven is overcooked or undercooked. Temperature and/or cook time may cook faster. When doing repeated toast cycles remember to make sure proper function is too dark. On broil, only the top heating elements will vary from the suggested setting in this manual. Check that both knobs are clean and free of the oven are set to the appropriate setting and the ON power light...
... ENGLISH TROUBLESHOOTING PROBLEM POSSIBLE CAUSE SOLUTION Oven is overcooked or undercooked. Temperature and/or cook time may cook faster. When doing repeated toast cycles remember to make sure proper function is too dark. On broil, only the top heating elements will vary from the suggested setting in this manual. Check that both knobs are clean and free of the oven are set to the appropriate setting and the ON power light...
User Manual
Page 12
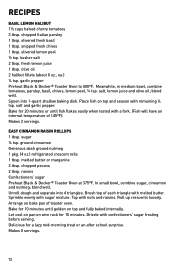
.... RECIPES BASIL LEMON HALIBUT 1½ cups halved cherry tomatoes 3 tbsp. snipped fresh chives 1 tbsp. garlic pepper Preheat Black & Decker® Toaster Oven to 400ºF. melted butter or margarine 2 tbsp. chopped pecans 2 tbsp. Top with remaining ¼ tsp. Arrange on bake pan of 145ºF). Bake for... halibut fillets (about 6 oz., ea.) ¼ tsp. Unroll dough and separate into 1-quart shallow baking dish. slivered fresh basil 1 tbsp. Let cool on pan on wire rack for 20 minutes or until golden on top and season with nuts and raisins. Place fish on top...
.... RECIPES BASIL LEMON HALIBUT 1½ cups halved cherry tomatoes 3 tbsp. snipped fresh chives 1 tbsp. garlic pepper Preheat Black & Decker® Toaster Oven to 400ºF. melted butter or margarine 2 tbsp. chopped pecans 2 tbsp. Top with remaining ¼ tsp. Arrange on bake pan of 145ºF). Bake for... halibut fillets (about 6 oz., ea.) ¼ tsp. Unroll dough and separate into 1-quart shallow baking dish. slivered fresh basil 1 tbsp. Let cool on pan on wire rack for 20 minutes or until golden on top and season with nuts and raisins. Place fish on top...
User Manual
Page 13
... the product to you need parts or accessories, please call the appropriate 800 number on the cover of this warranty? • This warranty gives you get service? • Save your warranty not cover? • Damage from commercial use • Damage from misuse, abuse or neglect • Products that have other accessory items that is a trademark of The Black & Decker Corporation...
... the product to you need parts or accessories, please call the appropriate 800 number on the cover of this warranty? • This warranty gives you get service? • Save your warranty not cover? • Damage from commercial use • Damage from misuse, abuse or neglect • Products that have other accessory items that is a trademark of The Black & Decker Corporation...


