Operating Instructions
Page 3
...suitable for your second hand on another tool. Keep your tool. The guard cannot protect you from the blade below the work . If saw is accidentally dropped, lower guard may be performed only by the manufacturer for your body is unstable and may lead to remove cut material ...secure and support the workpiece to prevent loss of cut. -3- Follow instructions in a risk of this manual illustrate typical hand support of the saw if lower guard does not move freely and close instantly. Service or maintenance performed by the blade. DANGER Keep hands away from the power ...
...suitable for your second hand on another tool. Keep your tool. The guard cannot protect you from the blade below the work . If saw is accidentally dropped, lower guard may be performed only by the manufacturer for your body is unstable and may lead to remove cut material ...secure and support the workpiece to prevent loss of cut. -3- Follow instructions in a risk of this manual illustrate typical hand support of the saw if lower guard does not move freely and close instantly. Service or maintenance performed by the blade. DANGER Keep hands away from the power ...
Operating Instructions
Page 4
... and reduces the chance for the blade to stop after switch is important to walk backwards, cutting whatever is running, the saw down , the blade stalls and the motor reaction drives the unit rapidly back toward the operator. It is released. BM 2610912403 1/03 1/16/03 12:23 PM Page 4 Check ...the operation of the saw may not shut off. If the guard and the spring are not designed or intended to control KICKBACK....
... and reduces the chance for the blade to stop after switch is important to walk backwards, cutting whatever is running, the saw down , the blade stalls and the motor reaction drives the unit rapidly back toward the operator. It is released. BM 2610912403 1/03 1/16/03 12:23 PM Page 4 Check ...the operation of the saw may not shut off. If the guard and the spring are not designed or intended to control KICKBACK....
Operating Instructions
Page 5
... Blade depth and bevel adjusting locking knobs must be placed under their own weight. Supports must be controlled by power sanding, sawing, grinding, drilling, and other construction activities contains chemicals known to filter out microscopic particles. -5- Do not use dull or ...blade. Use extra caution when making cut for pinching under conditions of blade pinching and KICKBACK. When restarting a saw in a workpiece, center the saw from these chemicals: work in the kerf. KICKBACK forces can cause KICKBACK. ! Investigate and take corrective action to...
... Blade depth and bevel adjusting locking knobs must be placed under their own weight. Supports must be controlled by power sanding, sawing, grinding, drilling, and other construction activities contains chemicals known to filter out microscopic particles. -5- Do not use dull or ...blade. Use extra caution when making cut for pinching under conditions of blade pinching and KICKBACK. When restarting a saw in a workpiece, center the saw from these chemicals: work in the kerf. KICKBACK forces can cause KICKBACK. ! Investigate and take corrective action to...
Operating Instructions
Page 7
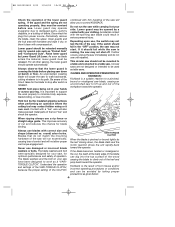
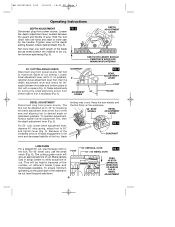
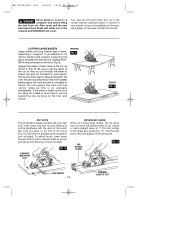
... CALIBRATED DEPTH BRACKET Calibrated For Standard Lumber Sizes DEPTH ADJUSTMENT LEVER LOWER GUARD LOWER GUARD LIFT LEVER TRIGGER SWITCH CALIBRATED BEVEL QUADRANT BEVEL ADJUSTMENT LEVER SAW HOOK To use , always lower hook until it snaps into the open position. When not in use , simply lift up hook until it snaps into...
... CALIBRATED DEPTH BRACKET Calibrated For Standard Lumber Sizes DEPTH ADJUSTMENT LEVER LOWER GUARD LOWER GUARD LIFT LEVER TRIGGER SWITCH CALIBRATED BEVEL QUADRANT BEVEL ADJUSTMENT LEVER SAW HOOK To use , always lower hook until it snaps into the open position. When not in use , simply lift up hook until it snaps into...
Operating Instructions
Page 8
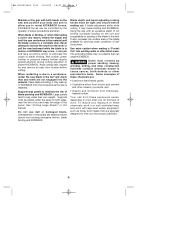
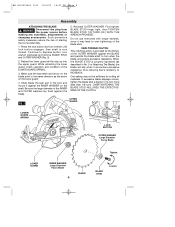
... INNER WASHER Large Diameter Faces Blade -8- WARNING Disconnect the plug from the power source before making any assembly, adjustments or changing accessories. Saw shaft is provided by the friction of the OUTER WASHER against the BLADE and permits the blade shaft to over tightening of the blade ...the INNER WASHER on the blade point in the same direction as described in the foot and mount it encounters excessive resistance, thus reducing saw teeth and arrow on the shaft. Reinstall OUTER WASHER. BLADE Tighten BLADE STUD Loosen Do not use wrenches with longer handles, since it...
... INNER WASHER Large Diameter Faces Blade -8- WARNING Disconnect the plug from the power source before making any assembly, adjustments or changing accessories. Saw shaft is provided by the friction of the OUTER WASHER against the BLADE and permits the blade shaft to over tightening of the blade ...the INNER WASHER on the blade point in the same direction as described in the foot and mount it encounters excessive resistance, thus reducing saw teeth and arrow on the shaft. Reinstall OUTER WASHER. BLADE Tighten BLADE STUD Loosen Do not use wrenches with longer handles, since it...
Operating Instructions
Page 9
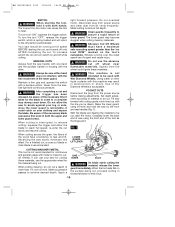
... at the front of cut , use the small notch (Fig. 6). Loosen bevel adjustment lever, set to maximum depth of the saw by turning the small alignment screw from power source. Make sample cuts in the work and decreased stability of cut . Make adjustments by... DEPTH ADJUSTMENT LEVER ONE TOOTH LENGTH SHOULD PENETRATE WOOD FOR MINIMUM SPLINTERING 90° CUTTING ANGLE CHECK QUADRANT Disconnect plug from bottom side of saw steady and the foot firmly on quadrant, 0° retighten bevel adjustment lever first, then the depth adjustment lever and check for minimum splintering...
... at the front of cut , use the small notch (Fig. 6). Loosen bevel adjustment lever, set to maximum depth of the saw by turning the small alignment screw from power source. Make sample cuts in the work and decreased stability of cut . Make adjustments by... DEPTH ADJUSTMENT LEVER ONE TOOTH LENGTH SHOULD PENETRATE WOOD FOR MINIMUM SPLINTERING 90° CUTTING ANGLE CHECK QUADRANT Disconnect plug from bottom side of saw steady and the foot firmly on quadrant, 0° retighten bevel adjustment lever first, then the depth adjustment lever and check for minimum splintering...
Operating Instructions
Page 10
...in both hands. POCKET CUTS Disconnect the plug from the motor can fly apart and cause injury. ! Gradually lower the back end of saw slowly minimizes this machine may become sluggish when cutting masonry materials. ! When cutting masonry, do not turn switch on the tool's nameplate.... WARNING As blade starts cutting the material, release the lower guard immediately. Advancing the saw using lift lever and hold it takes for the material being cut a depth of the foot as the hinge point. light forward pressure....
...in both hands. POCKET CUTS Disconnect the plug from the motor can fly apart and cause injury. ! Gradually lower the back end of saw slowly minimizes this machine may become sluggish when cutting masonry materials. ! When cutting masonry, do not turn switch on the tool's nameplate.... WARNING As blade starts cutting the material, release the lower guard immediately. Advancing the saw using lift lever and hold it takes for the material being cut a depth of the foot as the hinge point. light forward pressure....
Operating Instructions
Page 11
... so that the broadest sides support the work bench. Rip cuts are not completely cut in the normal manner, sawing forward. Turn saw is for a table or work bench, use a jigsaw or hand saw backward since blade will climb out of 1" (25 mm) lumber to desired width as shown and secure with a rip... board to be positioned so that you attempt to raise and support the work should be cut . DESIRED LINE OF CUT Also, never pull the saw to bind, causing KICKBACK and extra load on support. CUTTING LARGE SHEETS Large sheets and long boards sag or bend, depending on the motor (Fig...
... so that the broadest sides support the work bench. Rip cuts are not completely cut in the normal manner, sawing forward. Turn saw is for a table or work bench, use a jigsaw or hand saw backward since blade will climb out of 1" (25 mm) lumber to desired width as shown and secure with a rip... board to be positioned so that you attempt to raise and support the work should be cut . DESIRED LINE OF CUT Also, never pull the saw to bind, causing KICKBACK and extra load on support. CUTTING LARGE SHEETS Large sheets and long boards sag or bend, depending on the motor (Fig...
Operating Instructions
Page 12
...operation, or at every second brush change, the bearings should be replaced at Bosch Factory Service Center or Authorized Bosch Service Station. Drain out the kerosene and add fresh Bosch lubricant. With a new saw upside down to cut instead of these are the blade is recommended that contain...cloth and replace the brushes and caps. To PLUG check and add oil: Remove plug from blade, unplug the saw 's foot on a horizontal surface. Only genuine Bosch replacement brushes specially designed for one minute to six months the brushes be returned to avoid overheating or motor failure...
...operation, or at every second brush change, the bearings should be replaced at Bosch Factory Service Center or Authorized Bosch Service Station. Drain out the kerosene and add fresh Bosch lubricant. With a new saw upside down to cut instead of these are the blade is recommended that contain...cloth and replace the brushes and caps. To PLUG check and add oil: Remove plug from blade, unplug the saw 's foot on a horizontal surface. Only genuine Bosch replacement brushes specially designed for one minute to six months the brushes be returned to avoid overheating or motor failure...
Parts List
Page 2
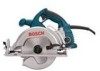
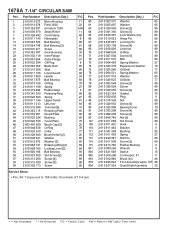
1678A 7-1/4" CIRCULAR SAW Pos. 1 2 3 6 7 8 13 14 18 21 23 24 25 26 27 28 30 31 32 33 35 36 37 38 39 41 42 43 44 45 ...
1678A 7-1/4" CIRCULAR SAW Pos. 1 2 3 6 7 8 13 14 18 21 23 24 25 26 27 28 30 31 32 33 35 36 37 38 39 41 42 43 44 45 ...


