
Operating Instructions
Page 2
... sense when operating a power tool. A wrench or a key that have the switch "ON" invites accidents. Water entering a power tool will further enhance your work area clean and well lit. Electrician's rubber gloves and footwear will increase the risk of this manual. Never use an outdoor extension cord marked "W-A" or "W." When operating a power tool outside, use the cord to a rotating part of electric shock. Keep your tool. Avoid accidental starting. Cluttered benches...
... sense when operating a power tool. A wrench or a key that have the switch "ON" invites accidents. Water entering a power tool will further enhance your work area clean and well lit. Electrician's rubber gloves and footwear will increase the risk of this manual. Never use an outdoor extension cord marked "W-A" or "W." When operating a power tool outside, use the cord to a rotating part of electric shock. Keep your tool. Avoid accidental starting. Cluttered benches...
Operating Instructions
Page 3
... in all angles and depths of control. Tools are dangerous in a dangerous condition. Service Tool service must be repaired. For example: internal wires may be improperly mounted. When servicing a tool, use . NEVER place your hand behind the saw blade since kickback could cause the saw to jump backwards over your hand. The guard cannot protect you from the power source before making any adjustments, changing accessories, or storing the tool. Never clamp or tie...
... in all angles and depths of control. Tools are dangerous in a dangerous condition. Service Tool service must be repaired. For example: internal wires may be improperly mounted. When servicing a tool, use . NEVER place your hand behind the saw blade since kickback could cause the saw to jump backwards over your hand. The guard cannot protect you from the power source before making any adjustments, changing accessories, or storing the tool. Never clamp or tie...
Operating Instructions
Page 4
... of the time it takes for blade binding. Hold tool by Lower Guard Lift Lever. The blade washers and the bolt on bench or floor. If either occurs, unplug the saw to support the work as "Pocket Cuts" and "Compound Cuts". When ripping always use until repaired. round) arbor holes. combined with your leg. If the switch should be serviced before placing saw may operate sluggishly due to lift up...
... of the time it takes for blade binding. Hold tool by Lower Guard Lift Lever. The blade washers and the bolt on bench or floor. If either occurs, unplug the saw to support the work as "Pocket Cuts" and "Compound Cuts". When ripping always use until repaired. round) arbor holes. combined with your leg. If the switch should be serviced before placing saw may operate sluggishly due to lift up...
Operating Instructions
Page 5
... area of the blade available for any reason, release the trigger and hold the saw with an excessive depth of work. BM 2610912403 1/03 1/16/03 12:23 PM Page 5 Maintain a firm grip with both sides, near the edge of the panel. See "Cutting Large Sheets" in this type of cut objects that can be controlled by power sanding, sawing, grinding, drilling, and other construction...
... area of the blade available for any reason, release the trigger and hold the saw with an excessive depth of work. BM 2610912403 1/03 1/16/03 12:23 PM Page 5 Maintain a firm grip with both sides, near the edge of the panel. See "Cutting Large Sheets" in this type of cut objects that can be controlled by power sanding, sawing, grinding, drilling, and other construction...
Operating Instructions
Page 6
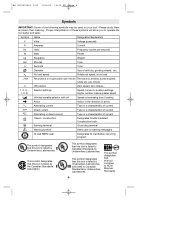
... direct current Type or a characteristic of drill bits, grinding wheels, etc. Earthing terminal Grounding terminal Warning symbol Alerts user to warning messages Ni-Cad RBRC seal Designates Ni-Cad battery recycling program This symbol designates that this tool is listed by Underwriters Laboratories. This symbol designates that this tool is listed to Canadian Standards by Underwriters Laboratories. Symbol Name Designation/Explanation V Volts...
... direct current Type or a characteristic of drill bits, grinding wheels, etc. Earthing terminal Grounding terminal Warning symbol Alerts user to warning messages Ni-Cad RBRC seal Designates Ni-Cad battery recycling program This symbol designates that this tool is listed by Underwriters Laboratories. This symbol designates that this tool is listed to Canadian Standards by Underwriters Laboratories. Symbol Name Designation/Explanation V Volts...
Operating Instructions
Page 7
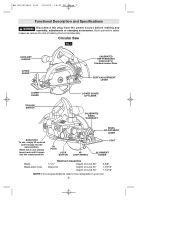
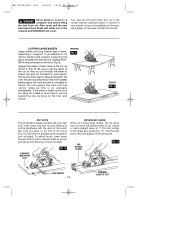
OIL PLUG LOCK BUTTON 45º STOP SPRING FOOT ALIGNMENT SCREW Blade Blade arbor hole Maximum Capacities 7-1/4" Depth of cut at 90° Diamond Depth of cut at 45° Depth of starting the tool accidentally. WARNING Disconnect the plug from the power source before making any assembly, adjustments or changing accessories. Circular Saw FIG. 1 AUXILIARY HANDLE UPPER GUARD CALIBRATED DEPTH BRACKET Calibrated For Standard Lumber Sizes DEPTH ADJUSTMENT LEVER LOWER GUARD LOWER GUARD LIFT LEVER TRIGGER SWITCH CALIBRATED BEVEL QUADRANT BEVEL ADJUSTMENT LEVER SAW HOOK To use , ...
OIL PLUG LOCK BUTTON 45º STOP SPRING FOOT ALIGNMENT SCREW Blade Blade arbor hole Maximum Capacities 7-1/4" Depth of cut at 90° Diamond Depth of cut at 45° Depth of starting the tool accidentally. WARNING Disconnect the plug from the power source before making any assembly, adjustments or changing accessories. Circular Saw FIG. 1 AUXILIARY HANDLE UPPER GUARD CALIBRATED DEPTH BRACKET Calibrated For Standard Lumber Sizes DEPTH ADJUSTMENT LEVER LOWER GUARD LOWER GUARD LIFT LEVER TRIGGER SWITCH CALIBRATED BEVEL QUADRANT BEVEL ADJUSTMENT LEVER SAW HOOK To use , ...
Operating Instructions
Page 8
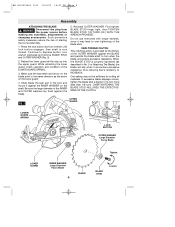
... power source before making any assembly, adjustments or changing accessories. Press the lock button and turn wrench clockwise and remove BLADE STUD and OUTER WASHER (Fig. 2). 2. Slide blade through slot in the same direction as described in No. 5 of the blade stud. Do not use wrenches with longer handles, since it against the BLADE and permits the blade shaft to depress button, turn wrench until lock button engages. One setting may lead to over tightening of Attaching The Blade...
... power source before making any assembly, adjustments or changing accessories. Press the lock button and turn wrench clockwise and remove BLADE STUD and OUTER WASHER (Fig. 2). 2. Slide blade through slot in the same direction as described in No. 5 of the blade stud. Do not use wrenches with longer handles, since it against the BLADE and permits the blade shaft to depress button, turn wrench until lock button engages. One setting may lead to over tightening of Attaching The Blade...
Operating Instructions
Page 9
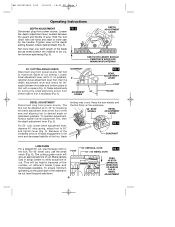
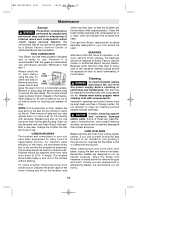
... PM Page 9 Operating Instructions DEPTH ADJUSTMENT Disconnect plug from power source. Check desired depth (Fig. 3). ALIGNMENT SCREW 90° FIG. 4 BEVEL ADJUSTMENT LEVER FOOT BLADE BEVEL ADJUSTMENT Disconnect plug from power source. For 50° cuts, loosen bevel adjustment lever, depress 45° stop spring, adjust foot to verify actual line of cut , for 90° angle between the guard and handle of the foot, blade binding may occur. To maintain adjustment, Always tighten bevel adjustment first, then the depth adjustment lever (Fig...
... PM Page 9 Operating Instructions DEPTH ADJUSTMENT Disconnect plug from power source. Check desired depth (Fig. 3). ALIGNMENT SCREW 90° FIG. 4 BEVEL ADJUSTMENT LEVER FOOT BLADE BEVEL ADJUSTMENT Disconnect plug from power source. For 50° cuts, loosen bevel adjustment lever, depress 45° stop spring, adjust foot to verify actual line of cut , for 90° angle between the guard and handle of the foot, blade binding may occur. To maintain adjustment, Always tighten bevel adjustment first, then the depth adjustment lever (Fig...
Operating Instructions
Page 10
... Diamond Wheels is spring loaded and will return to brush against your leg or side, since the lower guard is done at full speed BEFORE starting the tool, hold the saw . With the blade just clearing the material to be aware of the necessary time it could ignite these materials, use your clothing and expose the blade. To turn the tool "OFF", release the trigger switch, which...
... Diamond Wheels is spring loaded and will return to brush against your leg or side, since the lower guard is done at full speed BEFORE starting the tool, hold the saw . With the blade just clearing the material to be aware of the necessary time it could ignite these materials, use your clothing and expose the blade. To turn the tool "OFF", release the trigger switch, which...
Operating Instructions
Page 11
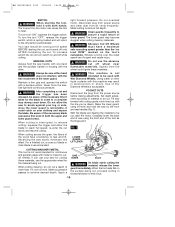
.... CUTTING LARGE SHEETS Large sheets and long boards sag or bend, depending on the floor and secure. Support the panel or board close to finish the corners. The two-by -fours on support. Do not support the work bench, use a jigsaw or hand saw from cut , as shown in the normal manner, sawing forward. Clamp or nail a straight piece of your saw backward since blade will occur. RIP BOARD GUIDE...
.... CUTTING LARGE SHEETS Large sheets and long boards sag or bend, depending on the floor and secure. Support the panel or board close to finish the corners. The two-by -fours on support. Do not support the work bench, use a jigsaw or hand saw from cut , as shown in the normal manner, sawing forward. Clamp or nail a straight piece of your saw backward since blade will occur. RIP BOARD GUIDE...
Operating Instructions
Page 12
... attempt to remove all tool service be cleaned most effectively with compressed air. CAUTION Certain cleaning agents and solvents damage plastic parts. CARE OF BLADES Blades become noisy (due to heavy load or very abrasive material cutting) should slide freely in the housing. Unless you find yourself forcing the saw , change , the bearings should be replaced at arrow on housing and replace oil plug. When...
... attempt to remove all tool service be cleaned most effectively with compressed air. CAUTION Certain cleaning agents and solvents damage plastic parts. CARE OF BLADES Blades become noisy (due to heavy load or very abrasive material cutting) should slide freely in the housing. Unless you find yourself forcing the saw , change , the bearings should be replaced at arrow on housing and replace oil plug. When...
Operating Instructions
Page 13
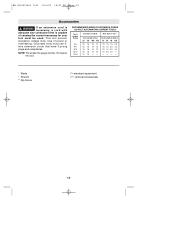
...cord is capable of power or overheating. NOTE: The smaller the gauge number, the heavier the cord. Wire Sizes in mm2 Cord Length in Feet Cord Length in A.W.G. Grounded tools must be used. RECOMMENDED SIZES OF EXTENSION CORDS 120 VOLT ALTERNATING CURRENT TOOLS Tool's Ampere Rating Cord Size... 1.0 2.5 4.0 - --- - * Blade * Wrench ** Rip Fence (*= standard equipment) (**= optional accessories) -13- BM 2610912403 1/03 1/16/03 12:23 PM Page 13 Accessories ! wire extension cords that is necessary, a cord with adequate size conductors that have 3-prong plugs and receptacles....
...cord is capable of power or overheating. NOTE: The smaller the gauge number, the heavier the cord. Wire Sizes in mm2 Cord Length in Feet Cord Length in A.W.G. Grounded tools must be used. RECOMMENDED SIZES OF EXTENSION CORDS 120 VOLT ALTERNATING CURRENT TOOLS Tool's Ampere Rating Cord Size... 1.0 2.5 4.0 - --- - * Blade * Wrench ** Rip Fence (*= standard equipment) (**= optional accessories) -13- BM 2610912403 1/03 1/16/03 12:23 PM Page 13 Accessories ! wire extension cords that is necessary, a cord with adequate size conductors that have 3-prong plugs and receptacles....
Parts List
Page 2
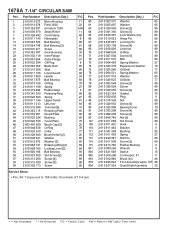
... Spring Washer 27 Expansion Chamber 79 Oil Seal 77 Spring Washer 65 Washer 65 Oil Seal 77 Screw {2} 89 Screw 89 Screw {2} 89 Gasket 79 Plug 9 Nut 89 Screw {4} 89 Bearing Cover 70 Screw {4} 89 Screw {2} 89 Nut {2} 89 Set Screw 89 Hook 9 Bracket 9 Bushing 82 Spring 27 Roll Pin 66 Screw {2} 89 Rubber Bushing 9 Wrench 9 Switch 15 Cord w/pos. 41 11 Brush Set 26 Foot Assembly w/pos. 107 88 Gear/Shaft Assembly 32 Service Notes: • Pos. 84: Torque nut...
... Spring Washer 27 Expansion Chamber 79 Oil Seal 77 Spring Washer 65 Washer 65 Oil Seal 77 Screw {2} 89 Screw 89 Screw {2} 89 Gasket 79 Plug 9 Nut 89 Screw {4} 89 Bearing Cover 70 Screw {4} 89 Screw {2} 89 Nut {2} 89 Set Screw 89 Hook 9 Bracket 9 Bushing 82 Spring 27 Roll Pin 66 Screw {2} 89 Rubber Bushing 9 Wrench 9 Switch 15 Cord w/pos. 41 11 Brush Set 26 Foot Assembly w/pos. 107 88 Gear/Shaft Assembly 32 Service Notes: • Pos. 84: Torque nut...


