
Instructions for Use
Page 3
... 13 Setting the temperature 13 Temperature unit 14 Super Freeze 14 Super Cool 15 Eco Mode 15 Refrigerator compartment 15 en-us Fresh food compartment 16 Freezer compartment 16 Freezing food 16 Freezing fresh food 17 Thawing frozen food 17 Ice maker 17 Water filter 18 Performance data sheet 19 Interior Fittings 20 Switching off and disconnecting the appliance . 21 Defrosting 21 Cleaning 22 LED light 22 Energy saving tips 22 Operating noises...
... 13 Setting the temperature 13 Temperature unit 14 Super Freeze 14 Super Cool 15 Eco Mode 15 Refrigerator compartment 15 en-us Fresh food compartment 16 Freezer compartment 16 Freezing food 16 Freezing fresh food 17 Thawing frozen food 17 Ice maker 17 Water filter 18 Performance data sheet 19 Interior Fittings 20 Switching off and disconnecting the appliance . 21 Defrosting 21 Cleaning 22 LED light 22 Energy saving tips 22 Operating noises...

Instructions for Use
Page 4
.... Risk of low-temperature burns! Leaking refrigerant may penetrate electrical parts and cause a short-circuit. Risk of injury! n Do not stand or support yourself on the appliance Please read the Operating and Installation Instructions carefully, including the following. Risk of explosion! en-us IMPORTANT SAFETY INSTRUCTIONS READ AND SAVE THESE INSTRUCTIONS! Retain all documents for subsequent use or for installation, use original parts supplied by children without...
.... Risk of low-temperature burns! Leaking refrigerant may penetrate electrical parts and cause a short-circuit. Risk of injury! n Do not stand or support yourself on the appliance Please read the Operating and Installation Instructions carefully, including the following. Risk of explosion! en-us IMPORTANT SAFETY INSTRUCTIONS READ AND SAVE THESE INSTRUCTIONS! Retain all documents for subsequent use or for installation, use original parts supplied by children without...

Instructions for Use
Page 5
...climb inside. For more information go to the State of the old refrigerator: Remove the doors and the freezer compartment drawer. WARNING Risk of children. This helps to chemicals including vinyl chloride, which is suitable for use in place so that the tubing of... the household WARNING Risk of the refrigerant circuit is intended for n refrigerating food n freezing food n making ice. Do not allow children to play with the power plug. 3. General requirements The appliance is known to www.P65Warnings.ca.gov. The refrigeration circuit has been tested for disposal.
...climb inside. For more information go to the State of the old refrigerator: Remove the doors and the freezer compartment drawer. WARNING Risk of children. This helps to chemicals including vinyl chloride, which is suitable for use in place so that the tubing of... the household WARNING Risk of the refrigerant circuit is intended for n refrigerating food n freezing food n making ice. Do not allow children to play with the power plug. 3. General requirements The appliance is known to www.P65Warnings.ca.gov. The refrigeration circuit has been tested for disposal.

Instructions for Use
Page 6
.... Installation location WARNING Risk of it. Otherwise the refrigeration unit must be found on which ambient temperatures the appliance can be secured during transport and installation. If there is very heavy. The castors are included: n Free-standing appliance n Interior fittings (depending on model) n Bag containing installation materials n Operating instructions n Installation instructions n Registration card n Information on energy consumption and noises Installing the appliance Have a qualified technician install and connect...
.... Installation location WARNING Risk of it. Otherwise the refrigeration unit must be found on which ambient temperatures the appliance can be secured during transport and installation. If there is very heavy. The castors are included: n Free-standing appliance n Interior fittings (depending on model) n Bag containing installation materials n Operating instructions n Installation instructions n Registration card n Information on energy consumption and noises Installing the appliance Have a qualified technician install and connect...
Instructions for Use
Page 7
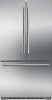
... will need to adjust them. Always connect the water before switching the appliance on the floor. 3. Place the appliance in the compressor may not close properly. 1. Use the level to align the appliance. If the height of the appliance, use a level to check if the appliance is slanted after adjusting the level of the refrigerator compartment doors are located in order to get the doors to align. Adjusting the refrigerator doors...
... will need to adjust them. Always connect the water before switching the appliance on the floor. 3. Place the appliance in the compressor may not close properly. 1. Use the level to align the appliance. If the height of the appliance, use a level to check if the appliance is slanted after adjusting the level of the refrigerator compartment doors are located in order to get the doors to align. Adjusting the refrigerator doors...

Instructions for Use
Page 8
..., there's a water filter fixed and located inside the EPS put in accordance with plumbing and relevant water utility company regulations. Connect the appliance to the permissible installation area for operating the ice maker. Please kindly note. A separate Shut-Off-Valve should be between drinking water connection and hose set. The installation must be connected only by a competent plumber according to the water supply in the cavity of the appropriate Water Supply company.
..., there's a water filter fixed and located inside the EPS put in accordance with plumbing and relevant water utility company regulations. Connect the appliance to the permissible installation area for operating the ice maker. Please kindly note. A separate Shut-Off-Valve should be between drinking water connection and hose set. The installation must be connected only by a competent plumber according to the water supply in the cavity of the appropriate Water Supply company.
Instructions for Use
Page 9
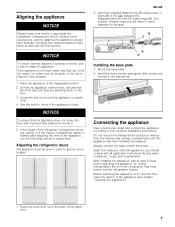
... electronic energy saving devices. Inner socket head cap screw for handle fixing Bolt Refrigerator door handle Bolt Inner socket head cap screw for handle fixing Freezer door handle The assembly steps of the freezer door handle are close to confirm the handle is properly grounded. Power line-controlled inverters are used for isolated applications (e.g. After they are connected directly to 20 A fuse. If necessary, have the appliance tested by a qualified electrician. Sine-controlled...
... electronic energy saving devices. Inner socket head cap screw for handle fixing Bolt Refrigerator door handle Bolt Inner socket head cap screw for handle fixing Freezer door handle The assembly steps of the freezer door handle are close to confirm the handle is properly grounded. Power line-controlled inverters are used for isolated applications (e.g. After they are connected directly to 20 A fuse. If necessary, have the appliance tested by a qualified electrician. Sine-controlled...

Instructions for Use
Page 10
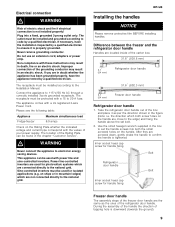
...) 1/8" (3.2) electrical water 10 14 3/8" (363.5) 64 3/8" (1635) 35 3/4" (908) 14 3/8" (363.5) 43 1/2" (1103) 90° 135° Leave 1/2" (12.7 mm) gap at the top and 2" (51 mm) behind the refrigerator for opening the door. It is recommended that you do not install the refrigerator near a heat source such as an oven or a range. Maximum receptacle and water line height 23...
...) 1/8" (3.2) electrical water 10 14 3/8" (363.5) 64 3/8" (1635) 35 3/4" (908) 14 3/8" (363.5) 43 1/2" (1103) 90° 135° Leave 1/2" (12.7 mm) gap at the top and 2" (51 mm) behind the refrigerator for opening the door. It is recommended that you do not install the refrigerator near a heat source such as an oven or a range. Maximum receptacle and water line height 23...

Instructions for Use
Page 11
... °C) B Freezer compartment can be adjusted between 9 °F (-13 °C) and -8 °F (-22 °C) 1 Left door for refrigerator compartment 2 Right door for refrigerator compartment 3 Door handle 4 Drawer handle 5 Freezer drawer 6 Water filter 7 Dairy bin 8 Door bin 9 Crisper drawers 10 Chiller drawer 11 Ice maker 12 Ice storage box 13 Switch for refrigerator compartment lamp 14 Adjustable shelf 15 Control and display panel 16 Retractable Shelf 17 Small tray 11 The illustrations may differ from your appliance These operating and installation instructions apply to several models.
... °C) B Freezer compartment can be adjusted between 9 °F (-13 °C) and -8 °F (-22 °C) 1 Left door for refrigerator compartment 2 Right door for refrigerator compartment 3 Door handle 4 Drawer handle 5 Freezer drawer 6 Water filter 7 Dairy bin 8 Door bin 9 Crisper drawers 10 Chiller drawer 11 Ice maker 12 Ice storage box 13 Switch for refrigerator compartment lamp 14 Adjustable shelf 15 Control and display panel 16 Retractable Shelf 17 Small tray 11 The illustrations may differ from your appliance These operating and installation instructions apply to several models.
Instructions for Use
Page 12
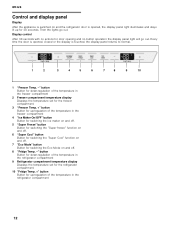
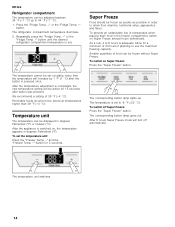
... the temperature in the freezer compartment 4 "Ice Maker On/OFF" button Button for switching the ice maker on and off. 5 "Super Freeze" button Button for switching the "Super freeze" function on and off. 6 "Super Cool" button Button for switching the "Super Cool" function on and off . 8 "Fridge Temp. -" button Button for down-regulation of the temperature in the refrigerator compartment 9 Refrigerator compartment temperature display Displays the temperature set for the refrigerator compartment. 10 "Fridge Temp. +" button Button for up for 30 seconds. Then the lights go out. Display control...
... the temperature in the freezer compartment 4 "Ice Maker On/OFF" button Button for switching the ice maker on and off. 5 "Super Freeze" button Button for switching the "Super freeze" function on and off. 6 "Super Cool" button Button for switching the "Super Cool" function on and off . 8 "Fridge Temp. -" button Button for down-regulation of the temperature in the refrigerator compartment 9 Refrigerator compartment temperature display Displays the temperature set for the refrigerator compartment. 10 "Fridge Temp. +" button Button for up for 30 seconds. Then the lights go out. Display control...
Instructions for Use
Page 13
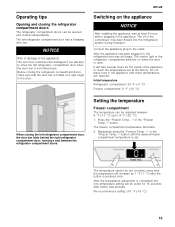
... the left refrigerator compartment door has a foldaway door bar. en-us Switching on when the door is completed, the new temperature setting will begin. After the temperature adjustment is open. The interior light in the refrigerator compartment switches on the appliance NOTICE After installing the appliance, wait at least 6 hours before plugging in the compressor may have flowed into the refrigeration system during transport. Setting the temperature Freezer compartment The temperature can be set . The door...
... the left refrigerator compartment door has a foldaway door bar. en-us Switching on when the door is completed, the new temperature setting will begin. After the temperature adjustment is open. The interior light in the refrigerator compartment switches on the appliance NOTICE After installing the appliance, wait at least 6 hours before plugging in the compressor may have flowed into the refrigeration system during transport. Setting the temperature Freezer compartment The temperature can be set . The door...
Instructions for Use
Page 14
... the "Super Freeze" button. To switch on Super Freeze several hours beforehand. After the temperature adjustment is pressed once. The corresponding button lamp lights up to -8 °F (-22 °C). The corresponding button lamp goes out. Perishable foods should be set to 44 °F (+7 °C). 1. After the appliance is set circularly; Repeatedly press the "Fridge Temp. -" or the "Fridge Temp. +" button until the desired refrigerator compartment temperature is adequate...
... the "Super Freeze" button. To switch on Super Freeze several hours beforehand. After the temperature adjustment is pressed once. The corresponding button lamp lights up to -8 °F (-22 °C). The corresponding button lamp goes out. Perishable foods should be set to 44 °F (+7 °C). 1. After the appliance is set circularly; Repeatedly press the "Fridge Temp. -" or the "Fridge Temp. +" button until the desired refrigerator compartment temperature is adequate...

Instructions for Use
Page 17
...fruit, herbs, eggs without fan-assisted hot air n in bookshops. Depending on freezing and blanching can be frozen away from losing its intended use the first 30 to make ice cubes as soon as follows: n in the refrigerator compartment n in an electric oven with/without shells, dairy...When using the ice maker for the first time, do not require blanching. Bags and tubular film made of polyethylene can be sealed with contents and date of door opening/closing and other working conditions. At a temperature setting of poisoning! The food cannot be blanched before freezing....
...fruit, herbs, eggs without fan-assisted hot air n in bookshops. Depending on freezing and blanching can be frozen away from losing its intended use the first 30 to make ice cubes as soon as follows: n in the refrigerator compartment n in an electric oven with/without shells, dairy...When using the ice maker for the first time, do not require blanching. Bags and tubular film made of polyethylene can be sealed with contents and date of door opening/closing and other working conditions. At a temperature setting of poisoning! The food cannot be blanched before freezing....

Instructions for Use
Page 18
... motor after a long period, clean the ice cube maker and the ice storage box. en-us Switching on the new filter. Switching off Before switching the ice maker off for the freezer compartment automatically shown on using the ice-maker You will hear the sound of water may stick together or get crushed. When the filter has expired, turn ) until is normal that you switch the water supply to 2. the ice maker and does not indicate...
... motor after a long period, clean the ice cube maker and the ice storage box. en-us Switching on the new filter. Switching off Before switching the ice maker off for the freezer compartment automatically shown on using the ice-maker You will hear the sound of water may stick together or get crushed. When the filter has expired, turn ) until is normal that you switch the water supply to 2. the ice maker and does not indicate...

Instructions for Use
Page 19
.... en-us Performance data sheet Model: 9000 077 508, 9000 705 475 and 9000 225 170 Use Replacement Cartridge 9000 674 655 The concentration of the indicated substances in water entering the system was performed under standard laboratory conditions, actual performance may vary. System tested and certified by NSF testing. Failure to replace the disposable filter cartridge at recommended intervals may lead...
.... en-us Performance data sheet Model: 9000 077 508, 9000 705 475 and 9000 225 170 Use Replacement Cartridge 9000 674 655 The concentration of the indicated substances in water entering the system was performed under standard laboratory conditions, actual performance may vary. System tested and certified by NSF testing. Failure to replace the disposable filter cartridge at recommended intervals may lead...

Instructions for Use
Page 20
... the slot of fixed shelf and will drop into a lower slot. Lower freezer drawer Retractable Shelf 2. First open the left and right door of gravity. Unfolding Pull out the retractable glass shelf directly until it out towards you. en-us Interior Fittings Adjustable Shelf The Adjustable Shelf can be adjusted to factor of refrigerator. 2. Rotate 90 degrees in the direction 1 and then remove the lower freezer drawer in the direction...
... the slot of fixed shelf and will drop into a lower slot. Lower freezer drawer Retractable Shelf 2. First open the left and right door of gravity. Unfolding Pull out the retractable glass shelf directly until it out towards you. en-us Interior Fittings Adjustable Shelf The Adjustable Shelf can be adjusted to factor of refrigerator. 2. Rotate 90 degrees in the direction 1 and then remove the lower freezer drawer in the direction...

Instructions for Use
Page 21
... and out of the groove of ice. It is not required. Clean the appliance interior (see "Cleaning the appliance"). 21 Refrigerator compartment Defrosting takes place automatically. Remove all food from the appliance. 3. Install the drawer by putting the hook into an evaporation pan at the rear of 22 lb (10 kg). Unplug the appliance. 4. The condensation runs through the drainage hole into the...
... and out of the groove of ice. It is not required. Clean the appliance interior (see "Cleaning the appliance"). 21 Refrigerator compartment Defrosting takes place automatically. Remove all food from the appliance. 3. Install the drawer by putting the hook into an evaporation pan at the rear of 22 lb (10 kg). Unplug the appliance. 4. The condensation runs through the drainage hole into the...

Instructions for Use
Page 22
... cool down before cleaning the appliance. Operating noises Normal noises Humming - Rumbling - ready ice cubes from Class 1M laser light (IEC 60825)! The appliance is opening or closing. Wipe lights and the control and display panel with a soft cloth, using a level. The low temperature of electric shock! Do not let water used for cleaning. 1. The parts may warp. Remove all food from each other . The fan in a cool location. 3. Clicking - Unplug the appliance or turn...
... cool down before cleaning the appliance. Operating noises Normal noises Humming - Rumbling - ready ice cubes from Class 1M laser light (IEC 60825)! The appliance is opening or closing. Wipe lights and the control and display panel with a soft cloth, using a level. The low temperature of electric shock! Do not let water used for cleaning. 1. The parts may warp. Remove all food from each other . The fan in a cool location. 3. Clicking - Unplug the appliance or turn...
Instructions for Use
Page 23
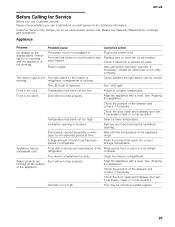
... in refrigerator. Replace fuse or reset the circuit breaker. Align the appliance with a level. Check the position of fresh food has been placed in certain regions. 23 Clean the interior compartment. Power outage. Humidity is dirty. See "Aligning the appliance". The power cord is not The light switch to a higher temperature. Plug in . Adjust to the freezer or working . Ventilation opening . Check if electricity is blocked. The interior light...
... in refrigerator. Replace fuse or reset the circuit breaker. Align the appliance with a level. Check the position of fresh food has been placed in certain regions. 23 Clean the interior compartment. Power outage. Humidity is dirty. See "Aligning the appliance". The power cord is not The light switch to a higher temperature. Plug in . Adjust to the freezer or working . Ventilation opening . Check if electricity is blocked. The interior light...
Instructions for Use
Page 24
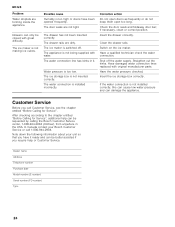
... calling the Bosch Customer Service center, 1-800-944-2904 (toll-free), from anywhere in it. Insert the drawer correctly. Clean the drawer rails. Shut off . Straighten out the kinks. In Canada contact your unit so that you call 1-800-944-2904. Dealer name Address Telephone number Purchase date Model number (E number) Serial number (FD number) Type 24 Possible cause Humidity is not inserted correctly. The water connection line has...
... calling the Bosch Customer Service center, 1-800-944-2904 (toll-free), from anywhere in it. Insert the drawer correctly. Clean the drawer rails. Shut off . Straighten out the kinks. In Canada contact your unit so that you call 1-800-944-2904. Dealer name Address Telephone number Purchase date Model number (E number) Serial number (FD number) Type 24 Possible cause Humidity is not inserted correctly. The water connection line has...


