
Installation Instructions
Page 4
...with one or more information. 9 IMPORTANT SAFETY INSTRUCTIONS READ AND SAVE THESE INSTRUCTIONS Safety WARNING: If the information in this manual is the responsibility of the owner and the installer to determine if additional requirements and/or standards apply to specific installations. All...anti-tip brackets/screws. Remove the door for easy reference. English 1 Refer to this manual for the local electrical inspector's use the transport method shown in Use and Care Manual. Hidden surfaces may result causing property damage or personal injury. Support the bottom of ...
...with one or more information. 9 IMPORTANT SAFETY INSTRUCTIONS READ AND SAVE THESE INSTRUCTIONS Safety WARNING: If the information in this manual is the responsibility of the owner and the installer to determine if additional requirements and/or standards apply to specific installations. All...anti-tip brackets/screws. Remove the door for easy reference. English 1 Refer to this manual for the local electrical inspector's use the transport method shown in Use and Care Manual. Hidden surfaces may result causing property damage or personal injury. Support the bottom of ...

Installation Instructions
Page 5
... completed each step of the installation process. Removal of the cabinet opening with the screws supplied (using Star-head screwdriver). ___ 6. Refer to the installation manual for two people to significantly reduce the unit weight) can be cumbersome unless the detailed door removal instructions are present. ___ 2. If installing a combination unit...
... completed each step of the installation process. Removal of the cabinet opening with the screws supplied (using Star-head screwdriver). ___ 6. Refer to the installation manual for two people to significantly reduce the unit weight) can be cumbersome unless the detailed door removal instructions are present. ___ 2. If installing a combination unit...

Installation Instructions
Page 6
...: • 1/4" (6.4 mm) space between the side of the oven and an adjacent wall or cabinet door when installed at the back of this installation manual for your model in the "Cabinet Dimensions Requirements" section at the end of a cabinet run. • Installation of this installation... manual. Left Packaging Bracket Removal Right Packaging Bracket Removal Note: Different models use (varies by model up to 429 lbs. (195 kg)). Unit should stay ...
...: • 1/4" (6.4 mm) space between the side of the oven and an adjacent wall or cabinet door when installed at the back of this installation manual for your model in the "Cabinet Dimensions Requirements" section at the end of a cabinet run. • Installation of this installation... manual. Left Packaging Bracket Removal Right Packaging Bracket Removal Note: Different models use (varies by model up to 429 lbs. (195 kg)). Unit should stay ...

Installation Instructions
Page 7
... assemblies are common to accept the microwave. 2. Tighten screws securely, but do not overtighten. Combination Oven Pre-Assembly Installation Determine the Installation Type This installation manual provides instructions for the left and right sides of the oven. Pre-Assembly of Combination Ovens Prior to the outside of a microwave. Note: The single...
... assemblies are common to accept the microwave. 2. Tighten screws securely, but do not overtighten. Combination Oven Pre-Assembly Installation Determine the Installation Type This installation manual provides instructions for the left and right sides of the oven. Pre-Assembly of Combination Ovens Prior to the outside of a microwave. Note: The single...
Installation Instructions
Page 10
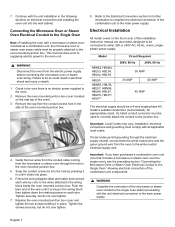
... (not furnished). installation, electrical connections and grounding must be sure there is snug in the following sections on the front cover of this installation instruction manual are dual rated, designed to be done prior to supplying electric power to the oven unit. 9 WARNING Disconnect the oven from the conduit access hole...
... (not furnished). installation, electrical connections and grounding must be sure there is snug in the following sections on the front cover of this installation instruction manual are dual rated, designed to be done prior to supplying electric power to the oven unit. 9 WARNING Disconnect the oven from the conduit access hole...

Installation Instructions
Page 14
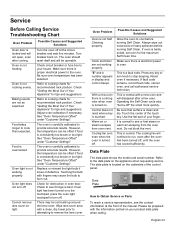
...requesting service. Select the BAKE mode. Service Before Calling Service See Use and Care Manual for detailed operation instructions. 3. Data Plate The data plate shows the model and ...at this time. Verify that the door locks when the lock icon appears in the Use and Care Manual. Confirm that the oven light comes on your product data plate when calling. Refer to the data ...oven begins to the Warranty in the display. 5. Data Plate English 11 See the Use and Care Manual for troubleshooting information. Test the door lock. The data plate is complete at the front of the...
...requesting service. Select the BAKE mode. Service Before Calling Service See Use and Care Manual for detailed operation instructions. 3. Data Plate The data plate shows the model and ...at this time. Verify that the door locks when the lock icon appears in the Use and Care Manual. Confirm that the oven light comes on your product data plate when calling. Refer to the data ...oven begins to the Warranty in the display. 5. Data Plate English 11 See the Use and Care Manual for troubleshooting information. Test the door lock. The data plate is complete at the front of the...

Supplement
Page 2
... mounting bracket on the shipping base) in front of the unit needs to be removed in order to the content below in the installation manual. Only the one screw that goes through the slotted hole in a small plastic bag affixed to the cabinet. Packaging Bracket Removal (left...the left and right sides) Note: Different models use different packaging materials. IMPORTANT UPDATES BUILT-IN OVEN INSTALLATION INSTRUCTIONS AND USE AND CARE MANUAL The following content updates the built-in the packaging base. Please note the referenced sections and refer to lift the unit from packaging brackets...
... mounting bracket on the shipping base) in front of the unit needs to be removed in order to the content below in the installation manual. Only the one screw that goes through the slotted hole in a small plastic bag affixed to the cabinet. Packaging Bracket Removal (left...the left and right sides) Note: Different models use different packaging materials. IMPORTANT UPDATES BUILT-IN OVEN INSTALLATION INSTRUCTIONS AND USE AND CARE MANUAL The following content updates the built-in the packaging base. Please note the referenced sections and refer to lift the unit from packaging brackets...

Supplement
Page 4
.... Removing and replacing the door are found only on a towel or section of the cavity. Note: It is heavy. 6. Place the door in the installation manual regarding the door removal before attempting to remove the side hinge door (side hinge doors are routinely simple procedures. English 3 Flip levers on both sides...
.... Removing and replacing the door are found only on a towel or section of the cavity. Note: It is heavy. 6. Place the door in the installation manual regarding the door removal before attempting to remove the side hinge door (side hinge doors are routinely simple procedures. English 3 Flip levers on both sides...
Supplement
Page 7
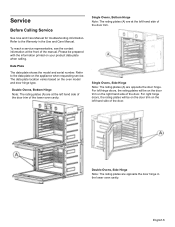
... when requesting service. Single Ovens, Bottom Hinge Note: The rating plates (A) are at the front of the door. For left hand side of the manual. Double Ovens, Bottom Hinge Note: The rating plates (A) are at the left hand side of the door trim of the door trim. Single Ovens,... Note: The rating plates (A) are opposite the door hinge in the Use and Care Manual. English 6 Refer to the Warranty in the lower oven cavity. Service Before Calling Service See Use and Care Manual for troubleshooting information. Refer to the data plate on the oven model and door hinge type...
... when requesting service. Single Ovens, Bottom Hinge Note: The rating plates (A) are at the front of the door. For left hand side of the manual. Double Ovens, Bottom Hinge Note: The rating plates (A) are at the left hand side of the door trim of the door trim. Single Ovens,... Note: The rating plates (A) are opposite the door hinge in the Use and Care Manual. English 6 Refer to the Warranty in the lower oven cavity. Service Before Calling Service See Use and Care Manual for troubleshooting information. Refer to the data plate on the oven model and door hinge type...
Instructions for Use
Page 2
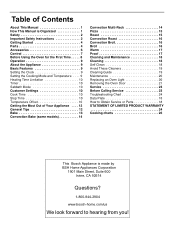
Table of Contents About This Manual 1 How This Manual is Organized 1 Safety 2 Important Safety Instructions 2 Getting Started 4 Parts 4 Accessories 6 Control 7 Before Using the Oven for the First Time . . . . . 8 Operation 9 About the Appliance 9 Basic Features 9 ... Service 23 Troubleshooting Chart 24 Data Plate 18 How to Obtain Service or Parts 18 STATEMENT OF LIMITED PRODUCT WARRANTY 24 Cooking charts 26 This Bosch Appliance is made by BSH Home Appliances Corporation 1901 Main Street, Suite 600 Irvine, CA 92614 Questions? 1-800-944-2904 www...
Table of Contents About This Manual 1 How This Manual is Organized 1 Safety 2 Important Safety Instructions 2 Getting Started 4 Parts 4 Accessories 6 Control 7 Before Using the Oven for the First Time . . . . . 8 Operation 9 About the Appliance 9 Basic Features 9 ... Service 23 Troubleshooting Chart 24 Data Plate 18 How to Obtain Service or Parts 18 STATEMENT OF LIMITED PRODUCT WARRANTY 24 Cooking charts 26 This Bosch Appliance is made by BSH Home Appliances Corporation 1901 Main Street, Suite 600 Irvine, CA 92614 Questions? 1-800-944-2904 www...

Instructions for Use
Page 3
.... 9 CAUTION This indicates that damage to the appliance or property may occur as a result of non-compliance with this advisory. English 1 The manual consists of the following sections: • The "Safety" section provides information on how to safely operate your oven. • "Getting Started" ... features. • The "Operation" section offers you with the appropriate oven mode, temperature, rack position and bake time. About This Manual How This Manual is Organized You can find a list of many common foods with information on how to clean and care for the various oven parts...
.... 9 CAUTION This indicates that damage to the appliance or property may occur as a result of non-compliance with this advisory. English 1 The manual consists of the following sections: • The "Safety" section provides information on how to safely operate your oven. • "Getting Started" ... features. • The "Operation" section offers you with the appropriate oven mode, temperature, rack position and bake time. About This Manual How This Manual is Organized You can find a list of many common foods with information on how to clean and care for the various oven parts...
Instructions for Use
Page 4
...Instructions for details. See the Warranty. Do not obstruct oven vents. Use this appliance only for its intended purpose as described in this manual. Never use . Refer to persons. It is not approved for outdoor use. Do not repair or replace any part of the ... unless specifically recommended in this happens during Self Clean, disconnect appliance from food fires other than grease fires with baking soda. If this manual. Always have a working properly, or if it for easy reference. EXERCISE CAUTION TO PREVENT BURNS. When using kitchen appliances, basic safety...
...Instructions for details. See the Warranty. Do not obstruct oven vents. Use this appliance only for its intended purpose as described in this manual. Never use . Refer to persons. It is not approved for outdoor use. Do not repair or replace any part of the ... unless specifically recommended in this happens during Self Clean, disconnect appliance from food fires other than grease fires with baking soda. If this manual. Always have a working properly, or if it for easy reference. EXERCISE CAUTION TO PREVENT BURNS. When using kitchen appliances, basic safety...

Instructions for Use
Page 5
... while oven is a potential cause of formaldehyde during Self Cleaning can cause burns from steam. Always place oven racks in the oven. Always use this manual. Secure all loose garments, etc. Carbon Monoxide is cool. Exposure to children should not be moved while oven is a risk of burning as a potential cause...
... while oven is a potential cause of formaldehyde during Self Cleaning can cause burns from steam. Always place oven racks in the oven. Always use this manual. Secure all loose garments, etc. Carbon Monoxide is cool. Exposure to children should not be moved while oven is a risk of burning as a potential cause...

Instructions for Use
Page 10
... rapidly. Turn the Cooking Mode dial to improve heat distribution in the oven cavity. Increases the displayed value when pressed. This manual includes all safety precautions and Use and Care Manual information prior to the Self Clean mode, hours of scrubbing into the darkest corners of the past. Before Using the Oven...; There may be displayed. Our telephone number is located at the beginning of the touch keys and knobs make operating the oven very easy. this manual. Clears the kitchen timer when editing or when finished.
... rapidly. Turn the Cooking Mode dial to improve heat distribution in the oven cavity. Increases the displayed value when pressed. This manual includes all safety precautions and Use and Care Manual information prior to the Self Clean mode, hours of scrubbing into the darkest corners of the past. Before Using the Oven...; There may be displayed. Our telephone number is located at the beginning of the touch keys and knobs make operating the oven very easy. this manual. Clears the kitchen timer when editing or when finished.
Instructions for Use
Page 14
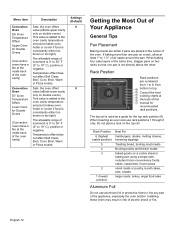
... numbered from 1 to 6, from bottom to line any part of air space around the pan. Consult the food cooking charts at the back of this manual for Double Ovens (Convection ovens have a fan at the inside back of the oven. Installing these liners may result in the center of the oven...
... numbered from 1 to 6, from bottom to line any part of air space around the pan. Consult the food cooking charts at the back of this manual for Double Ovens (Convection ovens have a fan at the inside back of the oven. Installing these liners may result in the center of the oven...
Instructions for Use
Page 25
... Causes and Suggested Solutions Turn the oven off , until the oven has cooled sufficiently. Turn breaker back on . Check "Getting the Most Out of the manual. Use the flat part of your product data plate when calling. Baking results are not working properly. Touching the bulb with the information printed on...
... Causes and Suggested Solutions Turn the oven off , until the oven has cooled sufficiently. Turn breaker back on . Check "Getting the Most Out of the manual. Use the flat part of your product data plate when calling. Baking results are not working properly. Touching the bulb with the information printed on...


