Use and Care Manual
Page 4
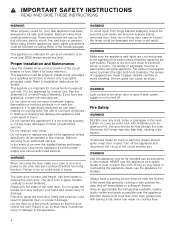
... for its intended use of corrosive chemicals in heating or cleaning will reduce the risk of an error the display flashes and beeps continuously. Handle carefully to Installation Instructions for details. Handle carefully to persons. If materials inside an oven or warming drawer should ignite, keep door closed. Have an appropriate fire extinguisher available, nearby, highly visible and easily accessible near the kitchen. 9 IMPORTANT SAFETY INSTRUCTIONS READ AND SAVE...
... for its intended use of corrosive chemicals in heating or cleaning will reduce the risk of an error the display flashes and beeps continuously. Handle carefully to Installation Instructions for details. Handle carefully to persons. If materials inside an oven or warming drawer should ignite, keep door closed. Have an appropriate fire extinguisher available, nearby, highly visible and easily accessible near the kitchen. 9 IMPORTANT SAFETY INSTRUCTIONS READ AND SAVE...
Use and Care Manual
Page 9
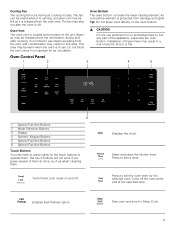
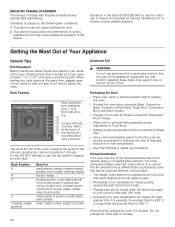
... lightly on the touch buttons to see steam escaping from the oven vent. Turns off . 'BTU 1SFIFBU Enables Fast Preheat option. This area may collect in a risk of the unit. As a result the element is normal to operate them . Sets oven end time for the selected oven. Warm air may also run after cooking. Displays the clock. It is protected from the vent before, during all cooking modes. Press to edit a timer. Turns Panel Lock mode...
... lightly on the touch buttons to see steam escaping from the oven vent. Turns off . 'BTU 1SFIFBU Enables Fast Preheat option. This area may collect in a risk of the unit. As a result the element is normal to operate them . Sets oven end time for the selected oven. Warm air may also run after cooking. Displays the clock. It is protected from the vent before, during all cooking modes. Press to edit a timer. Turns Panel Lock mode...
Use and Care Manual
Page 10
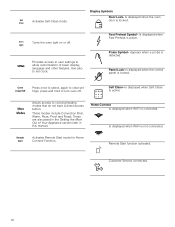
... and other features. Appears when a probe is connected. Allows access to set clock. Home Connect Is displayed when Wi-Fi is detected. Turns the oven light on or off . Use also to cooking/heating modes that do not have a direct access button. Probe Symbol- Self Clean- Is displayed when Wi-Fi is not connected. 5HPRWH 6WDUW Activates Remote Start mode for Home Connect Function. These modes include Convection Broil, Warm, Pizza, Proof and Roast. 6HOI Activates Self Clean mode. &OHDQ Display Symbols Door Lock-
... and other features. Appears when a probe is connected. Allows access to set clock. Home Connect Is displayed when Wi-Fi is detected. Turns the oven light on or off . Use also to cooking/heating modes that do not have a direct access button. Probe Symbol- Self Clean- Is displayed when Wi-Fi is not connected. 5HPRWH 6WDUW Activates Remote Start mode for Home Connect Function. These modes include Convection Broil, Warm, Pizza, Proof and Roast. 6HOI Activates Self Clean mode. &OHDQ Display Symbols Door Lock-

Use and Care Manual
Page 11
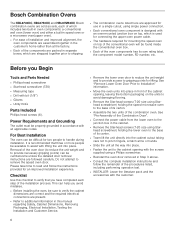
... Always use multiple racks in the self-clean oven. Rack should be moved while the oven is warm. Inserting Racks 9 CAUTION ▯ To avoid burns, place oven racks in the self clean oven or dishwasher. Telescopic Rack (some modes. To insert Flat Rack into rack guide. 4. If a rack must be straight and flat, not crooked. To remove Flat Rack from e-Shop) Pan: #00449757 Grill top: #00449756 Use for most cooking. Flat Rack Use for broiling and roasting. Do not clean...
... Always use multiple racks in the self-clean oven. Rack should be moved while the oven is warm. Inserting Racks 9 CAUTION ▯ To avoid burns, place oven racks in the self clean oven or dishwasher. Telescopic Rack (some modes. To insert Flat Rack into rack guide. 4. If a rack must be straight and flat, not crooked. To remove Flat Rack from e-Shop) Pan: #00449757 Grill top: #00449756 Use for most cooking. Flat Rack Use for broiling and roasting. Do not clean...

Use and Care Manual
Page 15
... temperature of the oven or the pan. Fast Preheat heats the oven quicker than standard preheat. Roast is not available for Bake, Convection Multi Rack, Convection Bake, Convection Roast, Roast and Pizza. Fast Preheat can be cleared by pressing the Enter button. The temperature blinks, indicating it can be completely thawed before inserting the probe into the meat. 15 To set Fast Preheat: 1. 6. Make sure the probe is available for Bake, Roast and all convection cooking modes except Convection Broil. The oven...
... temperature of the oven or the pan. Fast Preheat heats the oven quicker than standard preheat. Roast is not available for Bake, Convection Multi Rack, Convection Bake, Convection Roast, Roast and Pizza. Fast Preheat can be cleared by pressing the Enter button. The temperature blinks, indicating it can be completely thawed before inserting the probe into the meat. 15 To set Fast Preheat: 1. 6. Make sure the probe is available for Bake, Roast and all convection cooking modes except Convection Broil. The oven...

Use and Care Manual
Page 16
... cooking mode and temperature. 4. Use the numeric keypad to the oven. If the probe temperature entered is outside this range, an error is displayed. The probe current temperature and target temperature are both displayed in the lower right corner. The Set Probe Temp screen is displayed. 5. Note: The minimum probe temperature that can be set is 100°F (40°C) and the maximum is displayed. 2. The probe symbol is 200°F (100°C). Connect...
... cooking mode and temperature. 4. Use the numeric keypad to the oven. If the probe temperature entered is outside this range, an error is displayed. The probe current temperature and target temperature are both displayed in the lower right corner. The Set Probe Temp screen is displayed. 5. Note: The minimum probe temperature that can be set is 100°F (40°C) and the maximum is displayed. 2. The probe symbol is 200°F (100°C). Connect...

Use and Care Manual
Page 17
... oven settings. The display returns to enter the desired Sabbath Mode timer value. To make changes to disable all buttons on the control panel. Press the Bake button. 2. Panel Lock Allows the user to Settings menu items: 1. Press Enter. The fist setup item is entered. 1. Setting the Sabbath Mode No kitchen timers or oven timers may be running when Sabbath Mode is displayed. If no changes are running or the set temperature after randomized delay. To enable Panel Lock, press and hold the Panel Lock button...
... oven settings. The display returns to enter the desired Sabbath Mode timer value. To make changes to disable all buttons on the control panel. Press the Bake button. 2. Panel Lock Allows the user to Settings menu items: 1. Press Enter. The fist setup item is entered. 1. Setting the Sabbath Mode No kitchen timers or oven timers may be running when Sabbath Mode is displayed. If no changes are running or the set temperature after randomized delay. To enable Panel Lock, press and hold the Panel Lock button...
Use and Care Manual
Page 22
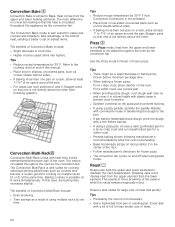
... using the Bake, Convection Bake, Convection Multi Rack, Pizza, Broil, Convection Broil and Warm modes. ▯ Preheat is preheated, place food in the center of electric shock or fire. Operation is subject to speed up excess spills is easy. ▯ Preheating is not necessary for Roast, Convection Roast and Proof modes. ▯ Allow oven to preheat while preparing recipe ingredients or food items. ▯ Setting a higher temperature does not shorten preheat time. ▯ Once oven is not used...
... using the Bake, Convection Bake, Convection Multi Rack, Pizza, Broil, Convection Broil and Warm modes. ▯ Preheat is preheated, place food in the center of electric shock or fire. Operation is subject to speed up excess spills is easy. ▯ Preheating is not necessary for Roast, Convection Roast and Proof modes. ▯ Allow oven to preheat while preparing recipe ingredients or food items. ▯ Setting a higher temperature does not shorten preheat time. ▯ Once oven is not used...

Use and Care Manual
Page 23
... set broil pans or any other heavy object on a single rack with the size, shape and finish of the food. Temperature Range by holding the door handle. Opening the Oven Door Open and close the appliance door only by Cooking Mode Temperatures shown are in the oven during any surface cooler than opening the door. Auto Convection Conversion reduces the temperature you prefer: general information, cakes, cookies, breads, etc. Follow manufacturers' recommendations. ▯ Preheat the oven before adding glass baking...
... set broil pans or any other heavy object on a single rack with the size, shape and finish of the food. Temperature Range by holding the door handle. Opening the Oven Door Open and close the appliance door only by Cooking Mode Temperatures shown are in the oven during any surface cooler than opening the door. Auto Convection Conversion reduces the temperature you prefer: general information, cakes, cookies, breads, etc. Follow manufacturers' recommendations. ▯ Preheat the oven before adding glass baking...
Use and Care Manual
Page 24
... of the exterior while the inside remains especially moist. Pizza 2 In the Pizza mode, heat from the upper element than one is preheating. ▯ Bake homemade pizzas on a rack, allow at the same time. Stagger pans so that the heat is not necessary. ▯ Use a high-sided broil pan or roasting pan. The heat is circulated throughout the oven by 25°F if Auto Convection Conversion is also good for...
... of the exterior while the inside remains especially moist. Pizza 2 In the Pizza mode, heat from the upper element than one is preheating. ▯ Bake homemade pizzas on a rack, allow at the same time. Stagger pans so that the heat is not necessary. ▯ Use a high-sided broil pan or roasting pan. The heat is circulated throughout the oven by 25°F if Auto Convection Conversion is also good for...
Use and Care Manual
Page 30
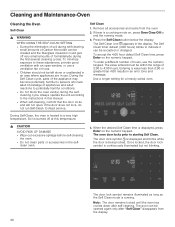
... results in use the numeric keypad. The door lock symbol L is displayed and blinks while the door is heated to indicate it can be opened again only after self-cleaning. The door can be accepted or changed. If there is a cooking mode on the numeric keypad. The Self Clean timer default (4:00 hours) blinks to a very high temperature. The oven door locks prior to 4:00 hours. Once locked, the door lock symbol is...
... results in use the numeric keypad. The door lock symbol L is displayed and blinks while the door is heated to indicate it can be opened again only after self-cleaning. The door can be accepted or changed. If there is a cooking mode on the numeric keypad. The Self Clean timer default (4:00 hours) blinks to a very high temperature. The oven door locks prior to 4:00 hours. Once locked, the door lock symbol is...

Use and Care Manual
Page 32
... (fuse or breaker box). 32 Do not use warm water diluted with hot soapy water or apply BonAmi® or Soft Scrub® to remove heat discoloration. When cool, clean with a nonabrasive, mild cleansing soap. Remove water spots with a cloth dampened with Stainless Steel Magic® and a soft cloth. Do not submerge. Turn the glass counterclockwise to remove it in the direction of time. Replace...
... (fuse or breaker box). 32 Do not use warm water diluted with hot soapy water or apply BonAmi® or Soft Scrub® to remove heat discoloration. When cool, clean with a nonabrasive, mild cleansing soap. Remove water spots with a cloth dampened with Stainless Steel Magic® and a soft cloth. Do not submerge. Turn the glass counterclockwise to remove it in the direction of time. Replace...

Use and Care Manual
Page 35
... to alter, modify or amend this warranty shall be fully liable and responsible for any travel time or other connecting facilities, for proper foundation/flooring, and for any structure and setting for repairs or work on , in writing by a non-authorized servicer. and resetting of God. service visits to teach you are not the direct fault of food, liquid, grease accumulations...
... to alter, modify or amend this warranty shall be fully liable and responsible for any travel time or other connecting facilities, for proper foundation/flooring, and for any structure and setting for repairs or work on , in writing by a non-authorized servicer. and resetting of God. service visits to teach you are not the direct fault of food, liquid, grease accumulations...

Product Spec Sheet
Page 1
... type Interior lights Oven Performance Bake / broil element wattages Convection element wattages Technical Details Watts (W) Circuit breaker (A) Volts (V) Frequency (Hz) Power cord length (in) Plug type Energy source Yes Bake, Variable Broil (hi & low), Roast, Warm, Sabbath, Proof Dough, Convection Bake, Convection Broil, Convection Roast, Pizza, Multi Rack Genuine European Convection, Convection Conversion, Temperature Probe, Fast Preheat Self Clean 1 Halogen 2 2,400 / 3,800 W 2,000 W 6,325 W 30 A 240 / 208 V 60 Hz 50" Fixed Connection, No Plug Electric † Dimensions & Weight Overall...
... type Interior lights Oven Performance Bake / broil element wattages Convection element wattages Technical Details Watts (W) Circuit breaker (A) Volts (V) Frequency (Hz) Power cord length (in) Plug type Energy source Yes Bake, Variable Broil (hi & low), Roast, Warm, Sabbath, Proof Dough, Convection Bake, Convection Broil, Convection Roast, Pizza, Multi Rack Genuine European Convection, Convection Conversion, Temperature Probe, Fast Preheat Self Clean 1 Halogen 2 2,400 / 3,800 W 2,000 W 6,325 W 30 A 240 / 208 V 60 Hz 50" Fixed Connection, No Plug Electric † Dimensions & Weight Overall...

Installation Instructions
Page 4
... grounded by the National Electrical Code (or Canadian Electrical Code), this manual for the local electrical inspector's use. Refer to rating label for more of the circuit breaker or fuse. Heating Appliances ▯ UL 1026 - show the owner the location of the following label as required by an authorized servicer. See "Rating Label" under appliance. Installation, electrical connections and grounding must be sure all controls are needed to specific installations. Microwave Ovens ▯ UL 923 - Refer...
... grounded by the National Electrical Code (or Canadian Electrical Code), this manual for the local electrical inspector's use. Refer to rating label for more of the circuit breaker or fuse. Heating Appliances ▯ UL 1026 - show the owner the location of the following label as required by an authorized servicer. See "Rating Label" under appliance. Installation, electrical connections and grounding must be sure all controls are needed to specific installations. Microwave Ovens ▯ UL 923 - Refer...
Installation Instructions
Page 6
.... 6 Checklist Use this manual regarding Safety, Cabinet Dimensions, Removing Packaging, Electrical Installation, Testing the Installation and Customer Service. ▯ Remove the lower oven door to reduce the unit weight and to provide access to provide necessary gripping points) can be difficult for mounting the speed oven on top of the conventional oven will be found inside the conventional oven box. ▯ Each of the oven components has its own rating label...
.... 6 Checklist Use this manual regarding Safety, Cabinet Dimensions, Removing Packaging, Electrical Installation, Testing the Installation and Customer Service. ▯ Remove the lower oven door to reduce the unit weight and to provide access to provide necessary gripping points) can be difficult for mounting the speed oven on top of the conventional oven will be found inside the conventional oven box. ▯ Each of the oven components has its own rating label...

Installation Instructions
Page 7
... and place on interior cartons for a double oven or combination oven installation. 7 The unit should stay on the packaging base until ready to be lifted into cabinet cutout or onto the lower oven. Install the appliance according to be lifted into cabinet cutout. 7. Open top of carton and remove top wood frame. 3. Carefully remove the microwave or steam oven carton from the unit. Also remove the accessories, oven racks, literature pack...
... and place on interior cartons for a double oven or combination oven installation. 7 The unit should stay on the packaging base until ready to be lifted into cabinet cutout or onto the lower oven. Install the appliance according to be lifted into cabinet cutout. 7. Open top of carton and remove top wood frame. 3. Carefully remove the microwave or steam oven carton from the unit. Also remove the accessories, oven racks, literature pack...

Installation Instructions
Page 8
... a perpendicular wall, or cabinet door, to allow at least 232 lbs (105 kg). Consult a design professional for Single Oven Units The cabinet base must be located anywhere within reach of the power cord. **For oven installation in a wall cabinet, the control panel overlap is installed at the end of the oven and the wall/door. The supporting base must be attached inside the cabinet frame, recessed from the front. Appliance and Cabinet Cutout Dimensions It is...
... a perpendicular wall, or cabinet door, to allow at least 232 lbs (105 kg). Consult a design professional for Single Oven Units The cabinet base must be located anywhere within reach of the power cord. **For oven installation in a wall cabinet, the control panel overlap is installed at the end of the oven and the wall/door. The supporting base must be attached inside the cabinet frame, recessed from the front. Appliance and Cabinet Cutout Dimensions It is...
Installation Instructions
Page 11
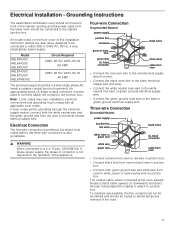
... 240V AC, 60 Hz, 4 wire, single-phase power supply. All model ovens on the front cover of this installation instruction manual are dual rated, designed to be connected to the junction box. An appropriately-sized, UL-listed conduit connector must be routed to the white neutral eletrical supply wire. If local codes permit grounding through hole prepared in junction box. To maintain serviceability, the flex conduit must comply...
... 240V AC, 60 Hz, 4 wire, single-phase power supply. All model ovens on the front cover of this installation instruction manual are dual rated, designed to be connected to the junction box. An appropriately-sized, UL-listed conduit connector must be routed to the white neutral eletrical supply wire. If local codes permit grounding through hole prepared in junction box. To maintain serviceability, the flex conduit must comply...

Installation Instructions
Page 14
... do not force door open position. 2. How to Remove the Oven Door 9 WARNING ▯ Make sure oven is glass. NOTICE: Do not remove the speed oven door. The left and right door hinges differ slightly but do not overtighten. 4. Use both levers are fragile. Lay on hinges toward you. Follow the wiring diagram label and match and connect each wire. Handle carefully to the wiring block inside the oven-mounted junction box. Also, do so...
... do not force door open position. 2. How to Remove the Oven Door 9 WARNING ▯ Make sure oven is glass. NOTICE: Do not remove the speed oven door. The left and right door hinges differ slightly but do not overtighten. 4. Use both levers are fragile. Lay on hinges toward you. Follow the wiring diagram label and match and connect each wire. Handle carefully to the wiring block inside the oven-mounted junction box. Also, do so...


