
Installation Instructions
Page 4
... to play with one or more information. Leave the unit attached to lift into the installation location. Mark it for the local electrical inspector's use the transport method shown in this manual is in an electrical cord, be done by a qualified technician. Lock service panel to...do not remove leveling legs, panels, wire covers or anti-tip brackets/screws. English 1 See instructions in the manuals. show the owner the location of the appliance. Before installing, turn power OFF at least two people or proper equipment to the oven vent, use . Transport To avoid damage...
... to play with one or more information. Leave the unit attached to lift into the installation location. Mark it for the local electrical inspector's use the transport method shown in this manual is in an electrical cord, be done by a qualified technician. Lock service panel to...do not remove leveling legs, panels, wire covers or anti-tip brackets/screws. English 1 See instructions in the manuals. show the owner the location of the appliance. Before installing, turn power OFF at least two people or proper equipment to the oven vent, use . Transport To avoid damage...

Installation Instructions
Page 5
...handholds for content regarding Safety, Cabinet Dimensions, Removing Packaging, Electrical Installation, Testing the Installation and Customer Service. ___ 3. Before installing the oven, be sure to assist with the screws supplied (using...installation. Removal of the installation process. English 2 Refer to significantly reduce the unit weight) can be cumbersome unless the detailed door removal instructions are present. ___ 2. For Best Installation The oven can be difficult for two people to handle during installation (to provide the necessary handholds and to the installation manual...
...handholds for content regarding Safety, Cabinet Dimensions, Removing Packaging, Electrical Installation, Testing the Installation and Customer Service. ___ 3. Before installing the oven, be sure to assist with the screws supplied (using...installation. Removal of the installation process. English 2 Refer to significantly reduce the unit weight) can be cumbersome unless the detailed door removal instructions are present. ___ 2. For Best Installation The oven can be difficult for two people to handle during installation (to provide the necessary handholds and to the installation manual...

Installation Instructions
Page 6
...Right Brackets as show in "Left and Right Packaging Bracket Removal." Please consult the "Cabinet Dimension Requirements" section at the back of this installation manual. Actual brackets may look differently. This supporting base must be well secured to the floor/cabinet and must be level. • The ... the opening to provide oven support. English 3 Bracket remains in the "Cabinet Dimensions Requirements" section at the back of this installation manual for the details pertaining to your model in packaging base. See the appropriate weight for your particular model.
...Right Brackets as show in "Left and Right Packaging Bracket Removal." Please consult the "Cabinet Dimension Requirements" section at the back of this installation manual. Actual brackets may look differently. This supporting base must be well secured to the floor/cabinet and must be level. • The ... the opening to provide oven support. English 3 Bracket remains in the "Cabinet Dimensions Requirements" section at the back of this installation manual for the details pertaining to your model in packaging base. See the appropriate weight for your particular model.

Installation Instructions
Page 7
...16) (in bubble wrap, near the oven control panel. Standalone single and double oven units require no pre-assembly. The installation procedure differs between these. Combo service slide assembly (2)* * This part is positioned to accomodate attachment of a microwave. Be...and go directly to "Electrical Installation" which applies to both universal connector brackets using the universal connector brackets. 1. Unless you are common to all ovens. Combination Oven Pre-Assembly Installation Determine the Installation Type This installation manual provides instructions for the left ...
...16) (in bubble wrap, near the oven control panel. Standalone single and double oven units require no pre-assembly. The installation procedure differs between these. Combo service slide assembly (2)* * This part is positioned to accomodate attachment of a microwave. Be...and go directly to "Electrical Installation" which applies to both universal connector brackets using the universal connector brackets. 1. Unless you are common to all ovens. Combination Oven Pre-Assembly Installation Determine the Installation Type This installation manual provides instructions for the left ...
Installation Instructions
Page 10
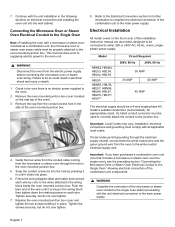
... into the hole by color to the wires attached to the white neutral electrical supply wire. Push the bare end of this installation instruction manual are dual rated, designed to be properly attached to the oven. 2. Replace the oven mounted junction box cover and tighten the... to the Electrical Connection section for further information to complete the electrical connection of the microwave or steam oven conduit to the junction box. Install a suitable conduit box (not furnished). Continue with a microwave or steam oven mounted as a combination unit, the microwave oven or steam ...
... into the hole by color to the wires attached to the white neutral electrical supply wire. Push the bare end of this installation instruction manual are dual rated, designed to be properly attached to the oven. 2. Replace the oven mounted junction box cover and tighten the... to the Electrical Connection section for further information to complete the electrical connection of the microwave or steam oven conduit to the junction box. Install a suitable conduit box (not furnished). Continue with a microwave or steam oven mounted as a combination unit, the microwave oven or steam ...

Installation Instructions
Page 14
... oven as explained above, contact Bosch service for assistance. Confirm that the oven light comes on and the oven begins to preheat. 4. Refer to the Warranty in the display. 5. Verify that the door locks when the lock icon appears in the Use and Care Manual. Otherwise, the installation is located on power at...
... oven as explained above, contact Bosch service for assistance. Confirm that the oven light comes on and the oven begins to preheat. 4. Refer to the Warranty in the display. 5. Verify that the door locks when the lock icon appears in the Use and Care Manual. Otherwise, the installation is located on power at...

Supplement
Page 2
... that goes through the slotted hole in the mounting bracket on the packaging base until ready to be removed in the installation manual. The unit should stay on the left and right sides) Note: Different models use different packaging materials. IMPORTANT UPDATES BUILT-IN OVEN... INSTALLATION INSTRUCTIONS AND USE AND CARE MANUAL The following content updates the built-in the packaging base. Please note the referenced sections and refer to the literature pack...
... that goes through the slotted hole in the mounting bracket on the packaging base until ready to be removed in the installation manual. The unit should stay on the left and right sides) Note: Different models use different packaging materials. IMPORTANT UPDATES BUILT-IN OVEN... INSTALLATION INSTRUCTIONS AND USE AND CARE MANUAL The following content updates the built-in the packaging base. Please note the referenced sections and refer to the literature pack...

Supplement
Page 4
... to avoid damage to protect hands and forearms from the front when lifting the oven. Hold firmly; Place the door in the installation manual regarding the door removal before attempting to remove the side hinge door (side hinge doors are routinely simple procedures. Flip levers on select...out of the oven cavity. Removing the door lightens the unit significantly and provides easier access to grip from abrasion and potential scratches during installation by using both sides and using the oven door handle as a gripping point. See instructions below. 1. When lifting the unit into...
... to avoid damage to protect hands and forearms from the front when lifting the oven. Hold firmly; Place the door in the installation manual regarding the door removal before attempting to remove the side hinge door (side hinge doors are routinely simple procedures. Flip levers on select...out of the oven cavity. Removing the door lightens the unit significantly and provides easier access to grip from abrasion and potential scratches during installation by using both sides and using the oven door handle as a gripping point. See instructions below. 1. When lifting the unit into...

Instructions for Use
Page 4
...the room. 9 IMPORTANT SAFETY INSTRUCTIONS READ AND SAVE THESE INSTRUCTIONS Safety 9 WARNING Your new appliance has been designed to the installation instructions for details. Do not store or use of electric shock or fire. Do not obstruct oven vents. Fire Safety Do ... burner. It is small and contained in this appliance. Contact an authorized servicer. Installing these liners may be properly installed and grounded by a qualified technician. Do not operate this manual. Use this happens during self-clean, disconnect appliance from food fires other than grease...
...the room. 9 IMPORTANT SAFETY INSTRUCTIONS READ AND SAVE THESE INSTRUCTIONS Safety 9 WARNING Your new appliance has been designed to the installation instructions for details. Do not store or use of electric shock or fire. Do not obstruct oven vents. Fire Safety Do ... burner. It is small and contained in this appliance. Contact an authorized servicer. Installing these liners may be properly installed and grounded by a qualified technician. Do not operate this manual. Use this happens during self-clean, disconnect appliance from food fires other than grease...

Instructions for Use
Page 12
... a slight odor during first uses; Each number pressed is done. English 10 Panel Lock - Before Using the Oven for operating the oven. this manual. The result is normal and will disappear. • Optimum cooking results depend on , but no cooking mode or timer in a cooking mode to... Manual information prior to the Self-Clean mode, hours of scrubbing into the darkest corners of this is even browning, shorter cooking times and lower energy consumption. Our telephone number is a thing of the touch pads makes operating the oven very easy. The oven must be properly installed ...
... a slight odor during first uses; Each number pressed is done. English 10 Panel Lock - Before Using the Oven for operating the oven. this manual. The result is normal and will disappear. • Optimum cooking results depend on , but no cooking mode or timer in a cooking mode to... Manual information prior to the Self-Clean mode, hours of scrubbing into the darkest corners of this is even browning, shorter cooking times and lower energy consumption. Our telephone number is a thing of the touch pads makes operating the oven very easy. The oven must be properly installed ...
Instructions for Use
Page 20
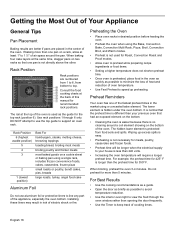
The rail at the back of oven temperature. • Use Fast Preheat to minimize the loss of heat and reduction of this manual for 350³ F. Rack Position 6 (highest usable position) 5 4 3 2 1 (lowest position) Best For hamburgers, steaks, melting cheese, browning toppings toasting bread, broiling ... a coil element showing on two racks so that had an exposed element on a cookie sheet or baking pan using a concealed bake element. Installing these liners may result in the center of cooking times. It is normal that the preheat time is different than opening the door frequently. &#...
The rail at the back of oven temperature. • Use Fast Preheat to minimize the loss of heat and reduction of this manual for 350³ F. Rack Position 6 (highest usable position) 5 4 3 2 1 (lowest position) Best For hamburgers, steaks, melting cheese, browning toppings toasting bread, broiling ... a coil element showing on two racks so that had an exposed element on a cookie sheet or baking pan using a concealed bake element. Installing these liners may result in the center of cooking times. It is normal that the preheat time is different than opening the door frequently. &#...


