
Short Instructions
Page 1
... rack by Mode Mode Lowest Highest Default °F °F °F Bake 100 550 350 Roast 100 550 325 Broil (low 450°; Slide the moveable part of the rack drops into place. Allowed Temperature Range by both sides. Perform a before preheating the oven. Prepare the Oven for mode descriptions). • Accept...
... rack by Mode Mode Lowest Highest Default °F °F °F Bake 100 550 350 Roast 100 550 325 Broil (low 450°; Slide the moveable part of the rack drops into place. Allowed Temperature Range by both sides. Perform a before preheating the oven. Prepare the Oven for mode descriptions). • Accept...

Short Instructions
Page 4
... fingers to avoid premature burnout due to removing. Wipe lens cover area with flat part of purchase. Allow oven to run until the oven has cooled sufficiently. press Touch the center part of the touch key using the flat pad of key not pressed with a clean... receive notices, updates and offers as expected Rack position incorrect. To contact customer service: US: 800-944-2904 Web: www.bosch-home.com.us Parts & Accessories: www.bosch-eshop.us English 4 Troubleshooting Before calling customer service, consult this guide before running a self-clean cycle may resolve your oven...
... fingers to avoid premature burnout due to removing. Wipe lens cover area with flat part of purchase. Allow oven to run until the oven has cooled sufficiently. press Touch the center part of the touch key using the flat pad of key not pressed with a clean... receive notices, updates and offers as expected Rack position incorrect. To contact customer service: US: 800-944-2904 Web: www.bosch-home.com.us Parts & Accessories: www.bosch-eshop.us English 4 Troubleshooting Before calling customer service, consult this guide before running a self-clean cycle may resolve your oven...
Installation Instructions
Page 2
... Packaging 8 Packaging Bracket Removal-Left and Right Sides ........ 8 Preparing Ovens 8 Installation 8 Pre-Assembly of the Combination Oven 8 Parts Provided 8 Installation with the Speed Oven or Microwave 9 Installation with this advisory. Table of Contents onaiurstlIc Safety Definitions 2 IMPORTANT SAFETY... INSTRUCTIONS 3 Appliance Handling Safety 3 Safety Codes and Standards 3 Electric Safety 3 Related Equipment Safety 4 Bosch Combination Ovens 5 Before you to the appliance or property may occur as a result of non-compliance with the Steam Convection...
... Packaging 8 Packaging Bracket Removal-Left and Right Sides ........ 8 Preparing Ovens 8 Installation 8 Pre-Assembly of the Combination Oven 8 Parts Provided 8 Installation with the Speed Oven or Microwave 9 Installation with this advisory. Table of Contents onaiurstlIc Safety Definitions 2 IMPORTANT SAFETY... INSTRUCTIONS 3 Appliance Handling Safety 3 Safety Codes and Standards 3 Electric Safety 3 Related Equipment Safety 4 Bosch Combination Ovens 5 Before you to the appliance or property may occur as a result of non-compliance with the Steam Convection...
Installation Instructions
Page 3
... plugged in to a matching grounding type receptacle to operate any appliance with the latest version of the appliance unless specifically recommended in any part of one or more information. Safety Codes and Standards This appliance complies with a damaged power cord or plug. Refer to specific installations....must be safe and reliable. Do not operate any appliance with a cord and plug, do not immerse cord, plugs or other electrical parts in the OFF position. For appliances equipped with a damaged cord or plug or after the appliance malfunctions or has been damaged in the...
... plugged in to a matching grounding type receptacle to operate any appliance with the latest version of the appliance unless specifically recommended in any part of one or more information. Safety Codes and Standards This appliance complies with a damaged power cord or plug. Refer to specific installations....must be safe and reliable. Do not operate any appliance with a cord and plug, do not immerse cord, plugs or other electrical parts in the OFF position. For appliances equipped with a damaged cord or plug or after the appliance malfunctions or has been damaged in the...
Installation Instructions
Page 5
...▯ The combination ovens listed here are approved for use in to place. Bosch Combination Ovens The HSLP751UC, HBL57M52UC, HBL87M52UC, HBL8752UC, and HBLP752UC Bosch combination ovens are sold as sets, each of the Bosch combination oven SKUs and its own rating label, the component model number, FD ...MW w/LCD, 240V, 20 Amp HBLP451UC HMCP0252UC Benchmark Oven + 240V Speed MW Speed MW w/TFT, 240V, 20 Amp Before you Begin Tools and Parts Needed ▯ Phillips-head screwdriver ▯ Star-head screwdriver (T20) ▯ Measuring tape ▯ Drill with bit (1/8") ▯ Gloves &#...
...▯ The combination ovens listed here are approved for use in to place. Bosch Combination Ovens The HSLP751UC, HBL57M52UC, HBL87M52UC, HBL8752UC, and HBLP752UC Bosch combination ovens are sold as sets, each of the Bosch combination oven SKUs and its own rating label, the component model number, FD ...MW w/LCD, 240V, 20 Amp HBLP451UC HMCP0252UC Benchmark Oven + 240V Speed MW Speed MW w/TFT, 240V, 20 Amp Before you Begin Tools and Parts Needed ▯ Phillips-head screwdriver ▯ Star-head screwdriver (T20) ▯ Measuring tape ▯ Drill with bit (1/8") ▯ Gloves &#...

Installation Instructions
Page 8
...Check both shipping cartons can be installed so that needs to installing the combination unit into cabinet cutout or onto the lower oven. The parts contained in front of the cabinet where it is to be opened. 3. Packaging Bracket Removal-Left and Right Sides Note: Actual bracket varies...Note: The installation procedures differ between the microwave, speed oven and steam convection oven combination units. Only the one screw only from inside parts box on top of oven Screws (16)--in line with the cabinet cutout. Do not remove any shipping materials from each unit are ...
...Check both shipping cartons can be installed so that needs to installing the combination unit into cabinet cutout or onto the lower oven. The parts contained in front of the cabinet where it is to be opened. 3. Packaging Bracket Removal-Left and Right Sides Note: Actual bracket varies...Note: The installation procedures differ between the microwave, speed oven and steam convection oven combination units. Only the one screw only from inside parts box on top of oven Screws (16)--in line with the cabinet cutout. Do not remove any shipping materials from each unit are ...
Instructions for Use
Page 3
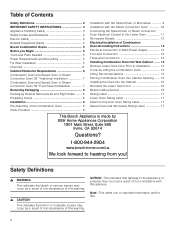
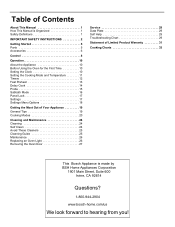
Table of Contents About This Manual 1 How This Manual is Organized 1 Safety Definitions 1 IMPORTANT SAFETY INSTRUCTIONS 2 Getting Started 5 Parts 5 Accessories 6 Control 8 Operation 10 About the Appliance 10 Before Using the Oven for the First Time 10 Setting the Clock 10 Setting the Cooking Mode ... the Oven Door 27 Service 29 Data Plate 29 Self Help 29 Troubleshooting Chart 29 Statement of Limited Product Warranty 31 Cooking Charts 33 This Bosch Appliance is made by BSH Home Appliances Corporation 1901 Main Street, Suite 600 Irvine, CA 92614 Questions? 1-800-944-2904 www...
Table of Contents About This Manual 1 How This Manual is Organized 1 Safety Definitions 1 IMPORTANT SAFETY INSTRUCTIONS 2 Getting Started 5 Parts 5 Accessories 6 Control 8 Operation 10 About the Appliance 10 Before Using the Oven for the First Time 10 Setting the Clock 10 Setting the Cooking Mode ... the Oven Door 27 Service 29 Data Plate 29 Self Help 29 Troubleshooting Chart 29 Statement of Limited Product Warranty 31 Cooking Charts 33 This Bosch Appliance is made by BSH Home Appliances Corporation 1901 Main Street, Suite 600 Irvine, CA 92614 Questions? 1-800-944-2904 www...
Instructions for Use
Page 4
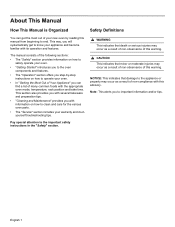
... Organized Safety Definitions You can get to know your appliance and become familiar with information on how to clean and care for the various oven parts. • The "Service" section includes your warranty and do-ityourself troubleshooting tips.
... Organized Safety Definitions You can get to know your appliance and become familiar with information on how to clean and care for the various oven parts. • The "Service" section includes your warranty and do-ityourself troubleshooting tips.
Instructions for Use
Page 5
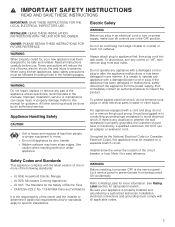
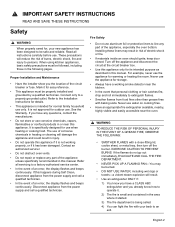
... normal family household use . Contact an authorized servicer. • Do not obstruct oven vents. • Do not repair or replace any part of electric shock or fire. • If materials inside an oven should ignite, keep door closed. For example, never use aluminum foil ...FLAMING PAN-You may result in the following pages. Refer all instructions carefully before use the appliance for storage. • Always have any part of the circuit breaker or fuse. 9 IMPORTANT SAFETY INSTRUCTIONS READ AND SAVE THESE INSTRUCTIONS Safety 9 WARNING When properly cared for, your back...
... normal family household use . Contact an authorized servicer. • Do not obstruct oven vents. • Do not repair or replace any part of electric shock or fire. • If materials inside an oven should ignite, keep door closed. For example, never use aluminum foil ...FLAMING PAN-You may result in the following pages. Refer all instructions carefully before use the appliance for storage. • Always have any part of the circuit breaker or fuse. 9 IMPORTANT SAFETY INSTRUCTIONS READ AND SAVE THESE INSTRUCTIONS Safety 9 WARNING When properly cared for, your back...

Instructions for Use
Page 6
... or storage drawer. Doing so may be hot even though they are instructed in foods, and open the oven door carefully. 9 WARNING NEVER cover any part of the appliance by an adult. Children climbing on the backsplash. Wet cloths or sponges can damage the appliance, and the unit may tip over...
... or storage drawer. Doing so may be hot even though they are instructed in foods, and open the oven door carefully. 9 WARNING NEVER cover any part of the appliance by an adult. Children climbing on the backsplash. Wet cloths or sponges can damage the appliance, and the unit may tip over...

Instructions for Use
Page 7
... Safety • Do not place food directly on oven bottom. • Follow the manufacturer's directions when using cooking or roasting bags. • Do not clean parts or accessories in this manual. • When self-cleaning, confirm that may also be minimized by: 1) Providing good ventilation when cooking with gas. 2) Providing good...
... Safety • Do not place food directly on oven bottom. • Follow the manufacturer's directions when using cooking or roasting bags. • Do not clean parts or accessories in this manual. • When self-cleaning, confirm that may also be minimized by: 1) Providing good ventilation when cooking with gas. 2) Providing good...
Instructions for Use
Page 8
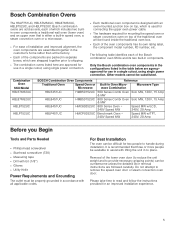
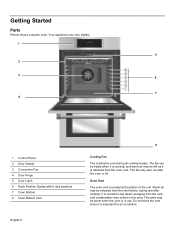
... when the oven is running, and warm air may collect in use. The fan can be heard when it is in this area. Getting Started Parts Picture shows a double oven. Warm air may vary slightly. 1 5 2 3 6 7 4 1 Control Panel 2 Door Gasket 3 Convection Fan 4 Door Hinge 5 Door Latch 6 Rack Position Guides with 6 rack positions...
... when the oven is running, and warm air may collect in use. The fan can be heard when it is in this area. Getting Started Parts Picture shows a double oven. Warm air may vary slightly. 1 5 2 3 6 7 4 1 Control Panel 2 Door Gasket 3 Convection Fan 4 Door Hinge 5 Door Latch 6 Rack Position Guides with 6 rack positions...
Instructions for Use
Page 9
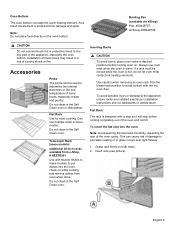
...: Note: Avoid pushing the rack back forcefully, impacting the rear of the appliance, especially the oven bottom. If a rack must be used to line any part of the oven cavity. Use caution when removing an oven rack from damage and spills. To insert the flat rack into the oven, check on...
...: Note: Avoid pushing the rack back forcefully, impacting the rear of the appliance, especially the oven bottom. If a rack must be used to line any part of the oven cavity. Use caution when removing an oven rack from damage and spills. To insert the flat rack into the oven, check on...
Instructions for Use
Page 10
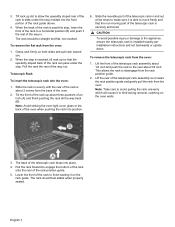
Telescopic Rack To insert the telescopic rack into place. 4. Slide the movable part of the telescopic rack in and out a few times to make sure it clears the rack position guide and gently pull the rack from the ... per installation instructions and not backwards or upside down. When the back of the rack is reached, tilt rack up so that the non-moving part of the rack position guide. 5. The rack should be straight and flat, not crooked. Note: Take care to avoid pulling the rack unevenly which will...
Telescopic Rack To insert the telescopic rack into place. 4. Slide the movable part of the telescopic rack in and out a few times to make sure it clears the rack position guide and gently pull the rack from the ... per installation instructions and not backwards or upside down. When the back of the rack is reached, tilt rack up so that the non-moving part of the rack position guide. 5. The rack should be straight and flat, not crooked. Note: Take care to avoid pulling the rack unevenly which will...

Instructions for Use
Page 14
... change the temperature, enter it turns off automatically after 5 seconds if Enter is used for the mode an error tone will sound and the lower part of time (see table below), unless using the numeric buttons. 375° is not pressed. 5. To set cooking mode and temperature. Note: If a ...the Cooking Mode: (not for Sabbath Mode is not within the allowed range for the mode selected an error tone will sound and the lower part of setting the temperature, an error tone sounds and a SELECT MODE message is compatible with the temperature entered. Note: The new temperature is selected...
... change the temperature, enter it turns off automatically after 5 seconds if Enter is used for the mode an error tone will sound and the lower part of time (see table below), unless using the numeric buttons. 375° is not pressed. 5. To set cooking mode and temperature. Note: If a ...the Cooking Mode: (not for Sabbath Mode is not within the allowed range for the mode selected an error tone will sound and the lower part of setting the temperature, an error tone sounds and a SELECT MODE message is compatible with the temperature entered. Note: The new temperature is selected...

Instructions for Use
Page 18
The displayed probe temperature is not touching fat, bone, or parts of the oven or the pan. Make sure the probe is updated in increments of meats during the cooking process. Note: Food must be completely ... prompt "- - -" blinks in the oven. • Always use the probe: 1. Note: • Probe is only available for the upper oven in the middle and thickest part of the display. Set the cooking mode and temperature. 4. The display enters probe temperature editing mode and displays the message "SET PROBE TEMP". The current...
The displayed probe temperature is not touching fat, bone, or parts of the oven or the pan. Make sure the probe is updated in increments of meats during the cooking process. Note: Food must be completely ... prompt "- - -" blinks in the oven. • Always use the probe: 1. Note: • Probe is only available for the upper oven in the middle and thickest part of the display. Set the cooking mode and temperature. 4. The display enters probe temperature editing mode and displays the message "SET PROBE TEMP". The current...
Instructions for Use
Page 22
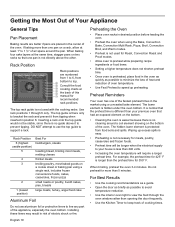
... guide is preheated, place food in the oven as quickly as possible to avoid temperature reduction. • Use the interior oven light to line any part of cooking times.
... guide is preheated, place food in the oven as quickly as possible to avoid temperature reduction. • Use the interior oven light to line any part of cooking times.

Instructions for Use
Page 23
... door. Condensation • It is cooking with at high altitudes, recipes and cooking times will absorb heat and result in the oven during any other parts of the food. The Bake mode can be a cost for oven temperature and baking time. English 20 Some manufacturers recommend reducing the temperature 25º...
... door. Condensation • It is cooking with at high altitudes, recipes and cooking times will absorb heat and result in the oven during any other parts of the food. The Bake mode can be a cost for oven temperature and baking time. English 20 Some manufacturers recommend reducing the temperature 25º...

Instructions for Use
Page 27
...begins its countdown. When the Self Clean timer ends, for safety the unit must be accepted or changed. During the Self Clean cycle, parts of the appliance may become potentially harmful to persons who lack adult knowledge of carbon monoxide can unlock. Select the oven to these substances,...than 4:00 results in use. Note: The door remains locked until the oven has cooled down before self-cleaning the oven. • Do not clean parts or accessories in the display. Use a longer setting for a heavily soiled oven. 4. Press the Self Clean button below the display. Soil is running ...
...begins its countdown. When the Self Clean timer ends, for safety the unit must be accepted or changed. During the Self Clean cycle, parts of the appliance may become potentially harmful to persons who lack adult knowledge of carbon monoxide can unlock. Select the oven to these substances,...than 4:00 results in use. Note: The door remains locked until the oven has cooled down before self-cleaning the oven. • Do not clean parts or accessories in the display. Use a longer setting for a heavily soiled oven. 4. Press the Self Clean button below the display. Soil is running ...

Instructions for Use
Page 28
6. They may become discolored over time. Never use soap-filled pads. Cleaning Guide Part Recommendations Flat Rack Wash with hot soapy water or apply Fantastik® or Formula 409® to stainless steel. If flat racks are corrosive to a ... slides. If the telescopic rack is displayed. 7. Rinse thoroughly and dry, or gently rub with soapy water. Re-lubrication may damage the oven finish or parts. Do not use flammable cleaners such as directed. DO NOT clean the rack in the oven during the Self Clean mode it will lose its...
6. They may become discolored over time. Never use soap-filled pads. Cleaning Guide Part Recommendations Flat Rack Wash with hot soapy water or apply Fantastik® or Formula 409® to stainless steel. If flat racks are corrosive to a ... slides. If the telescopic rack is displayed. 7. Rinse thoroughly and dry, or gently rub with soapy water. Re-lubrication may damage the oven finish or parts. Do not use flammable cleaners such as directed. DO NOT clean the rack in the oven during the Self Clean mode it will lose its...