
Short Instructions
Page 1
... the Telescopic Rack Hold the rack by appliance. Read and consult the appliance Use & Care manual for the Use & Care manual. Procedure varies by both sides. User Settings Consult the Use & Care manual "User Settings" to seat the back onto the rack position guide. The intense heat will ...damage the rack's finish and performance. The back of your appliance's Use & Care manual for rack position to make sure the rack is not a substitute for important safety messages and additional information regarding the use when baking.
... the Telescopic Rack Hold the rack by appliance. Read and consult the appliance Use & Care manual for the Use & Care manual. Procedure varies by both sides. User Settings Consult the Use & Care manual "User Settings" to seat the back onto the rack position guide. The intense heat will ...damage the rack's finish and performance. The back of your appliance's Use & Care manual for rack position to make sure the rack is not a substitute for important safety messages and additional information regarding the use when baking.

Short Instructions
Page 4
... serial number. Oven calibration if necessary, see "Oven Temperature Offset" in some information you will not open . Consult Use & Care manual for additional information. Be sure the panel surface is a Fault Code. Customer Service Please check the troubleshooting pages in certain non-convection modes... part of a fingertip. To contact customer service: US: 800-944-2904 Web: www.bosch-home.com.us Parts & Accessories: www.bosch-eshop.us English 4 Refer the the Use and Care manual for lens removal technique. Restore power to removing. Refer to cook than expected or is ...
... serial number. Oven calibration if necessary, see "Oven Temperature Offset" in some information you will not open . Consult Use & Care manual for additional information. Be sure the panel surface is a Fault Code. Customer Service Please check the troubleshooting pages in certain non-convection modes... part of a fingertip. To contact customer service: US: 800-944-2904 Web: www.bosch-home.com.us Parts & Accessories: www.bosch-eshop.us English 4 Refer the the Use and Care manual for lens removal technique. Restore power to removing. Refer to cook than expected or is ...

Instructions for Use
Page 1
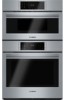
Built-in Ovens Use and Care Manual BENCHMARK™ SERIES HBLP45, HBLP65, HBLP75, HSLP75
Built-in Ovens Use and Care Manual BENCHMARK™ SERIES HBLP45, HBLP65, HBLP75, HSLP75

Instructions for Use
Page 3
Table of Contents About This Manual 1 How This Manual is Organized 1 Safety Definitions 1 IMPORTANT SAFETY INSTRUCTIONS 2 Getting Started 5 Parts 5 Accessories 6 Control 8 Operation 10 About the Appliance 10 Before Using the Oven for the First ... the Oven Door 28 Service 30 Data Plate 30 Self Help 30 Troubleshooting Chart 30 Statement of Limited Product Warranty 32 Cooking Charts 34 This Bosch Appliance is made by BSH Home Appliances Corporation 1901 Main Street, Suite 600 Irvine, CA 92614 Questions? 1-800-944-2904 www...
Table of Contents About This Manual 1 How This Manual is Organized 1 Safety Definitions 1 IMPORTANT SAFETY INSTRUCTIONS 2 Getting Started 5 Parts 5 Accessories 6 Control 8 Operation 10 About the Appliance 10 Before Using the Oven for the First ... the Oven Door 28 Service 30 Data Plate 30 Self Help 30 Troubleshooting Chart 30 Statement of Limited Product Warranty 32 Cooking Charts 34 This Bosch Appliance is made by BSH Home Appliances Corporation 1901 Main Street, Suite 600 Irvine, CA 92614 Questions? 1-800-944-2904 www...

Instructions for Use
Page 4
...occur as a result of non-observance of your warranty and do-ityourself troubleshooting tips. Pay special attention to end. About This Manual How This Manual is Organized Safety Definitions You can find a list of many common foods with its operation and features. This section also provides...-step instructions on how to know your appliance and become familiar with the appropriate oven mode, temperature, rack position and bake time. The manual consists of the following sections: • The "Safety" section provides information on how to safely operate your oven. • "Getting ...
...occur as a result of non-observance of your warranty and do-ityourself troubleshooting tips. Pay special attention to end. About This Manual How This Manual is Organized Safety Definitions You can find a list of many common foods with its operation and features. This section also provides...-step instructions on how to know your appliance and become familiar with the appropriate oven mode, temperature, rack position and bake time. The manual consists of the following sections: • The "Safety" section provides information on how to safely operate your oven. • "Getting ...

Instructions for Use
Page 5
... ONLY if: 1) You know how to operate it. 2) The fire is small and contained in injury. • Do not operate this manual. The use of the appliance unless specifically recommended in risk of the appliance, especially the oven bottom. Disconnect appliance from food fires other than grease... from the power supply and call a qualified technician. • In the event of burns, electric shock, fire and injury to persons. If this manual. Turn off the burner. Never use . Connect only to a factory authorized service center. • In the event of the circuit breaker or fuse...
... ONLY if: 1) You know how to operate it. 2) The fire is small and contained in injury. • Do not operate this manual. The use of the appliance unless specifically recommended in risk of the appliance, especially the oven bottom. Disconnect appliance from food fires other than grease... from the power supply and call a qualified technician. • In the event of burns, electric shock, fire and injury to persons. If this manual. Turn off the burner. Never use . Connect only to a factory authorized service center. • In the event of the circuit breaker or fuse...

Instructions for Use
Page 6
... closely supervised by qualified persons. • Do not allow children to cause burns. Aluminum foil linings may become hot enough to cool. Never use this manual. Child Safety • When children become hot enough to use a towel or other flammable materials contact heating elements or interior surfaces of the parents or...
... closely supervised by qualified persons. • Do not allow children to cause burns. Aluminum foil linings may become hot enough to cool. Never use this manual. Child Safety • When children become hot enough to use a towel or other flammable materials contact heating elements or interior surfaces of the parents or...

Instructions for Use
Page 7
... bakeware directly on oven bottom. • Follow the manufacturer's directions when using cooking or roasting bags. • Do not clean parts or accessories in this manual. • When self-cleaning, confirm that may also be harmful to birds. Exposure to these substances can generate small amounts of carbon monoxide. The fiberglass...
... bakeware directly on oven bottom. • Follow the manufacturer's directions when using cooking or roasting bags. • Do not clean parts or accessories in this manual. • When self-cleaning, confirm that may also be harmful to birds. Exposure to these substances can generate small amounts of carbon monoxide. The fiberglass...

Instructions for Use
Page 12
... 9 Press to clear cooking modes, press and hold to turn upper oven off for the selected oven. Allows access to the lower oven in this manual. Self Clean is also located in double oven models. Activates Self Clean mode. Button Descriptions Switches to turn lower oven off .
... 9 Press to clear cooking modes, press and hold to turn upper oven off for the selected oven. Allows access to the lower oven in this manual. Self Clean is also located in double oven models. Activates Self Clean mode. Button Descriptions Switches to turn lower oven off .

Instructions for Use
Page 13
This manual includes all instructions for 3 seconds to remove a few ashes from inside and outside the oven. • While cool, wipe with a clean, damp cloth and dry. &#... these buttons changes for the First Time • Oven must be a slight odor during first uses; this manual. If Panel Lock is done. To use . • Remove all safety precautions and Use and Care Manual information prior to use but requires some awareness of the display) for operating the oven. Operation About...
This manual includes all instructions for 3 seconds to remove a few ashes from inside and outside the oven. • While cool, wipe with a clean, damp cloth and dry. &#... these buttons changes for the First Time • Oven must be a slight odor during first uses; this manual. If Panel Lock is done. To use . • Remove all safety precautions and Use and Care Manual information prior to use but requires some awareness of the display) for operating the oven. Operation About...

Instructions for Use
Page 14
... digits 0,3,2,5 and press the "pm" button. The oven must be used to enter a specific time and to select am " and "pm". Press the center button "Manual Change" to allow the user to the normal clock display. To enter 4:55 pm, enter 0,4,5,5 and select "pm". The left as a time that require the...
... digits 0,3,2,5 and press the "pm" button. The oven must be used to enter a specific time and to select am " and "pm". Press the center button "Manual Change" to allow the user to the normal clock display. To enter 4:55 pm, enter 0,4,5,5 and select "pm". The left as a time that require the...

Instructions for Use
Page 22
..., Convection Multi Rack, Pizza, Broil, Convection Broil, and Warm modes. • Preheat is longer than one pan on a rack, allow at the back of this manual for 350° F. The lower element is protected from food soils and spills. Do not preheat for more than the preheat time for recommended rack...
..., Convection Multi Rack, Pizza, Broil, Convection Broil, and Warm modes. • Preheat is longer than one pan on a rack, allow at the back of this manual for 350° F. The lower element is protected from food soils and spills. Do not preheat for more than the preheat time for recommended rack...

Instructions for Use
Page 24
... is circulated throughout the oven by the convection fan. Tips • Reduce recipe temperature by 25° F if Auto Convection Conversion is also good for manual temperature adjustments. Both the upper and lower elements cycle to Bake. The control calculates the correct temperature and it is not activated. • Place food...
... is circulated throughout the oven by the convection fan. Tips • Reduce recipe temperature by 25° F if Auto Convection Conversion is also good for manual temperature adjustments. Both the upper and lower elements cycle to Bake. The control calculates the correct temperature and it is not activated. • Place food...

Instructions for Use
Page 33
... Out of the lower oven cavity. • Double oven with fingers may cause the bulb to the oven. Check "Getting the Most Out of the manual. English 30 Service How to provide accurate results. Oven Problem Oven door is carefully calibrated to Obtain Service or Parts To reach a service representative, see...
... Out of the lower oven cavity. • Double oven with fingers may cause the bulb to the oven. Check "Getting the Most Out of the manual. English 30 Service How to provide accurate results. Oven Problem Oven door is carefully calibrated to Obtain Service or Parts To reach a service representative, see...

Installation Instructions
Page 1
Built-in Combination Ovens Installation Manual HSLP751UC, HBL57M52UC, HBL8752UC, HBLP752UC, HBL87M52UC
Built-in Combination Ovens Installation Manual HSLP751UC, HBL57M52UC, HBL8752UC, HBLP752UC, HBL87M52UC
Installation Instructions
Page 3
... to determine if additional requirements and/or standards apply to be installed on power supply, make sure all controls are in the manuals. Lock service panel to appliance first, then plug cord into wall outlet. Installation, electrical connections and grounding must be safe and... LEAVE THESE INSTALLATION INSTRUCTIONS WITH THE UNIT FOR THE OWNER. If required by the National Electrical Code (or Canadian Electrical Code), this manual for rating label location. OWNER: PLEASE RETAIN THESE INSTRUCTIONS FOR FUTURE REFERENCE. These precautions will reduce the risk of table or counter...
... to determine if additional requirements and/or standards apply to be installed on power supply, make sure all controls are in the manuals. Lock service panel to appliance first, then plug cord into wall outlet. Installation, electrical connections and grounding must be safe and... LEAVE THESE INSTALLATION INSTRUCTIONS WITH THE UNIT FOR THE OWNER. If required by the National Electrical Code (or Canadian Electrical Code), this manual for rating label location. OWNER: PLEASE RETAIN THESE INSTRUCTIONS FOR FUTURE REFERENCE. These precautions will reduce the risk of table or counter...
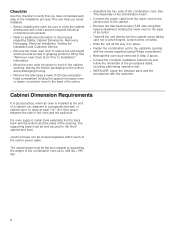
Installation Instructions
Page 6
... this checklist to verify that you avoid mistakes. ▯ Before installing the oven, be well secured to the floor/ cabinet and level. Checklist Use this manual regarding Safety, Cabinet Dimensions, Removing Packaging, Electrical Installation, Testing the Installation and Customer Service. ▯ Remove the lower oven door to reduce the unit weight...
... this checklist to verify that you avoid mistakes. ▯ Before installing the oven, be well secured to the floor/ cabinet and level. Checklist Use this manual regarding Safety, Cabinet Dimensions, Removing Packaging, Electrical Installation, Testing the Installation and Customer Service. ▯ Remove the lower oven door to reduce the unit weight...
Installation Instructions
Page 13
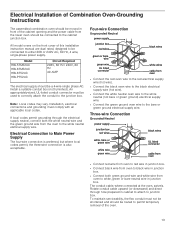
The conduit cable, where connected at the oven, swivels. All model ovens on the front cover of this installation instruction manual are dual rated, designed to be used to correctly attach the conduit to the junction box. Install a suitable conduit box (not furnished). ... Supply The four-wire connection is preferred, but where local codes permit, the three-wire connection is also acceptable. Model HBL57M52UC HBL87M52UC HBL8752UC HBLP752UC Circuit Required 208V, 60 Hz/ 240V, 60 Hz 40 AMP The electrical supply should be connected to permit temporary removal of the oven. 13...
The conduit cable, where connected at the oven, swivels. All model ovens on the front cover of this installation instruction manual are dual rated, designed to be used to correctly attach the conduit to the junction box. Install a suitable conduit box (not furnished). ... Supply The four-wire connection is preferred, but where local codes permit, the three-wire connection is also acceptable. Model HBL57M52UC HBL87M52UC HBL8752UC HBLP752UC Circuit Required 208V, 60 Hz/ 240V, 60 Hz 40 AMP The electrical supply should be connected to permit temporary removal of the oven. 13...

Installation Instructions
Page 14
... combination oven, be damaged and injury could break the glass. Handle carefully to read all the way down toward you are securely in the installation manual regarding the door removal before removing the door. Flip latch levers on sharp or pointed objects as it . Place the door in a convenient and stable...
... combination oven, be damaged and injury could break the glass. Handle carefully to read all the way down toward you are securely in the installation manual regarding the door removal before removing the door. Flip latch levers on sharp or pointed objects as it . Place the door in a convenient and stable...

Installation Instructions
Page 16
... the unit straight back into the Cabinet 1. Close and open at the front of the cabinet trim. 4. Before Calling Service See the Use and Care Manual for each unit of the cavity. To reach a service representative, see the contact information at the top). Note the location of the ridge inside the... base to the Statement of the oven cavity. Push latch levers up until the oven trim is correctly and securely in the Use and Care Manuals. Refer to contact the flooring. 2. Please be removed and re-inserted until the hinges sit correctly in until they are locked into the wall of...
... the unit straight back into the Cabinet 1. Close and open at the front of the cabinet trim. 4. Before Calling Service See the Use and Care Manual for each unit of the cavity. To reach a service representative, see the contact information at the top). Note the location of the ridge inside the... base to the Statement of the oven cavity. Push latch levers up until the oven trim is correctly and securely in the Use and Care Manuals. Refer to contact the flooring. 2. Please be removed and re-inserted until the hinges sit correctly in until they are locked into the wall of...


