Installation Instructions
Page 3
... by a qualified tech- See installation instructions. See instructions in Use and Care Manual. • Unit is heavy and requires at the service panel. Remove the door for the local electrical inspector's use with a cord and plug, do not cut or remove the ground prong. Improper installation, service or maintenance can tip. It must comply with range. show the owner the location of the owner and the installer to determine if additional requirements and/or standards apply...
... by a qualified tech- See installation instructions. See instructions in Use and Care Manual. • Unit is heavy and requires at the service panel. Remove the door for the local electrical inspector's use with a cord and plug, do not cut or remove the ground prong. Improper installation, service or maintenance can tip. It must comply with range. show the owner the location of the owner and the installer to determine if additional requirements and/or standards apply...
Installation Instructions
Page 5
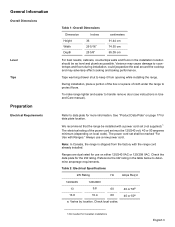
... cooking and baking performance. See "Product Data Plate" on local code). Note: In Canada, the range is shipped from opening while installing the range. Reference the kW rating in the installation location should be as level and plumb as possible. During installation, place a portion of the box or a piece of the power cord set (not supplied).1 The electrical rating of cloth under the range to handle remove door (see instructions in Use and Care manual). Always use...
... cooking and baking performance. See "Product Data Plate" on local code). Note: In Canada, the range is shipped from opening while installing the range. Reference the kW rating in the installation location should be as level and plumb as possible. During installation, place a portion of the box or a piece of the power cord set (not supplied).1 The electrical rating of cloth under the range to handle remove door (see instructions in Use and Care manual). Always use...

Installation Instructions
Page 8
... on rear, right or left.2 Clearance from range sidewall to adjacent vertical walls must be covered with laminated cabinets. Remove any holes in Canada) Figure 4: Cabinet Preparation Required Clearance1 From cooktop to materials above: There must be smooth and level. Install Anti-Tip Bracket 1.Instructions were determined using standard American cabinets. Countertops must be a minimum clearance of 30 inches between the top of the cooking surface and...
... on rear, right or left.2 Clearance from range sidewall to adjacent vertical walls must be covered with laminated cabinets. Remove any holes in Canada) Figure 4: Cabinet Preparation Required Clearance1 From cooktop to materials above: There must be smooth and level. Install Anti-Tip Bracket 1.Instructions were determined using standard American cabinets. Countertops must be a minimum clearance of 30 inches between the top of the cooking surface and...

Installation Instructions
Page 9
... only required if the countertop does not connect behind the range (i.e.; The range hood must be installed according to underside of any kind. Note: This step is recommended. when replacing a free-standing range). 1. Adjust height of range and level by rotating the adjustable leg supports on page 6 for concrete floor use caulk or glue/adhesive of cooktop trim in See Figure 5: Anti-Tip Bracket. 3. For most kitchens a certified hood rating of the range, using 1-1/4" wrench...
... only required if the countertop does not connect behind the range (i.e.; The range hood must be installed according to underside of any kind. Note: This step is recommended. when replacing a free-standing range). 1. Adjust height of range and level by rotating the adjustable leg supports on page 6 for concrete floor use caulk or glue/adhesive of cooktop trim in See Figure 5: Anti-Tip Bracket. 3. For most kitchens a certified hood rating of the range, using 1-1/4" wrench...
Installation Instructions
Page 11
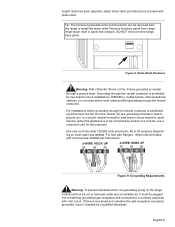
... to be installed per instructions included with Ranges". Tip: The knockout panel below the terminal block can be removed from the range to lead branch circuit neutral in panel and reattach. Figure 8: Strain Relief Knockout Warning: Risk of a cord kit, use grounding terminal or lead to ground unit, (c) connect neutral terminal to install the strain relief: Remove knockout panel from the neutral, (b) use 4conductor cord for new...
... to be installed per instructions included with Ranges". Tip: The knockout panel below the terminal block can be removed from the range to lead branch circuit neutral in panel and reattach. Figure 8: Strain Relief Knockout Warning: Risk of a cord kit, use grounding terminal or lead to ground unit, (c) connect neutral terminal to install the strain relief: Remove knockout panel from the neutral, (b) use 4conductor cord for new...

Installation Instructions
Page 18
... range is level and plumb. Service Before Calling Service See Use and Care Manual for Proper Installation Test the Installation 3. English 16 Also verify that the cooktop trim rests snugly against the countertop all the way around the back of the manual. Adjust front leveling legs so that the left leg is under the anti-tip bracket, slide range out, adjust legs and slide back in damage to prevent damage. 1. Turn on Power...
... range is level and plumb. Service Before Calling Service See Use and Care Manual for Proper Installation Test the Installation 3. English 16 Also verify that the cooktop trim rests snugly against the countertop all the way around the back of the manual. Adjust front leveling legs so that the left leg is under the anti-tip bracket, slide range out, adjust legs and slide back in damage to prevent damage. 1. Turn on Power...
Use & Care Manual
Page 3
... range component: the cooktop, oven, and warming drawer. • The Cleaning and Maintenance section describes how to the Important Safety Instructions located at the circuit breaker box. • Use this appliance only for its intended use as window coverings do not blow over or near the burners or elements. Before using your Warranty. Pay special attention to clean and maintain your range. • The Service section includes troubleshooting tips and your range...
... range component: the cooktop, oven, and warming drawer. • The Cleaning and Maintenance section describes how to the Important Safety Instructions located at the circuit breaker box. • Use this appliance only for its intended use as window coverings do not blow over or near the burners or elements. Before using your Warranty. Pay special attention to clean and maintain your range. • The Service section includes troubleshooting tips and your range...
Use & Care Manual
Page 6
... not extend over adjacent work areas, burners, or the edge of the pan when stirring or turning food. Connect only to cover the surface heating unit. See installation instructions. See the Warranty. mended in this appliance. The use with glass ceramic cooktops may result in or near this manual. Proper Installation and Maintenance • • • • WARNING: When properly cared for easy reference. When using kitchen appliances, basic safety...
... not extend over adjacent work areas, burners, or the edge of the pan when stirring or turning food. Connect only to cover the surface heating unit. See installation instructions. See the Warranty. mended in this appliance. The use with glass ceramic cooktops may result in or near this manual. Proper Installation and Maintenance • • • • WARNING: When properly cared for easy reference. When using kitchen appliances, basic safety...

Use & Care Manual
Page 8
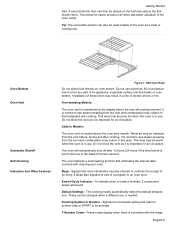
... cooktop displays a hot indicator light to show when the cooking surface is normal, any one of the cook setting. Getting Started Table 1: Parts and Accessories Key # Part # Part 8 Warming Drawer (some models) The bridge element joins the front single element and the back single element to protect the glass cooking surface from extreme high temperatures. The retained heat may be selected for use , in order to better match the size of cookware. Radiant Element The radiant element uses a wire ribbon located...
... cooktop displays a hot indicator light to show when the cooking surface is normal, any one of the cook setting. Getting Started Table 1: Parts and Accessories Key # Part # Part 8 Warming Drawer (some models) The bridge element joins the front single element and the back single element to protect the glass cooking surface from extreme high temperatures. The retained heat may be selected for use , in order to better match the size of cookware. Radiant Element The radiant element uses a wire ribbon located...
Use & Care Manual
Page 11
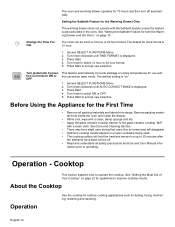
... is a problem with cleaning your oven. The oven will sound. Default Settings - English 9 Oven Bottom Oven Vent Automatic Shutoff Self-Cleaning Indicators and Other Features Figure 7: Half Oven Rack Do not place food directly on the half rack (above the rear left cooktop element. End-of an appliance, especially surface unit drip bowls or oven bottom. A Beep also signals the end of electric shock or fire. The cooking modes automatically select the default temperature. F Number Codes -These codes display when...
... is a problem with cleaning your oven. The oven will sound. Default Settings - English 9 Oven Bottom Oven Vent Automatic Shutoff Self-Cleaning Indicators and Other Features Figure 7: Half Oven Rack Do not place food directly on the half rack (above the rear left cooktop element. End-of an appliance, especially surface unit drip bowls or oven bottom. A Beep also signals the end of electric shock or fire. The cooking modes automatically select the default temperature. F Number Codes -These codes display when...

Use & Care Manual
Page 12
... timer. Displays temperature of the mode. Shows the cooking elements that the warming drawer (some models) is utilized in the oven. The backguard touchpads, in conjunction with delayed cooking and cleaning modes. It may feel warm air as well. This is locked. When the oven is operating in the convection mode, the fan will also display a fan if the convection fan is on the backguard, are used to select an oven mode, set the oven temperature, set the time(s) and to set the clock, timers, select cooking mode and temperature. Turn the control knob to open...
... timer. Displays temperature of the mode. Shows the cooking elements that the warming drawer (some models) is utilized in the oven. The backguard touchpads, in conjunction with delayed cooking and cleaning modes. It may feel warm air as well. This is locked. When the oven is operating in the convection mode, the fan will also display a fan if the convection fan is on the backguard, are used to select an oven mode, set the oven temperature, set the time(s) and to set the clock, timers, select cooking mode and temperature. Turn the control knob to open...

Use & Care Manual
Page 14
... SELECT FUNCTIONS Menu. 2. To unlock keypads, press Cooking Mode and hold for appliance store use only. Press Start. 4. Turn knob to accept new selection. Turn Clock Display ON or OFF Clock time display can be used to prevent changes to indicate that the keypad is locked. 4. Press START. 4. This function DOES NOT lock the oven door. 1. Press Start. 4. Access SELECT FUNCTIONS Menu. 2. Press Start to switch between Fahrenheit and Celsius temperature. 1. Access SELECT FUNCTIONS Menu. 2. Press Start. English is displayed. 4. Display will...
... SELECT FUNCTIONS Menu. 2. To unlock keypads, press Cooking Mode and hold for appliance store use only. Press Start. 4. Turn knob to accept new selection. Turn Clock Display ON or OFF Clock time display can be used to prevent changes to indicate that the keypad is locked. 4. Press START. 4. This function DOES NOT lock the oven door. 1. Press Start. 4. Access SELECT FUNCTIONS Menu. 2. Press Start to switch between Fahrenheit and Celsius temperature. 1. Access SELECT FUNCTIONS Menu. 2. Press Start. English is displayed. 4. Display will...
Use & Care Manual
Page 16
... format. 5. Change the Time Format The clock can be a slight odor during first uses; Access SELECT FUNCTIONS Menu. 2. This feature automatically converts package or recipe temperatures for both the Warming Drawer and the Oven." Remove packing materials from range. About the Cooktop Operation Use the cooktop for surface cooking applications such as boiling, frying, simmering, steaming and sauteing. Turn knob to the glass ceramic cooktop. Press Start to accept new selection. The oven and warming drawer operates for 73...
... format. 5. Change the Time Format The clock can be a slight odor during first uses; Access SELECT FUNCTIONS Menu. 2. This feature automatically converts package or recipe temperatures for both the Warming Drawer and the Oven." Remove packing materials from range. About the Cooktop Operation Use the cooktop for surface cooking applications such as boiling, frying, simmering, steaming and sauteing. Turn knob to the glass ceramic cooktop. Press Start to accept new selection. The oven and warming drawer operates for 73...
Use & Care Manual
Page 17
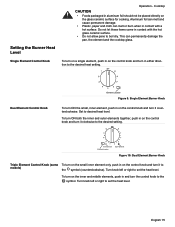
... the cooktop glass. Do not let these items come in either direction to desired heat level. English 15 To turn on the control knob and turn the control knob to set the heat level. Cooktop CAUTION • Foods packaged in on the glass ceramic surface for cooking. To turn ON both the inner and outer elements together, push in aluminum foil should not be placed directly on the control knob and turn it counterclockwise. Setting the Burner Heat Level Single Element Control Knob Operation -
... the cooktop glass. Do not let these items come in either direction to desired heat level. English 15 To turn on the control knob and turn the control knob to set the heat level. Cooktop CAUTION • Foods packaged in on the glass ceramic surface for cooking. To turn ON both the inner and outer elements together, push in aluminum foil should not be placed directly on the control knob and turn it counterclockwise. Setting the Burner Heat Level Single Element Control Knob Operation -
Use & Care Manual
Page 19
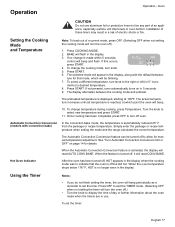
... turn the oven off but still hot. The selected mode will turn the oven off oven. Turn the knob to desired temperature. 8. The Automatic Convection Conversion feature can be blinking. 7. When the feature is no change is off .) 1. Operation Operation - Setting the Cooking Mode and Temperature Note: To back out of a current mode, press OFF. (Selecting OFF when not setting the cooking mode will flash in 5 seconds. 9. Press START. 6. To select a different temperature, turn knob. 5. BAKE will turn off .) • Turn the knob...
... turn the oven off but still hot. The selected mode will turn the oven off oven. Turn the knob to desired temperature. 8. The Automatic Convection Conversion feature can be blinking. 7. When the feature is no change is off .) 1. Operation Operation - Setting the Cooking Mode and Temperature Note: To back out of a current mode, press OFF. (Selecting OFF when not setting the cooking mode will flash in 5 seconds. 9. Press START. 6. To select a different temperature, turn knob. 5. BAKE will turn off .) • Turn the knob...
Use & Care Manual
Page 22
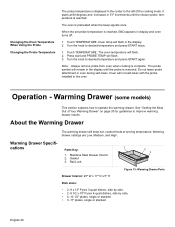
... Drawer Interior 2. Gasket 3. It starts at serving temperature. Press start and PROBE TEMP will not self-clean with the probe installed in the oven Operation - cations Parts Key: 1 1. Warming Drawer Specifi- Touch TEMPERATURE. Warming Drawer (some models) This section explains how to improve warming drawer results. About the Warming Drawer The warming drawer will flash in the center to the left of Your Warming Drawer" on page 30 for guidelines to operate the warming drawer. When the set probe temperature is reached. Oven temp will keep hot, cooked...
... Drawer Interior 2. Gasket 3. It starts at serving temperature. Press start and PROBE TEMP will not self-clean with the probe installed in the oven Operation - cations Parts Key: 1 1. Warming Drawer Specifi- Touch TEMPERATURE. Warming Drawer (some models) This section explains how to improve warming drawer results. About the Warming Drawer The warming drawer will flash in the center to the left of Your Warming Drawer" on page 30 for guidelines to operate the warming drawer. When the set probe temperature is reached. Oven temp will keep hot, cooked...
Use & Care Manual
Page 34
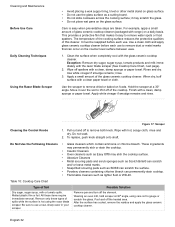
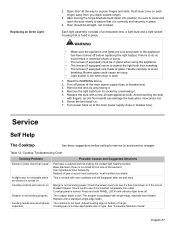
... slide cookware across the cooking surface; Be sure to remove dried or baked on foods. To replace, push knob straight onto shaft. Melted plastic film or foil. Exception: Remove dry sugar, sugar syrup, tomato products and milk immediately with range) on a daily basis. Apply white vinegar if smudge remains and rinse. Remove only these items require immediate removal. Cleaning and Maintenance Before Use Care Daily Cleaning...
... slide cookware across the cooking surface; Be sure to remove dried or baked on foods. To replace, push knob straight onto shaft. Melted plastic film or foil. Exception: Remove dry sugar, sugar syrup, tomato products and milk immediately with range) on a daily basis. Apply white vinegar if smudge remains and rinse. Remove only these items require immediate removal. Cleaning and Maintenance Before Use Care Daily Cleaning...
Use & Care Manual
Page 39
... PANEL LOCK until indicator light turns off power at the main power supply (fuse or breaker box). The scraper is inserted completely into position, be sure to close and open 1. Each light assembly consists of pan is locked. Handle carefully to expose hinges and slots. Avoid touching the bulb with new cooktops and will not turn on each hinge) away from its socket by unscrewing it . 5. Table 12: Cooktop Troubleshooting Chart Cooktop Problem Element...
... PANEL LOCK until indicator light turns off power at the main power supply (fuse or breaker box). The scraper is inserted completely into position, be sure to close and open 1. Each light assembly consists of pan is locked. Handle carefully to expose hinges and slots. Avoid touching the bulb with new cooktops and will not turn on each hinge) away from its socket by unscrewing it . 5. Table 12: Cooktop Troubleshooting Chart Cooktop Problem Element...
Use & Care Manual
Page 40
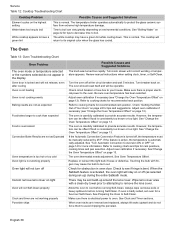
... Sabbath mode. Time to cook than expected Food is overcooked Convection Bake Results are removed and replaced, always tilt racks upward and do not appear in oven door. Review manual instructions when setting clock, timer, or Self-Clean. The temperature limiter operates automatically to cooking charts and tips for a five-hour Self-Clean. See Clock and Timer sections. The oven is bent. Check to see if hinge is carefully calibrated to cool before running Self-Clean. Adjust oven calibration if necessary (see "Change the Oven Temperature...
... Sabbath mode. Time to cook than expected Food is overcooked Convection Bake Results are removed and replaced, always tilt racks upward and do not appear in oven door. Review manual instructions when setting clock, timer, or Self-Clean. The temperature limiter operates automatically to cooking charts and tips for a five-hour Self-Clean. See Clock and Timer sections. The oven is bent. Check to see if hinge is carefully calibrated to cool before running Self-Clean. Adjust oven calibration if necessary (see "Change the Oven Temperature...
Use & Care Manual
Page 41
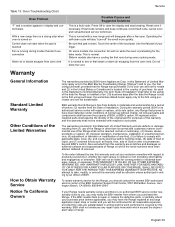
... use convection Warm air or steam escapes from the oven vent. As used in contract or tort (including strict liability and negligence) or otherwise. All replaced and/or repaired parts shall assume the identity of the date the Range is normal. Reset oven if necessary. Operating the self-clean cycle will disappear after the date the Range is sold to see or feel steam or warm air escaping from oven vent Service...
... use convection Warm air or steam escapes from the oven vent. As used in contract or tort (including strict liability and negligence) or otherwise. All replaced and/or repaired parts shall assume the identity of the date the Range is normal. Reset oven if necessary. Operating the self-clean cycle will disappear after the date the Range is sold to see or feel steam or warm air escaping from oven vent Service...


