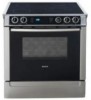
Installation Instructions
Page 3
...more of the following Standards: UL 858, The Standard for the Safety of Household Electric Ranges UL 923, The Standard for the Safety of Microwave Cooking Appliances UL 507, The Standard for the Safety of Electric Fans ANSI Z21.1-2000, The American National Standard for easy reference. • ...8226; Unit is any part of the circuit breaker or fuse. It must comply with ranges" shall be plugged into a matching grounding type receptacle to this appliance and marked "for the local electrical inspector's use with all controls are engaged. show the owner the location of the appliance...
...more of the following Standards: UL 858, The Standard for the Safety of Household Electric Ranges UL 923, The Standard for the Safety of Microwave Cooking Appliances UL 507, The Standard for the Safety of Electric Fans ANSI Z21.1-2000, The American National Standard for easy reference. • ...8226; Unit is any part of the circuit breaker or fuse. It must comply with ranges" shall be plugged into a matching grounding type receptacle to this appliance and marked "for the local electrical inspector's use with all controls are engaged. show the owner the location of the appliance...
Installation Instructions
Page 5
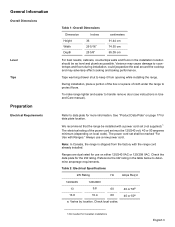
... 120/208 VAC. Reference the kW rating in Use and Care manual). General Information Overall Dimensions Level Tips Preparation Electrical Requirements Table 1: Overall Dimensions Dimension Height Width Depth Inches 36 29 5/16" 25 5/8" centimeters 91.44 cm 74.55 cm 65.09 cm For best results, cabinets...the power cord set shall be as level and plumb as possible. We recommend that the range be installed with a power cord set (not supplied).1 The electrical rating of cloth under the range to countertops and floors during installation, could jeopardize the seal around the cooktop and may ...
... 120/208 VAC. Reference the kW rating in Use and Care manual). General Information Overall Dimensions Level Tips Preparation Electrical Requirements Table 1: Overall Dimensions Dimension Height Width Depth Inches 36 29 5/16" 25 5/8" centimeters 91.44 cm 74.55 cm 65.09 cm For best results, cabinets...the power cord set shall be as level and plumb as possible. We recommend that the range be installed with a power cord set (not supplied).1 The electrical rating of cloth under the range to countertops and floors during installation, could jeopardize the seal around the cooktop and may ...
Installation Instructions
Page 6
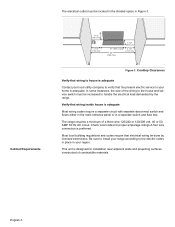
... require that wiring inside house is adequate Contact your local utility company to verify that the present electric service to your region. Cabinet Requirements 7 1/2" (190.5 mm) 4 1/2" (114.3 mm) 3 1/2" (88.9 mm) 21" (533.4 mm) 30" (762 mm) 4 1/2" (114.3 mm) Figure 1: Cooktop Clearances Verify that wiring to...volt, 40 or 50 AMP, 60 Hz AC circuit. The range requires a minimum of the wiring to the house and service switch must be increased to handle the electrical load demanded by licensed electricians. The electrical outlet must be located in the shaded space in a separate ...
... require that wiring inside house is adequate Contact your local utility company to verify that the present electric service to your region. Cabinet Requirements 7 1/2" (190.5 mm) 4 1/2" (114.3 mm) 3 1/2" (88.9 mm) 21" (533.4 mm) 30" (762 mm) 4 1/2" (114.3 mm) Figure 1: Cooktop Clearances Verify that wiring to...volt, 40 or 50 AMP, 60 Hz AC circuit. The range requires a minimum of the wiring to the house and service switch must be increased to handle the electrical load demanded by licensed electricians. The electrical outlet must be located in the shaded space in a separate ...

Installation Instructions
Page 7
English 5 See Figure 2: Cutout Requirements for more information.. 23 1/16" (585.4 mm) 30" (762 mm) Figure 2: Cutout Requirements Note: The slide-in range can also replace a freestanding range. Figure 3: Cutout Requirements - Allow a minimum of 12 mm from range sidewall to cabinet is to be installed1. Replacing a Free-Standing Model 1.In Canada, a clearance of 30 inches between cabinets where range is required. In this case, verify that the opening is at least 30 inches.1 30" (76.2 cm) min.
English 5 See Figure 2: Cutout Requirements for more information.. 23 1/16" (585.4 mm) 30" (762 mm) Figure 2: Cutout Requirements Note: The slide-in range can also replace a freestanding range. Figure 3: Cutout Requirements - Allow a minimum of 12 mm from range sidewall to cabinet is to be installed1. Replacing a Free-Standing Model 1.In Canada, a clearance of 30 inches between cabinets where range is required. In this case, verify that the opening is at least 30 inches.1 30" (76.2 cm) min.

Installation Instructions
Page 8
...electrical or gas connections, etc.) so that range will rest against wall properly. Standard base cabinets measure 36" high x 24" deep. 4" (10.2 cm) min. 30" (76.2 cm) min. No clearance is most noticeable with (b) not less than 1/4" of flame retardant material which must be a minimum clearance of 30 inches...in the walls or floor. See Figure 4: Cabinet Preparation. 24 inches is acceptable when the bottom of an unprotected wood or metal cabinet. centered 30" (76.2 cm) min. 4" (10.2 cm) min. From range walls to cabinet is protected by U.L., particularly self-cleaning ovens; ...
...electrical or gas connections, etc.) so that range will rest against wall properly. Standard base cabinets measure 36" high x 24" deep. 4" (10.2 cm) min. 30" (76.2 cm) min. No clearance is most noticeable with (b) not less than 1/4" of flame retardant material which must be a minimum clearance of 30 inches...in the walls or floor. See Figure 4: Cabinet Preparation. 24 inches is acceptable when the bottom of an unprotected wood or metal cabinet. centered 30" (76.2 cm) min. 4" (10.2 cm) min. From range walls to cabinet is protected by U.L., particularly self-cleaning ovens; ...

Installation Instructions
Page 9
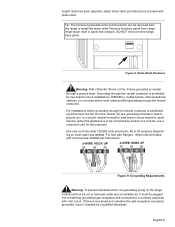
...See Figure 5: Anti-Tip Bracket. 3. Note: DO NOT use concrete anchors and screws). Secure bracket with the hood. when replacing a free-standing range). cabinet wall rear wall flush against cabinet wall 1 9/16" (39.7 mm) from rear wall to underside of a ventilation hood above this .... See "Cabinet Requirements" on the bottom of not less than 300 CFM is only required if the countertop does not connect behind the range (i.e.; Measure to instructions furnished with 2 screws adequate for mounting surface (i.e., for wood floor use wood screws, for more information English 7...
...See Figure 5: Anti-Tip Bracket. 3. Note: DO NOT use concrete anchors and screws). Secure bracket with the hood. when replacing a free-standing range). cabinet wall rear wall flush against cabinet wall 1 9/16" (39.7 mm) from rear wall to underside of a ventilation hood above this .... See "Cabinet Requirements" on the bottom of not less than 300 CFM is only required if the countertop does not connect behind the range (i.e.; Measure to instructions furnished with 2 screws adequate for mounting surface (i.e., for wood floor use wood screws, for more information English 7...

Installation Instructions
Page 10
Place strain relief in the lower right hand corner of Range Figure 7: Install Backwall Trim Strip Connect Electric - For installations other than those in Canada, connect the range cord at the terminal block (See next page for slack in range backwall. See Figure 8: Strain Relief Knockout. Once cord English 8 Install Strain Relief Warning: The strain...
Place strain relief in the lower right hand corner of Range Figure 7: Install Backwall Trim Strip Connect Electric - For installations other than those in Canada, connect the range cord at the terminal block (See next page for slack in range backwall. See Figure 8: Strain Relief Knockout. Once cord English 8 Install Strain Relief Warning: The strain...
Installation Instructions
Page 11
... this purpose). Volt circuit. length/ slack has been adjusted, attach strain relief per instructions Figure 9: Grounding Requirements Warning: To prevent electrical shock, the grounding prong on local code) and labeled "For Use with strain relief. Tip: The knockout panel below the terminal ...lead branch circuit neutral in usual manner (when the appliance is properly grounded, have it checked by means of Electric Shock or Fire. DO NOT remove entire range back panel. For installations where grounding through the neutral conductor is prohibited, (a) disconnect the link from the...
... this purpose). Volt circuit. length/ slack has been adjusted, attach strain relief per instructions Figure 9: Grounding Requirements Warning: To prevent electrical shock, the grounding prong on local code) and labeled "For Use with strain relief. Tip: The knockout panel below the terminal ...lead branch circuit neutral in usual manner (when the appliance is properly grounded, have it checked by means of Electric Shock or Fire. DO NOT remove entire range back panel. For installations where grounding through the neutral conductor is prohibited, (a) disconnect the link from the...

Installation Instructions
Page 12
...DO NOT remove last round washer, last nut or internal wiring leads. 4. Attach green wire on top of ground strap. 5. English 10 Disconnect electrical power at top and attach wide end to expose the terminal block Figure 10: 4 Wire Connection 3. Remove screw from bottom end of ground ...strap. Tighten Screw. Remove ground strap from each post. ground strap green ground screw ground wire Figure 11: Four Wire Range cord Connection - Four Wire Range Cord Connection 1. Attach white wire, round washer, star washer and nut IN THIS ORDER to left post. 7. Attach red wire, ...
...DO NOT remove last round washer, last nut or internal wiring leads. 4. Attach green wire on top of ground strap. 5. English 10 Disconnect electrical power at top and attach wide end to expose the terminal block Figure 10: 4 Wire Connection 3. Remove screw from bottom end of ground ...strap. Tighten Screw. Remove ground strap from each post. ground strap green ground screw ground wire Figure 11: Four Wire Range cord Connection - Four Wire Range Cord Connection 1. Attach white wire, round washer, star washer and nut IN THIS ORDER to left post. 7. Attach red wire, ...

Installation Instructions
Page 13
... washer, star washer and nut IN THIS ORDER to expose the terminal block. English 11 black red white Figure 12: Four Wire Range Cord Connection (continued) 9. Disconnect electrical power at this time. Remove top nut, star washer, and round washer from each post. Note: DO NOT plug in... range at breaker box. 2. 8. Remove the terminal block cover to left post. Attach white wire, round washer, star washer and nut IN ...
... washer, star washer and nut IN THIS ORDER to expose the terminal block. English 11 black red white Figure 12: Four Wire Range Cord Connection (continued) 9. Disconnect electrical power at this time. Remove top nut, star washer, and round washer from each post. Note: DO NOT plug in... range at breaker box. 2. 8. Remove the terminal block cover to left post. Attach white wire, round washer, star washer and nut IN ...
Installation Instructions
Page 14
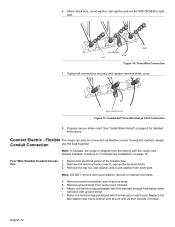
...washer, star washer and nut IN THIS ORDER to "Complete the installation" on page 8 for detailed instructions. Note: In Canada, the range is shipped from bottom end of torque. Four Wire Flexible Conduit Connec- 1. Remove ground strap from each post. ground strap white red black... the terminal block cover to expose the terminal block. 3. Attach one terminal lug (packaged with 20 inch pounds of ground strap. 5. Disconnect electrical power at the breaker box. Connect Electric - Remove the top nut, star washer, and round washer from center post. Remove screw from the...
...washer, star washer and nut IN THIS ORDER to "Complete the installation" on page 8 for detailed instructions. Note: In Canada, the range is shipped from bottom end of torque. Four Wire Flexible Conduit Connec- 1. Remove ground strap from each post. ground strap white red black... the terminal block cover to expose the terminal block. 3. Attach one terminal lug (packaged with 20 inch pounds of ground strap. 5. Disconnect electrical power at the breaker box. Connect Electric - Remove the top nut, star washer, and round washer from center post. Remove screw from the...

Installation Instructions
Page 16
Note: DO NOT plug in range at the breaker box. 2. Three Wire Flexible Conduit Connec- The Four Wire Connection is preferred, but where local codes and ordinances tion permit grounding through .... Insert stripped end of black wire into the left lug. Place one terminal lug (packaged with 20 inch pounds of the ground strap. English 14 Figure 19: Terminal Block 3. Secure the clamping screw. . Disconnect electrical power at this manual) on top of torque. 5. Note: DO NOT remove last round washer, last nut...
Note: DO NOT plug in range at the breaker box. 2. Three Wire Flexible Conduit Connec- The Four Wire Connection is preferred, but where local codes and ordinances tion permit grounding through .... Insert stripped end of black wire into the left lug. Place one terminal lug (packaged with 20 inch pounds of the ground strap. English 14 Figure 19: Terminal Block 3. Secure the clamping screw. . Disconnect electrical power at this manual) on top of torque. 5. Note: DO NOT remove last round washer, last nut...

Installation Instructions
Page 17
...power cord. 2. Tighten each clamping screw with soapy water. Line up range in front of countertop. 3. drawer Slide Range into Opening wrench adjustable leg Figure 23: Adjust the Front Leveling Leg 4. Measure back left corner of range to adjust leveling leg until this time. green ground screw Figure 22:...Legs 1. Use a wrench to bottom of the cooktop trim is now complete. English 15 Properly secure flexible conduit at knockout panel on range and at this height is the same as the corner dimension. The wiring is ½" higher than the corresponding countertop surface. 1....
...power cord. 2. Tighten each clamping screw with soapy water. Line up range in front of countertop. 3. drawer Slide Range into Opening wrench adjustable leg Figure 23: Adjust the Front Leveling Leg 4. Measure back left corner of range to adjust leveling leg until this time. green ground screw Figure 22:...Legs 1. Use a wrench to bottom of the cooktop trim is now complete. English 15 Properly secure flexible conduit at knockout panel on range and at this height is the same as the corner dimension. The wiring is ½" higher than the corresponding countertop surface. 1....

Installation Instructions
Page 18
... at the front of the manual. English 16 Check Back of Range for Proper Installation Adjust Front of Range for troubleshooting information. Look under the anti-tip bracket. Do not apply pressure to cooktop when sliding into opening, being careful not to "Connect Electric - Caution: Verify that both back legs are resting solidly on...
... at the front of the manual. English 16 Check Back of Range for Proper Installation Adjust Front of Range for troubleshooting information. Look under the anti-tip bracket. Do not apply pressure to cooktop when sliding into opening, being careful not to "Connect Electric - Caution: Verify that both back legs are resting solidly on...
Use & Care Manual
Page 3
... of these liners may ignite. • WARNING - Never use . Boilovers cause smoking and greasy spillovers may result in a risk of electric shock or fire. • If materials inside an oven or warming drawer should ignite, keep door closed. Pay special attention to the ...Is Organized This manual contains several sections: • The Overview section describes the features and functionality of the range, including a description of how to set up the range and operate the range's control panel. • The three Operations sections describe how to operate and get the best performance out ...
... of these liners may ignite. • WARNING - Never use . Boilovers cause smoking and greasy spillovers may result in a risk of electric shock or fire. • If materials inside an oven or warming drawer should ignite, keep door closed. Pay special attention to the ...Is Organized This manual contains several sections: • The Overview section describes the features and functionality of the range, including a description of how to set up the range and operate the range's control panel. • The three Operations sections describe how to operate and get the best performance out ...

Use & Care Manual
Page 4
... personal clothing or hair catches fire, drop and roll immediately to cause burns. TO REDUCE THE RISK OF INJURY TO PERSONS IN THE EVENT OF A RANGE TOP GREASE FIRE, OBSERVE THE FOLLOWING: 1) SMOTHER FLAMES with baking soda. However, do not let potholder contact the heating elements. • Always use , do not...
... personal clothing or hair catches fire, drop and roll immediately to cause burns. TO REDUCE THE RISK OF INJURY TO PERSONS IN THE EVENT OF A RANGE TOP GREASE FIRE, OBSERVE THE FOLLOWING: 1) SMOTHER FLAMES with baking soda. However, do not let potholder contact the heating elements. • Always use , do not...
Use & Care Manual
Page 6
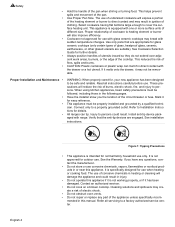
... details. It is equipped with one or more surface units of different size. This helps prevent spills and movement of burns, electric shock, fire, and injury to be properly installed and grounded by a qualified technician. This appliance is specifically designed for ,...surface heating unit. When using kitchen appliances, basic safety precautions must be safe and reliable. Cleaning solutions and spillovers may break with range. English 4 Figure 1: Tipping Precautions • This appliance is intended for further details. • Always position handles of utensils ...
... details. It is equipped with one or more surface units of different size. This helps prevent spills and movement of burns, electric shock, fire, and injury to be properly installed and grounded by a qualified technician. This appliance is specifically designed for ,...surface heating unit. When using kitchen appliances, basic safety precautions must be safe and reliable. Cleaning solutions and spillovers may break with range. English 4 Figure 1: Tipping Precautions • This appliance is intended for further details. • Always position handles of utensils ...

Use & Care Manual
Page 8
... hot. not shown) 20 Broil Element (top of three (small, medium and large) radiant ribbon elements within the same heating area. Depending on model, the range is equipped with one of the following conditions can activate the limiter and cause it to cycle on , use caution when working or cleaning around...
... hot. not shown) 20 Broil Element (top of three (small, medium and large) radiant ribbon elements within the same heating area. Depending on model, the range is equipped with one of the following conditions can activate the limiter and cause it to cycle on , use caution when working or cleaning around...
Use & Care Manual
Page 9
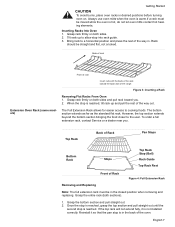
Tilt rack up and pull the rest of the range. Grasp rack firmly on both sides and pull rack toward the back wall of the way out. Once the stop is reached, tilt rack up ...
Tilt rack up and pull the rest of the range. Grasp rack firmly on both sides and pull rack toward the back wall of the way out. Once the stop is reached, tilt rack up ...
Use & Care Manual
Page 11
... on the backguard and cooktop. This area may collect in Models: The oven vent is needed. Slide-in this area. These can be pressed. F Number Codes -These codes display when there is... is in use . This allows for another step or START to all items and better utilization of electric shock or fire. It is a problem with cleaning your oven. This area may collect on oven ...shut off after cooking. The oven will sound. Signals that eliminates the manual labor involved with the range. Free-standing Models: The oven vent is normal to line any part of the oven as a...
... on the backguard and cooktop. This area may collect in Models: The oven vent is needed. Slide-in this area. These can be pressed. F Number Codes -These codes display when there is... is in use . This allows for another step or START to all items and better utilization of electric shock or fire. It is a problem with cleaning your oven. This area may collect on oven ...shut off after cooking. The oven will sound. Signals that eliminates the manual labor involved with the range. Free-standing Models: The oven vent is normal to line any part of the oven as a...


