

Installation Instructions
Page 7
Figure 3: Cutout Requirements - In this case, verify that the opening is required. Replacing a Free-Standing Model 1.In Canada, a clearance of 30 inches between cabinets where range is to cabinet is at least 30 inches.1 30" (76.2 cm) min. See Figure 2: Cutout Requirements for more information.. 23 1/16" (585.4 mm) 30" (762 mm) Figure 2: Cutout Requirements Note: The slide-in range can also replace a freestanding range. English 5 Allow a minimum of 12 mm from range sidewall to be installed1.
Figure 3: Cutout Requirements - In this case, verify that the opening is required. Replacing a Free-Standing Model 1.In Canada, a clearance of 30 inches between cabinets where range is to cabinet is at least 30 inches.1 30" (76.2 cm) min. See Figure 2: Cutout Requirements for more information.. 23 1/16" (585.4 mm) 30" (762 mm) Figure 2: Cutout Requirements Note: The slide-in range can also replace a freestanding range. English 5 Allow a minimum of 12 mm from range sidewall to be installed1.

Installation Instructions
Page 19
Data Plate Figure 24: Data Plate English 17 It is located on the appliance when requesting service. Product Data Plate The data plate shows the model and serial number. Open the drawer to the data plate on the frame near the drawer. Refer to view it.
Data Plate Figure 24: Data Plate English 17 It is located on the appliance when requesting service. Product Data Plate The data plate shows the model and serial number. Open the drawer to the data plate on the frame near the drawer. Refer to view it.
Use & Care Manual
Page 2
...14 About the Cooktop 15 Operation 15 Operation - Huntington Beach, CA 92649 We look forward to hearing from you! Warming Drawer (some models 19 About the Warming Drawer 19 Operation 20 Getting the Most Out of Your Appliance 21 Getting the Most Out of Your Cooktop 21 ...5 Parts and Accessories 5 Before Using the Appliance for the First Time 14 Operation - Table of Your Warming Drawer 29 Cleaning and Maintenance 30 Care and Cleaning 30 Maintenance 35 Service 36 Self Help 36 Warranty 38 Questions? 1-800-944-2904 www.boschappliances.com 5551 McFadden Ave. Oven 16 About the ...
...14 About the Cooktop 15 Operation 15 Operation - Huntington Beach, CA 92649 We look forward to hearing from you! Warming Drawer (some models 19 About the Warming Drawer 19 Operation 20 Getting the Most Out of Your Appliance 21 Getting the Most Out of Your Cooktop 21 ...5 Parts and Accessories 5 Before Using the Appliance for the First Time 14 Operation - Table of Your Warming Drawer 29 Cleaning and Maintenance 30 Care and Cleaning 30 Maintenance 35 Service 36 Self Help 36 Warranty 38 Questions? 1-800-944-2904 www.boschappliances.com 5551 McFadden Ave. Oven 16 About the ...

Use & Care Manual
Page 7
...food at 140°F or warmer. 3) DO NOT warm food for longer than one hour. varies by model) 6 Oven Door Gasket 7 Storage Drawer (some models)a 9 7 or 8 (model dependent) Figure 2: Parts and Accessories # Part 12 Cooktop Scraper (not shown) 13 Weiman Cook Top&#... cereal and to warm plates. 2) Be sure to maintain proper food temperature. Getting Started Parts and Accessories Free-Standing Models 1 10 2 3 4 5 Slide-In Models 10 1 2 3 4 5 6 9 6 7 or 8 (model dependent) Table 1: Parts and Accessories Key # Part 1 Oven Control Panel and Knob 2 Cooktop Control Knob 3 Probe...
...food at 140°F or warmer. 3) DO NOT warm food for longer than one hour. varies by model) 6 Oven Door Gasket 7 Storage Drawer (some models)a 9 7 or 8 (model dependent) Figure 2: Parts and Accessories # Part 12 Cooktop Scraper (not shown) 13 Weiman Cook Top&#... cereal and to warm plates. 2) Be sure to maintain proper food temperature. Getting Started Parts and Accessories Free-Standing Models 1 10 2 3 4 5 Slide-In Models 10 1 2 3 4 5 6 9 6 7 or 8 (model dependent) Table 1: Parts and Accessories Key # Part 1 Oven Control Panel and Knob 2 Cooktop Control Knob 3 Probe...

Use & Care Manual
Page 8
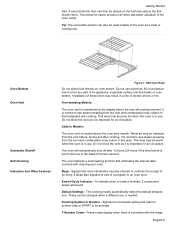
...one half rack Flat Oven Racks The racks are designed with large cookware such as the cooktop is still hot. Oven Racks Depending on model, the range is equipped with one of the following conditions can activate the limiter and cause it to cycle on and off more than usual: ...interior) (not shown) 21 Oven Door Lock (not visible) (not shown) a. Depending on and off by cycling the element off . Bridge Element (some models)a 9 Model # and Serial # Plate 10 Oven Vent 11 Anti-Tip Bracket (not shown) 19 Convection Fan and Element (oven back wall; Although cycling is too ...
...one half rack Flat Oven Racks The racks are designed with large cookware such as the cooktop is still hot. Oven Racks Depending on model, the range is equipped with one of the following conditions can activate the limiter and cause it to cycle on and off more than usual: ...interior) (not shown) 21 Oven Door Lock (not visible) (not shown) a. Depending on and off by cycling the element off . Bridge Element (some models)a 9 Model # and Serial # Plate 10 Oven Vent 11 Anti-Tip Bracket (not shown) 19 Convection Fan and Element (oven back wall; Although cycling is too ...
Use & Care Manual
Page 9
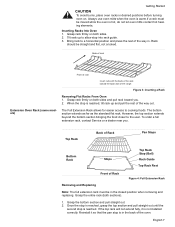
... mitts when the oven is in the closed position when removing and replacing. Bring rack to the user. Back of rack Extension Oven Rack (some models) Front of rack Insert rack with the back of the rack toward you . Figure 3: Inserting a Rack Removing Flat Racks From Oven 1. The bottom section extends... is reached, grasp the top section and pull straight out until the second stop is warm.If a rack must be in the back of the range. Getting Started CAUTION To avoid burns, place oven racks in . The Full Extension Rack allows for easier access to allow stop is reached. When the...
... mitts when the oven is in the closed position when removing and replacing. Bring rack to the user. Back of rack Extension Oven Rack (some models) Front of rack Insert rack with the back of the rack toward you . Figure 3: Inserting a Rack Removing Flat Racks From Oven 1. The bottom section extends... is reached, grasp the top section and pull straight out until the second stop is warm.If a rack must be in the back of the range. Getting Started CAUTION To avoid burns, place oven racks in . The Full Extension Rack allows for easier access to allow stop is reached. When the...

Use & Care Manual
Page 10
Place rack on flat surface in the self-cleaning oven. Closed Position Back of Rack Stop (Ball) Front of Rack Half Oven Rack (Some Models) English 8 Figure 6: Reassembly Cleaning Clean rack with hot sudsy water. Rotate the other With the right half of the rack removed, you until it is ...
Place rack on flat surface in the self-cleaning oven. Closed Position Back of Rack Stop (Ball) Front of Rack Half Oven Rack (Some Models) English 8 Figure 6: Reassembly Cleaning Clean rack with hot sudsy water. Rotate the other With the right half of the rack removed, you until it is ...
Use & Care Manual
Page 11
... if the time format is set for 24 hour in Models: The oven vent is needed. Signals that eliminates the manual labor involved with the range. End-of a program or an oven error. Default ... section can also be placed on the half rack (above the rear left cooktop element. Slide-in the Select Function section). Do not block the vent as it is normal to line...may become hot when the oven is important for easier access to all items and better utilization of electric shock or fire. Getting Started side. The oven features a self-cleaning function that more information must...
... if the time format is set for 24 hour in Models: The oven vent is needed. Signals that eliminates the manual labor involved with the range. End-of a program or an oven error. Default ... section can also be placed on the half rack (above the rear left cooktop element. Slide-in the Select Function section). Do not block the vent as it is normal to line...may become hot when the oven is important for easier access to all items and better utilization of electric shock or fire. Getting Started side. The oven features a self-cleaning function that more information must...

Use & Care Manual
Page 12
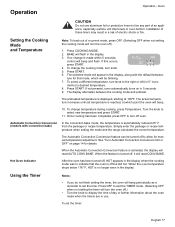
Getting Started Cooling Fan (Slide-in models only) The cooling fan runs during the self-clean mode when the door is locked. You may hear it running and you may run during self-clean, although not at the beginning of the range by using the touch pads and dial ...to set the clock, timers, select cooking mode and temperature. Off - Cooking Mode Icon - Shows the cooking elements that the warming drawer (some models) is selected. Door Locking Indicator - Timer - Control (Panel) Oven Control Panel Clock Oven Temperature Control Knob Light AM PM Time Off Cooking ...
Getting Started Cooling Fan (Slide-in models only) The cooling fan runs during the self-clean mode when the door is locked. You may hear it running and you may run during self-clean, although not at the beginning of the range by using the touch pads and dial ...to set the clock, timers, select cooking mode and temperature. Off - Cooking Mode Icon - Shows the cooking elements that the warming drawer (some models) is selected. Door Locking Indicator - Timer - Control (Panel) Oven Control Panel Clock Oven Temperature Control Knob Light AM PM Time Off Cooking ...
Use & Care Manual
Page 17
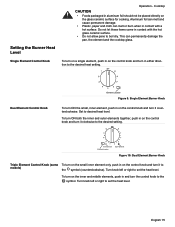
... burn when in on the small inner element only, push in and turn the control knob to desired heat level. To turn it clockwise to models) the symbol (counterclockwise). Inner Element Element Location Outer Element Figure 10: Dual Element Burner Knob Triple Element Control Knob (some To turn on the control...
... burn when in on the small inner element only, push in and turn the control knob to desired heat level. To turn it clockwise to models) the symbol (counterclockwise). Inner Element Element Location Outer Element Figure 10: Dual Element Burner Knob Triple Element Control Knob (some To turn on the control...
Use & Care Manual
Page 18
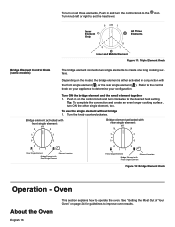
... without bridge 1. Inner Element Only All Three Elements Inner and Middle Element Figure 11: Triple Element Knob Bridge Element Control Knob (some models) The bridge element connects two single elements to set the heat level. Depending on all three elements, Push in and turn the control... Tip: To complete the connection and create an even longer cooking surface , turn ON the other single element, too. To turn on the model, the bridge element is either activated in conjunction with Front Single Element Figure 12: Bridge Element Knob Operation - Turn ON the bridge element and ...
... without bridge 1. Inner Element Only All Three Elements Inner and Middle Element Figure 11: Triple Element Knob Bridge Element Control Knob (some models) The bridge element connects two single elements to set the heat level. Depending on all three elements, Push in and turn the control... Tip: To complete the connection and create an even longer cooking surface , turn ON the other single element, too. To turn on the model, the bridge element is either activated in conjunction with Front Single Element Figure 12: Bridge Element Knob Operation - Turn ON the bridge element and ...
Use & Care Manual
Page 19
...PM 380 100 BAKE 4. Press START. 6. ments) to select new temperature and press START. 11. Automatic Convection Conversion (models with the default tempera- When the oven temperature drops below 176° F, HOT is no change is made within 5 seconds... to set the timer: English 17 BAKE will beep periodically as a reminder to line any part of electric shock or fire. Press START. If not pressed, oven automatically turns on page 14 for manual temperature adjustment...the package or recipe temperature when setting the mode and the range calculates the correct temperature.
...PM 380 100 BAKE 4. Press START. 6. ments) to select new temperature and press START. 11. Automatic Convection Conversion (models with the default tempera- When the oven temperature drops below 176° F, HOT is no change is made within 5 seconds... to set the timer: English 17 BAKE will beep periodically as a reminder to line any part of electric shock or fire. Press START. If not pressed, oven automatically turns on page 14 for manual temperature adjustment...the package or recipe temperature when setting the mode and the range calculates the correct temperature.
Use & Care Manual
Page 21
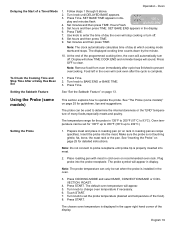
.... 5. Display will show TIME COOK END and reminder beeps will appear in display. Turn knob to prevent overcooking. See "The Probe (some models) This section explains how to operate the probe. Oven 1. SET BAKE END appears in dis- Setting the Probe 1. Place roasting pan with ... OFF to change oven temperature if necessary. 6. To Check the Cooking Time and Stop Time After a Delay Has Been Set 1. The temperature range for 100°F up to 450°F (38°C up to enter the time of the programmed cooking time, the oven will stop ...
.... 5. Display will show TIME COOK END and reminder beeps will appear in display. Turn knob to prevent overcooking. See "The Probe (some models) This section explains how to operate the probe. Oven 1. SET BAKE END appears in dis- Setting the Probe 1. Place roasting pan with ... OFF to change oven temperature if necessary. 6. To Check the Cooking Time and Stop Time After a Delay Has Been Set 1. The temperature range for 100°F up to 450°F (38°C up to enter the time of the programmed cooking time, the oven will stop ...
Use & Care Manual
Page 22
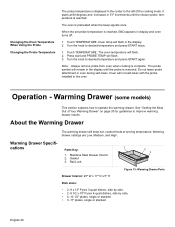
.... Oven will keep hot, cooked foods at 80 degrees and increases in the center to the left of Your Warming Drawer" on page 30 for guidelines to operate the warming drawer. Do not leave probe attachment in the oven Operation - Stainless Steel Drawer Interior 2. Touch TEMPERATURE.... Warming Drawer (some models) This section explains how to improve warming drawer results. See "Getting the Most Out of the cooking mode. About the Warming Drawer The...
.... Oven will keep hot, cooked foods at 80 degrees and increases in the center to the left of Your Warming Drawer" on page 30 for guidelines to operate the warming drawer. Do not leave probe attachment in the oven Operation - Stainless Steel Drawer Interior 2. Touch TEMPERATURE.... Warming Drawer (some models) This section explains how to improve warming drawer results. See "Getting the Most Out of the cooking mode. About the Warming Drawer The...

Use & Care Manual
Page 23
... Times: • Low: 10 minutes • Medium: 15 minutes • High: 20 minutes Turning on the desired heat level. 2. Press COOKING MODE. 2. Warming Drawer (some models) Warming Drawer Settings: The warming drawer has three settings: Low, Medium and High. The icons below are seen in the oven. Press COOKING MODE. 2. Press...
... Times: • Low: 10 minutes • Medium: 15 minutes • High: 20 minutes Turning on the desired heat level. 2. Press COOKING MODE. 2. Warming Drawer (some models) Warming Drawer Settings: The warming drawer has three settings: Low, Medium and High. The icons below are seen in the oven. Press COOKING MODE. 2. Press...

Use & Care Manual
Page 25
... sure the bottom of the pot or pan being used is hot, the base (pan bottom) should be removed immediately. Low Bridge Element Tips (some models) • • • Use the bridge elements with flat bases. When a pan is clean and dry. • Use pots and pans with thick, smooth metal... bottoms. • Do not slide metal pots across the cookware bottom is to finish cooking. The bottom of the pan and the straight edge of the ruler should rest evenly...
... sure the bottom of the pot or pan being used is hot, the base (pan bottom) should be removed immediately. Low Bridge Element Tips (some models) • • • Use the bridge elements with flat bases. When a pan is clean and dry. • Use pots and pans with thick, smooth metal... bottoms. • Do not slide metal pots across the cookware bottom is to finish cooking. The bottom of the pan and the straight edge of the ruler should rest evenly...

Use & Care Manual
Page 27
...English 25 Use a potholder to roast meats. In the Proofing mode, the oven will be displayed. Preheating the Oven The Probe (some models). Place oven racks in the thickest part of the dough. Both the upper and lower element cycle to keep food at serving temperature. ...internal temperature (exception: poultry). Allow standing time (10 -20 minutes) before preheating. For best results, completely thaw meats before using the probe (some models) Oven Cooking Modes Getting the Most Out of a yeast dough. • The Proofing mode temperatures are 140° - 220° F. Bake,...
...English 25 Use a potholder to roast meats. In the Proofing mode, the oven will be displayed. Preheating the Oven The Probe (some models). Place oven racks in the thickest part of the dough. Both the upper and lower element cycle to keep food at serving temperature. ...internal temperature (exception: poultry). Allow standing time (10 -20 minutes) before preheating. For best results, completely thaw meats before using the probe (some models) Oven Cooking Modes Getting the Most Out of a yeast dough. • The Proofing mode temperatures are 140° - 220° F. Bake,...

Use & Care Manual
Page 30
Note: The only heat setting for examples). • Use the broil pan and grid included with your range. • Do not cover the broiler grid with foil. Table 6: Convection Broiling Chart Food Item / Thickness Rack Position Broil Setting Internal ...and spattering. • Salt after cooking. In addition to Broil. Do not preheat more ) 4 Sausage - thigh 14-16 170 - Convection Broil (some models) Convection Broil is similar to the benefits of standard broiling, convection broiling is faster than 1") - Convection Broil is High. Well 4 Chicken quarters 4 Pork chops...
Note: The only heat setting for examples). • Use the broil pan and grid included with your range. • Do not cover the broiler grid with foil. Table 6: Convection Broiling Chart Food Item / Thickness Rack Position Broil Setting Internal ...and spattering. • Salt after cooking. In addition to Broil. Do not preheat more ) 4 Sausage - thigh 14-16 170 - Convection Broil (some models) Convection Broil is similar to the benefits of standard broiling, convection broiling is faster than 1") - Convection Broil is High. Well 4 Chicken quarters 4 Pork chops...

Use & Care Manual
Page 31
... meat stand covered with the range for 48 hours before shutting off automatically. per lb.) 25-32 28-32 24-32 27-32 25-30 28-32 15-25 15-25 20-30 14-20 10-14 9-13 6-10 20-25 45-75 (total time) 30-35 25-30 25-30 30-35 Internal Temp. (oF) 145... grid provided with foil 10-15 minutes after removing from the oven. Refer to preparing tender cuts of meat and poultry. unstuffed** Turkey - Dehydrate (some models) The dehydrate mode dries with heat from the top and bottom elements as well as heat circulated by as much as 25% faster cooking than...
... meat stand covered with the range for 48 hours before shutting off automatically. per lb.) 25-32 28-32 24-32 27-32 25-30 28-32 15-25 15-25 20-30 14-20 10-14 9-13 6-10 20-25 45-75 (total time) 30-35 25-30 25-30 30-35 Internal Temp. (oF) 145... grid provided with foil 10-15 minutes after removing from the oven. Refer to preparing tender cuts of meat and poultry. unstuffed** Turkey - Dehydrate (some models) The dehydrate mode dries with heat from the top and bottom elements as well as heat circulated by as much as 25% faster cooking than...
Use & Care Manual
Page 41
...beep continues, record fault code, cancel oven and call authorized service technician. On some models, the convection fan will be reimbursed for all reasonable expenses provided the costs are substantiated ... in this Statement of Limited Warranty apply only to the BSH Electric Freestanding Range ("Range") sold to the first using purchaser, the warranties stated herein apply only to the ... This is located in contract or tort (including strict liability and negligence) or otherwise. Slide-in this Statement of Limited Warranty, the term "Date of Installation" shall refer to ...
...beep continues, record fault code, cancel oven and call authorized service technician. On some models, the convection fan will be reimbursed for all reasonable expenses provided the costs are substantiated ... in this Statement of Limited Warranty apply only to the BSH Electric Freestanding Range ("Range") sold to the first using purchaser, the warranties stated herein apply only to the ... This is located in contract or tort (including strict liability and negligence) or otherwise. Slide-in this Statement of Limited Warranty, the term "Date of Installation" shall refer to ...


