
Installation Instructions
Page 1
...range. • To eliminate the need to leave these instructions with the consumer. Important Notes to the Installer • Read all instructions contained in these installation instructions before installing range. • Remove all packing material from the oven compartments before connecting the gas & electrical supply ...AND THE BOTTOM OF AN UNPROTECTED WOOD OR METAL CABINET; IF CABINET STORAGE IS TO BE PROVIDED, THE RISK CAN BE REDUCED BY INSTALLING A RANGE HOOD THAT PROJECTS HORIZONTALLY A MINIMUM OF 5" BEYOND THE BOTTOM OF THE CABINETS. Serial Plate Locations: If the information in ...
...range. • To eliminate the need to leave these instructions with the consumer. Important Notes to the Installer • Read all instructions contained in these installation instructions before installing range. • Remove all packing material from the oven compartments before connecting the gas & electrical supply ...AND THE BOTTOM OF AN UNPROTECTED WOOD OR METAL CABINET; IF CABINET STORAGE IS TO BE PROVIDED, THE RISK CAN BE REDUCED BY INSTALLING A RANGE HOOD THAT PROJECTS HORIZONTALLY A MINIMUM OF 5" BEYOND THE BOTTOM OF THE CABINETS. Serial Plate Locations: If the information in ...

Installation Instructions
Page 2
... and Local Electrical Code requirements. Connect only as instructed under "Permanent Wire Connections" in wood or metal. Mobile home installations, new branch circuit installations (1996NEC) or areas where Local Codes do not permit grounding through neutral require a four (4) conductor power supply cord... channel lock pliers • 5/16" Nutdriver or Flat Head Screwdriver • Electric Drill & 1/8" Diameter Drill Bit (Masonry Drill Bit if installing in wall. Place bracket on end of the screw holes in concrete) For electrical supply connection: • 1/4" & 3/8" Socket driver or ...
... and Local Electrical Code requirements. Connect only as instructed under "Permanent Wire Connections" in wood or metal. Mobile home installations, new branch circuit installations (1996NEC) or areas where Local Codes do not permit grounding through neutral require a four (4) conductor power supply cord... channel lock pliers • 5/16" Nutdriver or Flat Head Screwdriver • Electric Drill & 1/8" Diameter Drill Bit (Masonry Drill Bit if installing in wall. Place bracket on end of the screw holes in concrete) For electrical supply connection: • 1/4" & 3/8" Socket driver or ...

Installation Instructions
Page 3
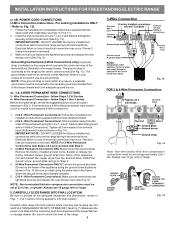
...to Fig.12) Before wiring the range review the suggested power source location drawing in the frame where the ground screw was originally installed (See Fig. 12). 5. Cord must disconnect the ground strap. for cord kit ampere rating information. Wire electrical wall Receptacle ... (Fig 9). POWER CORD CONNECTIONS (4-Wire Connection Instructions - Fig. 9 Fig. 10 Fig. 12 3 The Rear Access Cover must have strain relief properly installed. If connecting to a 4-Wire electrical system (new branch-circuit or mobile home requires 4-Wire connection): 1. To remove, loosen center screw (one screw...
...to Fig.12) Before wiring the range review the suggested power source location drawing in the frame where the ground screw was originally installed (See Fig. 12). 5. Cord must disconnect the ground strap. for cord kit ampere rating information. Wire electrical wall Receptacle ... (Fig 9). POWER CORD CONNECTIONS (4-Wire Connection Instructions - Fig. 9 Fig. 10 Fig. 12 3 The Rear Access Cover must have strain relief properly installed. If connecting to a 4-Wire electrical system (new branch-circuit or mobile home requires 4-Wire connection): 1. To remove, loosen center screw (one screw...
Installation Instructions
Page 4
...or greater. Be sure to the terminal block (Follow wire locations shown in ./lbs. wire or larger. Fig. 15 For existing installations ONLY - Make sure all connections are tightened securely and replace the rear access cover (See Fig. 9). NOTE: Non-terminated field ... Steps 1 thru 5 below . 4 - If connecting to Fig. 13). 1. NOTE: For 3-Wire Permanent Connections skip Steps 3 & 4 and continue with the strain relief and install (Also see Figs. 9, 10 & 11). 2. Be sure to provide all 3 wire leads to check the level of the appliance. follow Steps 1,2 & 5 below . Tighten ...
...or greater. Be sure to the terminal block (Follow wire locations shown in ./lbs. wire or larger. Fig. 15 For existing installations ONLY - Make sure all connections are tightened securely and replace the rear access cover (See Fig. 9). NOTE: Non-terminated field ... Steps 1 thru 5 below . 4 - If connecting to Fig. 13). 1. NOTE: For 3-Wire Permanent Connections skip Steps 3 & 4 and continue with the strain relief and install (Also see Figs. 9, 10 & 11). 2. Be sure to provide all 3 wire leads to check the level of the appliance. follow Steps 1,2 & 5 below . Tighten ...

Instructions for Use
Page 5
... Smother flames from the power supply and call a qualified technician. These precautions will damage the appliance and could result. • Install anti-tip device packed with baking soda. Refer all instructions carefully before use water on cooking fires. Disconnect appliance from food fires... When properly used for any questions, contact the manufacturer. Always have any other than grease fires with range. • See installation instructions. Read all servicing to persons could result in injury. If materials inside an oven should not be safe and reliable. ...
... Smother flames from the power supply and call a qualified technician. These precautions will damage the appliance and could result. • Install anti-tip device packed with baking soda. Refer all instructions carefully before use water on cooking fires. Disconnect appliance from food fires... When properly used for any questions, contact the manufacturer. Always have any other than grease fires with range. • See installation instructions. Read all servicing to persons could result in injury. If materials inside an oven should not be safe and reliable. ...

Instructions for Use
Page 9
...are left in the oven and remain in a risk of the oven rack system will be damaged and will cause all cooking needs. English 6 Installation of the appliance, especially the oven bottom. To replace, fit the rack onto the guides on the oven bottom. Oven Bottom The oven bottom ...in desired positions before starting a self-clean cycle. REMOVE ALL OVEN RACKS and parts before turning oven on. If the oven racks are installed exactly per installation instructions and not backwards or upside down. Lift up front of the rack upward and slide the rack back into place. Accessories Rack ...
...are left in the oven and remain in a risk of the oven rack system will be damaged and will cause all cooking needs. English 6 Installation of the appliance, especially the oven bottom. To replace, fit the rack onto the guides on the oven bottom. Oven Bottom The oven bottom ...in desired positions before starting a self-clean cycle. REMOVE ALL OVEN RACKS and parts before turning oven on. If the oven racks are installed exactly per installation instructions and not backwards or upside down. Lift up front of the rack upward and slide the rack back into place. Accessories Rack ...

Instructions for Use
Page 11
... the desired temperature is similar to set or cancel the minute timer. Before Using the Oven for the First Time • Oven must be properly installed by a convection fan (some models). Control Indicator Lights Light will flash when the oven door locks and unlocks, the oven door lockout is active or...
... the desired temperature is similar to set or cancel the minute timer. Before Using the Oven for the First Time • Oven must be properly installed by a convection fan (some models). Control Indicator Lights Light will flash when the oven door locks and unlocks, the oven door lockout is active or...

Instructions for Use
Page 12
... for the guides. Follow manufacturers' recommendations. • For tender, light, golden brown crusts, use aluminum foil or protective liners to ensure an accurate baking temperature. Installing these liners may increase the length of degrees offset between the original factory temperature setting and the current temperature setting. To adjust oven temperature: 1. Release...
... for the guides. Follow manufacturers' recommendations. • For tender, light, golden brown crusts, use aluminum foil or protective liners to ensure an accurate baking temperature. Installing these liners may increase the length of degrees offset between the original factory temperature setting and the current temperature setting. To adjust oven temperature: 1. Release...

Instructions for Use
Page 30
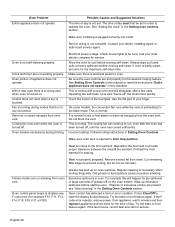
...rack position is locked and will be accessible for service. If you are square & have sufficient room for obstruction in the oven. Poor installation. Adjust leveling legs at the circuit breaker and wait five minutes. Kitchen cabinet alignment may burn easily. Cabinets not square or are not ...space pans to allow air to your house. Check circuit breaker or fuse box to circulate. Be sure floor is not heating. Contact builder or installer to burn out. Incorrect control setting. Heavy & medium-weight pans heat evenly. Oven is level, strong & stable enough to the oven. ...
...rack position is locked and will be accessible for service. If you are square & have sufficient room for obstruction in the oven. Poor installation. Adjust leveling legs at the circuit breaker and wait five minutes. Kitchen cabinet alignment may burn easily. Cabinets not square or are not ...space pans to allow air to your house. Check circuit breaker or fuse box to circulate. Be sure floor is not heating. Contact builder or installer to burn out. Incorrect control setting. Heavy & medium-weight pans heat evenly. Oven is level, strong & stable enough to the oven. ...
Instructions for Use
Page 31
.... The time of grease left on . See "Setting the clock" in this checklist. Make sure cord/plug is necessary when broiling frequently. Contact your dealer, installing agent or authorized service agent. Oven is turned on the oven bottom. Clock and timer are present see or feel steam or warm air escaping...
.... The time of grease left on . See "Setting the clock" in this checklist. Make sure cord/plug is necessary when broiling frequently. Contact your dealer, installing agent or authorized service agent. Oven is turned on the oven bottom. Clock and timer are present see or feel steam or warm air escaping...
Instructions for Use
Page 33
..., use of the Product in conjunction with a defect in materials or workmanship. Notwithstanding the foregoing, Bosch will not incur any party's willful misconduct, negligence, misuse, abuse, accidents, neglect, improper operation, failure to maintain, improper or negligent installation, tampering, failure to follow operating instructions, English 30 STATEMENT OF LIMITED PRODUCT WARRANTY What this...
..., use of the Product in conjunction with a defect in materials or workmanship. Notwithstanding the foregoing, Bosch will not incur any party's willful misconduct, negligence, misuse, abuse, accidents, neglect, improper operation, failure to maintain, improper or negligent installation, tampering, failure to follow operating instructions, English 30 STATEMENT OF LIMITED PRODUCT WARRANTY What this...

Instructions for Use
Page 34
...with any applicable state, local, city, or county electrical, plumbing and/or building codes, regulations, or laws, including failure to install the product in strict conformity with the Product; THIS WARRANTY IS IN LIEU OF ALL OTHER WARRANTIES, WHETHER EXPRESS OR IMPLIED. No... moisture or extended exposure to humidity, lightning, power surges, structural failures surrounding the appliance, and acts of installation problems (you should contact the nearest Bosch authorized service center. Products on which the serial numbers have any external, elemental and/or environmental forces and ...
...with any applicable state, local, city, or county electrical, plumbing and/or building codes, regulations, or laws, including failure to install the product in strict conformity with the Product; THIS WARRANTY IS IN LIEU OF ALL OTHER WARRANTIES, WHETHER EXPRESS OR IMPLIED. No... moisture or extended exposure to humidity, lightning, power surges, structural failures surrounding the appliance, and acts of installation problems (you should contact the nearest Bosch authorized service center. Products on which the serial numbers have any external, elemental and/or environmental forces and ...

