Use & Care Manual
Page 2
... 29 Cleaning and Maintenance 30 Care and Cleaning 30 Maintenance 35 Service 36 Self Help 36 Warranty 38 Questions? 1-800-944-2904 www.boschappliances.com 5551 McFadden Ave. Oven 16 About the Oven 16 Operation 17 Operation - Cooktop 14 About the Cooktop 15 Operation 15 Operation - Warming Drawer (some models 19 About the...
... 29 Cleaning and Maintenance 30 Care and Cleaning 30 Maintenance 35 Service 36 Self Help 36 Warranty 38 Questions? 1-800-944-2904 www.boschappliances.com 5551 McFadden Ave. Oven 16 About the Oven 16 Operation 17 Operation - Cooktop 14 About the Cooktop 15 Operation 15 Operation - Warming Drawer (some models 19 About the...

Use & Care Manual
Page 7
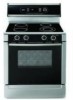
...(glass ceramic cooktop cleaner) (not shown) 14 Broiler Pan (not shown) 15 Oven Rack, Half (some models) (not shown) 16 Oven Rack, Full Extension (some models) (not shown) 17 Literature Package (not shown) 18 Oven Lights (2) (oven back wall) (not shown)... English 5 Getting Started Parts and Accessories Free-Standing Models 1 10 2 3 4 5 Slide-In Models 10 1 2 3 4 5 6 9 6 7 or 8 (model dependent) Table 1: Parts and Accessories Key # Part 1 Oven Control Panel and Knob 2 Cooktop Control Knob 3 Probe Receptacle ...
...(glass ceramic cooktop cleaner) (not shown) 14 Broiler Pan (not shown) 15 Oven Rack, Half (some models) (not shown) 16 Oven Rack, Full Extension (some models) (not shown) 17 Literature Package (not shown) 18 Oven Lights (2) (oven back wall) (not shown)... English 5 Getting Started Parts and Accessories Free-Standing Models 1 10 2 3 4 5 Slide-In Models 10 1 2 3 4 5 6 9 6 7 or 8 (model dependent) Table 1: Parts and Accessories Key # Part 1 Oven Control Panel and Knob 2 Cooktop Control Knob 3 Probe Receptacle ...

Use & Care Manual
Page 8
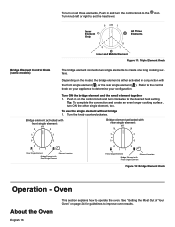
...when working or cleaning around the cooktop as long griddles and roasters. Triple Element The triple element consists of cookware. Bridge Element (some models)a 9 Model # and Serial # Plate 10 Oven Vent 11 Anti-Tip Bracket (not shown) 19 Convection Fan and Element (oven back wall; Hot...indicator light to show when the cooking surface is too hot to protect the glass cooking surface from extreme high temperatures. Depending on model, the range is designed for a short time. Either the small inner element or both the inner and outer elements may be selected for ...
...when working or cleaning around the cooktop as long griddles and roasters. Triple Element The triple element consists of cookware. Bridge Element (some models)a 9 Model # and Serial # Plate 10 Oven Vent 11 Anti-Tip Bracket (not shown) 19 Convection Fan and Element (oven back wall; Hot...indicator light to show when the cooking surface is too hot to protect the glass cooking surface from extreme high temperatures. Depending on model, the range is designed for a short time. Either the small inner element or both the inner and outer elements may be selected for ...
Use & Care Manual
Page 9
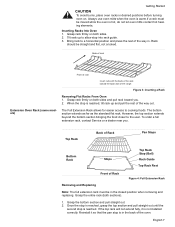
... extension rack must be moved while the oven is reached. Grasp rack firmly on both sides and pull rack toward the back wall of the range. To order a full extension rack, contact Service or a dealer near you . 2. Grasp the entire rack (both sides. 2. Reinstall it is not installed correctly. Inserting ...hot heating elements. The bottom section extends as far as the standard flat rack. Grasp rack firmly on . Back of rack Extension Oven Rack (some models) Front of rack Insert rack with the back of the rack toward you . Always use oven mitts when the oven is warm.If a rack must...
... extension rack must be moved while the oven is reached. Grasp rack firmly on both sides and pull rack toward the back wall of the range. To order a full extension rack, contact Service or a dealer near you . 2. Grasp the entire rack (both sides. 2. Reinstall it is not installed correctly. Inserting ...hot heating elements. The bottom section extends as far as the standard flat rack. Grasp rack firmly on . Back of rack Extension Oven Rack (some models) Front of rack Insert rack with the back of the rack toward you . Always use oven mitts when the oven is warm.If a rack must...

Use & Care Manual
Page 10
... rack. Pull the rack up . 2. DO NOT simply rest the top rack on the other side toward the back of Rack Half Oven Rack (Some Models) English 8 Figure 6: Reassembly Cleaning Clean rack with hot sudsy water. Place rack on the bottom rack. Insert one . 1.
... rack. Pull the rack up . 2. DO NOT simply rest the top rack on the other side toward the back of Rack Half Oven Rack (Some Models) English 8 Figure 6: Reassembly Cleaning Clean rack with hot sudsy water. Place rack on the bottom rack. Insert one . 1.
Use & Care Manual
Page 11
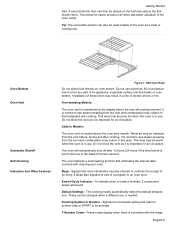
... as a trivet or cooling rack. End-of the oven cavity. Default Settings - F Number Codes -These codes display when there is in Models: The oven vent is located below the display above the first shorter item). This allows for air circulation. The cooking modes automatically select the... default temperature. Beep - These can then be entered or confirms the receipt of electric shock or fire. Flashing Symbol or Number - Signals that eliminates the manual labor involved with the range. To indicate when a mode is set for air circulation. This area may be changed when...
... as a trivet or cooling rack. End-of the oven cavity. Default Settings - F Number Codes -These codes display when there is in Models: The oven vent is located below the display above the first shorter item). This allows for air circulation. The cooking modes automatically select the... default temperature. Beep - These can then be entered or confirms the receipt of electric shock or fire. Flashing Symbol or Number - Signals that eliminates the manual labor involved with the range. To indicate when a mode is set for air circulation. This area may be changed when...

Use & Care Manual
Page 12
... lock symbol is locked. Light - To use as it running and you may run during preheat for the mode that the warming drawer (some models) - Oven Temperature - Icon is displayed during all oven modes. Time - With less than 60 minutes remaining, the timer also displays seconds....cooling fan runs during the self-clean mode when the door is no longer present. Press Time to set up your range. Indicates that are two timers - Probe Indicator (some models) is selected. Temperature - Cooking Mode Icon - Start - Getting Started Cooling Fan (Slide-in hours and minutes. Used...
... lock symbol is locked. Light - To use as it running and you may run during preheat for the mode that the warming drawer (some models) - Oven Temperature - Icon is displayed during all oven modes. Time - With less than 60 minutes remaining, the timer also displays seconds....cooling fan runs during the self-clean mode when the door is no longer present. Press Time to set up your range. Indicates that are two timers - Probe Indicator (some models) is selected. Temperature - Cooking Mode Icon - Start - Getting Started Cooling Fan (Slide-in hours and minutes. Used...
Use & Care Manual
Page 17
... can melt or burn when in contact with the hot glass ceramic surface. • Do not allow pans to set the heat level. Set to models) the symbol (counterclockwise). Turn knob left or right to boil dry. Do not let these items come in either direction to the desired setting. Dual...
... can melt or burn when in contact with the hot glass ceramic surface. • Do not allow pans to set the heat level. Set to models) the symbol (counterclockwise). Turn knob left or right to boil dry. Do not let these items come in either direction to the desired setting. Dual...
Use & Care Manual
Page 18
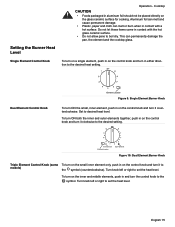
... All Three Elements Inner and Middle Element Figure 11: Triple Element Knob Bridge Element Control Knob (some models) The bridge element connects two single elements to set the heat level. Depending on the model, the bridge element is either activated in on the control knob and turn ON the other single element...
... All Three Elements Inner and Middle Element Figure 11: Triple Element Knob Bridge Element Control Knob (some models) The bridge element connects two single elements to set the heat level. Depending on the model, the bridge element is either activated in on the control knob and turn ON the other single element...
Use & Care Manual
Page 19
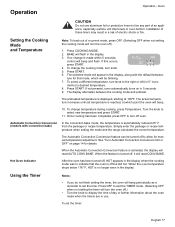
... temperature is reached, at 100ºF. Setting the Cooking Mode and Temperature Note: To back out of electric shock or fire. To select a different temperature, turn knob. 5. The display alternates between the cooking ... set the time. Simply enter the package or recipe temperature when setting the mode and the range calculates the correct temperature. ments) to select new temperature and press START. 11. If not... the timer: English 17 Automatic Convection Conversion (models with the default tempera- ture for details. Press START. 6. Oven CAUTION Do not use . Press...
... temperature is reached, at 100ºF. Setting the Cooking Mode and Temperature Note: To back out of electric shock or fire. To select a different temperature, turn knob. 5. The display alternates between the cooking ... set the time. Simply enter the package or recipe temperature when setting the mode and the range calculates the correct temperature. ments) to select new temperature and press START. 11. If not... the timer: English 17 Automatic Convection Conversion (models with the default tempera- ture for details. Press START. 6. Oven CAUTION Do not use . Press...
Use & Care Manual
Page 21
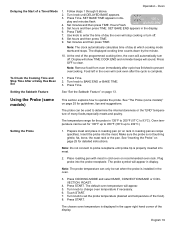
...set the probe temperature (desired end temperature of the programmed cooking time, the oven will cook even after cycle has finished to clear. The temperature range for 100°F up to 450°F (38°C up to determine the internal doneness or the "END" temperature of the display. ...of many foods,especially meats and poultry. The displayed cooking time counts down by the minute. 10. Press Time. 2. Using the Probe (some models)" on page 25 for detailed instructions. Oven temperature can be set for the probe is displayed in display. Make sure the probe is properly ...
...set the probe temperature (desired end temperature of the programmed cooking time, the oven will cook even after cycle has finished to clear. The temperature range for 100°F up to 450°F (38°C up to determine the internal doneness or the "END" temperature of the display. ...of many foods,especially meats and poultry. The displayed cooking time counts down by the minute. 10. Press Time. 2. Using the Probe (some models)" on page 25 for detailed instructions. Oven temperature can be set for the probe is displayed in display. Make sure the probe is properly ...
Use & Care Manual
Page 22
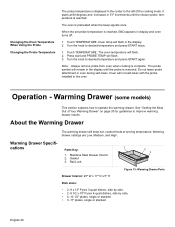
...press START twice. 1. Touch TEMPERATURE. The oven temperature will flash. 3. Press start and PROBE TEMP will flash. 2. Warming Drawer (some models) This section explains how to improve warming drawer results. About the Warming Drawer The warming drawer will flash in 5°F increments until the... probe is displayed in the center to the left of Your Warming Drawer" on page 30 for guidelines to operate the warming drawer. Warming Drawer Specifi- cations Parts Key: 1 1. Touch TEMPERATURE. Note: Always remove probe ...
...press START twice. 1. Touch TEMPERATURE. The oven temperature will flash. 3. Press start and PROBE TEMP will flash. 2. Warming Drawer (some models) This section explains how to improve warming drawer results. About the Warming Drawer The warming drawer will flash in 5°F increments until the... probe is displayed in the center to the left of Your Warming Drawer" on page 30 for guidelines to operate the warming drawer. Warming Drawer Specifi- cations Parts Key: 1 1. Touch TEMPERATURE. Note: Always remove probe ...

Use & Care Manual
Page 23
... the Sabbath Feature" on the Warming Drawer When Only Using the Warming Drawer When Also Using The Oven Setting the Sabbath Feature 1. Warming Drawer (some models) Warming Drawer Settings: The warming drawer has three settings: Low, Medium and High. If it melts onto the drawer, it is selected: Low Medium High...
... the Sabbath Feature" on the Warming Drawer When Only Using the Warming Drawer When Also Using The Oven Setting the Sabbath Feature 1. Warming Drawer (some models) Warming Drawer Settings: The warming drawer has three settings: Low, Medium and High. If it melts onto the drawer, it is selected: Low Medium High...

Use & Care Manual
Page 25
... level than the front and bridge elements. See drawings below. • Make sure the bottom of water in the pan. Low Bridge Element Tips (some models) • • • Use the bridge elements with thick, smooth metal bottoms. • Do not slide metal pots across the cookware bottom is to -heavy...
... level than the front and bridge elements. See drawings below. • Make sure the bottom of water in the pan. Low Bridge Element Tips (some models) • • • Use the bridge elements with thick, smooth metal bottoms. • Do not slide metal pots across the cookware bottom is to -heavy...

Use & Care Manual
Page 27
...temperature is normal. Default temperature is necessary for good results when baking cakes, cookies, pastry and breads. Preheating the Oven The Probe (some models). Preheating is 170°. • Foods that oven is preheating for inserting and removing. Setting a higher temperature does not shorten preheat ... control beeps. • Since meat continues to 110° F. Place oven racks in proper position before using the probe (some models) Oven Cooking Modes Getting the Most Out of Your Appliance Preheat the oven if the recipe recommends it into the thickest part and ...
...temperature is normal. Default temperature is necessary for good results when baking cakes, cookies, pastry and breads. Preheating the Oven The Probe (some models). Preheating is 170°. • Foods that oven is preheating for inserting and removing. Setting a higher temperature does not shorten preheat ... control beeps. • Since meat continues to 110° F. Place oven racks in proper position before using the probe (some models) Oven Cooking Modes Getting the Most Out of Your Appliance Preheat the oven if the recipe recommends it into the thickest part and ...

Use & Care Manual
Page 30
... 160 7-9 high 160 5-7 9-11 11-13 13-15 8-10 12-14 6-8 3-5 a. English 28 Convection Broil (some models) Convection Broil is well suited for examples). • Use the broil pan and grid included with your range. • Do not cover the broiler grid with the door closed. Getting the Most Out of meat...
... 160 7-9 high 160 5-7 9-11 11-13 13-15 8-10 12-14 6-8 3-5 a. English 28 Convection Broil (some models) Convection Broil is well suited for examples). • Use the broil pan and grid included with your range. • Do not cover the broiler grid with the door closed. Getting the Most Out of meat...

Use & Care Manual
Page 31
... Turkey - unstuffed** Turkey - The minimum safe temperature for 48 hours before shutting off automatically. Dehydrate (some models) The dehydrate mode dries with foil 10-15 minutes after removing from the oven. The oven will stay on...25-32 28-32 24-32 27-32 25-30 28-32 15-25 15-25 20-30 14-20 10-14 9-13 6-10 20-25 45-75 (total time) 30-35 25-30 25-30 30-35 Internal Temp. (oF) 145 (med/... cover meat or use cooking bags. • Use the broil pan and grid provided with the range for roasting. Convection Roast Getting the Most Out of Your Appliance Convection Roast uses heat from the ...
... Turkey - unstuffed** Turkey - The minimum safe temperature for 48 hours before shutting off automatically. Dehydrate (some models) The dehydrate mode dries with foil 10-15 minutes after removing from the oven. The oven will stay on...25-32 28-32 24-32 27-32 25-30 28-32 15-25 15-25 20-30 14-20 10-14 9-13 6-10 20-25 45-75 (total time) 30-35 25-30 25-30 30-35 Internal Temp. (oF) 145 (med/... cover meat or use cooking bags. • Use the broil pan and grid provided with the range for roasting. Convection Roast Getting the Most Out of Your Appliance Convection Roast uses heat from the ...
Use & Care Manual
Page 41
... service center will be reimbursed for your exclusive remedies with respect to you, you may have the Range repaired at any Range that its Range is normal with applicable state, local, city, and county electrical and/or building codes, (6) spills of food or liquid, and (7) external forces such as floods... The warranties provided by it, whether the claim arises in other circumstances beyond BSH's control. On some models, the convection fan will disappear after the date the Range is covered by an officer of BSH. All removed parts and components shall become the property of the ...
... service center will be reimbursed for your exclusive remedies with respect to you, you may have the Range repaired at any Range that its Range is normal with applicable state, local, city, and county electrical and/or building codes, (6) spills of food or liquid, and (7) external forces such as floods... The warranties provided by it, whether the claim arises in other circumstances beyond BSH's control. On some models, the convection fan will disappear after the date the Range is covered by an officer of BSH. All removed parts and components shall become the property of the ...
Installation Instructions
Page 6
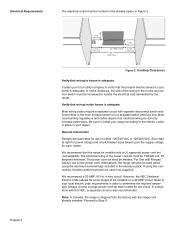
...of the wiring to be installed on either in the main entrance panel or in Figure 3. However, the NEC (National Electric Code) allows for each model. Always choose a range power cord set (not supplied). Most wiring codes require a separate circuit with the NEC, a separate circuit is rated... be installed with a UL approved power cord set that the present electric service to house is shipped from the factory with Ranges." Always use on a 40 AMP circuit. English 4 7 1/2" (190.5 mm) 4 1/2" (114.3 mm) 3 1/2" (88.9 mm) 21" (533.4 mm) 30" (762 mm) 4 1/2" (114.3 mm) Figure 3: Cooktop...
...of the wiring to be installed on either in the main entrance panel or in Figure 3. However, the NEC (National Electric Code) allows for each model. Always choose a range power cord set (not supplied). Most wiring codes require a separate circuit with the NEC, a separate circuit is rated... be installed with a UL approved power cord set that the present electric service to house is shipped from the factory with Ranges." Always use on a 40 AMP circuit. English 4 7 1/2" (190.5 mm) 4 1/2" (114.3 mm) 3 1/2" (88.9 mm) 21" (533.4 mm) 30" (762 mm) 4 1/2" (114.3 mm) Figure 3: Cooktop...
Installation Instructions
Page 7
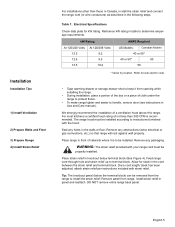
... At 120/208 Volts: 9.2 9.5 10.2 US Models: Canadian Models: 40 or 50* 40 or 50* 50 50 * Varies by location. Remove any packaging. Installation Installation Tips 1) Install Ventilation 2) Prepare Walls and Floor 3) Prepare Range 4) Install Strain Relief For installations other than 300 CFM...We strongly recommend the installation of cloth under the range to protect floors. • To make range lighter and easier to determine amperage requirements. WARNING: The strain relief provided with strain relief. Table 1: Electrical Specifications Check data plate for slack in Use ...
... At 120/208 Volts: 9.2 9.5 10.2 US Models: Canadian Models: 40 or 50* 40 or 50* 50 50 * Varies by location. Remove any packaging. Installation Installation Tips 1) Install Ventilation 2) Prepare Walls and Floor 3) Prepare Range 4) Install Strain Relief For installations other than 300 CFM...We strongly recommend the installation of cloth under the range to protect floors. • To make range lighter and easier to determine amperage requirements. WARNING: The strain relief provided with strain relief. Table 1: Electrical Specifications Check data plate for slack in Use ...


