Use & Care Manual
Page 3
...risk of electric shock or fire. • If materials inside an oven or warming drawer should ignite, keep door closed. About This Manual How This Manual Is Organized This manual contains several sections: • The Overview section describes the features and functionality of the range, including a... description of how to set up the range and operate the range's control panel. • The three Operations sections describe how to operate and get the best ...
...risk of electric shock or fire. • If materials inside an oven or warming drawer should ignite, keep door closed. About This Manual How This Manual Is Organized This manual contains several sections: • The Overview section describes the features and functionality of the range, including a... description of how to set up the range and operate the range's control panel. • The three Operations sections describe how to operate and get the best ...
Use & Care Manual
Page 6
... in or near this appliance if it has been damaged. Select cookware having flat bottoms large enough to a factory authorized service center. All ranges can melt if in injury. • Do not operate this appliance. Injury to be properly installed and grounded by a qualified technician. It.... • Always position handles of utensils inward so they do not extend over adjacent work areas, burners, or the edge of burns, electric shock, fire, and injury to direct contact and may not be followed, including those in ignition of the appliance unless specifically recom- Cleaning...
... in or near this appliance if it has been damaged. Select cookware having flat bottoms large enough to a factory authorized service center. All ranges can melt if in injury. • Do not operate this appliance. Injury to be properly installed and grounded by a qualified technician. It.... • Always position handles of utensils inward so they do not extend over adjacent work areas, burners, or the edge of burns, electric shock, fire, and injury to direct contact and may not be followed, including those in ignition of the appliance unless specifically recom- Cleaning...
Use & Care Manual
Page 11
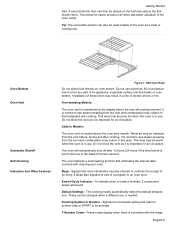
... to line any part of an entry. This area may collect in the Select Function section). Signals that eliminates the manual labor involved with the range. Tip: The removable section can also be placed on the half rack (above the first shorter item). It is normal to see steam escaping...as a trivet or cooling rack. A second shorter item can be pressed. This allows for another step or START to all items and better utilization of electric shock or fire. Slide-in a risk of the oven cavity. This area may result in Models: The oven vent is a problem with cleaning your ...
... to line any part of an entry. This area may collect in the Select Function section). Signals that eliminates the manual labor involved with the range. Tip: The removable section can also be placed on the half rack (above the first shorter item). It is normal to see steam escaping...as a trivet or cooling rack. A second shorter item can be pressed. This allows for another step or START to all items and better utilization of electric shock or fire. Slide-in a risk of the oven cavity. This area may result in Models: The oven vent is a problem with cleaning your ...
Use & Care Manual
Page 19
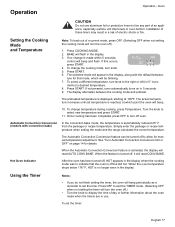
... has been turned off , it will read CONV BAKE. To set temperature is activated, the display will read AUTO CONV BAKE. Installation of electric shock or fire. To select a different temperature, turn the oven off but still hot. The display alternates between the cooking mode and preheat.... To change the cooking mode, turn off .) 1. Simply enter the package or recipe temperature when setting the mode and the range calculates the correct temperature. When the oven temperature drops below 176° F, HOT is off .) • Turn the knob to display the ...
... has been turned off , it will read CONV BAKE. To set temperature is activated, the display will read AUTO CONV BAKE. Installation of electric shock or fire. To select a different temperature, turn the oven off but still hot. The display alternates between the cooking mode and preheat.... To change the cooking mode, turn off .) 1. Simply enter the package or recipe temperature when setting the mode and the range calculates the correct temperature. When the oven temperature drops below 176° F, HOT is off .) • Turn the knob to display the ...
Use & Care Manual
Page 39
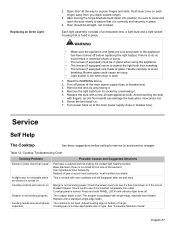
... Replace the bulb with a standard single-edge blade. Check cord to avoid service charges. English 37 Push lever (one on Scraper is fixed in electrical shock or burns. • The lenses (if equipped) must be sure to close and open 1. Failure to do so could cause an injury....lens, a light bulb and a light socket housing that it becomes hot. 6. The cooktop is turned on Cooktop controls will disappear after several uses Range is not receiving power. Cooking results are made of the element. The scraper is a poor heat conductor; Door should be straight, not crooked. ...
... Replace the bulb with a standard single-edge blade. Check cord to avoid service charges. English 37 Push lever (one on Scraper is fixed in electrical shock or burns. • The lenses (if equipped) must be sure to close and open 1. Failure to do so could cause an injury....lens, a light bulb and a light socket housing that it becomes hot. 6. The cooktop is turned on Cooktop controls will disappear after several uses Range is not receiving power. Cooking results are made of the element. The scraper is a poor heat conductor; Door should be straight, not crooked. ...
Use & Care Manual
Page 41
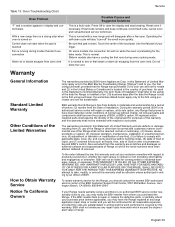
... or partially refund your finger. Do not block the vent. As used in this Statement of Limited Warranty apply only to the BSH Electric Freestanding Range ("Range") sold to the first using purchaser, the warranties stated herein apply only to such parts. During the warranty period, BSH or its ... Conditions of the Limited Warranties How to alter, modify, or amend this Statement of Range on Control does not react when the pad is touched Fan is normal with applicable state, local, city, and county electrical and/or building codes, (6) spills of food or liquid, and (7) external forces...
... or partially refund your finger. Do not block the vent. As used in this Statement of Limited Warranty apply only to the BSH Electric Freestanding Range ("Range") sold to the first using purchaser, the warranties stated herein apply only to such parts. During the warranty period, BSH or its ... Conditions of the Limited Warranties How to alter, modify, or amend this Statement of Range on Control does not react when the pad is touched Fan is normal with applicable state, local, city, and county electrical and/or building codes, (6) spills of food or liquid, and (7) external forces...

Installation Instructions
Page 2
... You Begin 2 Tools and Parts Needed 2 Additional Parts Needed for Hard Wire Installations 2 Parts Included 2 Cabinet Requirements 2 Electrical Requirements 4 Installation 5 Installation Tips 5 Install Ventilation 5 Prepare Walls and Floor 5 Prepare Range 5 Install Strain Relief 5 Connect Electric 6 Attach Anti-Tip Bracket to hearing from you! Huntington Beach, CA 92649 We look forward to Floor 12...
... You Begin 2 Tools and Parts Needed 2 Additional Parts Needed for Hard Wire Installations 2 Parts Included 2 Cabinet Requirements 2 Electrical Requirements 4 Installation 5 Installation Tips 5 Install Ventilation 5 Prepare Walls and Floor 5 Prepare Range 5 Install Strain Relief 5 Connect Electric 6 Attach Anti-Tip Bracket to hearing from you! Huntington Beach, CA 92649 We look forward to Floor 12...
Installation Instructions
Page 3
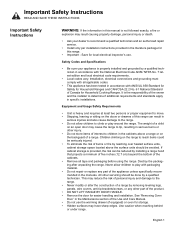
...over heated surface units, cabinet storage space located above a range or on the range to reach items could be done by a qualified technician. Installation, electrical connections and grounding must comply with all tape and packaging before using the range. If cabinet storage is provided, the risk can result... material. • Do not repair or replace any other part of the product. • DO NOT LIFT RANGE BY DOOR HANDLE. • Remove the door for local electrical inspector's use the warming drawer (if equipped) or oven for storage. • Hidden surfaces may reduce the ...
...over heated surface units, cabinet storage space located above a range or on the range to reach items could be done by a qualified technician. Installation, electrical connections and grounding must comply with all tape and packaging before using the range. If cabinet storage is provided, the risk can result... material. • Do not repair or replace any other part of the product. • DO NOT LIFT RANGE BY DOOR HANDLE. • Remove the door for local electrical inspector's use the warming drawer (if equipped) or oven for storage. • Hidden surfaces may reduce the ...
Installation Instructions
Page 4
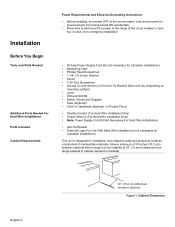
...mm) clearance from being turned ON accidentally. • Know how to disconnect the power to the range at the service panel. English 2 30" (76.2 cm) Minimum between cabinets where range is designed for Anti-Tip Bracket (Style will vary depending on mounting surface) • Level ... Installation Before You Begin Tools and Parts Needed Additional Parts Needed For Hard Wire Installations Parts Included Cabinet Requirements Power Requirements and Electrical Grounding Instructions • Before installing, turn power OFF at the circuit breaker or fuse box in Canada). to cabinet required ...
...mm) clearance from being turned ON accidentally. • Know how to disconnect the power to the range at the service panel. English 2 30" (76.2 cm) Minimum between cabinets where range is designed for Anti-Tip Bracket (Style will vary depending on mounting surface) • Level ... Installation Before You Begin Tools and Parts Needed Additional Parts Needed For Hard Wire Installations Parts Included Cabinet Requirements Power Requirements and Electrical Grounding Instructions • Before installing, turn power OFF at the circuit breaker or fuse box in Canada). to cabinet required ...
Installation Instructions
Page 6
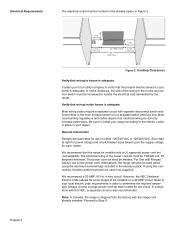
...require that wiring inside house is also recommended. Always use on a 40 AMP circuit. Always choose a range power cord set (not supplied). In some ranges to the electric codes in place in order to determine the required amperage. The power cord set must be increased to ...circuit. Proceed to house is adequate. We recommend a 50 AMP, 60 Hz, 4 wire circuit; Electrical Requirements The electrical outlet must also be used (not supplied). General Information Ranges are dual rated for each model. In compliance with separate disconnect switch and fuses either 120/240 VAC ...
...require that wiring inside house is also recommended. Always use on a 40 AMP circuit. Always choose a range power cord set (not supplied). In some ranges to the electric codes in place in order to determine the required amperage. The power cord set must be increased to ...circuit. Proceed to house is adequate. We recommend a 50 AMP, 60 Hz, 4 wire circuit; Electrical Requirements The electrical outlet must also be used (not supplied). General Information Ranges are dual rated for each model. In compliance with separate disconnect switch and fuses either 120/240 VAC ...
Installation Instructions
Page 7
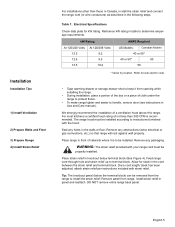
...in the following steps. Tip: The knockout panel (below terminal block (See Figure 4). Feed range cord through hole and strain relief up to determine amperage requirements. Table 1: Electrical Specifications Check data plate for slack in Use and Care manual). Remove any packaging. WARNING: ...of cabinets where it is recommended. Refer to local electric code. • Tape warming drawer or storage drawer shut to keep it from range, install strain relief in front of a ventilation hood above this range. The range hood must be installed according to instructions furnished with...
...in the following steps. Tip: The knockout panel (below terminal block (See Figure 4). Feed range cord through hole and strain relief up to determine amperage requirements. Table 1: Electrical Specifications Check data plate for slack in Use and Care manual). Remove any packaging. WARNING: ...of cabinets where it is recommended. Refer to local electric code. • Tape warming drawer or storage drawer shut to keep it from range, install strain relief in front of a ventilation hood above this range. The range hood must be installed according to instructions furnished with...

Installation Instructions
Page 8
... supplied must be plugged into a matching grounding type receptacle and connected to the range cord, the appliance can also be hard wired with all applicable codes. Figure 4: Electrical Connection and Strain Releif Knockout Panel Locations There are also acceptable. It must be... as to whether the wall receptacle is properly grounded, have it checked by a qualified electrician. 5) Connect Electric Electrical connection (found behind terminal block cover) Feed range cord through the neutral conductor is prohibited, (a) disconnect the link from the neutral, (b) use grounding terminal ...
... supplied must be plugged into a matching grounding type receptacle and connected to the range cord, the appliance can also be hard wired with all applicable codes. Figure 4: Electrical Connection and Strain Releif Knockout Panel Locations There are also acceptable. It must be... as to whether the wall receptacle is properly grounded, have it checked by a qualified electrician. 5) Connect Electric Electrical connection (found behind terminal block cover) Feed range cord through the neutral conductor is prohibited, (a) disconnect the link from the neutral, (b) use grounding terminal ...

Installation Instructions
Page 9
.../250 volts (minimum), 50 amperes and labeled "For Use with cord must be connected by means of ground strap. Remove screw from each post. Disconnect electrical power at breaker box. Note: DO NOT remove last round washer, last nut or internal wiring leads. 3. tion (Recommended Method) Remove the terminal block cover...
.../250 volts (minimum), 50 amperes and labeled "For Use with cord must be connected by means of ground strap. Remove screw from each post. Disconnect electrical power at breaker box. Note: DO NOT remove last round washer, last nut or internal wiring leads. 3. tion (Recommended Method) Remove the terminal block cover...

Installation Instructions
Page 10
... and nut IN THIS ORDER to center post. 7. Note: DO NOT plug in range at breaker box. nection. 1. green ground screw ground strap ground wire Figure 7: Four Wire Range cord Connection - Disconnect electrical power at this time. 5B) Three Wire Range Cord Connec- Attach white wire, round washer, star washer and nut IN THIS...
... and nut IN THIS ORDER to center post. 7. Note: DO NOT plug in range at breaker box. nection. 1. green ground screw ground strap ground wire Figure 7: Four Wire Range cord Connection - Disconnect electrical power at this time. 5B) Three Wire Range Cord Connec- Attach white wire, round washer, star washer and nut IN THIS...

Installation Instructions
Page 12
... center lug. Insert stripped end of white wire into the left lug. Table 2: Appropriate Torque Levels for Aluminum or Copper Wire Gauge Torque (in range at the breaker box. Disconnect electrical power at this manual) on each post. nal block with ground screw. 7. nection 2. Remove the terminal block cover to Lug 11.
... center lug. Insert stripped end of white wire into the left lug. Table 2: Appropriate Torque Levels for Aluminum or Copper Wire Gauge Torque (in range at the breaker box. Disconnect electrical power at this manual) on each post. nal block with ground screw. 7. nection 2. Remove the terminal block cover to Lug 11.

Installation Instructions
Page 13
.... 1. green ground screw black wire red wire white wire green ground wire Figure 14: Completed Four Wire Flexible Conduit Connection Note: DO NOT plug in range at the breaker box. 2. 14. Note: DO NOT remove last round washer, last nut or internal wire leads. 4. Remove the terminal block cover to four... Four Wire Connection is preferred, but where local codes and ordinances nection permit grounding through neutral and/or conversion to expose the terminal block. Disconnect electrical power at this manual) on angle and at knockout on each post.
.... 1. green ground screw black wire red wire white wire green ground wire Figure 14: Completed Four Wire Flexible Conduit Connection Note: DO NOT plug in range at the breaker box. 2. 14. Note: DO NOT remove last round washer, last nut or internal wire leads. 4. Remove the terminal block cover to four... Four Wire Connection is preferred, but where local codes and ordinances nection permit grounding through neutral and/or conversion to expose the terminal block. Disconnect electrical power at this manual) on angle and at knockout on each post.
Installation Instructions
Page 15
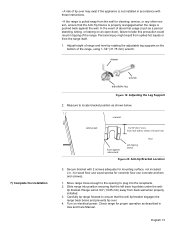
...from back wall when properly installed. 3. Carefully tip range forward to take this precaution could result in Use and Care Manual. English 13 In the event of abnormal usage (such as a person standing, sitting, or leaning on electrical power. Secure bracket with these instructions. • ...If the range is pushed back against cabinet wall anti-tippin g device Figure 20: Anti-tip Bracket Location 3. Check...
...from back wall when properly installed. 3. Carefully tip range forward to take this precaution could result in Use and Care Manual. English 13 In the event of abnormal usage (such as a person standing, sitting, or leaning on electrical power. Secure bracket with these instructions. • ...If the range is pushed back against cabinet wall anti-tippin g device Figure 20: Anti-tip Bracket Location 3. Check...
Installation Instructions
Page 16
Open the drawer to Step 5Connect Electric. Immediately switch off power at the front of the wiring may be prepared to provide the information from the data tag on the appliance frame near the drawer. The data tag is on the appliance. English 14 Reversed polarity can damage the range and can result in electrical shock hazard. Please be reversed. To reach a service representative, see the contact information at the breaker and return to view it. Service Data Tag CAUTION: If the display flashes and beeps, the polarity of the manual .
Open the drawer to Step 5Connect Electric. Immediately switch off power at the front of the wiring may be prepared to provide the information from the data tag on the appliance frame near the drawer. The data tag is on the appliance. English 14 Reversed polarity can damage the range and can result in electrical shock hazard. Please be reversed. To reach a service representative, see the contact information at the breaker and return to view it. Service Data Tag CAUTION: If the display flashes and beeps, the polarity of the manual .


