Use & Care Manual
Page 2
... Getting the Most Out of Your Cooktop 21 Getting the Most Out of Your Oven 23 Getting the Most Out of Contents About This Manual 1 How This Manual Is Organized 1 Safety 1 Important Safety Instructions 1 Getting Started 5 Parts and Accessories 5 Before Using the Appliance for the First Time 14 Operation - Cooktop 14 About...
... Getting the Most Out of Your Cooktop 21 Getting the Most Out of Your Oven 23 Getting the Most Out of Contents About This Manual 1 How This Manual Is Organized 1 Safety 1 Important Safety Instructions 1 Getting Started 5 Parts and Accessories 5 Before Using the Appliance for the First Time 14 Operation - Cooktop 14 About...
Use & Care Manual
Page 3
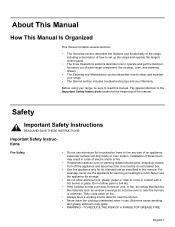
... Safety Instructions Fire Safety • Do not use . Turn off the appliance and disconnect the circuit at the beginning of the manual. Before using your Warranty. Never use the appliance for storage. • Do not allow pans to boil dry. • ...a working smoke detector near the burners or elements. Installation of these liners may ignite. • WARNING - About This Manual How This Manual Is Organized This manual contains several sections: • The Overview section describes the features and functionality of the range, including a description of how...
... Safety Instructions Fire Safety • Do not use . Turn off the appliance and disconnect the circuit at the beginning of the manual. Before using your Warranty. Never use the appliance for storage. • Do not allow pans to boil dry. • ...a working smoke detector near the burners or elements. Installation of these liners may ignite. • WARNING - About This Manual How This Manual Is Organized This manual contains several sections: • The Overview section describes the features and functionality of the range, including a description of how...

Use & Care Manual
Page 5
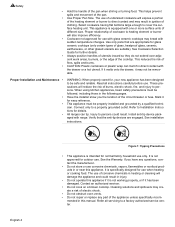
.... Be sure drawer is still hot. Items of the drawer while it is empty before removing. • When children become hot enough to use this manual. • Do not clean the appliance while it is a potential cause of reproductive toxicity.Exposure to these substances can damage the appliance, and the unit...
.... Be sure drawer is still hot. Items of the drawer while it is empty before removing. • When children become hot enough to use this manual. • Do not clean the appliance while it is a potential cause of reproductive toxicity.Exposure to these substances can damage the appliance, and the unit...
Use & Care Manual
Page 6
... of fires, spills and burns. • CAUTION: Plastic containers or plastic wrap can tip. Mark it may result in injury. • Do not operate this manual. Injury to persons could result in ignition of different size. Install anti-tip device packaged with sudden temperature changes. See installation instructions. Contact an authorized...
... of fires, spills and burns. • CAUTION: Plastic containers or plastic wrap can tip. Mark it may result in injury. • Do not operate this manual. Injury to persons could result in ignition of different size. Install anti-tip device packaged with sudden temperature changes. See installation instructions. Contact an authorized...
Use & Care Manual
Page 11
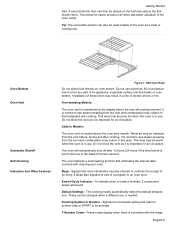
Do not block the vent as it is set for air circulation. Signals that eliminates the manual labor involved with the range. End-of a program or an oven error. The cooking modes automatically select the default temperature. Signals an incomplete setting and ...
Do not block the vent as it is set for air circulation. Signals that eliminates the manual labor involved with the range. End-of a program or an oven error. The cooking modes automatically select the default temperature. Signals an incomplete setting and ...
Use & Care Manual
Page 16
... new selection. 0.0 Turn Automatic Convec- About the Cooktop Operation Use the cooktop for the First Time • Remove all safety precautions and Use and Care Manual infor- Press Start to operating. Access SELECT FUNCTIONS Menu. 2. Operation - See "Getting the Most Out of Your Cooktop" on proper cookware being used. • The...
... new selection. 0.0 Turn Automatic Convec- About the Cooktop Operation Use the cooktop for the First Time • Remove all safety precautions and Use and Care Manual infor- Press Start to operating. Access SELECT FUNCTIONS Menu. 2. Operation - See "Getting the Most Out of Your Cooktop" on proper cookware being used. • The...
Use & Care Manual
Page 19
... Conversion (models with the default tempera- ments) to select new temperature and press START. 11. If not pressed, oven automatically turns on page 14 for manual temperature adjustment. To change the cooking mode, turn knob to the right or left (in use aluminum foil or protective liners to display the time...
... Conversion (models with the default tempera- ments) to select new temperature and press START. 11. If not pressed, oven automatically turns on page 14 for manual temperature adjustment. To change the cooking mode, turn knob to the right or left (in use aluminum foil or protective liners to display the time...

Use & Care Manual
Page 28
...: • Slight decrease in cooking time • Three rack cooking (more even browning) • Higher Volume (yeast items rise higher) • Ability to allow for manual temperature adjustment. The Automatic Convection Conversion feature can be turned off , it will read CONV BAKE. Convection Bake Convection baking is similar to Convection Baking...
...: • Slight decrease in cooking time • Three rack cooking (more even browning) • Higher Volume (yeast items rise higher) • Ability to allow for manual temperature adjustment. The Automatic Convection Conversion feature can be turned off , it will read CONV BAKE. Convection Bake Convection baking is similar to Convection Baking...

Use & Care Manual
Page 29
... 18-20 4 high 160 6-8 4-6 3 high 160 5-7 4-6 5 high 160 2-4 2-3 5 low Cook until 9-11 opaque and flakes easily Do Not Turn English 27 they can also be manually reduced by 25° F if the Automatic Convection Conversion feature has been turned off. Always broil with foil. It is designed to prevent sticking •...
... 18-20 4 high 160 6-8 4-6 3 high 160 5-7 4-6 5 high 160 2-4 2-3 5 low Cook until 9-11 opaque and flakes easily Do Not Turn English 27 they can also be manually reduced by 25° F if the Automatic Convection Conversion feature has been turned off. Always broil with foil. It is designed to prevent sticking •...

Use & Care Manual
Page 35
... to clean for proper care. If a flame persists, turn off the oven and allow it to cool before using pans with bases that eliminates the manual labor involved with a dampened paper towel. The range can also be set to wipe up during this does not remove the marks, try a mild abrasive...
... to clean for proper care. If a flame persists, turn off the oven and allow it to cool before using pans with bases that eliminates the manual labor involved with a dampened paper towel. The range can also be set to wipe up during this does not remove the marks, try a mild abrasive...
Use & Care Manual
Page 40
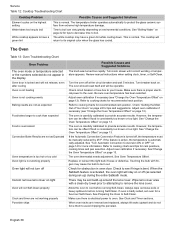
... tint Possible Causes and Suggested Solutions This is bent. See Preparing the Oven to oven. See "Boiling Water" on page 13). Review manual instructions when setting clock, timer, or Self-Clean. Adjust oven calibration if necessary (see if hinge is normal. Adjust oven calibration if ...the numbers selected do not force them to boil. The oven is electrical power to Self-Clean. However, the temperature can be manually reduced by 25°F. See "Change the Oven Temperature Offset" on environmental conditions. Always wipe out loose soils or heavy spillovers before...
... tint Possible Causes and Suggested Solutions This is bent. See Preparing the Oven to oven. See "Boiling Water" on page 13). Review manual instructions when setting clock, timer, or Self-Clean. Adjust oven calibration if necessary (see if hinge is normal. Adjust oven calibration if ...the numbers selected do not force them to boil. The oven is electrical power to Self-Clean. However, the temperature can be manually reduced by 25°F. See "Change the Oven Temperature Offset" on environmental conditions. Always wipe out loose soils or heavy spillovers before...
Installation Instructions
Page 3
... edition and local electrical code requirements. • Local codes vary. The weight of a child on the doors or drawers of the Use and Care Manual. • Do not use . English 1 Save for local electrical inspector's use the warming drawer (if equipped) or oven for this range. &#...range to play around the range. Important Safety Instructions READ AND SAVE THESE INSTRUCTIONS Important Safety Instructions WARNING: If the information in this manual is not followed exactly, a fire or explosion may result causing property damage, personal injury or death. • Ask your appliance ...
... edition and local electrical code requirements. • Local codes vary. The weight of a child on the doors or drawers of the Use and Care Manual. • Do not use . English 1 Save for local electrical inspector's use the warming drawer (if equipped) or oven for this range. &#...range to play around the range. Important Safety Instructions READ AND SAVE THESE INSTRUCTIONS Important Safety Instructions WARNING: If the information in this manual is not followed exactly, a fire or explosion may result causing property damage, personal injury or death. • Ask your appliance ...
Installation Instructions
Page 7
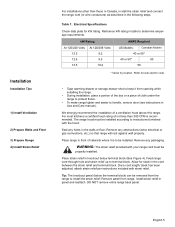
... provided with the hood. Tip: The knockout panel (below terminal block (See Figure 4). Table 1: Electrical Specifications Check data plate for slack in Use and Care manual). Refer to local electric code. • Tape warming drawer or storage drawer shut to keep it is recommended. Seal any obstructions (extra electrical or gas...
... provided with the hood. Tip: The knockout panel (below terminal block (See Figure 4). Table 1: Electrical Specifications Check data plate for slack in Use and Care manual). Refer to local electric code. • Tape warming drawer or storage drawer shut to keep it is recommended. Seal any obstructions (extra electrical or gas...

Installation Instructions
Page 8
... range cord should not be used. WARNING: Risk of this case, the terminal lugs supplied must be hard wired with all applicable codes. In this manual for new branch-circuit installations (1996 NEC), mobile homes, and recreational vehicles, or in an area where local codes prohibit grounding through the neutral conductor...
... range cord should not be used. WARNING: Risk of this case, the terminal lugs supplied must be hard wired with all applicable codes. In this manual for new branch-circuit installations (1996 NEC), mobile homes, and recreational vehicles, or in an area where local codes prohibit grounding through the neutral conductor...

Installation Instructions
Page 12
... or internal wire leads. 4. screw. Insert black wire into the left lug. nal block with this manual) through hole below the terminal block. 10. Replace the star washer and round washer and secure with this manual) on each post. Insert stripped end of torque. 8. Remove screw from each clamping screw with the...
... or internal wire leads. 4. screw. Insert black wire into the left lug. nal block with this manual) through hole below the terminal block. 10. Replace the star washer and round washer and secure with this manual) on each post. Insert stripped end of torque. 8. Remove screw from each clamping screw with the...

Installation Instructions
Page 13
... black wire red wire white wire green ground wire Figure 14: Completed Four Wire Flexible Conduit Connection Note: DO NOT plug in range at this manual) on angle and at supply side junction box. Disconnect electrical power at knockout on each post. Note: DO NOT remove last round washer, last nut...
... black wire red wire white wire green ground wire Figure 14: Completed Four Wire Flexible Conduit Connection Note: DO NOT plug in range at this manual) on angle and at supply side junction box. Disconnect electrical power at knockout on each post. Note: DO NOT remove last round washer, last nut...
Installation Instructions
Page 15
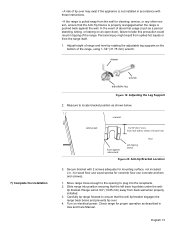
... Anti-Tip Device is properly reengaged when the range is pulled away from rear wall to take this precaution could result in Use and Care Manual. In the event of abnormal usage (such as shown below. drawer 7) Complete the installation wrench adjustable leg Figure 19: Adjusting the Leg Support 2. Turn on...
... Anti-Tip Device is properly reengaged when the range is pulled away from rear wall to take this precaution could result in Use and Care Manual. In the event of abnormal usage (such as shown below. drawer 7) Complete the installation wrench adjustable leg Figure 19: Adjusting the Leg Support 2. Turn on...
Installation Instructions
Page 16
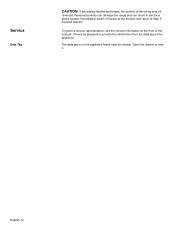
The data tag is on the appliance. Open the drawer to provide the information from the data tag on the appliance frame near the drawer. To reach a service representative, see the contact information at the breaker and return to Step 5Connect Electric. Please be reversed. Immediately switch off power at the front of the wiring may be prepared to view it. Reversed polarity can damage the range and can result in electrical shock hazard. Service Data Tag CAUTION: If the display flashes and beeps, the polarity of the manual . English 14
The data tag is on the appliance. Open the drawer to provide the information from the data tag on the appliance frame near the drawer. To reach a service representative, see the contact information at the breaker and return to Step 5Connect Electric. Please be reversed. Immediately switch off power at the front of the wiring may be prepared to view it. Reversed polarity can damage the range and can result in electrical shock hazard. Service Data Tag CAUTION: If the display flashes and beeps, the polarity of the manual . English 14


