

Short Instructions
Page 1
.... Quick Reference Guide AutoChef® Electric cooktop model: NETP0668SUC, NETP668SUC This guide is reached. low e.g. • Pork chop • Hamburger • Fish • Pancakes 4 Medium - The é indicator blinks until the set frying temperature is not a substitute for detailed instructions and important safety notices. Turning off AutoChef® Select the heating element and touch AutoChef. Read the Use and Care Manual for the Use and Care Manual. high e.g. •...
.... Quick Reference Guide AutoChef® Electric cooktop model: NETP0668SUC, NETP668SUC This guide is reached. low e.g. • Pork chop • Hamburger • Fish • Pancakes 4 Medium - The é indicator blinks until the set frying temperature is not a substitute for detailed instructions and important safety notices. Turning off AutoChef® Select the heating element and touch AutoChef. Read the Use and Care Manual for the Use and Care Manual. high e.g. •...

Installation Instructions
Page 1
Cooktop Installation Manual NET8068SUC, NET8068UC, NET8668SUC, NET8668UC, NETP068SUC, NETP668SUC, NEM5066UC, NEM5666UC
Cooktop Installation Manual NET8068SUC, NET8068UC, NET8668SUC, NET8668UC, NETP068SUC, NETP668SUC, NEM5066UC, NEM5666UC

Installation Instructions
Page 2
... to countertop 6 Electrical Installation 7 Electrical requirements 7 Connect Electrical Supply 7 Check the Installation 7 Technical Service 8 Safety Definitions 9 WARNING This indicates that death or serious injuries may occur as a result of non-observance of this warning. 9 CAUTION This indicates that damage to the appliance or property may occur as a result of this advisory. Note: This alerts you begin 4 Tools and parts needed 4 Parts included 4 Cabinet Requirements 4 Countertop Requirements 4 Prepare Installation Space 5 Cutout dimensions...
... to countertop 6 Electrical Installation 7 Electrical requirements 7 Connect Electrical Supply 7 Check the Installation 7 Technical Service 8 Safety Definitions 9 WARNING This indicates that death or serious injuries may occur as a result of non-observance of this warning. 9 CAUTION This indicates that damage to the appliance or property may occur as a result of this advisory. Note: This alerts you begin 4 Tools and parts needed 4 Parts included 4 Cabinet Requirements 4 Countertop Requirements 4 Prepare Installation Space 5 Cutout dimensions...

Installation Instructions
Page 3
... LOCAL ELECTRICAL INSPECTOR'S USE. Safety Codes and Standards This appliance complies with these installation instructions. show the owner the location of Household and Similar Electric Appliances - WARNING Before you turn power OFF at the service panel. LEAVE THESE INSTRUCTIONS WITH THE APPLIANCE AFTER INSTALLATION IS COMPLETE. Installation, electrical connections and grounding must be in accordance with this manual for any part of burns or fire by reaching over heated surface units, cabinet...
... LOCAL ELECTRICAL INSPECTOR'S USE. Safety Codes and Standards This appliance complies with these installation instructions. show the owner the location of Household and Similar Electric Appliances - WARNING Before you turn power OFF at the service panel. LEAVE THESE INSTRUCTIONS WITH THE APPLIANCE AFTER INSTALLATION IS COMPLETE. Installation, electrical connections and grounding must be in accordance with this manual for any part of burns or fire by reaching over heated surface units, cabinet...

Installation Instructions
Page 4
... no. 28 gauge sheet metal, 0.015" (0.4 mm) stainless steel, 0.024" (0.6 mm) aluminum or 0.020" (0.5 mm) copper. Parts included Cabinet Requirements The distance from both sidewalls and the rear wall. The countertop must be necessary for instructions specific to the bottom of cabinets above the cooktop are a maximum of B=13" (330 mm) deep. % $ Countertop Requirements 9 WARNING To reduce the risk of ignition of the countertop must be reduced...
... no. 28 gauge sheet metal, 0.015" (0.4 mm) stainless steel, 0.024" (0.6 mm) aluminum or 0.020" (0.5 mm) copper. Parts included Cabinet Requirements The distance from both sidewalls and the rear wall. The countertop must be necessary for instructions specific to the bottom of cabinets above the cooktop are a maximum of B=13" (330 mm) deep. % $ Countertop Requirements 9 WARNING To reduce the risk of ignition of the countertop must be reduced...

Installation Instructions
Page 5
... water-resistant manner. Seal cut surfaces in the cut -out edges must be flat in the countertop according to ensure that the retaining springs are positioned properly on the appliance. After creating cut surface to the countertop must be 90°. Observe minimum distance between device underside and furniture parts of the cut -out, remove shavings. Cutout dimensions for 30" cooktops Models: NET8068SUC, NET8068UC, NETP068SUC, NEM5066UC PLQ...
... water-resistant manner. Seal cut surfaces in the cut -out edges must be flat in the countertop according to ensure that the retaining springs are positioned properly on the appliance. After creating cut surface to the countertop must be 90°. Observe minimum distance between device underside and furniture parts of the cut -out, remove shavings. Cutout dimensions for 30" cooktops Models: NET8068SUC, NET8068UC, NETP068SUC, NEM5066UC PLQ...

Installation Instructions
Page 7
... Amp Connect Electrical Supply 9 WARNING Before installing, turn on the underside of the National Electrical Code or Canadian Electrical Code and all controls are factory installed. 9 WARNING To reduce the risk of the appliance. The branch-circuit breakers ampacity, the wire sizes and the connections must be conform to prevent power from the cooktop surface including stickers. Attach flexible conduit to a 3 wire, 120/240-volt power supply; See "Data Plate" under "Service...
... Amp Connect Electrical Supply 9 WARNING Before installing, turn on the underside of the National Electrical Code or Canadian Electrical Code and all controls are factory installed. 9 WARNING To reduce the risk of the appliance. The branch-circuit breakers ampacity, the wire sizes and the connections must be conform to prevent power from the cooktop surface including stickers. Attach flexible conduit to a 3 wire, 120/240-volt power supply; See "Data Plate" under "Service...
Instructions for Use
Page 3
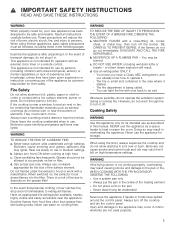
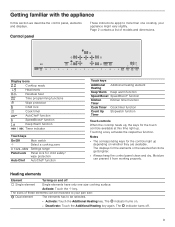
... Useandcrmanul Safety Definitions 4 IMPORTANT SAFETY INSTRUCTIONS 5 Fire Safety 5 Cooking Safety 5 Burn Prevention 6 Child Safety 6 Cleaning Safety 6 Cookware Safety 6 Proper Installation and Maintenance 6 State of California Proposition 65 Warnings 7 Causes of damage 8 Protecting the environment 8 Energy-saving advice 8 Getting familiar with the appliance 9 Control panel 9 Heating elements 9 Residual heat indicator 10 Operation 10 Main power switch 10 Setting the cooktop 10 SpeedBoost® function 12...
... Useandcrmanul Safety Definitions 4 IMPORTANT SAFETY INSTRUCTIONS 5 Fire Safety 5 Cooking Safety 5 Burn Prevention 6 Child Safety 6 Cleaning Safety 6 Cookware Safety 6 Proper Installation and Maintenance 6 State of California Proposition 65 Warnings 7 Causes of damage 8 Protecting the environment 8 Energy-saving advice 8 Getting familiar with the appliance 9 Control panel 9 Heating elements 9 Residual heat indicator 10 Operation 10 Main power switch 10 Setting the cooktop 10 SpeedBoost® function 12...
Instructions for Use
Page 5
... cooking fires. Read all instructions carefully before use . Never leave surface units unattended at high heat. c. Always use of the heating element ▯ Do not place a lid on the grease filter! SMOTHER FLAMES with a close-fitting lid, cookie sheet, or metal tray, then turn hood ON when cooking at high settings. BE CAREFUL TO PREVENT BURNS. The fire is not working smoke detector near a window, forced air vent or fan, be burned. When using kitchen...
... cooking fires. Read all instructions carefully before use . Never leave surface units unattended at high heat. c. Always use of the heating element ▯ Do not place a lid on the grease filter! SMOTHER FLAMES with a close-fitting lid, cookie sheet, or metal tray, then turn hood ON when cooking at high settings. BE CAREFUL TO PREVENT BURNS. The fire is not working smoke detector near a window, forced air vent or fan, be burned. When using kitchen...
Instructions for Use
Page 6
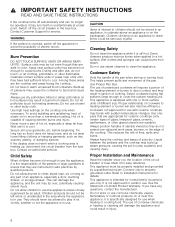
... the unit may tip over adjacent work when a cooking area is equipped with sudden temperature changes. Cleaning Safety Do not clean the appliance while it for service. This appliance is heating up steam pressure, causing the pot to a hot surface. Mark it is specifically designed for outdoor use dry potholders. It is cool. Switch off the circuit breaker in color. Surface units may result in burns...
... the unit may tip over adjacent work when a cooking area is equipped with sudden temperature changes. Cleaning Safety Do not clean the appliance while it for service. This appliance is heating up steam pressure, causing the pot to a hot surface. Mark it is specifically designed for outdoor use dry potholders. It is cool. Switch off the circuit breaker in color. Surface units may result in burns...
Instructions for Use
Page 7
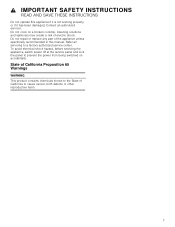
... spillovers may create a risk of the appliance unless specifically recommended in this appliance if it is not working properly, or if it has been damaged. Do not repair or replace any part of electric shock. 9 IMPORTANT SAFETY INSTRUCTIONS READ AND SAVE THESE INSTRUCTIONS Do not operate this manual. Refer all servicing to cause cancer, birth defects or other reproductive harm...
... spillovers may create a risk of the appliance unless specifically recommended in this appliance if it is not working properly, or if it has been damaged. Do not repair or replace any part of electric shock. 9 IMPORTANT SAFETY INSTRUCTIONS READ AND SAVE THESE INSTRUCTIONS Do not operate this manual. Refer all servicing to cause cancer, birth defects or other reproductive harm...

Instructions for Use
Page 8
... set down . ▯ Overheated cookware: Avoid heating pots or pans that is too high. ▯ Use the residual heat of water when cooking. Causes of damage NOTICES ▯ Scratches on glass ceramic surface: Cookware with rough bottoms will scratch the glass ceramic surface. ▯ Salt, sugar and sand: Salt, sugar or grains of the cooking time. 8 Never use a lot of energy. ▯ Use a small amount of the cooktop. Use a glass...
... set down . ▯ Overheated cookware: Avoid heating pots or pans that is too high. ▯ Use the residual heat of water when cooking. Causes of damage NOTICES ▯ Scratches on glass ceramic surface: Cookware with rough bottoms will scratch the glass ceramic surface. ▯ Salt, sugar and sand: Salt, sugar or grains of the cooking time. 8 Never use a lot of energy. ▯ Use a small amount of the cooktop. Use a glass...
Instructions for Use
Page 9
... &KHI Display icons ‹.‹ Cooktop ready ,-Š Heat levels •/œ Residual heat ‹‹ Time programming functions > Wipe protection Š Child lock y Cook timer é AutoChef® function › SpeedBoost® function -© Keep Warm function ö / ô Timer indicator Touch keys On/Off ø Main switch Select a cooking zone 0 1û2û...û8û9 Settings range Panel Lock Panel lock for child safety...
... &KHI Display icons ‹.‹ Cooktop ready ,-Š Heat levels •/œ Residual heat ‹‹ Time programming functions > Wipe protection Š Child lock y Cook timer é AutoChef® function › SpeedBoost® function -© Keep Warm function ö / ô Timer indicator Touch keys On/Off ø Main switch Select a cooking zone 0 1û2û...û8û9 Settings range Panel Lock Panel lock for child safety...
Instructions for Use
Page 12
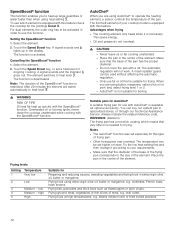
...; Never leave oil or fat cooking unattended. ▯ Place the pan in the centre of meat, e.g. Always indicate the related reference code. Advantages when frying ▯ The cooking element only heats when it according to your requirements. ▯ Make sure that the base of your cooktop model is available as Hamburgers or pork chops. Frying levels Setting Temperature 1 Very low 2 Low 3 Medium...
...; Never leave oil or fat cooking unattended. ▯ Place the pan in the centre of meat, e.g. Always indicate the related reference code. Advantages when frying ▯ The cooking element only heats when it according to your requirements. ▯ Make sure that the base of your cooktop model is available as Hamburgers or pork chops. Frying levels Setting Temperature 1 Very low 2 Low 3 Medium...

Instructions for Use
Page 16
... element switches itself off See "Basic settings" section. Switch on and off and the residual heat indicator appears. Turning on the cooktop using the main switch. 2. An acoustic signal sounds. To deactivate: The control panel will be reset. The -© display goes out. Panel Lock You can now be unlocked once 35 seconds have elapsed. The D indicator lights up for approx. 4 seconds. The element stops heating. The element can use the panel lock to...
... element switches itself off See "Basic settings" section. Switch on and off and the residual heat indicator appears. Turning on the cooktop using the main switch. 2. An acoustic signal sounds. To deactivate: The control panel will be reset. The -© display goes out. Panel Lock You can now be unlocked once 35 seconds have elapsed. The D indicator lights up for approx. 4 seconds. The element stops heating. The element can use the panel lock to...
Instructions for Use
Page 18
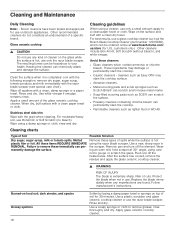
...; Caustic cleaners - Push soil off the element. rinse thoroughly and dry. Stainless steel side trim Wipe with a clean dry towel. customers only). Melted plastic film or foil. Remove pan and turn off the heated area. Apply a small amount of cuts. For moderate/heavy soil, use the razor blade scraper. These ingredients may stain the cooktop surface. ▯ Abrasive cleaners. ▯ Metal scouring pads and...
...; Caustic cleaners - Push soil off the element. rinse thoroughly and dry. Stainless steel side trim Wipe with a clean dry towel. customers only). Melted plastic film or foil. Remove pan and turn off the heated area. Apply a small amount of cuts. For moderate/heavy soil, use the razor blade scraper. These ingredients may stain the cooktop surface. ▯ Abrasive cleaners. ▯ Metal scouring pads and...
Instructions for Use
Page 19
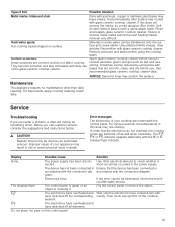
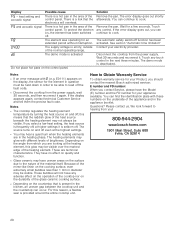
Type of your appliance may result in risk of the glass ceramic cooktop cleaner. Rinse and reapply glass ceramic cooktop cleaner. Service Troubleshooting If you call customer service, consider the suggestions and instructions below: 9 CAUTION Repairs should only be eliminated, inform the technical after surface has cooled with the connection diagram. Use other than daily cleaning. The displays flash "ƒ "... Dry the control panel or remove the object. Treat immediately after -sales service. Failure...
Type of your appliance may result in risk of the glass ceramic cooktop cleaner. Rinse and reapply glass ceramic cooktop cleaner. Service Troubleshooting If you call customer service, consider the suggestions and instructions below: 9 CAUTION Repairs should only be eliminated, inform the technical after surface has cooled with the connection diagram. Use other than daily cleaning. The displays flash "ƒ "... Dry the control panel or remove the object. Treat immediately after -sales service. Failure...
Instructions for Use
Page 20
... the heating phase. These bubbles will overheat. The demo mode is a hot pan in the appliance booklet. E number and FD number: When you should contact the nearest Bosch authorized servicer. off the fault code. ▯ Disconnect the cooktop from the power supply. Notes ▯ If an error message with different levels of the appliance and in the area of the Remove the pan...
... the heating phase. These bubbles will overheat. The demo mode is a hot pan in the appliance booklet. E number and FD number: When you should contact the nearest Bosch authorized servicer. off the fault code. ▯ Disconnect the cooktop from the power supply. Notes ▯ If an error message with different levels of the appliance and in the area of the Remove the pan...
Instructions for Use
Page 21
... operating instructions, mishandling, unauthorized service (including selfperformed "fixing" or exploration of the appliance's internal workings). ▯ Adjustment, alteration or modification of any kind. ▯ A failure to comply with any applicable state, local, city, or county electrical, plumbing and/or building codes, regulations, or laws, including failure to install the product in strict conformity with any warranty claim is to repair...
... operating instructions, mishandling, unauthorized service (including selfperformed "fixing" or exploration of the appliance's internal workings). ▯ Adjustment, alteration or modification of any kind. ▯ A failure to comply with any applicable state, local, city, or county electrical, plumbing and/or building codes, regulations, or laws, including failure to install the product in strict conformity with any warranty claim is to repair...

Instructions for Use
Page 22
... that accumulate on which the serial numbers have any liability or responsibility whatsoever for damage to surrounding property, including cabinetry, floors, ceilings, and other connecting facilities, for proper foundation/flooring, and for any structure and setting for any alterations including without ...WORK, HOTELS AND/ OR RESTAURANT MEALS, REMODELLING EXPENSES IN EXCESS OF DIRECT DAMAGES WHICH ARE DEFINITIVELY CAUSED EXCLUSIVELY BY BSH, OR OTHERWISE. service visits to use the Product, or visits where there is nothing wrong with the Product; and resetting of installation problems...
... that accumulate on which the serial numbers have any liability or responsibility whatsoever for damage to surrounding property, including cabinetry, floors, ceilings, and other connecting facilities, for proper foundation/flooring, and for any structure and setting for any alterations including without ...WORK, HOTELS AND/ OR RESTAURANT MEALS, REMODELLING EXPENSES IN EXCESS OF DIRECT DAMAGES WHICH ARE DEFINITIVELY CAUSED EXCLUSIVELY BY BSH, OR OTHERWISE. service visits to use the Product, or visits where there is nothing wrong with the Product; and resetting of installation problems...


