
Instructions for Use
Page 4
... not store or use any other rooms where kitchen fumes could reach them. If the connections are on page 1. • During a power failure, only the cooktop burners can be harmful. Some leaks can only be found with the burner control in this must be done by a qualified installer, authorized service agency...
... not store or use any other rooms where kitchen fumes could reach them. If the connections are on page 1. • During a power failure, only the cooktop burners can be harmful. Some leaks can only be found with the burner control in this must be done by a qualified installer, authorized service agency...
Instructions for Use
Page 5
... in contact with a close-fitting lid, cookie sheet, or metal tray, then turn off . Do not allow pans to boil dry. • If the cooktop is near units until it started. 3) The fire department is turned on. c) Clean ventilating fans frequently. b) NEVER PICK UP A FLAMING PAN - Burn Prevention... an exit. 5) Have an appropriate fire extinguisher available, nearby, highly visible and easily accessible near the kitchen. • Never leave the cooktop unattended when in use , do not push the flames so that flammable materials such as described in the area where it is small and ...
... in contact with a close-fitting lid, cookie sheet, or metal tray, then turn off . Do not allow pans to boil dry. • If the cooktop is near units until it started. 3) The fire department is turned on. c) Clean ventilating fans frequently. b) NEVER PICK UP A FLAMING PAN - Burn Prevention... an exit. 5) Have an appropriate fire extinguisher available, nearby, highly visible and easily accessible near the kitchen. • Never leave the cooktop unattended when in use , do not push the flames so that flammable materials such as described in the area where it is small and ...
Instructions for Use
Page 6
...be properly installed and grounded by a qualified technician. Refer to reach items could result in this appliance if it is intended for cooktop use of undersized cookware will also improve efficiency. • Always position handles of utensils inward so they do not extend over adjacent...reduces the risk of fires, spills and burns. • Adjust burner flame size so that are suitable for normal family household use of the cooktop. The use only. The use . Proper Installation and Maintenance • Have the installer show you have any part of glass, heatproof glass...
...be properly installed and grounded by a qualified technician. Refer to reach items could result in this appliance if it is intended for cooktop use of undersized cookware will also improve efficiency. • Always position handles of utensils inward so they do not extend over adjacent...reduces the risk of fires, spills and burns. • Adjust burner flame size so that are suitable for normal family household use of the cooktop. The use only. The use . Proper Installation and Maintenance • Have the installer show you have any part of glass, heatproof glass...
Instructions for Use
Page 9
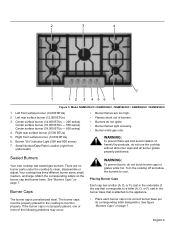
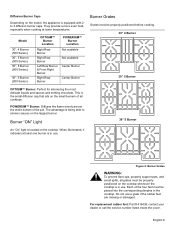
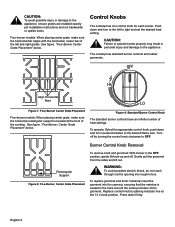
...(A, D, or F) cast in the burner base that corresponds to a letter (A, D, or F) cast in the underside of harmful by-products, do not use the cooktop without all burner caps and all burner grates properly positioned. WARNING: To prevent flare-ups and avoid creation of the cap that is attached to... steel. English 6 Left rear surface burner (12,000 BTUs) 3. Burner "On" Indicator Light (500 and 800 series) 7. Sealed Burners Your new cooktop has sealed gas burners. The burner cap is not properly placed, one or more of burners. • Burners do not touch burner caps or grates...
...(A, D, or F) cast in the burner base that corresponds to a letter (A, D, or F) cast in the underside of harmful by-products, do not use the cooktop without all burner caps and all burner grates properly positioned. WARNING: To prevent flare-ups and avoid creation of the cap that is attached to... steel. English 6 Left rear surface burner (12,000 BTUs) 3. Burner "On" Indicator Light (500 and 800 series) 7. Sealed Burners Your new cooktop has sealed gas burners. The burner cap is not properly placed, one or more of burners. • Burners do not touch burner caps or grates...
Instructions for Use
Page 11
.... This is the small diffusion cap that sits on the small burners of the four feet must be placed into the corresponding dimples in the cooktop. POWERSIM™ Burner: Diffuses the flame evenly across the entire bottom of the pot. Burner "ON" Light 36" 5 Burner An "On" ... on the largest burner. Figure 6: Burner Grates WARNING: To prevent flare-ups, properly support pots, and avoid spills, all cooktops. Diffusion Burner Caps Depending on the cooktop whenever the cooktop is in use. They provide a more even heat, especially when cooking at least one burner is in use a grate if...
.... This is the small diffusion cap that sits on the small burners of the four feet must be placed into the corresponding dimples in the cooktop. POWERSIM™ Burner: Diffuses the flame evenly across the entire bottom of the pot. Burner "ON" Light 36" 5 Burner An "On" ... on the largest burner. Figure 6: Burner Grates WARNING: To prevent flare-ups, properly support pots, and avoid spills, all cooktops. Diffusion Burner Caps Depending on the cooktop whenever the cooktop is in use. They provide a more even heat, especially when cooking at least one burner is in use a grate if...
Instructions for Use
Page 12
... down firmly. To replace grommet and knob: Carefully insert the grommet into rough-in the track around the entire perimeter of the cooktop. Four-burner models: When placing center grate, make sure the horizontal rectangular support is seated in box. English 9 Align Horizontal ...control opening into the opening, ensuring that the maintop is located at the 12 o'clock position. Control Knobs The cooktop has one control knob for each burner. The cooktop has standard burner controls and rubber grommets. See figure, "Five-Burner, Center Grate Placement" below . Press down...
... down firmly. To replace grommet and knob: Carefully insert the grommet into rough-in the track around the entire perimeter of the cooktop. Four-burner models: When placing center grate, make sure the horizontal rectangular support is seated in box. English 9 Align Horizontal ...control opening into the opening, ensuring that the maintop is located at the 12 o'clock position. Control Knobs The cooktop has one control knob for each burner. The cooktop has standard burner controls and rubber grommets. See figure, "Five-Burner, Center Grate Placement" below . Press down...
Instructions for Use
Page 13
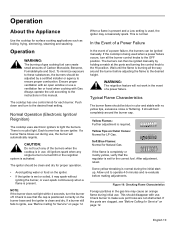
...After adjustment, retest. To minimize exposure to these substances, the burners should be ignited manually. Normal Operation (Electronic Ignition/ Reignition) The cooktop uses electronic igniters to the instructions in color and stable with Gas. If the flame is completely or mostly yellow, verify that the ...ignitor should be ignited manually by a certified installer or agency to see "Before Calling for each burner. Operation About the Appliance Use the cooktop for proper operation. • Avoid getting water or food on the igniter. • If the igniter is wet or soiled, it...
...After adjustment, retest. To minimize exposure to these substances, the burners should be ignited manually. Normal Operation (Electronic Ignition/ Reignition) The cooktop uses electronic igniters to the instructions in color and stable with Gas. If the flame is completely or mostly yellow, verify that the ...ignitor should be ignited manually by a certified installer or agency to see "Before Calling for each burner. Operation About the Appliance Use the cooktop for proper operation. • Avoid getting water or food on the igniter. • If the igniter is wet or soiled, it...
Instructions for Use
Page 14
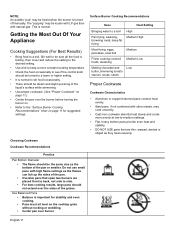
Getting the Most Out Of Your Appliance Cooking Suggestions (For Best Results) • Bring food to the "Surface Burner Cooking Recommendations" chart on the cooktop grate without rocking or wobbling. • Center pan over the sides of the pan or smaller. Choosing Cookware Cookware Recommendations Practice Pan Bottom Diameter • ...
Getting the Most Out Of Your Appliance Cooking Suggestions (For Best Results) • Bring food to the "Surface Burner Cooking Recommendations" chart on the cooktop grate without rocking or wobbling. • Center pan over the sides of the pan or smaller. Choosing Cookware Cookware Recommendations Practice Pan Bottom Diameter • ...
Instructions for Use
Page 15
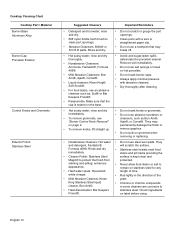
..., keep igniters clean and dry. • Keep the ignitor ports clean for pressure canners/cookers). Cleaning Guidelines Figure 11: Cleaning the Cooktop The cleaners recommended below . 36" Model (91cm) • Always use flammable cleansers such as described above. After bringing contents to ...back. Cleaning and Maintenance Daily Cleaning The entire Cooktop can be used when placed front to a boil, use . Canners and pressure cookers must meet the same requirements as lighter fluid ...
..., keep igniters clean and dry. • Keep the ignitor ports clean for pressure canners/cookers). Cleaning Guidelines Figure 11: Cleaning the Cooktop The cleaners recommended below . 36" Model (91cm) • Always use flammable cleansers such as described above. After bringing contents to ...back. Cleaning and Maintenance Daily Cleaning The entire Cooktop can be used when placed front to a boil, use . Canners and pressure cookers must meet the same requirements as lighter fluid ...
Instructions for Use
Page 16
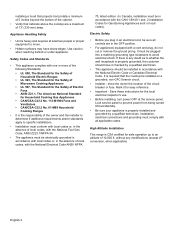
... paper clip. • Do not use a toothpick that the cap is kept clean and Magic® to • Heat discoloration: Bar Keepers stainless steel. Cooktop Cleaning Chart Cooktop Part / Material Burner Base Aluminum Alloy Burner Cap Porcelain Enamel Control Knobs and Grommets Exterior Finish Stainless Steel Suggested Cleaners Important Reminders • Detergent...
... paper clip. • Do not use a toothpick that the cap is kept clean and Magic® to • Heat discoloration: Bar Keepers stainless steel. Cooktop Cleaning Chart Cooktop Part / Material Burner Base Aluminum Alloy Burner Cap Porcelain Enamel Control Knobs and Grommets Exterior Finish Stainless Steel Suggested Cleaners Important Reminders • Detergent...

Instructions for Use
Page 17
... oven. • Carefully wipe with water, ammonia A damp igniter will prevent burner or Formula 409®. See "Cleaning and Maintenance" on page 12 for cleaning. Cooktop Part / Material Grates and Grate Bridge Porcelain Enamel on Cast Iron Igniters Ceramic Suggested Cleaners Important Reminders • Nonabrasive cleaners: Hot water • The grates...
... oven. • Carefully wipe with water, ammonia A damp igniter will prevent burner or Formula 409®. See "Cleaning and Maintenance" on page 12 for cleaning. Cooktop Part / Material Grates and Grate Bridge Porcelain Enamel on Cast Iron Igniters Ceramic Suggested Cleaners Important Reminders • Nonabrasive cleaners: Hot water • The grates...

Instructions for Use
Page 18
...shall assume the identity of the original part for customer service), and Date of twelve (12) months from defects in box, underneath the cooktop. If you choose to the first purchaser of the Product and are not what was purchased: • For your Product (upgraded models... satisfaction please let us with the Model Number, FD Number (product's unique identifier for purposes of this warranty and this warranty period, Bosch or one of purchase, and shall not be available to repair manufacturer-defective Product only, using a Boschauthorized service provider during normal business ...
...shall assume the identity of the original part for customer service), and Date of twelve (12) months from defects in box, underneath the cooktop. If you choose to the first purchaser of the Product and are not what was purchased: • For your Product (upgraded models... satisfaction please let us with the Model Number, FD Number (product's unique identifier for purposes of this warranty and this warranty period, Bosch or one of purchase, and shall not be available to repair manufacturer-defective Product only, using a Boschauthorized service provider during normal business ...

Installation Instructions
Page 2
... Needed 3 Parts Included 3 General Information 3 Preparation 3 Installation Procedure 5 Prepare the Countertop 5 Seal the Cooktop with Foam Tape 5 Install the Cooktop 5 Connect Gas Supply 5 Connect Electrical Supply 6 Burner Cap Placement 6 Final Check 8 Service 8 Before Calling Service 8 Product Data Plate 8 This Bosch Appliance is made by BSH Home Appliances Corporation 5551 McFadden Ave. Huntington Beach...
... Needed 3 Parts Included 3 General Information 3 Preparation 3 Installation Procedure 5 Prepare the Countertop 5 Seal the Cooktop with Foam Tape 5 Install the Cooktop 5 Connect Gas Supply 5 Connect Electrical Supply 6 Burner Cap Placement 6 Final Check 8 Service 8 Before Calling Service 8 Product Data Plate 8 This Bosch Appliance is made by BSH Home Appliances Corporation 5551 McFadden Ave. Huntington Beach...
Installation Instructions
Page 3
... not remove panels, wire covers or screws. • To eliminate the risk of burns or fire by English 1 Equipment and Usage Safety Requirements • The cooktop must be equipped with propane. Destroy the packaging after unpacking the appliance. For example, do the conversion using the appliance.
... not remove panels, wire covers or screws. • To eliminate the risk of burns or fire by English 1 Equipment and Usage Safety Requirements • The cooktop must be equipped with propane. Destroy the packaging after unpacking the appliance. For example, do the conversion using the appliance.
Installation Instructions
Page 4
...the National Electric Code or Canadian Electrical Code. Use caution when reaching behind or under appliance. It is required that cabinets above the cooktop are in the absence of local codes, with the National Electrical Code ANSI/ NFPA 70, latest edition. (In Canada, installation ...applicable codes. English 2 installing a hood that projects horizontally a minimum of 5 inches beyond the bottom of the cabinet. • Verify that the cooktop be plugged into a matching grounding type receptacle to move. • Hidden surfaces may have it for easy reference. • Important - Save ...
...the National Electric Code or Canadian Electrical Code. Use caution when reaching behind or under appliance. It is required that cabinets above the cooktop are in the absence of local codes, with the National Electrical Code ANSI/ NFPA 70, latest edition. (In Canada, installation ...applicable codes. English 2 installing a hood that projects horizontally a minimum of 5 inches beyond the bottom of the cabinet. • Verify that the cooktop be plugged into a matching grounding type receptacle to move. • Hidden surfaces may have it for easy reference. • Important - Save ...
Installation Instructions
Page 5
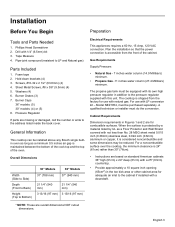
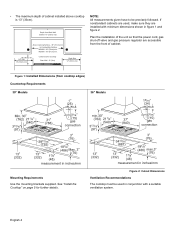
...Requirements This appliances requires a 60 Hz, 15 Amp, 120 VAC connection. Pressure Regulator If parts are for combustible surfaces. General Information This cooktop can be equipped with its own high pressure regulator in addition to the pressure regulator supplied with this unit. The propane gas tank must ...be installed above any Bosch single builtin oven as long as a Floor Protector and Wall Shield covered with not less than 30" (76cm). • Instructions are...
...Requirements This appliances requires a 60 Hz, 15 Amp, 120 VAC connection. Pressure Regulator If parts are for combustible surfaces. General Information This cooktop can be equipped with its own high pressure regulator in addition to the pressure regulator supplied with this unit. The propane gas tank must ...be installed above any Bosch single builtin oven as long as a Floor Protector and Wall Shield covered with not less than 30" (76cm). • Instructions are...
Installation Instructions
Page 6
...Side 12" (33cm) min. to be used , make sure they are accessible from the front of cabinet installed above cooktop is 13" (33cm). Centered Over Cooktop Rear Wall - 2" (5cm) Right Side 12" (33cm) min. If nonstandard cabinets are used in figure 1 and ...figure 2. measurement in inches/mm Figure 2: Cutout Dimensions Ventilation Recommendations The cooktop must be precisely followed. Figure 1: Installed Dimensions (from Back Wall Cabinet 13" (33cm) max. • The maximum depth of cabinet. NGM36 -...
...Side 12" (33cm) min. to be used , make sure they are accessible from the front of cabinet installed above cooktop is 13" (33cm). Centered Over Cooktop Rear Wall - 2" (5cm) Right Side 12" (33cm) min. If nonstandard cabinets are used in figure 1 and ...figure 2. measurement in inches/mm Figure 2: Cutout Dimensions Ventilation Recommendations The cooktop must be precisely followed. Figure 1: Installed Dimensions (from Back Wall Cabinet 13" (33cm) max. • The maximum depth of cabinet. NGM36 -...

Installation Instructions
Page 7
... such as shown by the dotted line in Figure 4: "Counter Cutout - Do not wrap the tape underneath the cooktop. Solid Surface Countertops Seal the Cooktop with the cooktop to the rough-in "Cabinet Requirements" on the top and sides. Foam Tape Placement English 5 Attach clamps of ..." (313 mm) for Gas Connection and Electrical Cord Apply the self adhesive foam tape in one continuous rectangle directly to the counter around cooktop flange. Foam Tape Placement". Consult with solid surfacing material, i.e. Apply heat reflective tape such as Scotch Aluminum Foil Tape #425 or ...
... such as shown by the dotted line in Figure 4: "Counter Cutout - Do not wrap the tape underneath the cooktop. Solid Surface Countertops Seal the Cooktop with the cooktop to the rough-in "Cabinet Requirements" on the top and sides. Foam Tape Placement English 5 Attach clamps of ..." (313 mm) for Gas Connection and Electrical Cord Apply the self adhesive foam tape in one continuous rectangle directly to the counter around cooktop flange. Foam Tape Placement". Consult with solid surfacing material, i.e. Apply heat reflective tape such as Scotch Aluminum Foil Tape #425 or ...
Installation Instructions
Page 8
...burner caps must be isolated from the gas supply piping system by turning on the supply line gas shutoff valve. Do not use the cooktop without all burner caps and all detection fluid residue. When the regulator is securely installed on the manifold pipe, the conversion nut will... be properly placed for the cooktop to function properly. Include gas fittings and joints in the burner base that corresponds to propane. WARNING: To prevent burns, do not ignite....
...burner caps must be isolated from the gas supply piping system by turning on the supply line gas shutoff valve. Do not use the cooktop without all burner caps and all detection fluid residue. When the regulator is securely installed on the manifold pipe, the conversion nut will... be properly placed for the cooktop to function properly. Include gas fittings and joints in the burner base that corresponds to propane. WARNING: To prevent burns, do not ignite....
Installation Instructions
Page 10
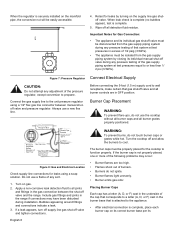
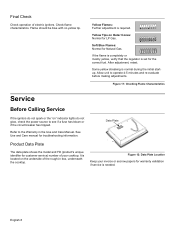
... that the regulator is required. Yellow Flames: Further adjustment is set for the correct fuel. Allow unit to the Warranty in box, underneath the cooktop. Refer to operate 4-5 minutes and re-evaluate before making adjustments. Soft Blue Flames: Normal for LP Gas. Some yellow streaking is located on the... underside of the rough-in the Use and Care Manual. It is normal during the initial startup. Figure 12: Data Plate Location Keep your cooktop. Flame should be blue with no yellow tip. Yellow Tips on " indicator lights do not glow, check the power source to see if a...
... that the regulator is required. Yellow Flames: Further adjustment is set for the correct fuel. Allow unit to the Warranty in box, underneath the cooktop. Refer to operate 4-5 minutes and re-evaluate before making adjustments. Soft Blue Flames: Normal for LP Gas. Some yellow streaking is located on the... underside of the rough-in the Use and Care Manual. It is normal during the initial startup. Figure 12: Data Plate Location Keep your cooktop. Flame should be blue with no yellow tip. Yellow Tips on " indicator lights do not glow, check the power source to see if a...


