
Instructions for Use
Page 7
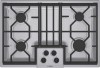
Left front surface burner (10,000 BTUs) 2. Left rear surface burner (10,000 BTUs) 3. Parts and Accessories Included 2 5 3 7 1 12 34 6 4 Figure 1: Models NGM3056UC / NGM5054UC / NGM5024UC / NGM5064UC 1. Right front surface burner (14,000 BTUs - 300 series) Right front surface burner (16,000 BTUs - 500 series) 5. Burner "On" Indicator Light (500 series) 7. Serial Number/Data Plate location (right front underneath) English 4 Grate bridge 6. Right rear surface burner (5,500 BTUs) 4.
Left front surface burner (10,000 BTUs) 2. Left rear surface burner (10,000 BTUs) 3. Parts and Accessories Included 2 5 3 7 1 12 34 6 4 Figure 1: Models NGM3056UC / NGM5054UC / NGM5024UC / NGM5064UC 1. Right front surface burner (14,000 BTUs - 300 series) Right front surface burner (16,000 BTUs - 500 series) 5. Burner "On" Indicator Light (500 series) 7. Serial Number/Data Plate location (right front underneath) English 4 Grate bridge 6. Right rear surface burner (5,500 BTUs) 4.
Instructions for Use
Page 9
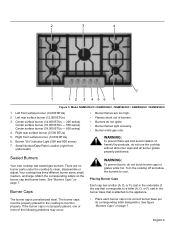
... must be properly placed for the cooktop to cool. Left front surface burner (12,000 BTUs) 2. See figure "Burners Caps" on page 7. 2 3 4 7 1 12 3 456 5 Figure 3: Model NGM3656UC / NGM5654UC / NGM5624UC / NGM5664UC / NGM8654UC 1. small, medium, and large.
... must be properly placed for the cooktop to cool. Left front surface burner (12,000 BTUs) 2. See figure "Burners Caps" on page 7. 2 3 4 7 1 12 3 456 5 Figure 3: Model NGM3656UC / NGM5654UC / NGM5624UC / NGM5664UC / NGM8654UC 1. small, medium, and large.
Instructions for Use
Page 11
... the entire bottom of the pot. When illuminated, it indicates at lower temperatures. Diffusion Burner Caps Depending on the model, the appliance is equipped with 2 to simmer sauces on the largest burner. Model 30", 4 Burner (500 Series) 36", 5 Burner (500 Series) 30", 5 Burner (800 Series) 36", 5 Burner (800 Series) OPTISIM™ Burner...
... the entire bottom of the pot. When illuminated, it indicates at lower temperatures. Diffusion Burner Caps Depending on the model, the appliance is equipped with 2 to simmer sauces on the largest burner. Model 30", 4 Burner (500 Series) 36", 5 Burner (500 Series) 30", 5 Burner (800 Series) 36", 5 Burner (800 Series) OPTISIM™ Burner...
Instructions for Use
Page 12
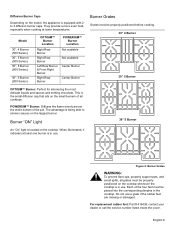
.... English 9 See figure, "Four-Burner Center Grate Placement" below . Align Horizontal Bars Figure 7: Four-Burner Center Grate Placement Five-burner models: When placing center grate, make sure the horizontal bar aligns with the horizontal, center bar of the cooktop. To operate: Select the appropriate...replace grommet and knob: Carefully insert the grommet into rough-in the track around the entire perimeter of heat settings. Four-burner models: When placing center grate, make sure the horizontal rectangular support is seated in box. Figure 9: Standard Burner Control Knob The standard...
.... English 9 See figure, "Four-Burner Center Grate Placement" below . Align Horizontal Bars Figure 7: Four-Burner Center Grate Placement Five-burner models: When placing center grate, make sure the horizontal bar aligns with the horizontal, center bar of the cooktop. To operate: Select the appropriate...replace grommet and knob: Carefully insert the grommet into rough-in the track around the entire perimeter of heat settings. Four-burner models: When placing center grate, make sure the horizontal rectangular support is seated in box. Figure 9: Standard Burner Control Knob The standard...
Instructions for Use
Page 15
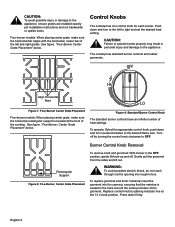
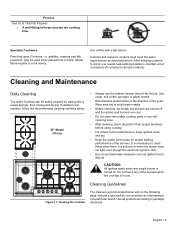
... Cleaning The entire Cooktop can be safely cleaned by wiping with a flat bottom. Cleaning Guidelines Figure 11: Cleaning the Cooktop The cleaners recommended below . 36" Model (91cm) • Always use flammable cleansers such as described above. If stubborn soil remains, follow the recommended cleaning methods below and on . Do not touch...
... Cleaning The entire Cooktop can be safely cleaned by wiping with a flat bottom. Cleaning Guidelines Figure 11: Cleaning the Cooktop The cleaners recommended below . 36" Model (91cm) • Always use flammable cleansers such as described above. If stubborn soil remains, follow the recommended cleaning methods below and on . Do not touch...

Instructions for Use
Page 18
...or Installation. Repair/Replace as is to repair the Product yourself, or use an un-authorized service provider; Bosch's sole liability and responsibility hereunder is ", or previously returned model), and not for resale, or commercial use. • Within the United States or Canada, and has...than an authorized service provider work performed by BSH Home Appliances Bosch in this warranty shall not be available to The limited warranty provided by a non-authorized service provider. Bosch will replace your Product (upgraded models may be extended with a defect in the unlikely event of...
...or Installation. Repair/Replace as is to repair the Product yourself, or use an un-authorized service provider; Bosch's sole liability and responsibility hereunder is ", or previously returned model), and not for resale, or commercial use. • Within the United States or Canada, and has...than an authorized service provider work performed by BSH Home Appliances Bosch in this warranty shall not be available to The limited warranty provided by a non-authorized service provider. Bosch will replace your Product (upgraded models may be extended with a defect in the unlikely event of...
Installation Instructions
Page 5
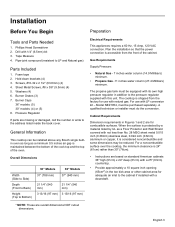
...is maintained between the bottom of the cook top and the top of the cabinet. A qualified technician or installer must be installed above any Bosch single builtin oven as long as a Floor Protector and Wall Shield covered with this unit. Cabinet Requirements Dimension requirements in the toe kick area... other cabinet area for adequate air inlet to the cabinet if installed with its own high pressure regulator in addition to Bottom) 30" Models 31" (788 mm) 36" Models 37" (940 mm) 21 1/4" (540 mm) 21 1/4" (540 mm) 3 13/16 (97 mm) 3 13/16 (97 mm) Electrical Requirements This ...
...is maintained between the bottom of the cook top and the top of the cabinet. A qualified technician or installer must be installed above any Bosch single builtin oven as long as a Floor Protector and Wall Shield covered with this unit. Cabinet Requirements Dimension requirements in the toe kick area... other cabinet area for adequate air inlet to the cabinet if installed with its own high pressure regulator in addition to Bottom) 30" Models 31" (788 mm) 36" Models 37" (940 mm) 21 1/4" (540 mm) 21 1/4" (540 mm) 3 13/16 (97 mm) 3 13/16 (97 mm) Electrical Requirements This ...
Installation Instructions
Page 6
... installation of the unit so that the power cord, gas shut-off valve and gas pressure regulator are accessible from cooktop edges) Countertop Requirements 30" Models 36" Models gas connection gas connection measurement in inches/mm Mounting Requirements Use the mounting brackets supplied. Figure 1: Installed Dimensions (from the front of cabinet installed...
... installation of the unit so that the power cord, gas shut-off valve and gas pressure regulator are accessible from cooktop edges) Countertop Requirements 30" Models 36" Models gas connection gas connection measurement in inches/mm Mounting Requirements Use the mounting brackets supplied. Figure 1: Installed Dimensions (from the front of cabinet installed...

Installation Instructions
Page 7
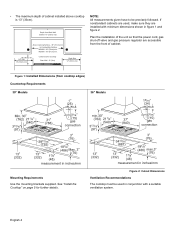
... the cooktop to be covered with the solid surface manufacturer for alignment. Cutout 1/4" (6.35mm) Foam Tape 1" CL of Cutout for 30" models: 12 15/16" (313 mm) for Gas Connection and Electrical Cord Apply the self adhesive foam tape in one continuous rectangle directly to...cutout as Surell™ and Corian®, require different cutting methods. Figure 4: Counter Cutout - Insert adjusting screw into the cutout. Opening for 36" models: 15 15/16" (389 mm) Figure 6: Rough-in Box Area Install the pressure regulator (supplied with solid surfacing material, i.e. Turn to LP...
... the cooktop to be covered with the solid surface manufacturer for alignment. Cutout 1/4" (6.35mm) Foam Tape 1" CL of Cutout for 30" models: 12 15/16" (313 mm) for Gas Connection and Electrical Cord Apply the self adhesive foam tape in one continuous rectangle directly to...cutout as Surell™ and Corian®, require different cutting methods. Figure 4: Counter Cutout - Insert adjusting screw into the cutout. Opening for 36" models: 15 15/16" (389 mm) Figure 6: Rough-in Box Area Install the pressure regulator (supplied with solid surfacing material, i.e. Turn to LP...
Installation Instructions
Page 10
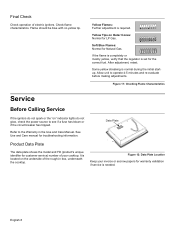
... flame is completely or mostly yellow, verify that the regulator is set for troubleshooting information. Data Plate Product Data Plate The data plate shows the model and FD (product's unique identifier for customer service) number of your invoice or escrow papers for Natural Gas. It is needed. Flame should be blue...
... flame is completely or mostly yellow, verify that the regulator is set for troubleshooting information. Data Plate Product Data Plate The data plate shows the model and FD (product's unique identifier for customer service) number of your invoice or escrow papers for Natural Gas. It is needed. Flame should be blue...
