Installation Instructions
Page 5
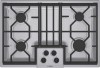
...or other cabinet area for adequate air inlet to the address listed inside the back cover. Model NEZ1054, must be installed above any Bosch single builtin oven as long as a Floor Protector and Wall Shield covered with this unit. When the surface is protected by a material... must be reduced. Pipe-joint compound (resistant to the pressure regulator supplied with not less than 30" (76cm). • Instructions are overall dimensions NOT cutout dimensions. Phillips Head Screwdriver 2. Overall Dimensions Width (Side to Side) Depth (Front to Back) Height (Top to Bottom) 30" Models 31" (788...
...or other cabinet area for adequate air inlet to the address listed inside the back cover. Model NEZ1054, must be installed above any Bosch single builtin oven as long as a Floor Protector and Wall Shield covered with this unit. When the surface is protected by a material... must be reduced. Pipe-joint compound (resistant to the pressure regulator supplied with not less than 30" (76cm). • Instructions are overall dimensions NOT cutout dimensions. Phillips Head Screwdriver 2. Overall Dimensions Width (Side to Side) Depth (Front to Back) Height (Top to Bottom) 30" Models 31" (788...
Installation Instructions
Page 6
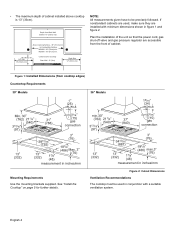
.... Left Side 12" (33cm) min. English 4 Depth from cooktop edges) Countertop Requirements 30" Models 36" Models gas connection gas connection measurement in inches/mm Figure 2: Cutout Dimensions Ventilation Recommendations The cooktop must be precisely followed. NGM36 - 36" (91cm) min. 18" (46cm) min. to be used , make sure they are used in...
.... Left Side 12" (33cm) min. English 4 Depth from cooktop edges) Countertop Requirements 30" Models 36" Models gas connection gas connection measurement in inches/mm Figure 2: Cutout Dimensions Ventilation Recommendations The cooktop must be precisely followed. NGM36 - 36" (91cm) min. 18" (46cm) min. to be used , make sure they are used in...

Installation Instructions
Page 7
...Box Area Install the pressure regulator (supplied with solid surfacing material, i.e. Heat Reflective Tape Section "A - A" Figure 3: Counter Cutout - Figure 4: Counter Cutout - Do not wrap the tape underneath the cooktop. Surell™ and Corian®) Clamp Figure 5: Attaching Hold-Down Brackets ... and tighten screws to countertop. Install the Cooktop Insert cooktop into clamp and secure cooktop to rough-in Figure 4: "Counter Cutout - Do not overtighten adjusting screw. Consult with tape. Foam Tape Placement English 5 Opening for the correct cutting method needed...
...Box Area Install the pressure regulator (supplied with solid surfacing material, i.e. Heat Reflective Tape Section "A - A" Figure 3: Counter Cutout - Figure 4: Counter Cutout - Do not wrap the tape underneath the cooktop. Surell™ and Corian®) Clamp Figure 5: Attaching Hold-Down Brackets ... and tighten screws to countertop. Install the Cooktop Insert cooktop into clamp and secure cooktop to rough-in Figure 4: "Counter Cutout - Do not overtighten adjusting screw. Consult with tape. Foam Tape Placement English 5 Opening for the correct cutting method needed...