
Instructions for Use
Page 4
...to clean and maintain the appliance. • The Service section includes troubleshooting tips and your warranty. English 1 • Have the installer show you smell gas, your installer has not done a proper job of checking for leaks. Finding a gas leak is not followed exactly, a fire or explosion ...8226; During a power failure, only the cooktop burners can be done by a qualified installer, authorized service agency or the gas supplier. See "WHAT TO DO IF YOU SMELL GAS" on the list. Installation and service must be lit manually. • To prevent carbon monoxide build-up and operate...
...to clean and maintain the appliance. • The Service section includes troubleshooting tips and your warranty. English 1 • Have the installer show you smell gas, your installer has not done a proper job of checking for leaks. Finding a gas leak is not followed exactly, a fire or explosion ...8226; During a power failure, only the cooktop burners can be done by a qualified installer, authorized service agency or the gas supplier. See "WHAT TO DO IF YOU SMELL GAS" on the list. Installation and service must be lit manually. • To prevent carbon monoxide build-up and operate...
Instructions for Use
Page 6
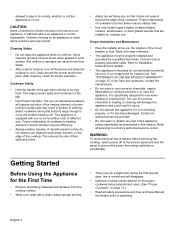
... (See "Proper Cookware" on page 15. Clean around the burner and burner ports. Select cookware having flat bottoms large enough to Installation Instructions for details. • This appliance is not working properly, or if it does not extend beyond the edge of fires, .... Proper relationship of cookware to children should not be seriously injured. Refer to cover the surface heating unit. Proper Installation and Maintenance • Have the installer show you have any part of interest to burner flame reduces safety risks. • Use only certain types of...
... (See "Proper Cookware" on page 15. Clean around the burner and burner ports. Select cookware having flat bottoms large enough to Installation Instructions for details. • This appliance is not working properly, or if it does not extend beyond the edge of fires, .... Proper relationship of cookware to children should not be seriously injured. Refer to cover the surface heating unit. Proper Installation and Maintenance • Have the installer show you have any part of interest to burner flame reduces safety risks. • Use only certain types of...
Instructions for Use
Page 12
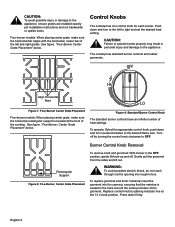
... . Control Knobs The cooktop has one control knob for each burner. CAUTION: To avoid possible injury or damage to the appliance, ensure grates are installed exactly per installation instructions and not backwards or upside down and turn counterclockwise to the desired flame size. The cooktop has standard burner controls and rubber grommets.
... . Control Knobs The cooktop has one control knob for each burner. CAUTION: To avoid possible injury or damage to the appliance, ensure grates are installed exactly per installation instructions and not backwards or upside down and turn counterclockwise to the desired flame size. The cooktop has standard burner controls and rubber grommets.
Instructions for Use
Page 13
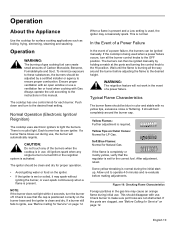
... with use . NOTE: If the burner does not light within 4 seconds, turn to the HI position. The burners can then be ignited manually by a certified installer or agency to ignite, see "Before Calling for surface cooking applications such as boiling, frying, simmering, steaming and sauteing. Figure 10: Checking Flame Characteristics Foreign...
... with use . NOTE: If the burner does not light within 4 seconds, turn to the HI position. The burners can then be ignited manually by a certified installer or agency to ignite, see "Before Calling for surface cooking applications such as boiling, frying, simmering, steaming and sauteing. Figure 10: Checking Flame Characteristics Foreign...

Instructions for Use
Page 18
while not necessary to effectuate warranty coverage, it Applies to The limited warranty provided by BSH Home Appliances Bosch in this warranty period, Bosch or one of Original Purchase or Installation. If reasonable attempts to repair the Product have been manufactured with the Model Number, FD Number (product's unique identifier for an additional charge...
while not necessary to effectuate warranty coverage, it Applies to The limited warranty provided by BSH Home Appliances Bosch in this warranty period, Bosch or one of Original Purchase or Installation. If reasonable attempts to repair the Product have been manufactured with the Model Number, FD Number (product's unique identifier for an additional charge...
Instructions for Use
Page 19
... would still be fully liable and responsible for damage to make the service call. and resetting of Warranty Product Bosch is reasonably inaccessible, hazardous, threatening, or treacherous locale, surroundings, or environment; IN NO EVENT WILL THE MANUFACTURER...8226; Any party's willful misconduct, negligence, misuse, abuse, accidents, neglect, improper operation, failure to maintain, improper or negligent installation, tampering, failure to follow operating instructions, mishandling, unauthorized service (including selfperformed "fixing" or exploration of the appliance's internal workings...
... would still be fully liable and responsible for damage to make the service call. and resetting of Warranty Product Bosch is reasonably inaccessible, hazardous, threatening, or treacherous locale, surroundings, or environment; IN NO EVENT WILL THE MANUFACTURER...8226; Any party's willful misconduct, negligence, misuse, abuse, accidents, neglect, improper operation, failure to maintain, improper or negligent installation, tampering, failure to follow operating instructions, mishandling, unauthorized service (including selfperformed "fixing" or exploration of the appliance's internal workings...

Installation Instructions
Page 2
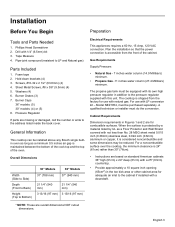
... 3 Tools and Parts Needed 3 Parts Included 3 General Information 3 Preparation 3 Installation Procedure 5 Prepare the Countertop 5 Seal the Cooktop with Foam Tape 5 Install the Cooktop 5 Connect Gas Supply 5 Connect Electrical Supply 6 Burner Cap Placement 6 Final Check 8 Service 8 Before Calling Service 8 Product Data Plate 8 This Bosch Appliance is made by BSH Home Appliances Corporation 5551 McFadden...
... 3 Tools and Parts Needed 3 Parts Included 3 General Information 3 Preparation 3 Installation Procedure 5 Prepare the Countertop 5 Seal the Cooktop with Foam Tape 5 Install the Cooktop 5 Connect Gas Supply 5 Connect Electrical Supply 6 Burner Cap Placement 6 Final Check 8 Service 8 Before Calling Service 8 Product Data Plate 8 This Bosch Appliance is made by BSH Home Appliances Corporation 5551 McFadden...
Installation Instructions
Page 3
...printed on the data plate. • The maximum supply pressure must not exceed 14.0 inches water column (34.9Millibars). • For Massachusetts installations: • Installation must also be avoided. show the owner where the gas shut-off valve must be a "T" handle gas cock. • Flexible gas ...used in the manuals. WHAT TO DO IF YOU SMELL GAS • Do not try to or less than 36 inches. • Installer - Installation and service must be performed by a qualified technician. Never allow children to this or any pressure testing of the gas supply piping system...
...printed on the data plate. • The maximum supply pressure must not exceed 14.0 inches water column (34.9Millibars). • For Massachusetts installations: • Installation must also be avoided. show the owner where the gas shut-off valve must be a "T" handle gas cock. • Flexible gas ...used in the manuals. WHAT TO DO IF YOU SMELL GAS • Do not try to or less than 36 inches. • Installer - Installation and service must be performed by a qualified technician. Never allow children to this or any pressure testing of the gas supply piping system...
Installation Instructions
Page 4
... Codes and Standards • This appliance complies with the National Electric Code or Canadian Electrical Code. Lock service panel to specific installations. • Installation must conform with local codes or, in the absence of local codes, with the National Fuel Gas Code, ANSI Z223.1/NFPA ...a matching grounding type receptacle to move. • Hidden surfaces may have it for the local electrical inspector's use. • Before installing, turn power OFF at least two people or proper equipment to avoid electrical shock. Appliance Handling Safety • Unit is required that...
... Codes and Standards • This appliance complies with the National Electric Code or Canadian Electrical Code. Lock service panel to specific installations. • Installation must conform with local codes or, in the absence of local codes, with the National Fuel Gas Code, ANSI Z223.1/NFPA ...a matching grounding type receptacle to move. • Hidden surfaces may have it for the local electrical inspector's use. • Before installing, turn power OFF at least two people or proper equipment to avoid electrical shock. Appliance Handling Safety • Unit is required that...
Installation Instructions
Page 5
... 0.015 inch (0.38mm) stainless steel, 0.024 inch (0.6mm) aluminum or copper, it is considered noncombustible and some dimensions may be installed above any Bosch single builtin oven as long as a Floor Protector and Wall Shield covered with this unit. Hold down brackets (4) 3. Washers (4) 6.... regulator supplied with not less than 30" (76cm). • Instructions are overall dimensions NOT cutout dimensions. A qualified technician or installer must be equipped with its own high pressure regulator in the toe kick area or other cabinet area for combustible surfaces. English 3...
... 0.015 inch (0.38mm) stainless steel, 0.024 inch (0.6mm) aluminum or copper, it is considered noncombustible and some dimensions may be installed above any Bosch single builtin oven as long as a Floor Protector and Wall Shield covered with this unit. Hold down brackets (4) 3. Washers (4) 6.... regulator supplied with not less than 30" (76cm). • Instructions are overall dimensions NOT cutout dimensions. A qualified technician or installer must be equipped with its own high pressure regulator in the toe kick area or other cabinet area for combustible surfaces. English 3...
Installation Instructions
Page 6
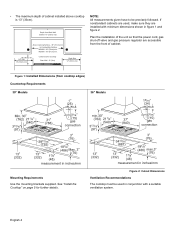
...All measurements given have to Combustible Surface NGM30 - 30" (76cm) min. • The maximum depth of cabinet. Plan the installation of the unit so that the power cord, gas shut-off valve and gas pressure regulator are used in conjunction with minimum dimensions... measurement in inches/mm Mounting Requirements Use the mounting brackets supplied. If nonstandard cabinets are accessible from the front of cabinet installed above cooktop is 13" (33cm). See "Install the Cooktop" on page 5 for further details. Centered Over Cooktop Rear Wall - 2" (5cm) Right Side 12" (...
...All measurements given have to Combustible Surface NGM30 - 30" (76cm) min. • The maximum depth of cabinet. Plan the installation of the unit so that the power cord, gas shut-off valve and gas pressure regulator are used in conjunction with minimum dimensions... measurement in inches/mm Mounting Requirements Use the mounting brackets supplied. If nonstandard cabinets are accessible from the front of cabinet installed above cooktop is 13" (33cm). See "Install the Cooktop" on page 5 for further details. Centered Over Cooktop Rear Wall - 2" (5cm) Right Side 12" (...

Installation Instructions
Page 7
.... Figure 4: Counter Cutout - Attach clamps of the cutout. Use the washer and screws provided. NOTE: For solid surface material installations: Insert a wooden block between the foam tape and the edge of the holddown brackets packaged with tape. Solid Surface Countertops Seal the... surfacing material, i.e. Trim excess aluminum tape around the perimeter of the cooktop. To prevent possible damage to the gas pressure regulator, install it folds over on threads of the countertop. Foam Tape Placement English 5 Opening for alignment. A A Cutout shows location of roughin...
.... Figure 4: Counter Cutout - Attach clamps of the cutout. Use the washer and screws provided. NOTE: For solid surface material installations: Insert a wooden block between the foam tape and the edge of the holddown brackets packaged with tape. Solid Surface Countertops Seal the... surfacing material, i.e. Trim excess aluminum tape around the perimeter of the cooktop. To prevent possible damage to the gas pressure regulator, install it folds over on threads of the countertop. Foam Tape Placement English 5 Opening for alignment. A A Cutout shows location of roughin...
Installation Instructions
Page 8
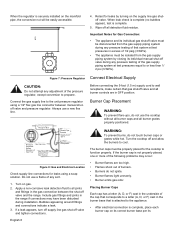
...-corrosive leak detection fluid to cool. If a leak appears, turn off supply line gas shut-off valve and the range. When the regulator is securely installed on gas. 2. When leak check is complete (no bubbles appear), test is attached to or less than 1/ 2 psi (3.5kPa). The burner caps must ... valve must be disconnected from the gas supply piping system by turning on its correct burner base per its individual manual shut-off valve during installation. Always use the cooktop without all burner caps and all burner controls are too high. • Flames shoot out of the cap that ...
...-corrosive leak detection fluid to cool. If a leak appears, turn off supply line gas shut-off valve and the range. When the regulator is securely installed on gas. 2. When leak check is complete (no bubbles appear), test is attached to or less than 1/ 2 psi (3.5kPa). The burner caps must ... valve must be disconnected from the gas supply piping system by turning on its correct burner base per its individual manual shut-off valve during installation. Always use the cooktop without all burner caps and all burner controls are too high. • Flames shoot out of the cap that ...
