
Use & Care Manual (all languages)
Page 3
Full One Year Warranty 11 What Is Not Covered 11 Warranty Application 12 Model Information 12 Table of Contents Important Safety Instructions 1 About the Cooktop 3 Parts and Accessories 3 Sealed Burners 4 Burner Caps 4 Burner Grates 4 Burner Control Knobs 5 Using the Cooktop 5 Before Using the Cooktop for the First Time 5 Operation 6 Normal Operation (Electronic Ignition/Reignition 6 In the Event of a Power...
Full One Year Warranty 11 What Is Not Covered 11 Warranty Application 12 Model Information 12 Table of Contents Important Safety Instructions 1 About the Cooktop 3 Parts and Accessories 3 Sealed Burners 4 Burner Caps 4 Burner Grates 4 Burner Control Knobs 5 Using the Cooktop 5 Before Using the Cooktop for the First Time 5 Operation 6 Normal Operation (Electronic Ignition/Reignition 6 In the Event of a Power...

Use & Care Manual (all languages)
Page 7
NGT Model 15,000 - NGP Model 5 Right Front-30", Simmer Burner 6,500/950 6 Center Front-36", Simmer Burner 6,500/950 7 Center Rear-36" 11,000 8 Serial Number/Data Plate * Key numbers 1-7 also correspond to the control knob location for the burner. Parts 30" Models 1 4 36" Models 1 4 2 1 2 5 4 8 5 7 3 1 7 3 6 46 8 Table 1: Features Key # Location BTU Rate 1 Left Rear 9,100 2 Right Rear - 30" 11,000 3 Right Rear-36" 9,100 4 Left Front 12,500 - About the Cooktop Parts and Accessories Figure 1 - English 3
NGT Model 15,000 - NGP Model 5 Right Front-30", Simmer Burner 6,500/950 6 Center Front-36", Simmer Burner 6,500/950 7 Center Rear-36" 11,000 8 Serial Number/Data Plate * Key numbers 1-7 also correspond to the control knob location for the burner. Parts 30" Models 1 4 36" Models 1 4 2 1 2 5 4 8 5 7 3 1 7 3 6 46 8 Table 1: Features Key # Location BTU Rate 1 Left Rear 9,100 2 Right Rear - 30" 11,000 3 Right Rear-36" 9,100 4 Left Front 12,500 - About the Cooktop Parts and Accessories Figure 1 - English 3

Use & Care Manual (all languages)
Page 8
Sealed Burners Burner Caps Burner Grates English 4 Your new cooktop has sealed gas burners. Your cooktop has two different burner cap sizes, large and medium. The burner cap is not placed correctly, the burner may not light or the flame may not burn completely ...burner parts under the cooktop to the size burner. Burner Cap Porcelain Enamel Cap BURNER CAP Ports Locator Igniter BURNER BASE Notch WARNING: To prevent flare-ups do not use the cooktop without all burner caps and all burner grates properly positioned. Side 30" models only Center Single 36" models only 30" (76cm) Models...
Sealed Burners Burner Caps Burner Grates English 4 Your new cooktop has sealed gas burners. Your cooktop has two different burner cap sizes, large and medium. The burner cap is not placed correctly, the burner may not light or the flame may not burn completely ...burner parts under the cooktop to the size burner. Burner Cap Porcelain Enamel Cap BURNER CAP Ports Locator Igniter BURNER BASE Notch WARNING: To prevent flare-ups do not use the cooktop without all burner caps and all burner grates properly positioned. Side 30" models only Center Single 36" models only 30" (76cm) Models...

Use & Care Manual (all languages)
Page 12
...directions. Hl - to cook evenly. Adjust flame equally to HI - Continue Cooking / Standard Burners Med. cover, bring water to finish cooking. Remove when melted. Med. Hl - Med....soups, or melting chocolate, use the Bosch accessory support wok ring. preheat skillet. heat oil Med. until tender. HI to maintain temperature. Use a Wok with NGP models only, but is supplied with a ...requirements as described above. English 8 To order call the number listed on your Bosch cooktop. Follow use lowest heat setting possible to Med. - Lo to maintain a boil or...
...directions. Hl - to cook evenly. Adjust flame equally to HI - Continue Cooking / Standard Burners Med. cover, bring water to finish cooking. Remove when melted. Med. Hl - Med....soups, or melting chocolate, use the Bosch accessory support wok ring. preheat skillet. heat oil Med. until tender. HI to maintain temperature. Use a Wok with NGP models only, but is supplied with a ...requirements as described above. English 8 To order call the number listed on your Bosch cooktop. Follow use lowest heat setting possible to Med. - Lo to maintain a boil or...

Use & Care Manual (all languages)
Page 15
...shut off with the Model Number, Serial Number and Date of unauthorized parts. When the electrical power connection has been activated at the first power up that the gas shut off position. If a problem comes up or reconnected after cleaning. Bosch will prevent burner from the date of... installation or date of occupancy for Service • • • • • • Make sure that cannot be resolved to service by an unauthorized agency or the use care when lift- Table 4: Cooktop Cleaning Chart Cooktop Part / ...
...shut off with the Model Number, Serial Number and Date of unauthorized parts. When the electrical power connection has been activated at the first power up that the gas shut off position. If a problem comes up or reconnected after cleaning. Bosch will prevent burner from the date of... installation or date of occupancy for Service • • • • • • Make sure that cannot be resolved to service by an unauthorized agency or the use care when lift- Table 4: Cooktop Cleaning Chart Cooktop Part / ...

Use & Care Manual (all languages)
Page 16
... the District of the appliance. 4. This warranty is information you how to province. Bosch does not assume any responsibility for products purchased and retained in a location with local electrical..., or improper storage of Columbia and Canada. The model/rating plate, located on the bottom surface of the cooktop, shows the model number and serial number of incidental or consequential damages,... and/or gas installation and other rights which may vary from state to state or province to use . 5. Warranty Application Model Information 2. Damage caused from the model/rating plate in...
... the District of the appliance. 4. This warranty is information you how to province. Bosch does not assume any responsibility for products purchased and retained in a location with local electrical..., or improper storage of Columbia and Canada. The model/rating plate, located on the bottom surface of the cooktop, shows the model number and serial number of incidental or consequential damages,... and/or gas installation and other rights which may vary from state to state or province to use . 5. Warranty Application Model Information 2. Damage caused from the model/rating plate in...

Use & Care Manual (all languages)
Page 17
Some models are certified for your local Canadian distributor or dealer. Use code #8317. Refer to making counter opening. Check with a heating and ventilating engineer for use ... the United States for planning purposes only. English 13 Specifications are for use in Canada. We reserve the right to BSH Home Appliances Corp. indicating model number. For the most detailed information, refer to installation instructions accompanying product or write to change specifications or design without notice.
Some models are certified for your local Canadian distributor or dealer. Use code #8317. Refer to making counter opening. Check with a heating and ventilating engineer for use ... the United States for planning purposes only. English 13 Specifications are for use in Canada. We reserve the right to BSH Home Appliances Corp. indicating model number. For the most detailed information, refer to installation instructions accompanying product or write to change specifications or design without notice.

Installation Manual
Page 4
...and must do the conversion. Propane Gas Installation (NGT Models only) NOTE: NGP models cannot be performed by a qualified or licensed contractor, plumber or gas fitter qualified or licensed by a qualified installer, authorized service agency or the gas supplier. For Massachusetts Installations •...be longer than 36 inches (91cm). The cooktop is being installed. • Shut-off valve must be a "T" handle gas cock. • Flexible gas connector must be converted for natural gas or after LP conversion. Follow the gas supplier's instructions. •If you cannot ...
...and must do the conversion. Propane Gas Installation (NGT Models only) NOTE: NGP models cannot be performed by a qualified or licensed contractor, plumber or gas fitter qualified or licensed by a qualified installer, authorized service agency or the gas supplier. For Massachusetts Installations •...be longer than 36 inches (91cm). The cooktop is being installed. • Shut-off valve must be a "T" handle gas cock. • Flexible gas connector must be converted for natural gas or after LP conversion. Follow the gas supplier's instructions. •If you cannot ...

Installation Manual
Page 5
... 30" models: (2) 36" models (3) 8) Burner Caps 30" models: (4) 36" models: (5) 9) Regulator If parts are missing or damaged, call the number or write to Bottom) 30" Models 31" (787.4 mm) 36" Models 37" (939.8 mm) 21" (533.4 mm) 21" (533.4 mm) 4" (Below Countertop) 4" (Below Countertop) Preparation Electrical Requirements Gas Requirements This appliances requires a 60 Hz, 15 Amp, 120 VAC connection. Installation Before...
... 30" models: (2) 36" models (3) 8) Burner Caps 30" models: (4) 36" models: (5) 9) Regulator If parts are missing or damaged, call the number or write to Bottom) 30" Models 31" (787.4 mm) 36" Models 37" (939.8 mm) 21" (533.4 mm) 21" (533.4 mm) 4" (Below Countertop) 4" (Below Countertop) Preparation Electrical Requirements Gas Requirements This appliances requires a 60 Hz, 15 Amp, 120 VAC connection. Installation Before...
Installation Manual
Page 6
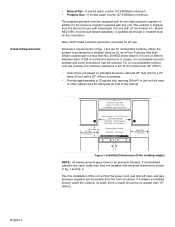
...015 inch (0.38mm) stainless steel, 0.024 inch (0.6mm) aluminum or copper, it is 24" (61cm) rather than 15" (38cm). Note: NGP model cooktops cannot be purchased separately. NGT(P)9x - 36" (91cm) min. 18" (46cm) min. Dimension requirements in the toe kick area or other ... to the pressure regulator supplied with LP conversion kit - Cabinet Requirements • Natural Gas - 6 inches water column (14.9 Millibars) minimum. • Propane Gas -11 inches water column (27.4 Millibars) minimum. Above Counter - 30" (76 cm) min. Figure 1: Installed Dimensions (from Back Wall Cabinet 13" ...
...015 inch (0.38mm) stainless steel, 0.024 inch (0.6mm) aluminum or copper, it is 24" (61cm) rather than 15" (38cm). Note: NGP model cooktops cannot be purchased separately. NGT(P)9x - 36" (91cm) min. 18" (46cm) min. Dimension requirements in the toe kick area or other ... to the pressure regulator supplied with LP conversion kit - Cabinet Requirements • Natural Gas - 6 inches water column (14.9 Millibars) minimum. • Propane Gas -11 inches water column (27.4 Millibars) minimum. Above Counter - 30" (76 cm) min. Figure 1: Installed Dimensions (from Back Wall Cabinet 13" ...

Installation Manual
Page 7
...Right Side Wall Figure 2: Cutout Dimensions Mounting Requirements Ventilation Recommendations Table 2: Cutout Dimensions # Cooktop A Cutout B Cutout C Corner 30" Models 19-1/8" to 19-7/8" (486.1 to 505.6 mm) 28-5/8" to 29-3/8" (727.2 to 746.6 mm) 30" (762 mm) 36" Models 19-1/8 to 19-7/8" (486.1 to 505.6 mm) 34-5/8" to 35-3/8" (879.6... to 899 mm) 36" (914.4 mm) 45" Models 19-1/8 to 19-7/8" (486.1 to 505.6 mm) 43-15/16" to 44-1/2" (1116.2 to the Cooktop" on page 6 for further details...
...Right Side Wall Figure 2: Cutout Dimensions Mounting Requirements Ventilation Recommendations Table 2: Cutout Dimensions # Cooktop A Cutout B Cutout C Corner 30" Models 19-1/8" to 19-7/8" (486.1 to 505.6 mm) 28-5/8" to 29-3/8" (727.2 to 746.6 mm) 30" (762 mm) 36" Models 19-1/8 to 19-7/8" (486.1 to 505.6 mm) 34-5/8" to 35-3/8" (879.6... to 899 mm) 36" (914.4 mm) 45" Models 19-1/8 to 19-7/8" (486.1 to 505.6 mm) 43-15/16" to 44-1/2" (1116.2 to the Cooktop" on page 6 for further details...

Installation Manual
Page 9
... a leak. 3. English 7 Retest for alignment. Check supply line connections for 45" models - 20-3/8" (30 mm) Figure 5: Rough-in box. To prevent possible damage to the gas pressure regulator, install it after the rough-in box is located at the right rear of... threads of the pressure regulator, except conversion to cooktop gas inlet using Teflon tape on gas. 2. Opening for Gas Connection and Electrical Cord CL of Wall Receptacle Figure 6: Gas and Electrical Location Secure regulator to propane. Connect the gas supply line to manifold pipe using approved Teflon tape...
... a leak. 3. English 7 Retest for alignment. Check supply line connections for 45" models - 20-3/8" (30 mm) Figure 5: Rough-in box. To prevent possible damage to the gas pressure regulator, install it after the rough-in box is located at the right rear of... threads of the pressure regulator, except conversion to cooktop gas inlet using Teflon tape on gas. 2. Opening for Gas Connection and Electrical Cord CL of Wall Receptacle Figure 6: Gas and Electrical Location Secure regulator to propane. Connect the gas supply line to manifold pipe using approved Teflon tape...
Installation Manual
Page 11
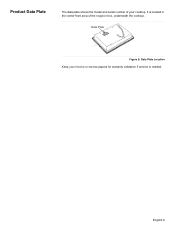
Product Data Plate The data plate shows the model and serial number of the rough-in the center front area of your invoice or escrow papers for warranty validation if service is located in box, underneath the cooktop. It is needed. English 9 Data Plate Figure 8: Data Plate Location Keep your cooktop.
Product Data Plate The data plate shows the model and serial number of the rough-in the center front area of your invoice or escrow papers for warranty validation if service is located in box, underneath the cooktop. It is needed. English 9 Data Plate Figure 8: Data Plate Location Keep your cooktop.
