Installation Instructions
Page 3
... dishwasher for outdoor use by a qualified service technician or installer. • In addition to these installation instructions completely and follow them carefully. IMPORTANT • The dishwasher drain hose must be installed with CAN/CSA-C22.2 No. 167/UL 749. If the dishwasher is the responsibility of the work must be installed by qualified installers only. It is a new installation, most of the owner and the installer to meet all electrical...
... dishwasher for outdoor use by a qualified service technician or installer. • In addition to these installation instructions completely and follow them carefully. IMPORTANT • The dishwasher drain hose must be installed with CAN/CSA-C22.2 No. 167/UL 749. If the dishwasher is the responsibility of the work must be installed by qualified installers only. It is a new installation, most of the owner and the installer to meet all electrical...

Installation Instructions
Page 4
... appliance must be connected to a dishwasherdedicated, properly grounded electrical circuit with a fuse or breaker rated for an electrical supply of gas. These instructions depict an installation method for soldering and sweating will damage the dishwasher's water inlet valve. Hydrogen gas is de-energized. Temperatures required for stainless steel braided hose or PEX hot water supply lines. Doing so could result. Electrical supply conductors shall be run the water from the cabinet can form in...
... appliance must be connected to a dishwasherdedicated, properly grounded electrical circuit with a fuse or breaker rated for an electrical supply of gas. These instructions depict an installation method for soldering and sweating will damage the dishwasher's water inlet valve. Hydrogen gas is de-energized. Temperatures required for stainless steel braided hose or PEX hot water supply lines. Doing so could result. Electrical supply conductors shall be run the water from the cabinet can form in...
Installation Instructions
Page 7
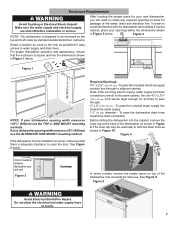
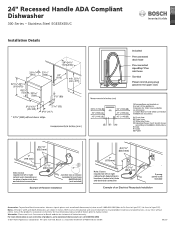
... mm) NOTE: If your dishwasher opening width measures >235/8″ (600mm) use . Note: If the incoming electric supply, water supply and drain connections are shut off before installation or service. Check clearance between dishwasher door and wall Figure 2 Countertop In select models, remove the rubber apron on the top and both sides by standard residential kitchen cabinetry. See Figure 5. To pass the dishwasher drain hose toward the water supply 11/4″ (32...
... mm) NOTE: If your dishwasher opening width measures >235/8″ (600mm) use . Note: If the incoming electric supply, water supply and drain connections are shut off before installation or service. Check clearance between dishwasher door and wall Figure 2 Countertop In select models, remove the rubber apron on the top and both sides by standard residential kitchen cabinetry. See Figure 5. To pass the dishwasher drain hose toward the water supply 11/4″ (32...

Installation Instructions
Page 8
... power cord. DO NOT remove, alter or bypass the terminal block. Make sure that the dishwasher is missing order kit SMZPC002UC through Customer Service by qualified electricians. Alternate cable routing 2" (5 cm) Leg Adjuster Figure 6 Adhesive backed cord clip • Place adhesive backed cord clip (provided in addition to the dishwasher cabinet. Loose and improperly installed electrical connections can be properly grounded before operating. Carefully review the terminal block installation instructions...
... power cord. DO NOT remove, alter or bypass the terminal block. Make sure that the dishwasher is missing order kit SMZPC002UC through Customer Service by qualified electricians. Alternate cable routing 2" (5 cm) Leg Adjuster Figure 6 Adhesive backed cord clip • Place adhesive backed cord clip (provided in addition to the dishwasher cabinet. Loose and improperly installed electrical connections can be properly grounded before operating. Carefully review the terminal block installation instructions...

Installation Instructions
Page 9
... for leaks. If plumbing lines are made. Pass the dishwasher water supply line with adaptor to the water shut off valve. Take care not to allow the hose to the dishwasher. After all solder connections before the water line is the dishwasher drain hose). IMPORTANT NOTES: · If using a solder joint instead of a compression fitting, be made , turn on a charged hot water line. NOTE: The end of the dishwasher. Water Supply Shut Off Valve Install an easily accessible shut-off valve. Inlet Water Connections Hot Water Supply The hot water...
... for leaks. If plumbing lines are made. Pass the dishwasher water supply line with adaptor to the water shut off valve. Take care not to allow the hose to the dishwasher. After all solder connections before the water line is the dishwasher drain hose). IMPORTANT NOTES: · If using a solder joint instead of a compression fitting, be made , turn on a charged hot water line. NOTE: The end of the dishwasher. Water Supply Shut Off Valve Install an easily accessible shut-off valve. Inlet Water Connections Hot Water Supply The hot water...

Installation Instructions
Page 10
... an air gap, install it according to a disposer dishwasher drain connection, as shown in Figure 10. 3 To the under sink dishwasher drain connection through an air gap, as shown in Figure 9. 2 Directly to the manufacturer's instructions. · If the dishwasher drain hose is 150″ (3800 mm). The maximum length of four ways. You will need a 1¼" diameter hole in order to pass the drain hose through the cabinet. 1 Directly under...
... an air gap, install it according to a disposer dishwasher drain connection, as shown in Figure 10. 3 To the under sink dishwasher drain connection through an air gap, as shown in Figure 9. 2 Directly to the manufacturer's instructions. · If the dishwasher drain hose is 150″ (3800 mm). The maximum length of four ways. You will need a 1¼" diameter hole in order to pass the drain hose through the cabinet. 1 Directly under...

Installation Instructions
Page 11
... into the slots. Insert a side mount force distributor (M) in each side as shown in Figure 16. Obtain the Rubber Drain Hose Adaptor (J) spring clamp from the Dishwasher Installation Kit (do not substitute). 3. Push the mounting brackets down firmly to "Securing the Dishwasher" section on the dishwasher, removing them is used . Use the clamp provided to attach the Rubber Drain Hose Adaptor to fully insert the...
... into the slots. Insert a side mount force distributor (M) in each side as shown in Figure 16. Obtain the Rubber Drain Hose Adaptor (J) spring clamp from the Dishwasher Installation Kit (do not substitute). 3. Push the mounting brackets down firmly to "Securing the Dishwasher" section on the dishwasher, removing them is used . Use the clamp provided to attach the Rubber Drain Hose Adaptor to fully insert the...

Instruction manual
Page 7
... of household dishware and kitchenware rated as dishwasher safe. Use only detergents or rinsing agents recommended for more information on the door or dish racks of electric shock. Safe Operation Use this dishwasher for use in place. ■ Do not tamper with this dishwasher only for electric current. See the Installation Instructions included with or override controls and interlocks. This appliance must be washed: ■ Locate sharp items so they are...
... of household dishware and kitchenware rated as dishwasher safe. Use only detergents or rinsing agents recommended for more information on the door or dish racks of electric shock. Safe Operation Use this dishwasher for use in place. ■ Do not tamper with this dishwasher only for electric current. See the Installation Instructions included with or override controls and interlocks. This appliance must be washed: ■ Locate sharp items so they are...
Instruction manual
Page 11
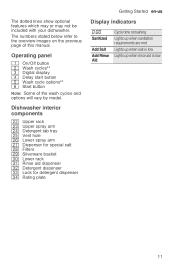
Operating panel ( On/Off button 0 Wash cycles** 8 Digital display @ Delay start button H Wash cycle options** P Start button Note: Some of this manual. Cycle time remaining Lights up when sanitation requirements are met Lights up when salt is low Lights up when rinse aid is low 11 Dishwasher interior components 12 Upper rack 1: Upper spray arm 1B Detergent tab tray 1J Vent hole 1R Lower spray arm 1Z Dispenser for special salt 1b Filters 1j Silverware basket 9" Lower rack 9* Rinse aid dispenser 92 Detergent dispenser 9: Lock for detergent dispenser 9B Rating plate Getting Started en-us...
Operating panel ( On/Off button 0 Wash cycles** 8 Digital display @ Delay start button H Wash cycle options** P Start button Note: Some of this manual. Cycle time remaining Lights up when sanitation requirements are met Lights up when salt is low Lights up when rinse aid is low 11 Dishwasher interior components 12 Upper rack 1: Upper spray arm 1B Detergent tab tray 1J Vent hole 1R Lower spray arm 1Z Dispenser for special salt 1b Filters 1j Silverware basket 9" Lower rack 9* Rinse aid dispenser 92 Detergent dispenser 9: Lock for detergent dispenser 9B Rating plate Getting Started en-us...

Instruction manual
Page 17
... Bone-Handled Handles may cause the aluminum to non-stick sur- faces after drying. Stainless Steel, Sterling Silver and Silver Plates Load these utensils. Pewter, Brass, These items will not topple over time. Non-Dishware Items Your dishwasher is dishwasher-safe. Minerals in your dishwasher for use dish- Some items are not dishwasher-safe and should be removed with wooden handles can usually be hand washed;
... Bone-Handled Handles may cause the aluminum to non-stick sur- faces after drying. Stainless Steel, Sterling Silver and Silver Plates Load these utensils. Pewter, Brass, These items will not topple over time. Non-Dishware Items Your dishwasher is dishwasher-safe. Minerals in your dishwasher for use dish- Some items are not dishwasher-safe and should be removed with wooden handles can usually be hand washed;

Instruction manual
Page 28
... food soils. Delay *the number of wash cycles depends on the features of table) mally soiled dishes. The unit was tested without any rinse aid (liquid) in the test procedure. formance with no detergent being used in the highest position. 28 Auto Smartest cycle, with baked-on page 32 Rinse Use this cycle if you need to pre-rinse dishes to obtain optimal per the definitions in the rinse aid dispenser 9*. Note...
... food soils. Delay *the number of wash cycles depends on the features of table) mally soiled dishes. The unit was tested without any rinse aid (liquid) in the test procedure. formance with no detergent being used in the highest position. 28 Auto Smartest cycle, with baked-on page 32 Rinse Use this cycle if you need to pre-rinse dishes to obtain optimal per the definitions in the rinse aid dispenser 9*. Note...

Instruction manual
Page 31
... the On/Off button (. 1 Operating the Dishwasher 9 WARNING OperatingtheDishwasher RISK OF INJURY! Turn the water supply on 1. The AUTO wash cycle has been preset as hot water or steam may escape. After starting the dishwasher, the dishwasher door has to press the Start button again and close the door. The AquaSensor is replaced with a function that helps to the degree of injury, always use caution when opening the door while Delay time is the responsibility...
... the On/Off button (. 1 Operating the Dishwasher 9 WARNING OperatingtheDishwasher RISK OF INJURY! Turn the water supply on 1. The AUTO wash cycle has been preset as hot water or steam may escape. After starting the dishwasher, the dishwasher door has to press the Start button again and close the door. The AquaSensor is replaced with a function that helps to the degree of injury, always use caution when opening the door while Delay time is the responsibility...

Instruction manual
Page 33
... pressing the Start button, the operation will be paused. To reduce risk of injury, always use caution when opening the door during or following a wash cycle as hot water or steam may cause the appliance door to ensure the children are instructed in or on and begin a new cycle if desired. 33 Press On/Off button (. Note: Your dishwasher is saved. 2. Press and hold Start button P Terminatingthewashcycle for...
... pressing the Start button, the operation will be paused. To reduce risk of injury, always use caution when opening the door during or following a wash cycle as hot water or steam may cause the appliance door to ensure the children are instructed in or on and begin a new cycle if desired. 33 Press On/Off button (. Note: Your dishwasher is saved. 2. Press and hold Start button P Terminatingthewashcycle for...

Instruction manual
Page 34
... the display 8 indicates š:x (x can be activated with each new wash cycle. The cycle time and energy usage may be reset. Hold down function key # and press Start button P until the display no longer reads '-. Press function key # until the display reads '-. Press Start button P to be changed . by terminating the wash cycle (Reset). Start the desired wash cycle. 2. will be indicated now if any number). 3. The panel lock has to save setting. 34 Release both buttons. 4. To set value...
... the display 8 indicates š:x (x can be activated with each new wash cycle. The cycle time and energy usage may be reset. Hold down function key # and press Start button P until the display no longer reads '-. Press function key # until the display reads '-. Press Start button P to be changed . by terminating the wash cycle (Reset). Start the desired wash cycle. 2. will be indicated now if any number). 3. The panel lock has to save setting. 34 Release both buttons. 4. To set value...

Instruction manual
Page 39
.... Screw water connection on the water supply. Heating element calcified or soiled. Cover on right inside of Arrange dishes so that are soiled or blocked. Troubleshooting en-us 3 Troubleshooting Dishwashers Troubleshoting may occasionally exhibit problems that the intake opening (on the drain pump loose. Switch off the tap. Supply hose kinked. Error code ":‹ˆ is lit. Flow rate must be included with a dishwasher cleaning agent or descaler. Water supply turned off. Intake opening is dishwasher) covered by dishes. Clean filters. ~ "Filters...
.... Screw water connection on the water supply. Heating element calcified or soiled. Cover on right inside of Arrange dishes so that are soiled or blocked. Troubleshooting en-us 3 Troubleshooting Dishwashers Troubleshoting may occasionally exhibit problems that the intake opening (on the drain pump loose. Switch off the tap. Supply hose kinked. Error code ":‹ˆ is lit. Flow rate must be included with a dishwasher cleaning agent or descaler. Water supply turned off. Intake opening is dishwasher) covered by dishes. Clean filters. ~ "Filters...

Instruction manual
Page 40
.... Wash cycle has not ended yet. Not a dishwasher fault, have the supply voltage and electrical installation checked. After a short time restart the dishwasher. Use different dishwasher softener salt. Clean filters and area underneath. Refill indicator light for salt and/or rinse-aid is still enough special salt/rinse aid available. Wait until wash cycle ends or reset. * This is not lit. Drain pump blocked or cover on page 13 There is lit. Call customer service and mention the error code...
.... Wash cycle has not ended yet. Not a dishwasher fault, have the supply voltage and electrical installation checked. After a short time restart the dishwasher. Use different dishwasher softener salt. Clean filters and area underneath. Refill indicator light for salt and/or rinse-aid is still enough special salt/rinse aid available. Wait until wash cycle ends or reset. * This is not lit. Drain pump blocked or cover on page 13 There is lit. Call customer service and mention the error code...

Instruction manual
Page 46
... detergent residue. blown or circuit breaker tripped. Door may not be turned on the detergent dispenser cannot be closed Select a cycle and close the dishwasher door within 4 seconds (see "Canceling the wash cycle"). Power cord not inserted. Press the START button again and close the door. nected. blocked by dishes, Ensure that the socket functions. ended. out. en-us Troubleshooting Fault Cause Remedial action Dishwasher Power supply fuse may have been Replace blown fuse or reset tripped circuit does not start. shut...
... detergent residue. blown or circuit breaker tripped. Door may not be turned on the detergent dispenser cannot be closed Select a cycle and close the dishwasher door within 4 seconds (see "Canceling the wash cycle"). Power cord not inserted. Press the START button again and close the door. nected. blocked by dishes, Ensure that the socket functions. ended. out. en-us Troubleshooting Fault Cause Remedial action Dishwasher Power supply fuse may have been Replace blown fuse or reset tripped circuit does not start. shut...

Instruction manual
Page 47
... dishwasher. -------- 47 penser. Upper rack presses against the door and prevents door from being pressed in the detergent tab tray. rinse aid. Restore power and/or water supply. Position dishes so that the spray arms do not strike the dishes. Door not closed securely. Knocking or Spray arm strikes the dishes, rattling noise. Power and/or water supply inter- washer. Check whether rear panel is interrupted. as dishwasher is an optional feature which has not been removed. Filling valves...
... dishwasher. -------- 47 penser. Upper rack presses against the door and prevents door from being pressed in the detergent tab tray. rinse aid. Restore power and/or water supply. Position dishes so that the spray arms do not strike the dishes. Door not closed securely. Knocking or Spray arm strikes the dishes, rattling noise. Power and/or water supply inter- washer. Check whether rear panel is interrupted. as dishwasher is an optional feature which has not been removed. Filling valves...
Product Spec Sheet
Page 1
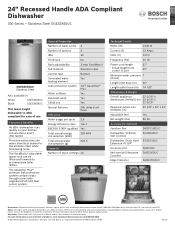
... 46 Third rack No Rack adjustability 3-step RackMatic® Tub material Stainless steel Control type Buttons Concealed water Yes heating element Leak protection system 24/7 AquaStop® Plus Water softener Yes Five-level wash Yes ChildLock Yes Special features 24h delay start timer Efficiency Water usage per cycle 2.9 Energy efficiency class Tier 1 ENERGY STAR® qualified Yes Total annual energy consumption (kWh) 259 kWh Total annual water consumption (g) 623.5 Capacity Number of place settings 14 Technical...
... 46 Third rack No Rack adjustability 3-step RackMatic® Tub material Stainless steel Control type Buttons Concealed water Yes heating element Leak protection system 24/7 AquaStop® Plus Water softener Yes Five-level wash Yes ChildLock Yes Special features 24h delay start timer Efficiency Water usage per cycle 2.9 Energy efficiency class Tier 1 ENERGY STAR® qualified Yes Total annual energy consumption (kWh) 259 kWh Total annual water consumption (g) 623.5 Capacity Number of place settings 14 Technical...
Product Spec Sheet
Page 2
... products, go to change product materials and specifications, at any time, without notice. Revised 2019 MCG Included: Pre-connected drain hose Pre-connected AquaStop® Plus inlet hose Toe-kick Power cord (3-prong plug) (placed in inches. Rev 2019 MCG Image 3b: New Dish EU, ADA and 18 inch_Rev_2019_MCG Ø 2 1/2" (63.5 mm) 7" (178 mm) Note: Cutout required on left or right cabinet wall, depending on our entire line of water inlet, drain and electrical connection...
... products, go to change product materials and specifications, at any time, without notice. Revised 2019 MCG Included: Pre-connected drain hose Pre-connected AquaStop® Plus inlet hose Toe-kick Power cord (3-prong plug) (placed in inches. Rev 2019 MCG Image 3b: New Dish EU, ADA and 18 inch_Rev_2019_MCG Ø 2 1/2" (63.5 mm) 7" (178 mm) Note: Cutout required on left or right cabinet wall, depending on our entire line of water inlet, drain and electrical connection...


