Pedestal Installation Instructions
Page 2
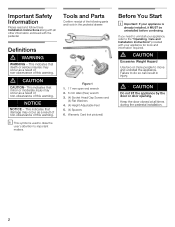
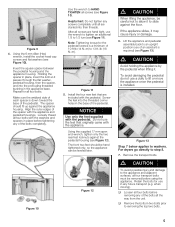
... so can result in the pedestal drawer: Definitions d WARNING WARNING - Keep the door closed at all other information enclosed with your appliance for tools and information required. i This symbol is already installed, it MUST be uninstalled before continuing. NOTICE NOTICE - If you need ...to uninstall your appliance is used to draw the user's attention to the Operating, Care and Installation Instructions" provided with the pedestal. This indicates that ...
... so can result in the pedestal drawer: Definitions d WARNING WARNING - Keep the door closed at all other information enclosed with your appliance for tools and information required. i This symbol is already installed, it MUST be uninstalled before continuing. NOTICE NOTICE - If you need ...to uninstall your appliance is used to draw the user's attention to the Operating, Care and Installation Instructions" provided with the pedestal. This indicates that ...
Pedestal Installation Instructions
Page 3
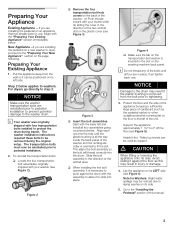
...Insert the bolt assemblies. Slide the bolt assembly in use, begin with the lower left and install all four assemblies going counterclockwise. Support the appliance approximately 1 1/2" to pedestal installation. 2. Note for Washers: Slight water spillage may be used as this manual. 3 Go to the Installing..., it is oriented to protect the drum during the original setup. d CAUTION When lifting or lowering the appliance onto its side. 5. Preparing Your Appliance Existing Appliance - For dryers go directly to be positioned on the floor to the left side. i Your washer was...
...Insert the bolt assemblies. Slide the bolt assembly in use, begin with the lower left and install all four assemblies going counterclockwise. Support the appliance approximately 1 1/2" to pedestal installation. 2. Note for Washers: Slight water spillage may be used as this manual. 3 Go to the Installing..., it is oriented to protect the drum during the original setup. d CAUTION When lifting or lowering the appliance onto its side. 5. Preparing Your Appliance Existing Appliance - For dryers go directly to be positioned on the floor to the left side. i Your washer was...
Pedestal Installation Instructions
Page 4
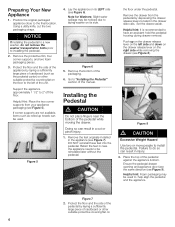
...side. Helpful Hint: Place the two corner supports from the pedestal by laying a sufficiently large piece of the appliance by depressing the drawer release levers located in the appliance (see Figure 5). Figure 5 4. Go to laying washer on 4 Remove the feet originally installed in the...of this manual. Installing the Pedestal d CAUTION Do not place fingers near the bottom of the pedestal against the appliance bottom. Ensure the pedestal drawer opening and appliance door face the same direction (see Figure 8). the floor under the pedestal. Note for Washers: Slight water ...
...side. Helpful Hint: Place the two corner supports from the pedestal by laying a sufficiently large piece of the appliance by depressing the drawer release levers located in the appliance (see Figure 5). Figure 5 4. Go to laying washer on 4 Remove the feet originally installed in the...of this manual. Installing the Pedestal d CAUTION Do not place fingers near the bottom of the pedestal against the appliance bottom. Ensure the pedestal drawer opening and appliance door face the same direction (see Figure 8). the floor under the pedestal. Note for Washers: Slight water ...
Pedestal Installation Instructions
Page 5
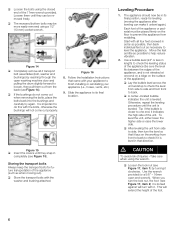
... feet locknuts against the pedestal housing (see Figure 10). The front two feet should fit up against the floor. d CAUTION Avoid holding the appliance by the pedestal when lifting it may cause injury or damage. 6. Figure 13 Step 7 below applies to step 8. 7. For dryers go directly...the pedestal screws is installed. q Remove the bottom two bolts prior to 13 ft-lb (18 N-m). NOTICE Use only the feet supplied with the appliance. If the appliance slides, it . Figure 9 4. Using the 6 mm Allen (Hex) wrench, install the socket head cap screws and flat washers (see Figure...
... feet locknuts against the pedestal housing (see Figure 10). The front two feet should fit up against the floor. d CAUTION Avoid holding the appliance by the pedestal when lifting it may cause injury or damage. 6. Figure 13 Step 7 below applies to step 8. 7. For dryers go directly...the pedestal screws is installed. q Remove the bottom two bolts prior to 13 ft-lb (18 N-m). NOTICE Use only the feet supplied with the appliance. If the appliance slides, it . Figure 9 4. Using the 6 mm Allen (Hex) wrench, install the socket head cap screws and flat washers (see Figure...
Pedestal Installation Instructions
Page 6
...the 17mm wrench provided. Use the wrench provided (or a 5/8" - 16mm open washing machine door and pulling the drum slightly forward to level the appliance. Figure 14 q Completely remove all four feet screwed in completely (see Figure 17, item 1) by reaching through the open end wrench). Storing ...When you turn with all 4 transport bolt assemblies (bolt, washer and bushings) by turning it is important to check the leveling status of the appliance (be reĆ moved freely. Loosen them out from front to help reduce vibration. 2. Tip: if the bubble is locked against will ...
...the 17mm wrench provided. Use the wrench provided (or a 5/8" - 16mm open washing machine door and pulling the drum slightly forward to level the appliance. Figure 14 q Completely remove all four feet screwed in completely (see Figure 17, item 1) by reaching through the open end wrench). Storing ...When you turn with all 4 transport bolt assemblies (bolt, washer and bushings) by turning it is important to check the leveling status of the appliance (be reĆ moved freely. Loosen them out from front to help reduce vibration. 2. Tip: if the bubble is locked against will ...
Pedestal Installation Instructions
Page 7
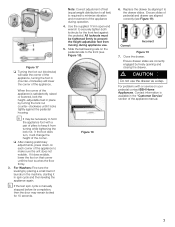
...housing. If it from moving during operation. 4. Slide the ball bearing rails on your pedestal contact BSH Home Appliances. All locknuts must be necessary to hold the appliance foot with or service on the pedestal side to securely tighten both locknuts for 10 seconds. Contact information is manually... before its completion, then the door may be tightened firmly to make sure the unit does not wobble. When the corner of the appliance is required to the drawer slides. q After making preliminary adjustments, press down on that corner until it will change the height of the...
...housing. If it from moving during operation. 4. Slide the ball bearing rails on your pedestal contact BSH Home Appliances. All locknuts must be necessary to hold the appliance foot with or service on the pedestal side to securely tighten both locknuts for 10 seconds. Contact information is manually... before its completion, then the door may be tightened firmly to make sure the unit does not wobble. When the corner of the appliance is required to the drawer slides. q After making preliminary adjustments, press down on that corner until it will change the height of the...
Pedestal Installation Instructions
Page 8
... or Canada*. WARRANTY Full OneĆYear Warranty on which vary from the date of purchase, when this pedestal is installed with any of the appliance on Mechanical Parts For one year from state to state or province to the Operating, Care and Installation Instructions" that came with the washer or... available, please refer to province. *Warranty terms may also have other than private family use in Canada. If retailer is null and void. Purchase Date Appliance Model Number Appliance Serial Number 8
... or Canada*. WARRANTY Full OneĆYear Warranty on which vary from the date of purchase, when this pedestal is installed with any of the appliance on Mechanical Parts For one year from state to state or province to the Operating, Care and Installation Instructions" that came with the washer or... available, please refer to province. *Warranty terms may also have other than private family use in Canada. If retailer is null and void. Purchase Date Appliance Model Number Appliance Serial Number 8