

Operating Guide
Page 3
... 5 GROUNDING INSTRUCTIONS 6 INSTALLATION INSTRUCTIONS 7 Introduction 7 Information concerning waste disposal 7 Before installing the dryer 7 Checklist for Installation 8 Installation Location 8 Dryer Dimensions 8 Door Hinge Reversal 9 Installation Types 11 Electrical connection 14 Exhaust air connection 17 Accessories 19 Preparing to transport the dryer - Table of cycle sequence 23 Cycle Selection Table 24 Automatic cycles...
... 5 GROUNDING INSTRUCTIONS 6 INSTALLATION INSTRUCTIONS 7 Introduction 7 Information concerning waste disposal 7 Before installing the dryer 7 Checklist for Installation 8 Installation Location 8 Dryer Dimensions 8 Door Hinge Reversal 9 Installation Types 11 Electrical connection 14 Exhaust air connection 17 Accessories 19 Preparing to transport the dryer - Table of cycle sequence 23 Cycle Selection Table 24 Automatic cycles...

Operating Guide
Page 5
.../salt air, and excessive cold. 15. Do not allow anyone to carry out. 17. Children should only be stored near the dryer. 11. To reduce the risk of the machine and exhaust duct should be placed in the dryer. Children should be used for its intended purpose..../or damage when using the dryer. ,/k IMPORTANT SAFETY INSTRUCTIONS The warnings and safety instructions in this manual can ignite by spontaneous combustion. 20. Bosch dryers are instructed in safe practices by qualified persons. 5. These items may contribute to a chemical reaction that pose a fire hazard must only ...
.../salt air, and excessive cold. 15. Do not allow anyone to carry out. 17. Children should only be stored near the dryer. 11. To reduce the risk of the machine and exhaust duct should be placed in the dryer. Children should be used for its intended purpose..../or damage when using the dryer. ,/k IMPORTANT SAFETY INSTRUCTIONS The warnings and safety instructions in this manual can ignite by spontaneous combustion. 20. Bosch dryers are instructed in safe practices by qualified persons. 5. These items may contribute to a chemical reaction that pose a fire hazard must only ...
Operating Guide
Page 8
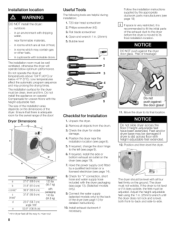
... for the swivel range of breakage! If required, install the side or bottom exhaust air outlet on carpets! DO NOT push against the do6r glass! 11. Do not slide dryer across floor with height-adjustable feet extended. 12. Dryer Dimensions a b c (min)* c (max)* d e Dimension 27,0" (68,6cm) 31,8" (81,0cm) 36,9" (93...
... for the swivel range of breakage! If required, install the side or bottom exhaust air outlet on carpets! DO NOT push against the do6r glass! 11. Do not slide dryer across floor with height-adjustable feet extended. 12. Dryer Dimensions a b c (min)* c (max)* d e Dimension 27,0" (68,6cm) 31,8" (81,0cm) 36,9" (93...

Operating Guide
Page 10
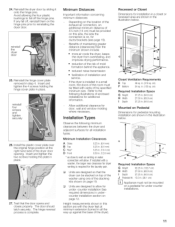
... on the inside of the raised glass handle, marked in the illustration below as (A). 19. 9. Flip the door over so the front ring faces up. 11. Rotate the striker cover and striker 180 degrees so the assembly fits to be mounted back on the dryer housing. The leading edge of the...
... on the inside of the raised glass handle, marked in the illustration below as (A). 19. 9. Flip the door over so the front ring faces up. 11. Rotate the striker cover and striker 180 degrees so the assembly fits to be mounted back on the dryer housing. The leading edge of the...
Operating Guide
Page 11
... place. Reinstall the hinge cover plate removed in . (310sq. Installation Types Observe the following illustrations of the dryer). Units are shown in under counter installations. 11 If any fall off , reinstall them on , for under-counter installation See required dimensions in the illustration below . The door should latch securely. If the...
... place. Reinstall the hinge cover plate removed in . (310sq. Installation Types Observe the following illustrations of the dryer). Units are shown in under counter installations. 11 If any fall off , reinstall them on , for under-counter installation See required dimensions in the illustration below . The door should latch securely. If the...
Operating Guide
Page 12
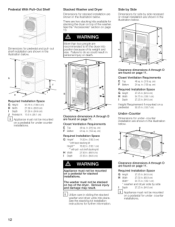
... under counter installation are shown in the illustration below. The washer must not be stacked on page 19. H Clearance dimensions A through D are found on page 11. Closet Ventilation Requirements E Top 48 sq, in. (310sq, cm) F Bottom 24 sq, in, (155sq, cm) Required G Height H Width I Depth ...I Depth 37.25in.(94.6cm) D Appliance must not be mounted on a pedestal for further information. More than two people are found on page 11. Failure to lift the dryer into place. Required Installation Space G Height 37.25in.(94.6cm) H Width 27.50in,(69.9cm) Width* 54.75in...
... under counter installation are shown in the illustration below. The washer must not be stacked on page 19. H Clearance dimensions A through D are found on page 11. Closet Ventilation Requirements E Top 48 sq, in. (310sq, cm) F Bottom 24 sq, in, (155sq, cm) Required G Height H Width I Depth ...I Depth 37.25in.(94.6cm) D Appliance must not be mounted on a pedestal for further information. More than two people are found on page 11. Failure to lift the dryer into place. Required Installation Space G Height 37.25in.(94.6cm) H Width 27.50in,(69.9cm) Width* 54.75in...
Operating Guide
Page 14
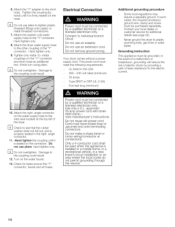
... tighten only. 8. D Do not overtighten. The power cord must be grounded. Power cord must meet the following requirements: UL listed in the right angle connector. 11. Hand tighten only. 9. Do not use an adapter. In such cases, the required accessory ground wire, clamp and screw must have closed loop or upturned...
... tighten only. 8. D Do not overtighten. The power cord must be grounded. Power cord must meet the following requirements: UL listed in the right angle connector. 11. Hand tighten only. 9. Do not use an adapter. In such cases, the required accessory ground wire, clamp and screw must have closed loop or upturned...

Operating Guide
Page 17
... avoid leaks. Do clean and inspect the exhaust system on the rear of a building, furnace cold air duct, attic, crawl space, or any other wildlife. 11. DO NOT assemble the duct work with magnetic latches. 12. Remove accumulated lint to an existing venting system or a new venting 17 D Problems that extend...
... avoid leaks. Do clean and inspect the exhaust system on the rear of a building, furnace cold air duct, attic, crawl space, or any other wildlife. 11. DO NOT assemble the duct work with magnetic latches. 12. Remove accumulated lint to an existing venting system or a new venting 17 D Problems that extend...
Operating Guide
Page 19
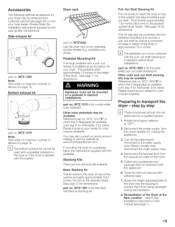
... dryer or if the dryer is available as a combined increase in stacked installations. D The bottom exhaust kit cannot be used with adhesive tape. 7. See page 11 for dimensions. WTZ 1600"X" in this manual (see page 32) or from your dryer. Preparing to the Installation Instructions in which the X designates an available...
... dryer or if the dryer is available as a combined increase in stacked installations. D The bottom exhaust kit cannot be used with adhesive tape. 7. See page 11 for dimensions. WTZ 1600"X" in this manual (see page 32) or from your dryer. Preparing to the Installation Instructions in which the X designates an available...

Operating Guide
Page 27
... operate the dryer without the lint filter in place! 27 A filter with warm soapy water. The filter is lint free. The dryer light goes out. 11. Open the door. 3. D If lint falls off with hot water and liquid detergent. 4. Cleaning the filter reduces the drying time and saves energy. 12. Wet...
... operate the dryer without the lint filter in place! 27 A filter with warm soapy water. The filter is lint free. The dryer light goes out. 11. Open the door. 3. D If lint falls off with hot water and liquid detergent. 4. Cleaning the filter reduces the drying time and saves energy. 12. Wet...
Operating Guide
Page 31
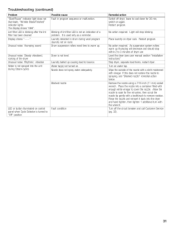
...: Steadyvibrationd, rockingof the dryer Unusuanl oise: Rhythmic vibration Wateris not sprayedintothe unit duringSteamcycles Dryeris not level. Lightwill stop blinking. Turnon watertap. Removethe nozzleusinga 7/16 inch(11 mm)socket wrench. Watertap(s)not turnedon. Restartprogram. Noaction required.As suspensionsystemrollers warm up thumpingwill decreaseand shouldstop within 2 to warm up. Noaction required. Troubleshooting (continued) Problem...
...: Steadyvibrationd, rockingof the dryer Unusuanl oise: Rhythmic vibration Wateris not sprayedintothe unit duringSteamcycles Dryeris not level. Lightwill stop blinking. Turnon watertap. Removethe nozzleusinga 7/16 inch(11 mm)socket wrench. Watertap(s)not turnedon. Restartprogram. Noaction required.As suspensionsystemrollers warm up thumpingwill decreaseand shouldstop within 2 to warm up. Noaction required. Troubleshooting (continued) Problem...

