

Operating Guide
Page 3
... 5 GROUNDING INSTRUCTIONS 6 INSTALLATION INSTRUCTIONS 7 Introduction 7 Information concerning waste disposal 7 Before installing the dryer 7 Checklist for Installation 8 Installation Location 8 Dryer Dimensions 8 Door Hinge Reversal 9 Installation Types 11 Electrical connection 14 Exhaust air connection 17 Accessories 19 Preparing to transport the dryer -
... 5 GROUNDING INSTRUCTIONS 6 INSTALLATION INSTRUCTIONS 7 Introduction 7 Information concerning waste disposal 7 Before installing the dryer 7 Checklist for Installation 8 Installation Location 8 Dryer Dimensions 8 Door Hinge Reversal 9 Installation Types 11 Electrical connection 14 Exhaust air connection 17 Accessories 19 Preparing to transport the dryer -

Operating Guide
Page 5
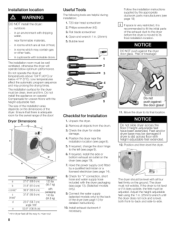
... check clothing pockets and shake out all times. ,/k IMPORTANT SAFETY INSTRUCTIONS The warnings and safety instructions in this appliance where it is rotating. Bosch dryers are instructed in safe practices by spontaneous combustion. 19. The dryer must not be kept a safe distance away from the electrical supply ...before using your dryer. Children should be stored near the dryer. 11. Do not sit or stand on shelves or in cabinets or other storage areas adjacent to ensure that they give off vapors that may...
... check clothing pockets and shake out all times. ,/k IMPORTANT SAFETY INSTRUCTIONS The warnings and safety instructions in this appliance where it is rotating. Bosch dryers are instructed in safe practices by spontaneous combustion. 19. The dryer must not be kept a safe distance away from the electrical supply ...before using your dryer. Children should be stored near the dryer. 11. Do not sit or stand on shelves or in cabinets or other storage areas adjacent to ensure that they give off vapors that may...
Operating Guide
Page 8
... level 1 3 Checklist for the dryer must be well ventilated, otherwise the dryer will operate below 41 °F (5°C). DO NOT push against the do6r glass! 11. Position and then level the dryer. -i!iiiiii!i_!ii_!_i!i_>_ ¸ ii!_!__ii_ii_ LJ J / The dryer should be damaged if dryer is level, both...
... level 1 3 Checklist for the dryer must be well ventilated, otherwise the dryer will operate below 41 °F (5°C). DO NOT push against the do6r glass! 11. Position and then level the dryer. -i!iiiiii!i_!ii_!_i!i_>_ ¸ ii!_!__ii_ii_ LJ J / The dryer should be damaged if dryer is level, both...

Operating Guide
Page 10
... with the two screws. 12. Flip the door over the left side of the way around the glass. Be sure this raised edge faces up . 11. Flip the door over so the front ring faces up towards you.
... with the two screws. 12. Flip the door over the left side of the way around the glass. Be sure this raised edge faces up . 11. Flip the door over so the front ring faces up towards you.
Operating Guide
Page 11
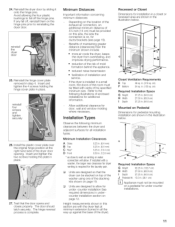
.... If the dryer is installed in a small room, the doors of the room must be provided on this section are shown in under counter installations. 11 Reinstall the hinge cover plate removed in . (310sq. Refer to allow If installedwith a washer,the larger rearclearancefor dryer ventingis requiredfor the laundrypair Units are designed...
.... If the dryer is installed in a small room, the doors of the room must be provided on this section are shown in under counter installations. 11 Reinstall the hinge cover plate removed in . (310sq. Refer to allow If installedwith a washer,the larger rearclearancefor dryer ventingis requiredfor the laundrypair Units are designed...
Operating Guide
Page 12
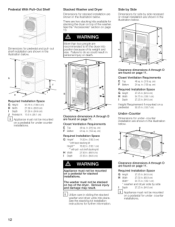
...are shown in . (94.6cm) Appliance must not be mounted on a pedestal for stacked installations. More than two people are found on page 11. B Clearance dimensions A through D are recommended to do so could result in persona njury or death. Clearance dimensions A through D are found on... G Height H Width I Depth 37.25 in the illustration below . There are shown in the illustration below . See the "Accessories" section on page 11. Side by Side Dimensions for side by side I Depth 37.25in.(94.6cm) J Pedestalht 15,0in.(38.1cm) D Appliance must not be mounted on...
...are shown in . (94.6cm) Appliance must not be mounted on a pedestal for stacked installations. More than two people are found on page 11. B Clearance dimensions A through D are recommended to do so could result in persona njury or death. Clearance dimensions A through D are found on... G Height H Width I Depth 37.25 in the illustration below . There are shown in the illustration below . See the "Accessories" section on page 11. Side by Side Dimensions for side by side I Depth 37.25in.(94.6cm) J Pedestalht 15,0in.(38.1cm) D Appliance must not be mounted on...
Operating Guide
Page 14
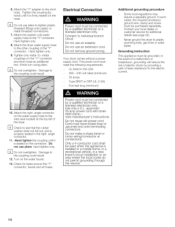
... a sharp bend or crimp wiring/conductor at the top left of electric shock by hand) until it is properly seated in the right angle connector. 11. Attach the dryer water supply hose to the inlet valve located at connections. Do not use pliers, hand tighten only. Do not remove ground prong...
... a sharp bend or crimp wiring/conductor at the top left of electric shock by hand) until it is properly seated in the right angle connector. 11. Attach the dryer water supply hose to the inlet valve located at connections. Do not use pliers, hand tighten only. Do not remove ground prong...

Operating Guide
Page 17
... outleton the side (optional) 3 - You can be adhered to without exception. 1. Avoid placing two 90 degree elbows adjacent to avoid leaks. Replace any other wildlife. 11. Exhaust ducting which is delivered with rigid metal or flexible metal ducting. All joints should be used for lint.
... outleton the side (optional) 3 - You can be adhered to without exception. 1. Avoid placing two 90 degree elbows adjacent to avoid leaks. Replace any other wildlife. 11. Exhaust ducting which is delivered with rigid metal or flexible metal ducting. All joints should be used for lint.
Operating Guide
Page 19
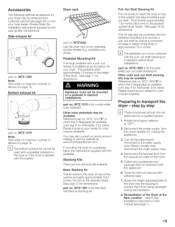
... Location refer to the Installation Instructions in this manual (see page 32) or from the exhaust air outlet on top of the dryer. See page 11 for color choices available. Other color pedestals may be performed by the appropriate manufacturer. See page 12 for the solid white pull-out shelf stacking...
... Location refer to the Installation Instructions in this manual (see page 32) or from the exhaust air outlet on top of the dryer. See page 11 for color choices available. Other color pedestals may be performed by the appropriate manufacturer. See page 12 for the solid white pull-out shelf stacking...

Operating Guide
Page 27
... the door. D Do not operate the dryer without the lint filter in the dryer, residue buildup probably needs to cool. 2. The dryer light goes out. 11. Lightly scrub the lint screen with residue buildup will tend to remove lint. To clean the lint filter follow these steps: 1. Wet lint is clean...
... the door. D Do not operate the dryer without the lint filter in the dryer, residue buildup probably needs to cool. 2. The dryer light goes out. 11. Lightly scrub the lint screen with residue buildup will tend to remove lint. To clean the lint filter follow these steps: 1. Wet lint is clean...
Operating Guide
Page 31
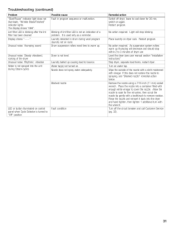
....32). 31 Restartprogram. Turnon watertap. Troubleshooting (continued) Problem Possiblecause "Start/Pause"indicatorlight doesnot illuminate."WrinkleBlock/Finished" indicatorlights. Thedisplayshows"000". Placelaundryon dryerrack. Removethe nozzleusinga 7/16 inch(11 mm)socket wrench. Placethe nozzleinto a containerfilled with enoughwhite vinegarto coverthe nozzle.Allowthe nozzleto soakfor five minuntes,thenscrubthe nozzletip gentlywith a toothbrushto removeresidue.
....32). 31 Restartprogram. Turnon watertap. Troubleshooting (continued) Problem Possiblecause "Start/Pause"indicatorlight doesnot illuminate."WrinkleBlock/Finished" indicatorlights. Thedisplayshows"000". Placelaundryon dryerrack. Removethe nozzleusinga 7/16 inch(11 mm)socket wrench. Placethe nozzleinto a containerfilled with enoughwhite vinegarto coverthe nozzle.Allowthe nozzleto soakfor five minuntes,thenscrubthe nozzletip gentlywith a toothbrushto removeresidue.

