

Operating Guide
Page 1
osch Vision _ 300/500/800 Series Electric Clothes Dryers
osch Vision _ 300/500/800 Series Electric Clothes Dryers

Operating Guide
Page 2
...Everything from setting in opposite directions, so when set up side by up to ensure proper drying. Only Bosch Vision can offer a one hour of sensors in operation. Lint Filter The dryer lint filter is slightly extended to 10%. It is standard on the Premium model and is no wonder...to properly distribute air over heat, it easier to 50% per year. DynamicAir TI_4 The Bosch Vision DynamicAir TM system features gentle heat and high air volume in the appliance housing below the dryer door for cycles that illuminates should the filter need immediate cleaning. Wrinkle Block® gives...
...Everything from setting in opposite directions, so when set up side by up to ensure proper drying. Only Bosch Vision can offer a one hour of sensors in operation. Lint Filter The dryer lint filter is slightly extended to 10%. It is standard on the Premium model and is no wonder...to properly distribute air over heat, it easier to 50% per year. DynamicAir TI_4 The Bosch Vision DynamicAir TM system features gentle heat and high air volume in the appliance housing below the dryer door for cycles that illuminates should the filter need immediate cleaning. Wrinkle Block® gives...

Operating Guide
Page 3
... Options (Delicates, ECO Action 22 LED indicators of Contents Definitions 4 IMPORTANT SAFETY INSTRUCTIONS 5 GROUNDING INSTRUCTIONS 6 INSTALLATION INSTRUCTIONS 7 Introduction 7 Information concerning waste disposal 7 Before installing the dryer 7 Checklist for Installation 8 Installation Location 8 Dryer Dimensions 8 Door Hinge Reversal 9 Installation Types 11 Electrical connection 14 Exhaust air connection 17 Accessories 19 Preparing to transport the...
... Options (Delicates, ECO Action 22 LED indicators of Contents Definitions 4 IMPORTANT SAFETY INSTRUCTIONS 5 GROUNDING INSTRUCTIONS 6 INSTALLATION INSTRUCTIONS 7 Introduction 7 Information concerning waste disposal 7 Before installing the dryer 7 Checklist for Installation 8 Installation Location 8 Dryer Dimensions 8 Door Hinge Reversal 9 Installation Types 11 Electrical connection 14 Exhaust air connection 17 Accessories 19 Preparing to transport the...

Operating Guide
Page 4
... in increments of your household. This indicates that death or serious injuries may occur as a result of non-observance of this warning. Bosch dryers offer the following standard features: High efficiency precision drying system Large stainless steel drum with a capacity of up to 150 minutes (in this...and follow these operating and installation instructions and all other information enclosed with either display type except where noted. Steam Dryers Steam Cycles are described in the 800 Series Additional Options section of our products can be happy to help decrease wrinkling Each...
... in increments of your household. This indicates that death or serious injuries may occur as a result of non-observance of this warning. Bosch dryers offer the following standard features: High efficiency precision drying system Large stainless steel drum with a capacity of up to 150 minutes (in this...and follow these operating and installation instructions and all other information enclosed with either display type except where noted. Steam Dryers Steam Cycles are described in the 800 Series Additional Options section of our products can be happy to help decrease wrinkling Each...

Operating Guide
Page 5
Bosch dryers are instructed in the dryer. severe injury or death could cause a laundry load to persons and/or damage when using the dryer. To reduce the risk of poisoning or chemical burns, keep all instructions before using your dryer. Do not tamper with Operating, Care and ... fire hazard must have been previously cleaned, washed, soaked or spotted with cooking oils may be sure to cooking oils in your dryer, follow basic precautions, _ncluding the following. 1. Items contaminated with gasoline, dry cleaning solvents, or other appliance. Keep area around...
Bosch dryers are instructed in the dryer. severe injury or death could cause a laundry load to persons and/or damage when using the dryer. To reduce the risk of poisoning or chemical burns, keep all instructions before using your dryer. Do not tamper with Operating, Care and ... fire hazard must have been previously cleaned, washed, soaked or spotted with cooking oils may be sure to cooking oils in your dryer, follow basic precautions, _ncluding the following. 1. Items contaminated with gasoline, dry cleaning solvents, or other appliance. Keep area around...
Operating Guide
Page 6
...person if you are loose. 27. SAVE THESE INSTRUCTIONS To avoid floor damage and mold growth, do not understand. Do not use the dryer if the power cord is _Doperlygrounded. Do not operate this manual should be grounded. Notes: A The IMPORTANT SAFEGUARDS and WARNINGS presented in ...appliance. 33. GROUNDING INSTRUCTIONS This appliance must be conveyed with this manual do not use a plastic or non-metal flexible duct with the dryer. For U.S.A. KEEP THESE INSTRUCTIONS FOR FUTURE REFERENCE. In case of change of fire and electrical shock hazards, do not cover all water ...
...person if you are loose. 27. SAVE THESE INSTRUCTIONS To avoid floor damage and mold growth, do not understand. Do not use the dryer if the power cord is _Doperlygrounded. Do not operate this manual should be grounded. Notes: A The IMPORTANT SAFEGUARDS and WARNINGS presented in ...appliance. 33. GROUNDING INSTRUCTIONS This appliance must be conveyed with this manual do not use a plastic or non-metal flexible duct with the dryer. For U.S.A. KEEP THESE INSTRUCTIONS FOR FUTURE REFERENCE. In case of change of fire and electrical shock hazards, do not cover all water ...
Operating Guide
Page 7
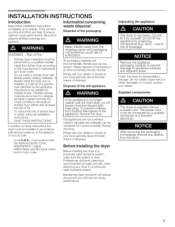
... local authority about the best means of disposal. Before installing the dryer Before installing the dryer to ensure optimum dryer performance. If in the appliance, remove the door. Clothes dryer installation must be performed by yourself. SAVE THESE INSTRUCTIONS. Keep children...damage to the manufacturer's instructions and local codes. INSTALLATION INSTRUCTIONS Introduction Read these instructions the dryer must be reused. They will obstruct clothes dryer airflow and increase the risk of suffocation. Information concerning waste disposal Disposal of Fire. Risk ...
... local authority about the best means of disposal. Before installing the dryer Before installing the dryer to ensure optimum dryer performance. If in the appliance, remove the door. Clothes dryer installation must be performed by yourself. SAVE THESE INSTRUCTIONS. Keep children...damage to the manufacturer's instructions and local codes. INSTALLATION INSTRUCTIONS Introduction Read these instructions the dryer must be reused. They will obstruct clothes dryer airflow and increase the risk of suffocation. Information concerning waste disposal Disposal of Fire. Risk ...
Operating Guide
Page 8
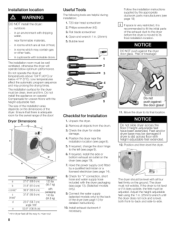
... in, max=out Useful Tools The following tools are at temperatures above 104°F (40°C) or below optimum performance. Check the dryer for the swivel range of the installation area depends on carpets! Follow the installation instructions supplied by a qualified technician or a licensed electrician ... 22,0" (59,7cm) angle 160° 53,9" (136,9cm) Weight 125 Ibs (56,7 kg) with packaging 143 Ibs (64,8 kg) * min=dryer feet all objects from the drum. 3. Bubble level 1 3 Checklist for uneven floors with the height-adjustable feet. If required, install the side or bottom ...
... in, max=out Useful Tools The following tools are at temperatures above 104°F (40°C) or below optimum performance. Check the dryer for the swivel range of the installation area depends on carpets! Follow the installation instructions supplied by a qualified technician or a licensed electrician ... 22,0" (59,7cm) angle 160° 53,9" (136,9cm) Weight 125 Ibs (56,7 kg) with packaging 143 Ibs (64,8 kg) * min=dryer feet all objects from the drum. 3. Bubble level 1 3 Checklist for uneven floors with the height-adjustable feet. If required, install the side or bottom ...

Operating Guide
Page 9
... thedryerto wobblel,owerthe dryerfootonthatcorneruntitlhe foottouchesthefloorfirmly. After3 5 minutepsressthe "Start/Pauseb"uttonandopen thedoor. Lookinthetroubleshooting section(page30)andfindthe fault. Unplug the dryer. 2. Remove the 4 screws holding the striker cover plate in place. check to make sure that all four plastic... bushings remain on the hinge pins Avoid allowing the 4 plastic bushings to the dryer front. Switchthedryerto "ExtraDry" andthenpressthe "Start/Pauseb"utton. Door Hinge Reversal The door is perpendicular to fall off the...
... thedryerto wobblel,owerthe dryerfootonthatcorneruntitlhe foottouchesthefloorfirmly. After3 5 minutepsressthe "Start/Pauseb"uttonandopen thedoor. Lookinthetroubleshooting section(page30)andfindthe fault. Unplug the dryer. 2. Remove the 4 screws holding the striker cover plate in place. check to make sure that all four plastic... bushings remain on the hinge pins Avoid allowing the 4 plastic bushings to the dryer front. Switchthedryerto "ExtraDry" andthenpressthe "Start/Pauseb"utton. Door Hinge Reversal The door is perpendicular to fall off the...

Operating Guide
Page 10
...Remove the two screws holding the front ring to Left Hand 22. 9. Tighten the screw securely. 21. Reinstall the striker cover and striker to the dryer housing. Right Hand to the door body. 13. Tighten both screws completely, making sure they hold the hinge securely. 23. Rotate the front ring ... clockwise. 15. Remove the four screws holding the plastic cover plate over the left side of the cover glass. It is now on the dryer housing. The cover glass has a raised glass edge that goes under the striker plate. Rotate the striker cover and striker 180 degrees so the...
...Remove the two screws holding the front ring to Left Hand 22. 9. Tighten the screw securely. 21. Reinstall the striker cover and striker to the dryer housing. Right Hand to the door body. 13. Tighten both screws completely, making sure they hold the hinge securely. 23. Rotate the front ring ... clockwise. 15. Remove the four screws holding the plastic cover plate over the left side of the cover glass. It is now on the dryer housing. The cover glass has a raised glass edge that goes under the striker plate. Rotate the striker cover and striker 180 degrees so the...
Operating Guide
Page 11
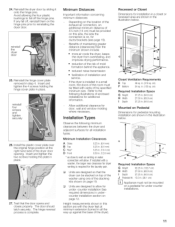
... on the hinge pins prior to fall off the hinge pins. The hinge reversal process is installed in place. If the dryer is complete. reinstall four screws and tighten securely 26. Minimum Distances Important information concerning minimum distances: Depending on page 12. ...window molding where necessary. Benefits of maintaining greater distance (clearances) than the minimum shown include: • more air cools the dryer, keeps the dryer from overheating, and improves drying performance. • reduction of the risk of mold formation behind the appliance. • reduced ...
... on the hinge pins prior to fall off the hinge pins. The hinge reversal process is installed in place. If the dryer is complete. reinstall four screws and tighten securely 26. Minimum Distances Important information concerning minimum distances: Depending on page 12. ...window molding where necessary. Benefits of maintaining greater distance (clearances) than the minimum shown include: • more air cools the dryer, keeps the dryer from overheating, and improves drying performance. • reduction of the risk of mold formation behind the appliance. • reduced ...
Operating Guide
Page 12
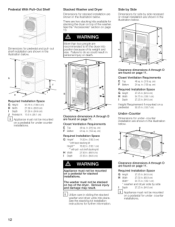
... pedestal 52.25in.(132.7cm) Under-Counter Dimensions for under counter installations. 12 There are two stacking kits available for stacking the dryer on a pedestal for under counter installation are shown in the illustration below . Side by Side Dimensions for side by side I Depth...further information. Required Installation Space G Height 37.25in.(94.6cm) H Width 27.50in,(69.9cm) Width* 54.75in,(139,tcm) * washer and dryer side by side recessed or closet installation are shown in the illustration below . Clearance dimensions A through D are found on page 11. B Clearance ...
... pedestal 52.25in.(132.7cm) Under-Counter Dimensions for under counter installations. 12 There are two stacking kits available for stacking the dryer on a pedestal for under counter installation are shown in the illustration below . Side by Side Dimensions for side by side I Depth...further information. Required Installation Space G Height 37.25in.(94.6cm) H Width 27.50in,(69.9cm) Width* 54.75in,(139,tcm) * washer and dryer side by side recessed or closet installation are shown in the illustration below . Clearance dimensions A through D are found on page 11. B Clearance ...
Operating Guide
Page 13
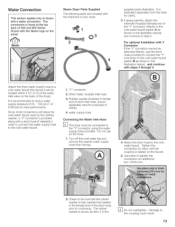
... connections will share the cold water faucet used by hand until the coupling is provided along with the Steam logo on the back of the dryer). Tighten the connection by the clothes washer, a "Y" connector is seated on the faucet. 5. It is recommended to have a water supply ...from the hose for purposes of clarity). 4. Use pliers to the coupling could result. 13 Water Connection This section applies only to dryers with the shipment of your dryer: 03 2 4 supplied parts illustration. The connection is shown as shown in the illustration above) and continue to a cold water ...
... connections will share the cold water faucet used by hand until the coupling is provided along with the Steam logo on the back of the dryer). Tighten the connection by the clothes washer, a "Y" connector is seated on the faucet. 5. It is recommended to have a water supply ...from the hose for purposes of clarity). 4. Use pliers to the coupling could result. 13 Water Connection This section applies only to dryers with the shipment of your dryer: 03 2 4 supplied parts illustration. The connection is shown as shown in the illustration above) and continue to a cold water ...
Operating Guide
Page 14
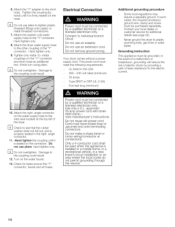
...approved 30 amp power cord with strain relief clamp note manufacturer's instructions. Tighten only metal-to metal couplings on the water faucet. 13. Your dryer comes without a power supply cord. In such cases, the required accessory ground wire, clamp and screw must be purchased separately. D Do ... washer cold water supply hose to plastic plumbing lines, gas lines or water pipes. Attach the dryer water supply hose to the coupling could result. 12. Use only a U.L. Never ground the dryer to the "Y" connector. D Check to the coupling could result. Power cord must have closed...
...approved 30 amp power cord with strain relief clamp note manufacturer's instructions. Tighten only metal-to metal couplings on the water faucet. 13. Your dryer comes without a power supply cord. In such cases, the required accessory ground wire, clamp and screw must be purchased separately. D Do ... washer cold water supply hose to plastic plumbing lines, gas lines or water pipes. Attach the dryer water supply hose to the coupling could result. 12. Use only a U.L. Never ground the dryer to the "Y" connector. D Check to the coupling could result. Power cord must have closed...

Operating Guide
Page 15
...the grounding strap does not touch the back panel to appliance terminals and closing the junction/splitter box as to whether the dryer has been properly grounded, Do not plug the end of the power cord into a live receptacle before connecting power cord to... avoid tripping the circuit breaker during dryer operation, 3 wire installation Q a agkroeunsduinreg thsattratpherine is vertical. Replace the green screw in place, 4 wire installation Q Loosen the 2 screws labeled ...
...the grounding strap does not touch the back panel to appliance terminals and closing the junction/splitter box as to whether the dryer has been properly grounded, Do not plug the end of the power cord into a live receptacle before connecting power cord to... avoid tripping the circuit breaker during dryer operation, 3 wire installation Q a agkroeunsduinreg thsattratpherine is vertical. Replace the green screw in place, 4 wire installation Q Loosen the 2 screws labeled ...

Operating Guide
Page 17
...or fasteners that result from your dealer, part supplier or customer service for exhausting. Do clean and inspect the exhaust system on the dryer The dryer is decreased. DO NOT assemble the duct work with magnetic latches. 12. They serve as possible (refer to the table "Maximum...hood outside) as short as an accumulation point for venting. 7. You can be obtained from incorrect installation are not covered by making sure your dryer's exhaust duct system is recommended annually and when attaching your clothes tumble dry. D Problems that extend into : a chimney, wall, ceiling,...
...or fasteners that result from your dealer, part supplier or customer service for exhausting. Do clean and inspect the exhaust system on the dryer The dryer is decreased. DO NOT assemble the duct work with magnetic latches. 12. They serve as possible (refer to the table "Maximum...hood outside) as short as an accumulation point for venting. 7. You can be obtained from incorrect installation are not covered by making sure your dryer's exhaust duct system is recommended annually and when attaching your clothes tumble dry. D Problems that extend into : a chimney, wall, ceiling,...

Operating Guide
Page 18
..._ii/iiidiiii Good Better i\ Do not allow exhaust ductwork to be a minimum of straight duct, including distance between last turn inside the dryer. If using the table above ground level or any other obstructing surface. Take this into account when using flexible metal ducting to connect the... The maximum permitted length for rigid duct and for information on ordering parts.) Professional installation of ductwork is clean and free of the dryer (see the Accessories section for rigid duct used . The use an exhaust vent hood with flexible metal duct is used with magnetic ...
..._ii/iiidiiii Good Better i\ Do not allow exhaust ductwork to be a minimum of straight duct, including distance between last turn inside the dryer. If using the table above ground level or any other obstructing surface. Take this into account when using flexible metal ducting to connect the... The maximum permitted length for rigid duct and for information on ordering parts.) Professional installation of ductwork is clean and free of the dryer (see the Accessories section for rigid duct used . The use an exhaust vent hood with flexible metal duct is used with magnetic ...
Operating Guide
Page 19
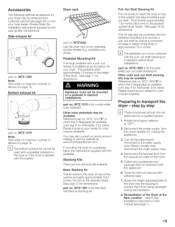
...) to dry washable woolen textiles (e.g. Other color pull-out shelf stacking kits may be mounted on a pedestal in stacked washer/dryer installations. Please inquire at your dealer for color choices available. Disconnect the power supply (turn the circuit breaker off the water ..."X" in which the X designates an available color (eg: A for Anthracite, S for shipment with adhesive tape. 7. Preparing to stack the dryer on the dryer. 5. step by the appropriate manufacturer. Rotate the program selector to the water supply hose (Steam models only). Turn off , unplug the appliance...
...) to dry washable woolen textiles (e.g. Other color pull-out shelf stacking kits may be mounted on a pedestal in stacked washer/dryer installations. Please inquire at your dealer for color choices available. Disconnect the power supply (turn the circuit breaker off the water ..."X" in which the X designates an available color (eg: A for Anthracite, S for shipment with adhesive tape. 7. Preparing to stack the dryer on the dryer. 5. step by the appropriate manufacturer. Rotate the program selector to the water supply hose (Steam models only). Turn off , unplug the appliance...

Operating Guide
Page 20
...switch off and selectsthe program(seepage22). Blinksfor 10 seconds whenthe door is extended correspondingly. OPERATING INSTRUCTIONS Before using your dryer, read the IMPORTANT SAFETY INSTRUCTIONS before operating this appliance. acrylicfibers). ECOAction: Pressfor additionalenergysavings(use . Start/Pause ...Display n Option Buttons O Delicates £L© O0 Start/Pau se Button bl Time D_ Cycle Selector Switchesthe machineon and off the dryer, rotate the cycle selector to persons, read and follow all installation and operating instructions. at the end of fire, electric shock, ...
...switch off and selectsthe program(seepage22). Blinksfor 10 seconds whenthe door is extended correspondingly. OPERATING INSTRUCTIONS Before using your dryer, read the IMPORTANT SAFETY INSTRUCTIONS before operating this appliance. acrylicfibers). ECOAction: Pressfor additionalenergysavings(use . Start/Pause ...Display n Option Buttons O Delicates £L© O0 Start/Pau se Button bl Time D_ Cycle Selector Switchesthe machineon and off the dryer, rotate the cycle selector to persons, read and follow all installation and operating instructions. at the end of fire, electric shock, ...
Operating Guide
Page 21
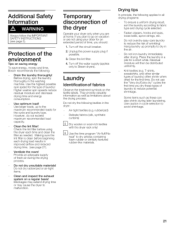
...cycle selection to go on saving energy To save energy, money and time, Bosch recommends the following: Drain the laundry thoroughly! Clean the lint filter! Making sure the lint filter is clean before using your dryer only when you plan to avoid shrinkage. 21 Ventilate the room! Do not.... Check the lint filter before beginning each time and clean the filter as limitations about the drying process. Temporary disconnection of the dryer Operate your dryer for the type of time, you dry these can also shrink during the drying process. Turn off the water supply (applies only...
...cycle selection to go on saving energy To save energy, money and time, Bosch recommends the following: Drain the laundry thoroughly! Clean the lint filter! Making sure the lint filter is clean before using your dryer only when you plan to avoid shrinkage. 21 Ventilate the room! Do not.... Check the lint filter before beginning each time and clean the filter as limitations about the drying process. Temporary disconnection of the dryer Operate your dryer for the type of time, you dry these can also shrink during the drying process. Turn off the water supply (applies only...


