

Operating Guide
Page 2
...tumbling. Constant monitoring ensures the lowest energy usage possible, cutting consumption by side, transferring your damp laundry to reduce odor. Only Bosch Vision can offer a one hour of intermittent tumbling, preventing creases from T shirts to ensure proper drying. Washer and dryer doors ... that illuminates should the filter need immediate cleaning. Wrinkle Block® gives you can be installed virtually anywhere in and, ultimately, reducing ironing time. Stainless Steel Drum Bosch dryers feature smooth, stainless steel drums for the gentlest of care. 160 ° Door ...
...tumbling. Constant monitoring ensures the lowest energy usage possible, cutting consumption by side, transferring your damp laundry to reduce odor. Only Bosch Vision can offer a one hour of intermittent tumbling, preventing creases from T shirts to ensure proper drying. Washer and dryer doors ... that illuminates should the filter need immediate cleaning. Wrinkle Block® gives you can be installed virtually anywhere in and, ultimately, reducing ironing time. Stainless Steel Drum Bosch dryers feature smooth, stainless steel drums for the gentlest of care. 160 ° Door ...

Operating Guide
Page 3
... 22 Options (Delicates, ECO Action 22 LED indicators of Contents Definitions 4 IMPORTANT SAFETY INSTRUCTIONS 5 GROUNDING INSTRUCTIONS 6 INSTALLATION INSTRUCTIONS 7 Introduction 7 Information concerning waste disposal 7 Before installing the dryer 7 Checklist for Installation 8 Installation Location 8 Dryer Dimensions 8 Door Hinge Reversal 9 Installation Types 11 Electrical connection 14 Exhaust air connection 17 Accessories 19 Preparing to transport the dryer - Table...
... 22 Options (Delicates, ECO Action 22 LED indicators of Contents Definitions 4 IMPORTANT SAFETY INSTRUCTIONS 5 GROUNDING INSTRUCTIONS 6 INSTALLATION INSTRUCTIONS 7 Introduction 7 Information concerning waste disposal 7 Before installing the dryer 7 Checklist for Installation 8 Installation Location 8 Dryer Dimensions 8 Door Hinge Reversal 9 Installation Types 11 Electrical connection 14 Exhaust air connection 17 Accessories 19 Preparing to transport the dryer - Table...

Operating Guide
Page 4
... with two different display types. 300 and 500 Series dryers have an LED display 800 Series dryers have any questions, especially concerning installation of this warning. If you . Further information and a selection of 10 minutes) Wrinkle Block® feature tumbles clothes periodically for...60 minute cycles 800 Series Dryer: 10 to 150 minutes (in increments of our products can be happy to important information. 4 CAUTION- Bosch dryers offer the following standard features: High efficiency precision drying system Large stainless steel drum with a capacity of up to 17.6 Ibs (8...
... with two different display types. 300 and 500 Series dryers have an LED display 800 Series dryers have any questions, especially concerning installation of this warning. If you . Further information and a selection of 10 minutes) Wrinkle Block® feature tumbles clothes periodically for...60 minute cycles 800 Series Dryer: 10 to 150 minutes (in increments of our products can be happy to important information. 4 CAUTION- Bosch dryers offer the following standard features: High efficiency precision drying system Large stainless steel drum with a capacity of up to 17.6 Ibs (8...

Operating Guide
Page 5
...the drum is the responsibility of the machine and exhaust duct should be cleaned periodically by grasping the plug, not the cord. 24. Bosch dryers are instructed in safe practices by qualified persons. 5. Do not allow children to catch fire. 3. Gasoline, combustible materials and ... time; To avoid fire hazards, do not use fabric softeners or products to ensure that could result. Items contaminated with Operating, Care and Installation Instructions. 2. Do not allow anyone to a chemical reaction that pose a fire hazard must only be placed in your dryer, follow basic ...
...the drum is the responsibility of the machine and exhaust duct should be cleaned periodically by grasping the plug, not the cord. 24. Bosch dryers are instructed in safe practices by qualified persons. 5. Do not allow children to catch fire. 3. Gasoline, combustible materials and ... time; To avoid fire hazards, do not use fabric softeners or products to ensure that could result. Items contaminated with Operating, Care and Installation Instructions. 2. Do not allow anyone to a chemical reaction that pose a fire hazard must only be placed in your dryer, follow basic ...
Operating Guide
Page 6
.... 32. Notes: A The IMPORTANT SAFEGUARDS and WARNINGS presented in this dryer. GROUNDING INSTRUCTIONS This appliance must be exercised when installing, maintaining or operating the dryer. Check with all water connections to the manufacturer's instructions may OCCUr. If it will reduce ... on a regular basis to whether the dryer is a potential fire hazard. 30. C Follow the Safety Information provided in the INSTALLATION INSTRUCTIONS and the OPERATING INSTRUCTIONS. NOT modify the plug provided with the dryer. KEEP THESE INSTRUCTIONS FOR FUTURE REFERENCE. inappropriate objects can...
.... 32. Notes: A The IMPORTANT SAFEGUARDS and WARNINGS presented in this dryer. GROUNDING INSTRUCTIONS This appliance must be exercised when installing, maintaining or operating the dryer. Check with all water connections to the manufacturer's instructions may OCCUr. If it will reduce ... on a regular basis to whether the dryer is a potential fire hazard. 30. C Follow the Safety Information provided in the INSTALLATION INSTRUCTIONS and the OPERATING INSTRUCTIONS. NOT modify the plug provided with the dryer. KEEP THESE INSTRUCTIONS FOR FUTURE REFERENCE. inappropriate objects can...
Operating Guide
Page 7
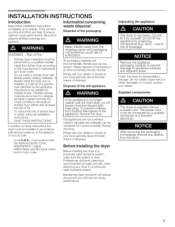
.... Valuable raw materials can be reused. Professional ductwork cleaning is recommended annually and also when attaching your dealer. Do not install a dryer which is supplied without a power cord. Thepower cord must be performed by the appliance manufacturer as suitable for transportation...and increase the risk of fire. Flexible venting materials are not worthless rubbish! SAVE THESE INSTRUCTIONS. In addition to these installation instructions completely and carefully. Please dispose of packaging in doubt, contact your dryer to the manufacturer's instructions and local codes...
.... Valuable raw materials can be reused. Professional ductwork cleaning is recommended annually and also when attaching your dealer. Do not install a dryer which is supplied without a power cord. Thepower cord must be performed by the appliance manufacturer as suitable for transportation...and increase the risk of fire. Flexible venting materials are not worthless rubbish! SAVE THESE INSTRUCTIONS. In addition to these installation instructions completely and carefully. Please dispose of packaging in doubt, contact your dryer to the manufacturer's instructions and local codes...
Operating Guide
Page 8
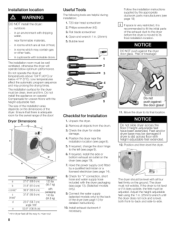
... the power supply cord fitted by the appropriate ductwork parts manufacturers (see page 9). 6. Risk of frost, in rooms which are helpful during installation: 1. Do not push against the dryer door glass. Do not slide dryer across floor with height-adjustable feet extended. 12. Low temperatures...very restricted, it does wobble, the feet must be level with all objects from the drum. 3. Unpack the dryer. 2. Follow the installation instructions supplied by a qualified technician or a licensed electrician (see page 14). , Check for "Y" connection, short hose and water supply hose...
... the power supply cord fitted by the appropriate ductwork parts manufacturers (see page 9). 6. Risk of frost, in rooms which are helpful during installation: 1. Do not push against the dryer door glass. Do not slide dryer across floor with height-adjustable feet extended. 12. Low temperatures...very restricted, it does wobble, the feet must be level with all objects from the drum. 3. Unpack the dryer. 2. Follow the installation instructions supplied by a qualified technician or a licensed electrician (see page 14). , Check for "Y" connection, short hose and water supply hose...

Operating Guide
Page 10
... front ring. Tighten both screws completely, making sure they hold the hinge securely. 23. 9. Remove the four screws holding the metal door hinge to the install area on the inside of the cover glass. Reinsert and tighten the four front ring screws. 10. Flip the door over so the back faces...
... front ring. Tighten both screws completely, making sure they hold the hinge securely. 23. 9. Remove the four screws holding the metal door hinge to the install area on the inside of the cover glass. Reinsert and tighten the four front ring screws. 10. Flip the door over so the back faces...
Operating Guide
Page 11
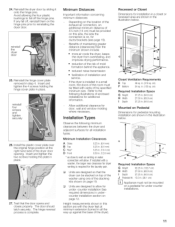
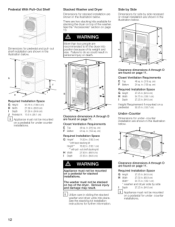
... the following minimum clearances between the dryer and adjacent surfaces for additional information. Recessed or Closet Dimensions for under-counter installation See required dimensions in the illustration below . Units are designed to allow If installedwith a washer,the larger rearclearancefor dryer... ventingis requiredfor the laundrypair Units are shown in . (94.6cm) Mounted on this section are shown in under counter installations. 11 in a small room, the doors of the dryer door opening. reinstall the dryer door 25. The hinge reversal process...
... the following minimum clearances between the dryer and adjacent surfaces for additional information. Recessed or Closet Dimensions for under-counter installation See required dimensions in the illustration below . Units are designed to allow If installedwith a washer,the larger rearclearancefor dryer... ventingis requiredfor the laundrypair Units are shown in . (94.6cm) Mounted on this section are shown in under counter installations. 11 in a small room, the doors of the dryer door opening. reinstall the dryer door 25. The hinge reversal process...
Operating Guide
Page 12
...result in persona njury or death. Closet Ventilation Requirements E Top F Bottom 48 sq, in. (310 sq,cm) 24 sq, in, (155 sq,cm) Required Installation Space G Height* 74.50 in, (189,3 cm) * with basicstackingkit Height** 76.02 in, (t93,1 cm) **with pull-out shelfstackingkit H Width 27....50 in, (69.9cm) I Depth 37.25in.(94.6cm) D Appliance must not be mounted on a pedestal for stacked installations. Required Installation Space G Height 37.25in.(94.6cm) H Width 27.50in,(69.9cm) Width* 54.75in,(139,tcm) * washer and dryer side by side ...
...result in persona njury or death. Closet Ventilation Requirements E Top F Bottom 48 sq, in. (310 sq,cm) 24 sq, in, (155 sq,cm) Required Installation Space G Height* 74.50 in, (189,3 cm) * with basicstackingkit Height** 76.02 in, (t93,1 cm) **with pull-out shelfstackingkit H Width 27....50 in, (69.9cm) I Depth 37.25in.(94.6cm) D Appliance must not be mounted on a pedestal for stacked installations. Required Installation Space G Height 37.25in.(94.6cm) H Width 27.50in,(69.9cm) Width* 54.75in,(139,tcm) * washer and dryer side by side ...
Operating Guide
Page 13
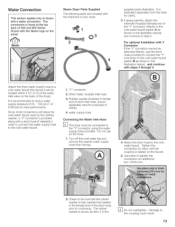
... short hose provided to connect the "Y" connector to the cold water faucet (option B as shown in the illustration above) and continue to step 6 For optional Installation with a short hose (if needed) in the D Do not overtighten. water supply hose Connecting the Water Inlet Hose D The dryer must be connected to the...
... short hose provided to connect the "Y" connector to the cold water faucet (option B as shown in the illustration above) and continue to step 6 For optional Installation with a short hose (if needed) in the D Do not overtighten. water supply hose Connecting the Water Inlet Hose D The dryer must be connected to the...
Operating Guide
Page 14
... leaks around the "Y" connector, faucet and all hoses. Grounding instruction This appliance must be connected by hand) until it is installed in a mobile home, in a recreational vehicle, in a new branch circuit installation or an area where the local codes do not permit grounding through the neutral. 14 Attach the "Y" adapter to tighten...
... leaks around the "Y" connector, faucet and all hoses. Grounding instruction This appliance must be connected by hand) until it is installed in a mobile home, in a recreational vehicle, in a new branch circuit installation or an area where the local codes do not permit grounding through the neutral. 14 Attach the "Y" adapter to tighten...

Operating Guide
Page 15
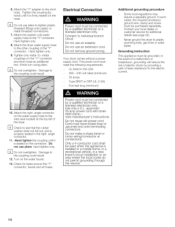
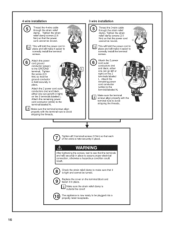
... on the terminal block. Tighten the nut to the angle bracket. Also loosen the screw on the GROUND terminal. 3 wire installation Q oosen the 2 screws labeled L and the single screw labeled N on the terminal block. terminal bmock grounding strap strain ...top rear of the power cord into a live receptacle before connecting power cord to avoid tripping the circuit breaker during dryer operation, 3 wire installation Q a agkroeunsduinreg thsattratpherine is vertical. Replace the green screw in doubt as to 0 the ground terminal. Connecting the Power Supply (3 wire ...
... on the terminal block. Tighten the nut to the angle bracket. Also loosen the screw on the GROUND terminal. 3 wire installation Q oosen the 2 screws labeled L and the single screw labeled N on the terminal block. terminal bmock grounding strap strain ...top rear of the power cord into a live receptacle before connecting power cord to avoid tripping the circuit breaker during dryer operation, 3 wire installation Q a agkroeunsduinreg thsattratpherine is vertical. Replace the green screw in doubt as to 0 the ground terminal. Connecting the Power Supply (3 wire ...
Operating Guide
Page 16
...Attach the 2 power cord outer conductors (red and black, either one can go left or right) on the 2 terminals labeled L. m 3 wire installation ® Thread the 3-wire cable through the strain relief clamp. f_3 _'_, _Ji!__ _ This will hold the power cord in place and will... Make sure the strain relief clamp is hteigchkt tahned sctraaninotrelibeef tuclranmedp. D Make sure the terminal screws align properly with the terminal nuts to correctly install the terminal screws, ® Attach the 2 power cord outer conductors (red and black, either one can go left or right) on the...
...Attach the 2 power cord outer conductors (red and black, either one can go left or right) on the 2 terminals labeled L. m 3 wire installation ® Thread the 3-wire cable through the strain relief clamp. f_3 _'_, _Ji!__ _ This will hold the power cord in place and will... Make sure the strain relief clamp is hteigchkt tahned sctraaninotrelibeef tuclranmedp. D Make sure the terminal screws align properly with the terminal nuts to correctly install the terminal screws, ® Attach the 2 power cord outer conductors (red and black, either one can go left or right) on the...

Operating Guide
Page 17
... or any other wildlife. 11. DO NOT exhaust the dryer into the duct. at least once each duct section must point away from incorrect installation are illustrated below. DO NOT use of birds or other ductwork used for either connection type (see page 18). 3. They serve as an ... the undersideof the appliance(optional) Special exhaust air connections can shorten drying times, save energy and help ensure the safety of elbows needed when installing the exhaust duct system. You can be used exhaust duct system. Metal foil and flexible metal ducting are NOT the same. 4. The exhaust...
... or any other wildlife. 11. DO NOT exhaust the dryer into the duct. at least once each duct section must point away from incorrect installation are illustrated below. DO NOT use of birds or other ductwork used for either connection type (see page 18). 3. They serve as an ... the undersideof the appliance(optional) Special exhaust air connections can shorten drying times, save energy and help ensure the safety of elbows needed when installing the exhaust duct system. You can be used exhaust duct system. Metal foil and flexible metal ducting are NOT the same. 4. The exhaust...

Operating Guide
Page 18
... 2 48 ft. 29 ft. (1463cm) (884 cm) 3 39 ft. 22 ft. (1189cm) (671 cm) 4 30ft. (914cm) 16ft. (488 cm) Note: Side and bottom exhaust installations have a 90 °turn and exhaust hood. Longer ductwork will reduce airflow and will reduce airflow and result in standard delivery of flexible metal duct... reduced if flexible ducting is not crushed or constricted. The maximum permitted length for rigid duct and for information on ordering parts.) Professional installation of ductwork is clean and free of straight duct, including distance between last turn inside the dryer.
... 2 48 ft. 29 ft. (1463cm) (884 cm) 3 39 ft. 22 ft. (1189cm) (671 cm) 4 30ft. (914cm) 16ft. (488 cm) Note: Side and bottom exhaust installations have a 90 °turn and exhaust hood. Longer ductwork will reduce airflow and will reduce airflow and result in standard delivery of flexible metal duct... reduced if flexible ducting is not crushed or constricted. The maximum permitted length for rigid duct and for information on ordering parts.) Professional installation of ductwork is clean and free of straight duct, including distance between last turn inside the dryer.
Operating Guide
Page 19
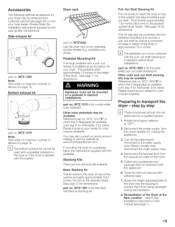
...7). 19 D The bottom exhaust kit cannot be performed by the appropriate manufacturer. Pedestal Mounting Kit A storage pedestal with a pedestal installed on the dryer. 5. Appliance must not be combined with the pedestal. Other color pull-out shelf stacking kits may also consult... white pull-out shelf stacking kit. Bottom exhaust kit part no . D The pedestal can not be mounted on a pedestal, follow the installation instructions supplied by a qualified person. 1. WTZ 1600 is available as a combined increase in which the X designates an available color (eg:...
...7). 19 D The bottom exhaust kit cannot be performed by the appropriate manufacturer. Pedestal Mounting Kit A storage pedestal with a pedestal installed on the dryer. 5. Appliance must not be combined with the pedestal. Other color pull-out shelf stacking kits may also consult... white pull-out shelf stacking kit. Bottom exhaust kit part no . D The pedestal can not be mounted on a pedestal, follow the installation instructions supplied by a qualified person. 1. WTZ 1600 is available as a combined increase in which the X designates an available color (eg:...

Operating Guide
Page 20
... Start/Pau se Button bl Time D_ Cycle Selector Switchesthe machineon and off the dryer, rotate the cycle selector to persons, read and follow all installation and operating instructions. Blinksfor 10 seconds whenthe door is extended correspondingly. To switch off and selectsthe program(seepage22). ECOAction: Pressfor additionalenergysavings(use . Start/Pause Button...
... Start/Pau se Button bl Time D_ Cycle Selector Switchesthe machineon and off the dryer, rotate the cycle selector to persons, read and follow all installation and operating instructions. Blinksfor 10 seconds whenthe door is extended correspondingly. To switch off and selectsthe program(seepage22). ECOAction: Pressfor additionalenergysavings(use . Start/Pause Button...

Operating Guide
Page 31
... minuntes,thenscrubthe nozzletip gentlywith a toothbrushto removeresidue. Unusuanl oise: thumpingsound Faultin programsequenceor malfunction. Laundrydetectedin drum duringwool program (laundrynoton rack) Drumsuspensionrollersneedtime to 3 minutesof dryeruse Levelthe dryer(seeusermanualsection"Installation Instructons" Stopdryer,separateloaditems, restartdryer. Noaction required.As suspensionsystemrollers warm up thumpingwill decreaseand shouldstop within 2 to warm up. Lightwill stop blinking. Rinsethe nozzleand reinsertit backinto the...
... minuntes,thenscrubthe nozzletip gentlywith a toothbrushto removeresidue. Unusuanl oise: thumpingsound Faultin programsequenceor malfunction. Laundrydetectedin drum duringwool program (laundrynoton rack) Drumsuspensionrollersneedtime to 3 minutesof dryeruse Levelthe dryer(seeusermanualsection"Installation Instructons" Stopdryer,separateloaditems, restartdryer. Noaction required.As suspensionsystemrollers warm up thumpingwill decreaseand shouldstop within 2 to warm up. Lightwill stop blinking. Rinsethe nozzleand reinsertit backinto the...

Operating Guide
Page 32
... 9999xxxxxxxxxxxxxx j .... SERVICE and REPAIR WARNING - Please be sure to include (if writing) or have received: First, please contact your installer or the Bosch Authorized Service Contractor in your dryer, please refer to make changes in the Cleaning and Care section. The manufacturer reserves the right to...servicing. The serial number is shown below. If you are having a problem with your Bosch dryer and are having a problem with your area and explain to your dealer or installer or an authorized service center. An example is located below shows the approximate location of...
... 9999xxxxxxxxxxxxxx j .... SERVICE and REPAIR WARNING - Please be sure to include (if writing) or have received: First, please contact your installer or the Bosch Authorized Service Contractor in your dryer, please refer to make changes in the Cleaning and Care section. The manufacturer reserves the right to...servicing. The serial number is shown below. If you are having a problem with your Bosch dryer and are having a problem with your area and explain to your dealer or installer or an authorized service center. An example is located below shows the approximate location of...
