The Bose® Lifestyle® amplifier - Owner's guide
Page 15
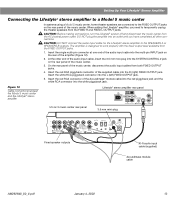
...~ POWER 12VAC IN 1.0A ANTENNA SEE INSTRUCTION MANUAL Fixed speaker outputs 30-ft audio input cable (supplied) Acoustimass module cable AM262840_00_V.pdf January 4, 2002 13 When adding the Lifestyle® amplifier, you have completed all other end of the audio input cable, insert the 3.5.... Insert the red RCA piggyback connector of the Acoustimass® module cable into the red piggyback jack and the white RCA connector into the L (left) FIXED OUTPUT jack. 5. Setting Up Your Lifestyle® Stereo Amplifier Connecting the Lifestyle® stereo amplifier to a Model ...
...~ POWER 12VAC IN 1.0A ANTENNA SEE INSTRUCTION MANUAL Fixed speaker outputs 30-ft audio input cable (supplied) Acoustimass module cable AM262840_00_V.pdf January 4, 2002 13 When adding the Lifestyle® amplifier, you have completed all other end of the audio input cable, insert the 3.5.... Insert the red RCA piggyback connector of the Acoustimass® module cable into the red piggyback jack and the white RCA connector into the L (left) FIXED OUTPUT jack. 5. Setting Up Your Lifestyle® Stereo Amplifier Connecting the Lifestyle® stereo amplifier to a Model ...
The Bose® Lifestyle® amplifier - Owner's guide
Page 18
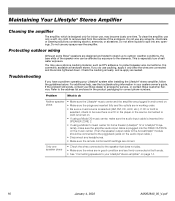
...correct. Do not use only a soft, dry cloth to the piggyback jacks on the music center. (Then the speaker output cable to the Acoustimass® module should be connected to remove dust from the outside of the speaker wire can be sure there is a CD in the player or the ... • See "Connecting speakers to your Bose dealer to do use a silicone caulking material, such as needed. If you have a problem operating your system owner's guide. Problem What to arrange for indoor use, may use caulking, apply it only after installing the Lifestyle® stereo amplifier, follow the...
...correct. Do not use only a soft, dry cloth to the piggyback jacks on the music center. (Then the speaker output cable to the Acoustimass® module should be connected to remove dust from the outside of the speaker wire can be sure there is a CD in the player or the ... • See "Connecting speakers to your Bose dealer to do use a silicone caulking material, such as needed. If you have a problem operating your system owner's guide. Problem What to arrange for indoor use, may use caulking, apply it only after installing the Lifestyle® stereo amplifier, follow the...
Owner's guide
Page 2
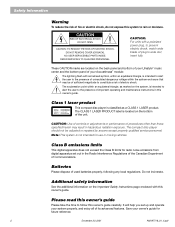
... LASER PRODUKT LASER LAITE LASER APPARAT This compact disc player is located on the back panel and bottom of your Lifestyle® music center and the bottom panel of your Acoustimass® module: The lightning flash with a polarized power plug, to the presence of its advanced features. CAUTION: For units with arrowhead symbol...
... LASER PRODUKT LASER LAITE LASER APPARAT This compact disc player is located on the back panel and bottom of your Lifestyle® music center and the bottom panel of your Acoustimass® module: The lightning flash with a polarized power plug, to the presence of its advanced features. CAUTION: For units with arrowhead symbol...
Owner's guide
Page 5
... this owner's guide. December 20, 2001 3 Lifestyle® music center serial number Acoustimass module serial number Dealer name Dealer phone Purchase date We suggest you begin ...4 Unpack the carton ...5 Select the locations for your Lifestyle® 25 system 6 Connect the speakers and music center 8...dual voltage systems 14 Operating Your Lifestyle® 25 System Turn on the bottom of the music center and the bottom panel of your Lifestyle® 25 system 28 Product Information Technical information 29 Accessories ...29 Index ...30 Bose® Corporation inside back cover ...
... this owner's guide. December 20, 2001 3 Lifestyle® music center serial number Acoustimass module serial number Dealer name Dealer phone Purchase date We suggest you begin ...4 Unpack the carton ...5 Select the locations for your Lifestyle® 25 system 6 Connect the speakers and music center 8...dual voltage systems 14 Operating Your Lifestyle® 25 System Turn on the bottom of the music center and the bottom panel of your Lifestyle® 25 system 28 Product Information Technical information 29 Accessories ...29 Index ...30 Bose® Corporation inside back cover ...
Owner's guide
Page 6
... To select surround-encoded material, look for purchasing the Bose® Lifestyle® 25 system. When sound is recorded in SURROUND (5-speaker) mode, whether the program is produced in AM/FM radio and six-disc CD changer • Powered Acoustimass® speakers with a hide-away Acoustimass module • An easy-to-use remote control • Inputs...
... To select surround-encoded material, look for purchasing the Bose® Lifestyle® 25 system. When sound is recorded in SURROUND (5-speaker) mode, whether the program is produced in AM/FM radio and six-disc CD changer • Powered Acoustimass® speakers with a hide-away Acoustimass module • An easy-to-use remote control • Inputs...
Owner's guide
Page 7
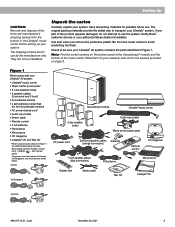
... CD AM antenna THE BOSE SPECIAL EDITION LIFESTYLE MUSIC SYSTEM CD ® Lifestyle® CD Australia AM187718_01_V.pdf December 20, 2001 5 Unpack the carton Carefully unpack your Lifestyle® 25 system: • Lifestyle® music center • Music center power pack* • 5 cube speaker arrays • 5 speaker cables (2 surround and 3 front) • Acoustimass module • 4 self-adhesive rubber...
... CD AM antenna THE BOSE SPECIAL EDITION LIFESTYLE MUSIC SYSTEM CD ® Lifestyle® CD Australia AM187718_01_V.pdf December 20, 2001 5 Unpack the carton Carefully unpack your Lifestyle® 25 system: • Lifestyle® music center • Music center power pack* • 5 cube speaker arrays • 5 speaker cables (2 surround and 3 front) • Acoustimass module • 4 self-adhesive rubber...
Owner's guide
Page 8
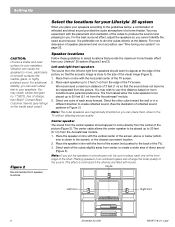
...on smooth surfaces like marble, glass, or highly polished wood. For more discussion of the cubes slightly away from Bose®. CAUTION: Choose a stable and level surface for your Lifestyle® 25 system When you can add rubber feet to come directly from the center of the visual image (Figure 2). ... picture. Place each array forward. Direct one at the front edge of the picture, so that the sound does not become too separated from the Acoustimass module. 1. Placing speakers in line with the front of the screen (not pushed to 20 feet (6.1 m) from the edge of the sound. Figure...
...on smooth surfaces like marble, glass, or highly polished wood. For more discussion of the cubes slightly away from Bose®. CAUTION: Choose a stable and level surface for your Lifestyle® 25 system When you can add rubber feet to come directly from the center of the visual image (Figure 2). ... picture. Place each array forward. Direct one at the front edge of the picture, so that the sound does not become too separated from the Acoustimass module. 1. Placing speakers in line with the front of the screen (not pushed to 20 feet (6.1 m) from the edge of the sound. Figure...
Owner's guide
Page 9
... lift the door and to your ear, the better. Place the speakers at the listener. Left surround Right surround 3. Figure 4 Acoustimass module positions Preferred ® position Treble Bass Alternate position ® RIGHT REAR LEFT REAR RIGHT FRONT CENTER LEFT FRONT CUOBUETSPPUETASKTEORS ® ®...room. For proper ventilation, place it within 30 feet (9.1 m) of the Acoustimass module (the length of your dealer or call Bose® customer service. 3. Note: Once you do not place the module so that you have been removed before proceeding. 1. The rubber feet provide ...
... lift the door and to your ear, the better. Place the speakers at the listener. Left surround Right surround 3. Figure 4 Acoustimass module positions Preferred ® position Treble Bass Alternate position ® RIGHT REAR LEFT REAR RIGHT FRONT CENTER LEFT FRONT CUOBUETSPPUETASKTEORS ® ®...room. For proper ventilation, place it within 30 feet (9.1 m) of the Acoustimass module (the length of your dealer or call Bose® customer service. 3. Note: Once you do not place the module so that you have been removed before proceeding. 1. The rubber feet provide ...

Owner's guide
Page 10
...input cable into the matching left surround and right surround jacks. Note: Be sure that affect proper operation of wire from the Acoustimass module, simply pull apart the cables as possible, since it includes an antenna for your speakers and music center, connect the system...of your dealer, electronics store, or call Bose® customer service. Bridged wires create short circuits that each wire to its corresponding terminal red to red (+ to +) and black to -). Connecting the Acoustimass module to the music center Connect the module to the music center with L, R, and...
...input cable into the matching left surround and right surround jacks. Note: Be sure that affect proper operation of wire from the Acoustimass module, simply pull apart the cables as possible, since it includes an antenna for your speakers and music center, connect the system...of your dealer, electronics store, or call Bose® customer service. Bridged wires create short circuits that each wire to its corresponding terminal red to red (+ to +) and black to -). Connecting the Acoustimass module to the music center Connect the module to the music center with L, R, and...
Owner's guide
Page 11
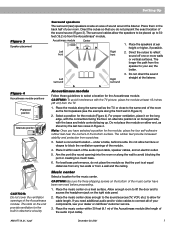
... power cord into SPEAKER ZONE 1 Power jack Audio input cable L TAPE IN RL R TAPE OUT AC power pack Figure 7 Dual voltage Acoustimass module: voltage selector switch settings 230 V 115 V CAUTION: Make sure the voltage selector switch is set for the appropriate voltage setting. 2. Using...dual voltage Acoustimass module, the voltage selector switch is not set correctly. Plug the small end of the Lifestyle® music center. 2. Connecting the music center power pack The Lifestyle® music center comes with either a 100V, 120V, 230V, or 240V power pack. Use only the Bose® ...
... power cord into SPEAKER ZONE 1 Power jack Audio input cable L TAPE IN RL R TAPE OUT AC power pack Figure 7 Dual voltage Acoustimass module: voltage selector switch settings 230 V 115 V CAUTION: Make sure the voltage selector switch is set for the appropriate voltage setting. 2. Using...dual voltage Acoustimass module, the voltage selector switch is not set correctly. Plug the small end of the Lifestyle® music center. 2. Connecting the music center power pack The Lifestyle® music center comes with either a 100V, 120V, 230V, or 240V power pack. Use only the Bose® ...
Owner's guide
Page 15
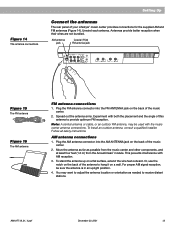
Follow all safety instructions. To stand the antenna up on the back of your Lifestyle® music center provides connections for the supplied AM and FM antennas (Figure 14). You may be sure the antenna is in an upright position. 4. ... want to adjust the antenna location or orientation as possible from the music center and other components, and at least four feet (1.2 m) from the Acoustimass® module. AM antenna connections 1. Move the antenna as far as needed to provide optimum FM reception. AM187718_01_V.pdf December 20, 2001 13 Antennas provide better reception...
Follow all safety instructions. To stand the antenna up on the back of your Lifestyle® music center provides connections for the supplied AM and FM antennas (Figure 14). You may be sure the antenna is in an upright position. 4. ... want to adjust the antenna location or orientation as possible from the music center and other components, and at least four feet (1.2 m) from the Acoustimass® module. AM antenna connections 1. Move the antenna as far as needed to provide optimum FM reception. AM187718_01_V.pdf December 20, 2001 13 Antennas provide better reception...
Owner's guide
Page 17
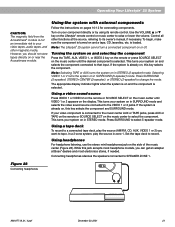
... removed before turning on the music center. Turning the system off • Press the ON/OFF key on the music center functions. Operating Your Lifestyle® 25 System CAUTION: Be sure the three shipping screws on the bottom of the door (Figure 18). • To play compact discs, follow the...center power pack. Press MUTE ALL to restore volume to the radio, follow the instructions on pages 18 and 19. To verify your Lifestyle® 25 system Plug the Acoustimass® module power cord into an AC power (mains) outlet. Or, press ON/OFF or SOURCE SELECT on the remote (CD, AM/FM...
... removed before turning on the music center. Turning the system off • Press the ON/OFF key on the music center functions. Operating Your Lifestyle® 25 System CAUTION: Be sure the three shipping screws on the bottom of the door (Figure 18). • To play compact discs, follow the...center power pack. Press MUTE ALL to restore volume to the radio, follow the instructions on pages 18 and 19. To verify your Lifestyle® 25 system Plug the Acoustimass® module power cord into an AC power (mains) outlet. Or, press ON/OFF or SOURCE SELECT on the remote (CD, AM/FM...
Owner's guide
Page 23
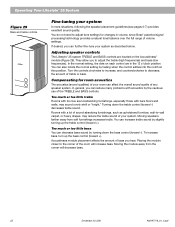
Operating Your Lifestyle® 25 System CAUTION: The magnetic field from the Acoustimass® module is not an immediate risk to your video tapes, audio tapes, and other functions at Bose® dealers and most headphone models, you can get an adapter at the source, referring to its remote ... side of the music center (Figure 28). Using headphones For headphone listening, use the stereo mini headphones jack on or near the Acoustimass module. Figure 28 Connecting headphones ® AM187718_01_V.pdf December 20, 2001 21 However, you want to change the mode. Control all other...
Operating Your Lifestyle® 25 System CAUTION: The magnetic field from the Acoustimass® module is not an immediate risk to your video tapes, audio tapes, and other functions at Bose® dealers and most headphone models, you can get an adapter at the source, referring to its remote ... side of the music center (Figure 28). Using headphones For headphone listening, use the stereo mini headphones jack on or near the Acoustimass module. Figure 28 Connecting headphones ® AM187718_01_V.pdf December 20, 2001 21 However, you want to change the mode. Control all other...
Owner's guide
Page 24
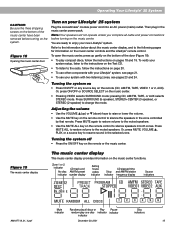
... 12 o'clock position. Rooms with a lot of sound-absorbing furnishings, such as described below. Acoustimass module placement affects the amount of the TREBLE and BASS controls. Placing the module closer to -wall carpet, or heavy drapes, may sound overly shrill or "bright." Too much... To increase bass, turn up the treble control (toward -). Adjusting speaker controls The Lifestyle® 25 system TREBLE and BASS controls are located on each control are in volume, since Bose® patented signal processing technology provides a natural tonal balance over the full range of ...
... 12 o'clock position. Rooms with a lot of sound-absorbing furnishings, such as described below. Acoustimass module placement affects the amount of the TREBLE and BASS controls. Placing the module closer to -wall carpet, or heavy drapes, may sound overly shrill or "bright." Too much... To increase bass, turn up the treble control (toward -). Adjusting speaker controls The Lifestyle® 25 system TREBLE and BASS controls are located on each control are in volume, since Bose® patented signal processing technology provides a natural tonal balance over the full range of ...
Owner's guide
Page 28
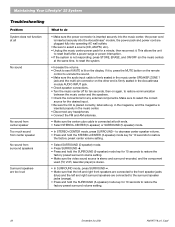
Maintaining Your Lifestyle® 25 System Troubleshooting Problem System does not function at all No sound No ...Make sure the power connector is inserted securely into the music center, the power cord is inserted securely into the Acoustimass® module, the power pack and power cord are connected to the surround speaker jacks (orange). • Press and hold...the music center SPEAKER ZONE 1 jack and the multi-pin connector on the other end is firmly seated in the Acoustimass module AUDIO INPUT jack. • Check speaker connections. • Turn the music center off for ten seconds, then on...
Maintaining Your Lifestyle® 25 System Troubleshooting Problem System does not function at all No sound No ...Make sure the power connector is inserted securely into the music center, the power cord is inserted securely into the Acoustimass® module, the power pack and power cord are connected to the surround speaker jacks (orange). • Press and hold...the music center SPEAKER ZONE 1 jack and the multi-pin connector on the other end is firmly seated in the Acoustimass module AUDIO INPUT jack. • Check speaker connections. • Turn the music center off for ten seconds, then on...
Owner's guide
Page 31
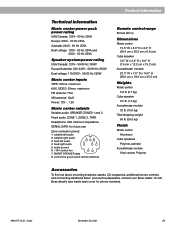
...) Cube speaker 3.0" W x 4.8" D x 6.0" H (7.6 cm x 12.2 cm x 15.2 cm) Acoustimass® module 23.3" W x 7.5" D x 14.0" H (59.0 cm x 19.0 cm x 35.5 cm) Weights Music center 5.9 lb (2.7 kg) Cube speaker 2.0 lb (1.0 kg) Acoustimass module 33 lb (15.0 kg) Total shipping weight 65 lb (29.5 kg) Finish Music center Aluminum Cube... speakers Polymer, painted Acoustimass module Vinyl veneer, Polymer Accessories To find out about mounting brackets, stands, CD magazines, additional remote controls, and connecting additional Bose® powered loudspeakers, contact your Bose dealer. Technical information ...
...) Cube speaker 3.0" W x 4.8" D x 6.0" H (7.6 cm x 12.2 cm x 15.2 cm) Acoustimass® module 23.3" W x 7.5" D x 14.0" H (59.0 cm x 19.0 cm x 35.5 cm) Weights Music center 5.9 lb (2.7 kg) Cube speaker 2.0 lb (1.0 kg) Acoustimass module 33 lb (15.0 kg) Total shipping weight 65 lb (29.5 kg) Finish Music center Aluminum Cube... speakers Polymer, painted Acoustimass module Vinyl veneer, Polymer Accessories To find out about mounting brackets, stands, CD magazines, additional remote controls, and connecting additional Bose® powered loudspeakers, contact your Bose dealer. Technical information ...

Owner's guide
Page 32
Index A accessories 29 Acoustimass® module 2-9, 13, 15, 21, 22, 26, 29 adapter plug 9 AM antenna 5, 13, 26, 29 AM/FM 4,...5, 18 center speaker 6, 26 cleaning 28 compact disc 15, 18 connections 8, 9, 11-13, 26, 27 controls 2, 7, 10, 16, 17, 22, 25, 29 cube speaker array 8, 29 cube speakers 6, 29 customer service 6, 8, 27 D display 10, 11, 14, 15, 18-21, 24-27 dual...14, 17, 20 error message 27 F FM antenna 5, 13, 29 front speakers 4, 6, 7, 26 H headphones 21, 26 house codes 14, 25 L laserdisc 10, 11, 26 laserdisc player 12 listening zone 8, 16, 23, 24 M magazine 5, 16, 18, 26, 27 music center ...
Index A accessories 29 Acoustimass® module 2-9, 13, 15, 21, 22, 26, 29 adapter plug 9 AM antenna 5, 13, 26, 29 AM/FM 4,...5, 18 center speaker 6, 26 cleaning 28 compact disc 15, 18 connections 8, 9, 11-13, 26, 27 controls 2, 7, 10, 16, 17, 22, 25, 29 cube speaker array 8, 29 cube speakers 6, 29 customer service 6, 8, 27 D display 10, 11, 14, 15, 18-21, 24-27 dual...14, 17, 20 error message 27 F FM antenna 5, 13, 29 front speakers 4, 6, 7, 26 H headphones 21, 26 house codes 14, 25 L laserdisc 10, 11, 26 laserdisc player 12 listening zone 8, 16, 23, 24 M magazine 5, 16, 18, 26, 27 music center ...

