User Manual
Page 2
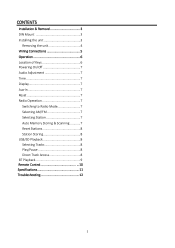
CONTENTS Installation & Removal 3 DIN Mount 3 Installing the unit 3 Removing the unit 4 Wiring Connections 5 Operation 6 Location of Keys 6 Powering On/Off 7 Audio Adjustment 7 Time 7 Display 7 Aux-In 7 Reset 7 Radio Operation 7 Switching to Radio Mode 7 Selecting AM/FM 7 Selecting Station 7 Auto Memory Storing & Scanning 7 Reset Stations 8 Station Storing 8 USB/SD Playback 8 Selecting Tracks 8 Play/Pause 8 Direct Track Access 8 BT Playback 9 Remote Control 10 Specifications 11 Troubleshooting 12 2
CONTENTS Installation & Removal 3 DIN Mount 3 Installing the unit 3 Removing the unit 4 Wiring Connections 5 Operation 6 Location of Keys 6 Powering On/Off 7 Audio Adjustment 7 Time 7 Display 7 Aux-In 7 Reset 7 Radio Operation 7 Switching to Radio Mode 7 Selecting AM/FM 7 Selecting Station 7 Auto Memory Storing & Scanning 7 Reset Stations 8 Station Storing 8 USB/SD Playback 8 Selecting Tracks 8 Play/Pause 8 Direct Track Access 8 BT Playback 9 Remote Control 10 Specifications 11 Troubleshooting 12 2
User Manual
Page 7
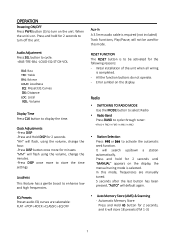
... once more to store the time settings Loudness This feature has a gentle boost to enhance low and high frequencies. Radio SWITCHING TO RADIO MODE Use the MODE button to select Radio Radio Band Press BAND to cycle through tuner: →FM1→ FM2→ FM3→ AM1→ AM2 &#..., frequencies are selectable: FLAT →POP→ROCK→CLASSIC→EQ OFF Aux-In A 3.5mm audio cable is required (not included) Track Functions, Play/Pause, will store 18 presets (FM 1-3) 7 Audio Adjustment Press SEL button to cycle. →BAS-TRE-BAL -LOUD-EQ-ST-DX-VOL BAS: Bass...
... once more to store the time settings Loudness This feature has a gentle boost to enhance low and high frequencies. Radio SWITCHING TO RADIO MODE Use the MODE button to select Radio Radio Band Press BAND to cycle through tuner: →FM1→ FM2→ FM3→ AM1→ AM2 &#..., frequencies are selectable: FLAT →POP→ROCK→CLASSIC→EQ OFF Aux-In A 3.5mm audio cable is required (not included) Track Functions, Play/Pause, will store 18 presets (FM 1-3) 7 Audio Adjustment Press SEL button to cycle. →BAS-TRE-BAL -LOUD-EQ-ST-DX-VOL BAS: Bass...
User Manual
Page 10
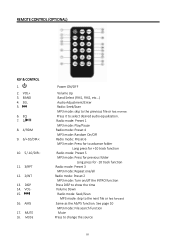
...-: 11. 3/RPT 12. 2/INT 13. MUTE 18. VOL15. 16. MODE Power ON/OFF Volume Up Band Select (FM1, FM2, etc...) Audio Adjustment/Enter Radio: Seek/Scan MP3 mode: skip to select desired audio equalization. Press it to the previous file or fast reverse. VOL+ 3. DISP 14. AMS 17. BAND... 4. Radio mode: Preset 1 MP3 mode: Play/Pause Radio mode: Preset 4 MP3 mode: Random On/Off Radio mode: Preset 6 MP3 mode: Press for to advance folder...
...-: 11. 3/RPT 12. 2/INT 13. MUTE 18. VOL15. 16. MODE Power ON/OFF Volume Up Band Select (FM1, FM2, etc...) Audio Adjustment/Enter Radio: Seek/Scan MP3 mode: skip to select desired audio equalization. Press it to the previous file or fast reverse. VOL+ 3. DISP 14. AMS 17. BAND... 4. Radio mode: Preset 1 MP3 mode: Play/Pause Radio mode: Preset 4 MP3 mode: Random On/Off Radio mode: Preset 6 MP3 mode: Press for to advance folder...

User Manual
Page 12
... same type and rating. Select a station manually. 12 Adjust volume to the "ACC" or "IGN" position The fuse is not on. Press "MODE" to select radio Press the reset button. TROUBLESHOOTING Before going through the checklist, check wiring connection.
... same type and rating. Select a station manually. 12 Adjust volume to the "ACC" or "IGN" position The fuse is not on. Press "MODE" to select radio Press the reset button. TROUBLESHOOTING Before going through the checklist, check wiring connection.


