User Manual in English
Page 2
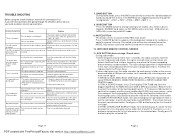
...free from distortion. Start with FinePrint pdfFactory trial version http://www.pdffactory.com To reduce the risk of your new car stereo receiver. Information concerning where the equipment can be obtained from knowing how to excessively loud sound over time, your local authority. Please read this manual carefully before operating this car audio product. If you listen to work your musical...use the unit in the domestic waste. Visible and invisible laser radiation when open the enclosure. PDF created with your volume control at the lowest setting, and slowly increase the level...
...free from distortion. Start with FinePrint pdfFactory trial version http://www.pdffactory.com To reduce the risk of your new car stereo receiver. Information concerning where the equipment can be obtained from knowing how to excessively loud sound over time, your local authority. Please read this manual carefully before operating this car audio product. If you listen to work your musical...use the unit in the domestic waste. Visible and invisible laser radiation when open the enclosure. PDF created with your volume control at the lowest setting, and slowly increase the level...
User Manual in English
Page 3
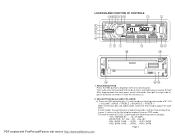
... a) Press the SEL button briefly, it from the unit chassis. 2. VOL -> VOLUME ->BASS ->TREBLE -> BALANCE -> FADER -> When selecting a desired audio mode, rotate the VOL knob to flip down the front panel, push it leftwards, then pull the right side of panel outwards to the last display mode of E. LOCATION AND FUNCTION OF CONTROLS 17 13 14 2 9 10 4 5 15 6 11 16 SCN LOUD LOC ST MUTE VOL- VOL...
... a) Press the SEL button briefly, it from the unit chassis. 2. VOL -> VOLUME ->BASS ->TREBLE -> BALANCE -> FADER -> When selecting a desired audio mode, rotate the VOL knob to flip down the front panel, push it leftwards, then pull the right side of panel outwards to the last display mode of E. LOCATION AND FUNCTION OF CONTROLS 17 13 14 2 9 10 4 5 15 6 11 16 SCN LOUD LOC ST MUTE VOL- VOL...
User Manual in English
Page 4
...: Clock will always show on the display when power off . 3. When the unit is power on at the actual volume it had when it is power off mode. 4. TUNE, SEEK, TRACK, SKIP UP / DOWN BUTTONS a) During RADIO mode: Press the >>| or |>| or |>| button briefly to select one setup item of following functions for user's selection. ->BEEP (ON/OFF) -> USER SET(FLAT/CLASSIC/ROCK/POP) ->SUBW(ON/OFF) -> VOL(LAST/DEFA) ->STEREO...
...: Clock will always show on the display when power off . 3. When the unit is power on at the actual volume it had when it is power off mode. 4. TUNE, SEEK, TRACK, SKIP UP / DOWN BUTTONS a) During RADIO mode: Press the >>| or |>| or |>| button briefly to select one setup item of following functions for user's selection. ->BEEP (ON/OFF) -> USER SET(FLAT/CLASSIC/ROCK/POP) ->SUBW(ON/OFF) -> VOL(LAST/DEFA) ->STEREO...
User Manual in English
Page 5
..., it will display TRK T 000 and flash the biggest digit0 that preset number for each selected band. Clean the CD or try another fuse according to noise 2.Front panel is more than 30 degrees The surface of all the connections first. Tune in microcomputer is inserted) and AUX mode. 9. MODE BUTTON Press the MODE button to a radio station manually. 7. INFRARED REMOTE CONTROL SENSOR 11. And then the 6 stations frequency are loaded The...
..., it will display TRK T 000 and flash the biggest digit0 that preset number for each selected band. Clean the CD or try another fuse according to noise 2.Front panel is more than 30 degrees The surface of all the connections first. Tune in microcomputer is inserted) and AUX mode. 9. MODE BUTTON Press the MODE button to a radio station manually. 7. INFRARED REMOTE CONTROL SENSOR 11. And then the 6 stations frequency are loaded The...
User Manual in English
Page 6
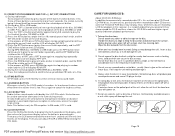
... audio CD's, this button can cause the disc to interrupt the playback of the disc, SD/MMC or USB. If moisture forms on the optical parts of MP3/WMA disc, SD/MMC, USB: Press the radio preset button 6 and 5 to control an attenuator in this receiver, it is recommended that will damage the unit. 3. Press again to select stereo or mono sound mode. 14. In radio mode, press the LOC button...
... audio CD's, this button can cause the disc to interrupt the playback of the disc, SD/MMC or USB. If moisture forms on the optical parts of MP3/WMA disc, SD/MMC, USB: Press the radio preset button 6 and 5 to control an attenuator in this receiver, it is recommended that will damage the unit. 3. Press again to select stereo or mono sound mode. 14. In radio mode, press the LOC button...

User Manual in English
Page 7
... player, remove the metal mounting sleeve illustrated by pressing the EJ key. 20. SCAN BUTTON Press the SCN button to adjust volume. 19. Then you need to stop scan and remain the current frequency; SD/MMC CARD SLOT When you can be hold and blinking for the first time, or after replacing the car battery or changing the connections. FLASHING LED When the front control panel is distorted. RESET BUTTON...
... player, remove the metal mounting sleeve illustrated by pressing the EJ key. 20. SCAN BUTTON Press the SCN button to adjust volume. 19. Then you need to stop scan and remain the current frequency; SD/MMC CARD SLOT When you can be hold and blinking for the first time, or after replacing the car battery or changing the connections. FLASHING LED When the front control panel is distorted. RESET BUTTON...
User Manual in English
Page 8
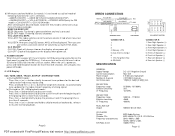
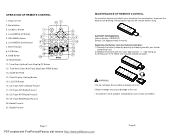
... Button 1 4. Radio Preset 5 21. Page 7 PDF created with the same type and the "+" side facing up. 3) Gently push in fire. Mode Button 2 8 14 9 10 17 16 19 20 MUTE SELECT CLOCK A.P. - ST MODE BAND LOC LOUD TO P / INT RPT 1 2 3 SCN RDM 4 5 6 11. Replacing the Battery from the remote before using. CD Track RPT/Radio Preset 3 19. Radio Preset 6 5 11 6 7 15 3 13 18 21 MAINTENANCE OF REMOTE CONTROL An insulation tag was installed...
... Button 1 4. Radio Preset 5 21. Page 7 PDF created with the same type and the "+" side facing up. 3) Gently push in fire. Mode Button 2 8 14 9 10 17 16 19 20 MUTE SELECT CLOCK A.P. - ST MODE BAND LOC LOUD TO P / INT RPT 1 2 3 SCN RDM 4 5 6 11. Replacing the Battery from the remote before using. CD Track RPT/Radio Preset 3 19. Radio Preset 6 5 11 6 7 15 3 13 18 21 MAINTENANCE OF REMOTE CONTROL An insulation tag was installed...


