User Manual in English
Page 1
Contents Contents 01 Caution 02 Caution 03 Product Controls and Functions 04 Product Controls and Functions 05 Remote Control Diagram 06 Power And Mode Selection 07 Picture 08 Volume 09 System 10 Setup Key 11 Setup Menu 12 Setup Menu 13 DVD Functions 14 DVD Functions 15 DVD Functions 16 DVD Functions 17 DVD Functions 18 Connection Diagram 19 Installation 20 Interchangeabel housing change diagram 21 Disc Inform ation 22 Troubleshooting 23 Specifications 24
Contents Contents 01 Caution 02 Caution 03 Product Controls and Functions 04 Product Controls and Functions 05 Remote Control Diagram 06 Power And Mode Selection 07 Picture 08 Volume 09 System 10 Setup Key 11 Setup Menu 12 Setup Menu 13 DVD Functions 14 DVD Functions 15 DVD Functions 16 DVD Functions 17 DVD Functions 18 Connection Diagram 19 Installation 20 Interchangeabel housing change diagram 21 Disc Inform ation 22 Troubleshooting 23 Specifications 24
User Manual in English
Page 2
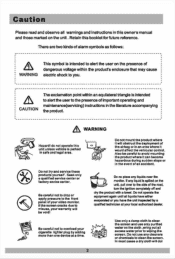
... of Important operating end maintenance(servicIng) Instructions In the literature accompanying the product a j WARNING Hazard! In most cases a dry cloth will dot 2 Also be void! Seek only a qualified service center or factory sevice center. Retain this unit unless vehicle is parked in safe and legal area. Use only a damp cloth to clean the screen and use any Iktukts near the monitor.
... of Important operating end maintenance(servicIng) Instructions In the literature accompanying the product a j WARNING Hazard! In most cases a dry cloth will dot 2 Also be void! Seek only a qualified service center or factory sevice center. Retain this unit unless vehicle is parked in safe and legal area. Use only a damp cloth to clean the screen and use any Iktukts near the monitor.
User Manual in English
Page 3
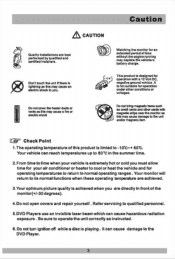
... monitor(+/-30 degrees). 4.Do not open covers and repair yourself . Your vehicle can reach temperatures up to 80'C in the summer time. 2.From time to operate the unit correctly as this product Is limted to its normal functions when these operating temperature are achieved. 3.Your optimum picture quality is playing . Be sure to time when your air conditioner or heater to the DVD Player...
... monitor(+/-30 degrees). 4.Do not open covers and repair yourself . Your vehicle can reach temperatures up to 80'C in the summer time. 2.From time to operate the unit correctly as this product Is limted to its normal functions when these operating temperature are achieved. 3.Your optimum picture quality is playing . Be sure to time when your air conditioner or heater to the DVD Player...
User Manual in English
Page 4
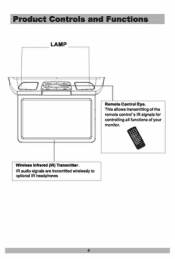
Wireless Infrared (IR Transmitter. IR audio signals are transmitted wirelessly to optional IR headphones Product Controls and Functions LAMP Remote Control Eye. This allows transmitting of the remote control's IR signals for controlling all functions of your monitor.
Wireless Infrared (IR Transmitter. IR audio signals are transmitted wirelessly to optional IR headphones Product Controls and Functions LAMP Remote Control Eye. This allows transmitting of the remote control's IR signals for controlling all functions of your monitor.
User Manual in English
Page 5
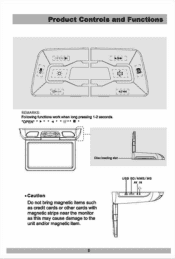
Product Controls and Functions OPE., r - 7 r i -10-0e REMARKS. USB SD/MMS/MS AVI IN n Following functions work when long pressing 1-2 seconds "OPEN` • lo • 4 " 'kV"' • ' Disc loading slot *Caution Do not bring magnetic items such as credit cards or other cards with magnetic strips near the monitor as this may cause damage to the unit and/or magnetic item.
Product Controls and Functions OPE., r - 7 r i -10-0e REMARKS. USB SD/MMS/MS AVI IN n Following functions work when long pressing 1-2 seconds "OPEN` • lo • 4 " 'kV"' • ' Disc loading slot *Caution Do not bring magnetic items such as credit cards or other cards with magnetic strips near the monitor as this may cause damage to the unit and/or magnetic item.
User Manual in English
Page 6
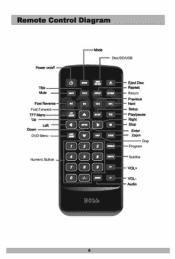
Remote Control Diagram Power ortroff Mode Cisc/SD/USB The Mule Fast Reverse Fast Forward TFT Menu Up Left Down DVD Menu Numeric Button mu mar smile +I N 44 MN r4 SETO MI Ofr t• C-14.01 SIP DWI • 3 4 ( 6 ) atm 7( ) L- ) Eject DM Repeat Return Previous Need Setup Play/pause Right Stop Enter Zoom Disp Program Subtitle VOL+ VOLAudio 30SS 6
Remote Control Diagram Power ortroff Mode Cisc/SD/USB The Mule Fast Reverse Fast Forward TFT Menu Up Left Down DVD Menu Numeric Button mu mar smile +I N 44 MN r4 SETO MI Ofr t• C-14.01 SIP DWI • 3 4 ( 6 ) atm 7( ) L- ) Eject DM Repeat Return Previous Need Setup Play/pause Right Stop Enter Zoom Disp Program Subtitle VOL+ VOLAudio 30SS 6
User Manual in English
Page 7
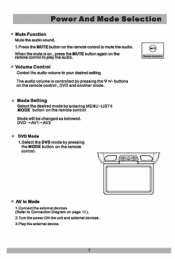
...pressing the MODE button on the remote control. Mode will be changed as belowed. o AV In Mode 1.Connect the external devices. (Refer to mute the audio. Power And Mode Selection o Mute Function Mute the audio sound. 1.Press the MUTE button on the remote control to Connection Diagram on page 19). 2.Tum the power ON the unit and external devices. 3.Play the external device. DVD -.AV1-.AV2 o DVD Mode 1.Select the DVD mode by entering MENU -LIST4 MODE button on the remote control to play the audio. o Volume Control Control the audio volume to your desired setting The audio volume is on...
...pressing the MODE button on the remote control. Mode will be changed as belowed. o AV In Mode 1.Connect the external devices. (Refer to mute the audio. Power And Mode Selection o Mute Function Mute the audio sound. 1.Press the MUTE button on the remote control to Connection Diagram on page 19). 2.Tum the power ON the unit and external devices. 3.Play the external device. DVD -.AV1-.AV2 o DVD Mode 1.Select the DVD mode by entering MENU -LIST4 MODE button on the remote control to play the audio. o Volume Control Control the audio volume to your desired setting The audio volume is on...
User Manual in English
Page 8
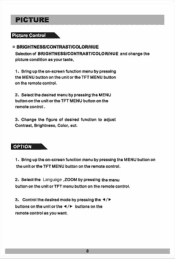
... on-screen function menu by pressing the MENU button on the unit or the TFT MENU button on the remote control. 2, Select the desired menu by pressing the MENU button on the unit or the TFT MENU button on the unit or the 4/0. buttons on the remote control. 2. Select the Language ,ZOOM by pressing the menu button on the unit or TFT menu button on the remote control. 3, Control the desired mode by pressing the l/► buttons on the remote control . 3. PICTURE Picture Control o BRIGHTNESS/CONTRAST/COLOR...
... on-screen function menu by pressing the MENU button on the unit or the TFT MENU button on the remote control. 2, Select the desired menu by pressing the MENU button on the unit or the TFT MENU button on the unit or the 4/0. buttons on the remote control. 2. Select the Language ,ZOOM by pressing the menu button on the unit or TFT menu button on the remote control. 3, Control the desired mode by pressing the l/► buttons on the remote control . 3. PICTURE Picture Control o BRIGHTNESS/CONTRAST/COLOR...
User Manual in English
Page 9
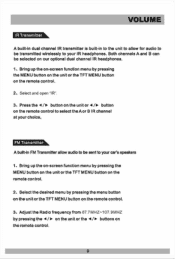
VOLUME Ilift==\ A built-in dual channel IR transmitter is built-in to the unit to allow audio to be sent to your car's speakers 1, Bring up the on-screen function menu by pressing the MENU button on the unit or the TFT MENU button on the remote control. 2, Select and open "IR". 3, Press the I /► button on the unit or I /► buttons on the remote control. 9 Both channels A and B can be transmitted...
VOLUME Ilift==\ A built-in dual channel IR transmitter is built-in to the unit to allow audio to be sent to your car's speakers 1, Bring up the on-screen function menu by pressing the MENU button on the unit or the TFT MENU button on the remote control. 2, Select and open "IR". 3, Press the I /► button on the unit or I /► buttons on the remote control. 9 Both channels A and B can be transmitted...
User Manual in English
Page 10
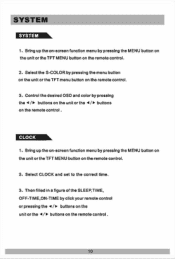
... TFT menu button on the remote control . 10 Select the S-COLOR by pressing the 4/► buttons on the unit or the 4/► buttons on the remote control. 2. CLOCK 1. buttons on the remote control. 3. Bring up the on-screen function menu by click your remote control or pressing the II /► buttons on the remote control. 2. Select CLOCK and set to the correct time. 3. Then filled in a figure of the SLEEP,TIME, OFF-TIME,ON-TIME by pressing the MENU button...
... TFT menu button on the remote control . 10 Select the S-COLOR by pressing the 4/► buttons on the unit or the 4/► buttons on the remote control. 2. CLOCK 1. buttons on the remote control. 3. Bring up the on-screen function menu by click your remote control or pressing the II /► buttons on the remote control. 2. Select CLOCK and set to the correct time. 3. Then filled in a figure of the SLEEP,TIME, OFF-TIME,ON-TIME by pressing the MENU button...
User Manual in English
Page 11
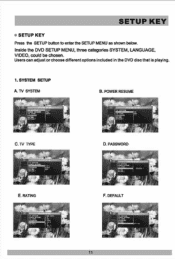
TV SYSTEM (e: B. Users can adjust or choose different options included in the DVD disc that is playing. 1. PASSWORD E. DEFAULT amiammie I F. SETUP KEY o SETUP KEY Press the SETUP button to enter the SETUP MENU as shown below. TV TYPE D. Inside the DVD SETUP MENU, three categories SYSTEM, LANGUAGE, VIDEO, could be chosen. Apt -- :JO I 11 POWER RESUME 10111inbefts C. RATING s l ot; SYSTEM SETUP A.
TV SYSTEM (e: B. Users can adjust or choose different options included in the DVD disc that is playing. 1. PASSWORD E. DEFAULT amiammie I F. SETUP KEY o SETUP KEY Press the SETUP button to enter the SETUP MENU as shown below. TV TYPE D. Inside the DVD SETUP MENU, three categories SYSTEM, LANGUAGE, VIDEO, could be chosen. Apt -- :JO I 11 POWER RESUME 10111inbefts C. RATING s l ot; SYSTEM SETUP A.
User Manual in English
Page 14
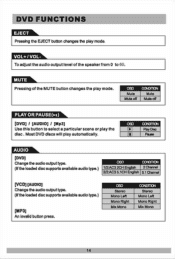
...+ / VOLTo adjust the audio output level of the MUTE button changes the play automatically. Disc Paw AUDIO [DVD] Change the audio output type. (If the loaded disc supports available audio type ) OSD COMMON 1/2:AC3 2CH English 2 Channel 2/2:AC3 5.1CH English 5.1 Ctorrel [VCD] [AUDIO] Change the audio output type. (If the loaded disc supports available audio type.) [MP3] An invalid button press. Pressing of the speaker from 0 to select a particular scene or play mode. DVD FUNCTIONS Pressing the EJECT button changes the play the disc.
...+ / VOLTo adjust the audio output level of the MUTE button changes the play automatically. Disc Paw AUDIO [DVD] Change the audio output type. (If the loaded disc supports available audio type ) OSD COMMON 1/2:AC3 2CH English 2 Channel 2/2:AC3 5.1CH English 5.1 Ctorrel [VCD] [AUDIO] Change the audio output type. (If the loaded disc supports available audio type.) [MP3] An invalid button press. Pressing of the speaker from 0 to select a particular scene or play mode. DVD FUNCTIONS Pressing the EJECT button changes the play the disc.
User Manual in English
Page 15
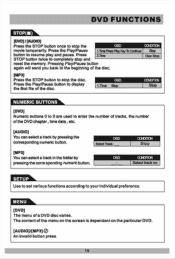
... Sto • [DVD] Numeric buttons 0 to 9 are used to display the first file of the disc. DVD FUNCTIONS STOP ■ [DVD] / [AUDIO] Press the STOP button once to completely stop and reset the memory. Press 2.11ns STOP button twice to stop the movie temporarily. Press the Play/Pause button to enter the number of tracks, the number of the menu on the screen Is dependent on the particular DVD. [AUDIO]/[NIP3] 0 An...
... Sto • [DVD] Numeric buttons 0 to 9 are used to display the first file of the disc. DVD FUNCTIONS STOP ■ [DVD] / [AUDIO] Press the STOP button once to completely stop and reset the memory. Press 2.11ns STOP button twice to stop the movie temporarily. Press the Play/Pause button to enter the number of tracks, the number of the menu on the screen Is dependent on the particular DVD. [AUDIO]/[NIP3] 0 An...

User Manual in English
Page 16
DVD FUNCTIONS [DVD] Used to display the title menu of the loaded DVD disc. (This function is disc-dependent.) [AUDIO] /(Mp3] 0 An invalid button press. [DVD] Pressing FR button changes he play mode as follows: O6O FR 2X FR 4X FR 8X FR 16X FR 32X PLAY OCICITCN 2X rewind search 4X rewind search 8X rewind search 16X rewind search 32X rewind search PLAY [AUDIO] / [DVD] Pressing FR button changes the play mode as follows' OEO...
DVD FUNCTIONS [DVD] Used to display the title menu of the loaded DVD disc. (This function is disc-dependent.) [AUDIO] /(Mp3] 0 An invalid button press. [DVD] Pressing FR button changes he play mode as follows: O6O FR 2X FR 4X FR 8X FR 16X FR 32X PLAY OCICITCN 2X rewind search 4X rewind search 8X rewind search 16X rewind search 32X rewind search PLAY [AUDIO] / [DVD] Pressing FR button changes the play mode as follows' OEO...

User Manual in English
Page 17
... search 32X forward search PLAY [AUDIO] I [VCD] Used to move to the previous track. NEXT(Mr4) [DVD] I [VCD] Pressing FR button changes the play mode as follows: OSO FF2X FF 4X FF 8X FF 16X FF 32X PLAY COPCOSIN 2X forward play 4X forward play 8X forward play 16X forward play 32X forward play PLAY [MP3] Pressing FR button changes the play PLAY 1113=11L [DVD] / [VCD] Used to move to...
... search 32X forward search PLAY [AUDIO] I [VCD] Used to move to the previous track. NEXT(Mr4) [DVD] I [VCD] Pressing FR button changes the play mode as follows: OSO FF2X FF 4X FF 8X FF 16X FF 32X PLAY COPCOSIN 2X forward play 4X forward play 8X forward play 16X forward play 32X forward play PLAY [MP3] Pressing FR button changes the play PLAY 1113=11L [DVD] / [VCD] Used to move to...
User Manual in English
Page 18
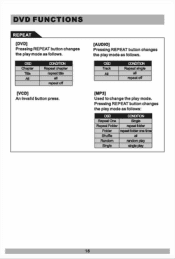
OSD Chapter tee MI COMMOV Repeat chapter repasts all repeat off [VCD] An Invalid button press. [AUDIO] Pressing REPEAT button changes the play mode as follows. Pressing REPEAT button changes the play mode. OSD Track Al CCMITCN Repeat angle all repeat off [MP3] Used to change the play mode as follows. DVD FUNCTIONS [DVD] Pressing REPEAT button changes the play mode as follows: OSD COMMON Repeat One sinsm Folder repeatfoider Folder Shuffle a Random random MOTMIfll 18
OSD Chapter tee MI COMMOV Repeat chapter repasts all repeat off [VCD] An Invalid button press. [AUDIO] Pressing REPEAT button changes the play mode as follows. Pressing REPEAT button changes the play mode. OSD Track Al CCMITCN Repeat angle all repeat off [MP3] Used to change the play mode as follows. DVD FUNCTIONS [DVD] Pressing REPEAT button changes the play mode as follows: OSD COMMON Repeat One sinsm Folder repeatfoider Folder Shuffle a Random random MOTMIfll 18
User Manual in English
Page 21
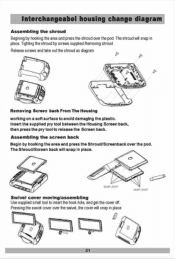
IP 0 fir Removing Screen back From The Housing working on a soft surface to insert the hook hole, and get the cover off. Assembling the screen back Begin by screws supplied.Removing shroud Release screws and take out the shroud as diagram r.5' t. The Shroud/Screen back will snap In place. O O SNAP JOINT SNAP JOIN Swivel cover moving/assembling Use supplied small...
IP 0 fir Removing Screen back From The Housing working on a soft surface to insert the hook hole, and get the cover off. Assembling the screen back Begin by screws supplied.Removing shroud Release screws and take out the shroud as diagram r.5' t. The Shroud/Screen back will snap In place. O O SNAP JOINT SNAP JOIN Swivel cover moving/assembling Use supplied small...

User Manual in English
Page 22
...'t touch the shiny side of certain U.S. Olt Caution Wipe softly with a wet cloth and then with high-quality sound and surround sound effects . Don't use of the disc . To avoid damaging your car in the shade. Also , a CD or a CD-RW which was recorded on special software cannot be played on a DVD disc . Owner's use discs that is intended for home and other limited viewing uses...
...'t touch the shiny side of certain U.S. Olt Caution Wipe softly with a wet cloth and then with high-quality sound and surround sound effects . Don't use of the disc . To avoid damaging your car in the shade. Also , a CD or a CD-RW which was recorded on special software cannot be played on a DVD disc . Owner's use discs that is intended for home and other limited viewing uses...
User Manual in English
Page 23
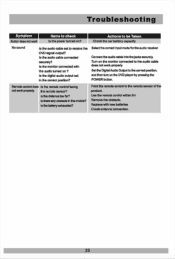
... middle? Use the remote control within 5m Remove the °balder Replace wtth new batteries Check antenna connection. 23 Troubleshooting Symptom Button does not teak Items to receive the DVD signal output? is the dstancti too far? Actions to be Taken Check the car battery capacity No sound Is the audio cable sot to check Is the power turned on? Remote control doss Is the remote cortml facing not work properly Set the DigitalAudio Output to the...
... middle? Use the remote control within 5m Remove the °balder Replace wtth new batteries Check antenna connection. 23 Troubleshooting Symptom Button does not teak Items to receive the DVD signal output? is the dstancti too far? Actions to be Taken Check the car battery capacity No sound Is the audio cable sot to check Is the power turned on? Remote control doss Is the remote cortml facing not work properly Set the DigitalAudio Output to the...
User Manual in English
Page 24
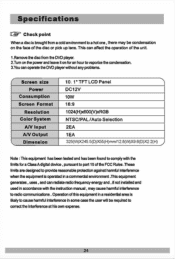
... Specifications tit' Check point When a disc is operated in a commercial environment .This equipment generates , uses , and can radiate radio frequency energy and ,if not installed and used in some case the user will be condensation on for an hour to vaporize the condensation. 3.You can operate the DVD player without any problems. l" Screen size Power Consumption Screen Format Resolution Color System AN Input NV Output Dimension 10. 1' TFT LCD Panel...
... Specifications tit' Check point When a disc is operated in a commercial environment .This equipment generates , uses , and can radiate radio frequency energy and ,if not installed and used in some case the user will be condensation on for an hour to vaporize the condensation. 3.You can operate the DVD player without any problems. l" Screen size Power Consumption Screen Format Resolution Color System AN Input NV Output Dimension 10. 1' TFT LCD Panel...


