User Manual in English
Page 4
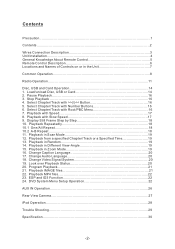
Select Chapter/Track with >>|/| Stop Playback 16 4. Pause Playback 16 3. Contents Precaution...1 Contents...2 Wires Connection Description 3 Unit Installation 4 General Knowledge About Remote Control 5 Remote Control Description 6 Locations and Names of Controls on or in the Unit 7 Common Operation 8 Radio Operation 11 Disc, USB and Card Operation 14 1. Load/unload Disc, USB or Card 14 2.
Select Chapter/Track with >>|/| Stop Playback 16 4. Pause Playback 16 3. Contents Precaution...1 Contents...2 Wires Connection Description 3 Unit Installation 4 General Knowledge About Remote Control 5 Remote Control Description 6 Locations and Names of Controls on or in the Unit 7 Common Operation 8 Radio Operation 11 Disc, USB and Card Operation 14 1. Load/unload Disc, USB or Card 14 2.

User Manual in English
Page 5
... VIDEO RCA OUT BLACK REAR VIEW CAMERA WIRING CONNECTING SOCKET 2 WIRING CONNECTING PLUG 2 GREY REAR AUDIO RCA OUT BLUE BACKGROUND AUDIO RCA OUT RED R WHITE L RED R WHITE L Description of Connecting the Parking Brake Line to the Parking Brake System Built in order for Socket 1 video out yellow ISO CONNECTOR WIRING CONNECTING SOCKET 1 WIRING...
... VIDEO RCA OUT BLACK REAR VIEW CAMERA WIRING CONNECTING SOCKET 2 WIRING CONNECTING PLUG 2 GREY REAR AUDIO RCA OUT BLUE BACKGROUND AUDIO RCA OUT RED R WHITE L RED R WHITE L Description of Connecting the Parking Brake Line to the Parking Brake System Built in order for Socket 1 video out yellow ISO CONNECTOR WIRING CONNECTING SOCKET 1 WIRING...
User Manual in English
Page 10
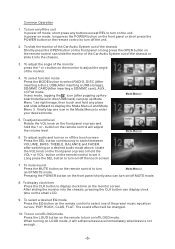
...Mode Menu 3 on/off the touch screen Press the SEL button continuously to enter your desired mode. To adjust audio and turn on the unit. The sound effect will adjust the volume level. Common Operation 1. In any mode, ... Press the EQ button on the monitor screen. To slide the monitor of the Car Audio System out of the chassis or slide it into the chassis, pressing the CLK button can slide the monitor of ...the Car Audio System out of the chassis Shortly press the OPEN button on the front panel or long press ...
...Mode Menu 3 on/off the touch screen Press the SEL button continuously to enter your desired mode. To adjust audio and turn on the unit. The sound effect will adjust the volume level. Common Operation 1. In any mode, ... Press the EQ button on the monitor screen. To slide the monitor of the Car Audio System out of the chassis or slide it into the chassis, pressing the CLK button can slide the monitor of ...the Car Audio System out of the chassis Shortly press the OPEN button on the front panel or long press ...
User Manual in English
Page 22
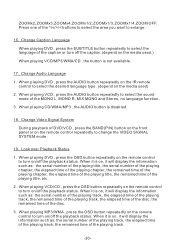
...title, the remained time of the playing track. -20- Change Video Signal System During playback of the disc. 3. When playing DVD , press the AUDIO button repeatedly on the IR remote control to change the VIDEO SIGNAL SYSTEM mode . 19. When it is on /off the playback status. When ...it is not available. 17. Look over Playback Status 1. When it is disabled. 18. ZOOMx2,ZOOMx3,ZOOMx4,ZOOMx1/2,ZOOMx1/3,ZOOMx1/4,ZOOM OFF. Change Audio Language 1. When playing VCD/CD ...
...title, the remained time of the playing track. -20- Change Video Signal System During playback of the disc. 3. When playing DVD , press the AUDIO button repeatedly on the IR remote control to change the VIDEO SIGNAL SYSTEM mode . 19. When it is on /off the playback status. When ...it is not available. 17. Look over Playback Status 1. When it is disabled. 18. ZOOMx2,ZOOMx3,ZOOMx4,ZOOMx1/2,ZOOMx1/3,ZOOMx1/4,ZOOM OFF. Change Audio Language 1. When playing VCD/CD ...
User Manual in English
Page 24
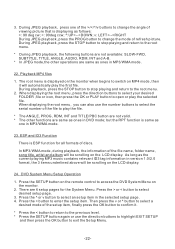
or < button to enter the setup item. Then press the v or ^ button to select a desired mode of the >/: 90 deg cw; During JPEG playback, press one of the setup item, finally press the OK button to confirm it. * Press the < button to return to the previous level. * Press the SETUP button again or use the direction buttons to highlight EXIT SETUP and then press the OK button to select an setup item in the selected setup page. 4. Press the > button to select desired setup page. 3. 3. Press the ^ or v button to exit the Setup Menu. -22-
or < button to enter the setup item. Then press the v or ^ button to select a desired mode of the >/: 90 deg cw; During JPEG playback, press one of the setup item, finally press the OK button to confirm it. * Press the < button to return to the previous level. * Press the SETUP button again or use the direction buttons to highlight EXIT SETUP and then press the OK button to select an setup item in the selected setup page. 4. Press the > button to select desired setup page. 3. 3. Press the ^ or v button to exit the Setup Menu. -22-
User Manual in English
Page 25
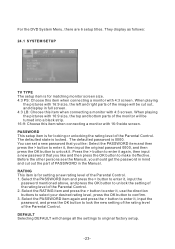
... of the Parental Control. The defaulted password is for setting a new rating level of the Parental Control. 2. For the DVD System Menu, there are 6 setup titles. They display as follows: 24.1 SYSTEM SETUP TV TYPE The setup item is locked. The defaulted state is for locking or unlocking the rating level of...
... of the Parental Control. The defaulted password is for setting a new rating level of the Parental Control. 2. For the DVD System Menu, there are 6 setup titles. They display as follows: 24.1 SYSTEM SETUP TV TYPE The setup item is locked. The defaulted state is for locking or unlocking the rating level of...

User Manual in English
Page 26
SUBTITLE LANG This item is for selecting a audio language. 24.2 LANGUAGE SETUP OSD LANGUAGE This item is for selecting the language of the video output. AUDIO LANG This item is for selecting a subtitle language. MENU LANG This item is for selecting a disc menu language. 24.3 AUDIO SETUP KEY It is for selecting your desired basic music tone(from low to high). 24.4 VIDEO SETUP BRIGHTNESS It is for adjusting the brightness of the SYSTEM MENU and all operating prompt interface displayed during playback. CONTRAST It is for adjusting the contrast of the video output. -24-
SUBTITLE LANG This item is for selecting a audio language. 24.2 LANGUAGE SETUP OSD LANGUAGE This item is for selecting the language of the video output. AUDIO LANG This item is for selecting a subtitle language. MENU LANG This item is for selecting a disc menu language. 24.3 AUDIO SETUP KEY It is for selecting your desired basic music tone(from low to high). 24.4 VIDEO SETUP BRIGHTNESS It is for adjusting the brightness of the SYSTEM MENU and all operating prompt interface displayed during playback. CONTRAST It is for adjusting the contrast of the video output. -24-
User Manual in English
Page 28
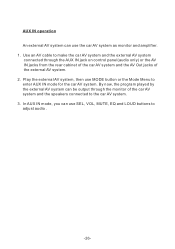
... monitor and amplifier. 1. AUX IN operation An external AV system can use SEL, VOL, MUTE, EQ and LOUD buttons to adjust audio . -26- Play the external AV system, then use MODE button or the Mode Menu to make the car AV system and the external AV system connected through the monitor of the external AV... system. 2. By now, the program played by the external AV system can be output through the AUX IN jack on control panel(audio only) or the AV IN jacks from the rear...
... monitor and amplifier. 1. AUX IN operation An external AV system can use SEL, VOL, MUTE, EQ and LOUD buttons to adjust audio . -26- Play the external AV system, then use MODE button or the Mode Menu to make the car AV system and the external AV system connected through the monitor of the external AV... system. 2. By now, the program played by the external AV system can be output through the AUX IN jack on control panel(audio only) or the AV IN jacks from the rear...
User Manual in English
Page 29
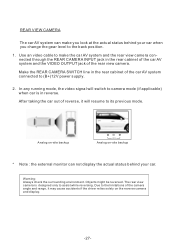
... the limitations of reverse, it may cause accidents if the driver relies solely on -site backup * Note : the external monitor can make the car AV system and the rear view camera connected through the REAR CAMERA INPUT jack in the rear cabinet of the rear view camera. Due to assist while...PIC ANGLE Analog on the reverse camera and display. -27- Make the REAR CAMERA SWITCH line in the rear cabinet of the car AV system and the VIDEO OUTPUT jack of the car AV system connected to (B+)12V power supply. 2. Warning: Always check the surrounding environment. REAR VIEW CAMERA The car AV...
... the limitations of reverse, it may cause accidents if the driver relies solely on -site backup * Note : the external monitor can make the car AV system and the rear view camera connected through the REAR CAMERA INPUT jack in the rear cabinet of the rear view camera. Due to assist while...PIC ANGLE Analog on the reverse camera and display. -27- Make the REAR CAMERA SWITCH line in the rear cabinet of the car AV system and the VIDEO OUTPUT jack of the car AV system connected to (B+)12V power supply. 2. Warning: Always check the surrounding environment. REAR VIEW CAMERA The car AV...
User Manual in English
Page 31
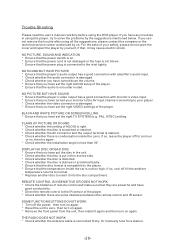
...muted. BLACK AND WHITE PICTURE OR SCREEN ROLLING * Ensure that the temperature inside the Lens. FLAWS OF PICTURE OR SOUND * Check whether the setting of AUDIO is right. * Check whether the disc is scratched or stained. * Check whether the AV connector and the output terminal is stained. * Check whether... your safety, please do not open the cover and repair the player by yourself, if that they are powerful and have set the right TV SYSTEM (e.g. NO PICTURE, SOUND AND INDICATION * Ensure that the disc format is not too high. SOME FUNCTION BUTTONS DO NOT WORK * Turn off for a station...
...muted. BLACK AND WHITE PICTURE OR SCREEN ROLLING * Ensure that the temperature inside the Lens. FLAWS OF PICTURE OR SOUND * Check whether the setting of AUDIO is right. * Check whether the disc is scratched or stained. * Check whether the AV connector and the output terminal is stained. * Check whether... your safety, please do not open the cover and repair the player by yourself, if that they are powerful and have set the right TV SYSTEM (e.g. NO PICTURE, SOUND AND INDICATION * Ensure that the disc format is not too high. SOME FUNCTION BUTTONS DO NOT WORK * Turn off for a station...
User Manual in English
Page 32
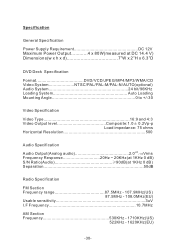
... Power Output............4 x 80W(measured at DC 14.4 V) Dimensions(w x h x d 7"W x 2"H x 6.3"D DVD Deck Specification Format DVD/VCD/JPEG/MP4/MP3/WMA/CD Video System NTSC/PAL/PAL-M/PAL-N/AUTO(optional) Audio System 24 bit/96KHz Loading System Auto Loading Mounting Angle 0 to +/-30 Video Specification Video Type 16:9 and 4:3 Video Output level Composite:1.0± 0.2Vp-p Load impedance...
... Power Output............4 x 80W(measured at DC 14.4 V) Dimensions(w x h x d 7"W x 2"H x 6.3"D DVD Deck Specification Format DVD/VCD/JPEG/MP4/MP3/WMA/CD Video System NTSC/PAL/PAL-M/PAL-N/AUTO(optional) Audio System 24 bit/96KHz Loading System Auto Loading Mounting Angle 0 to +/-30 Video Specification Video Type 16:9 and 4:3 Video Output level Composite:1.0± 0.2Vp-p Load impedance...


