Operation Manual
Page 2
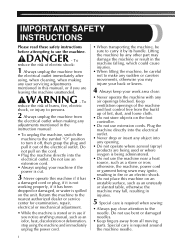
...; To unplug the machine, switch the machine to the symbol "O" position to turn it off, then grasp the plug and pull it by any other part may fall, resulting in injuries. 5 Special care is required around the machine needle. 1 To reduce the risk of lint, dust, and loose cloth. •... Special care is required when sewing: • Always pay close attention to carry it out of electric shock: 1 Always unplug the machine from all moving parts. Do not use the machine near a heat source, such as an unsteady or slanted table, otherwise the machine may damage the machine or result in...
...; To unplug the machine, switch the machine to the symbol "O" position to turn it off, then grasp the plug and pull it by any other part may fall, resulting in injuries. 5 Special care is required around the machine needle. 1 To reduce the risk of lint, dust, and loose cloth. •... Special care is required when sewing: • Always pay close attention to carry it out of electric shock: 1 Always unplug the machine from all moving parts. Do not use the machine near a heat source, such as an unsteady or slanted table, otherwise the machine may damage the machine or result in...
Operation Manual
Page 3
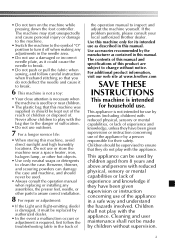
... experience and knowledge if they have been given supervision or instruction concerning use by or near a space heater, iron, halogen lamp, or other parts to assure correct installation. 8 For repair or adjustment: • If the Light unit (light-emitting diode) is damaged, it to the ...Do not use as described in this manual. If the problem persists, please consult your local authorized Brother dealer. For additional product information, visit our web site at www.brother.com SAVE THESE INSTRUCTIONS This machine is not intended for their safety. This appliance can damage the case...
... experience and knowledge if they have been given supervision or instruction concerning use by or near a space heater, iron, halogen lamp, or other parts to assure correct installation. 8 For repair or adjustment: • If the Light unit (light-emitting diode) is damaged, it to the ...Do not use as described in this manual. If the problem persists, please consult your local authorized Brother dealer. For additional product information, visit our web site at www.brother.com SAVE THESE INSTRUCTIONS This machine is not intended for their safety. This appliance can damage the case...
Operation Manual
Page 4
KNOWING YOUR SEWING MACHINE 4 ACCESSORIES 4 Optional accessories 4 THE MAIN PARTS 5 Flat bed attachment 5 USING YOUR SEWING MACHINE 6 Connecting plugs 6 Main power and sewing light switch 7 Foot controller 7 Checking the needle 7 Replacing the needle 7 Changing the ...
KNOWING YOUR SEWING MACHINE 4 ACCESSORIES 4 Optional accessories 4 THE MAIN PARTS 5 Flat bed attachment 5 USING YOUR SEWING MACHINE 6 Connecting plugs 6 Main power and sewing light switch 7 Foot controller 7 Checking the needle 7 Replacing the needle 7 Changing the ...
Operation Manual
Page 5
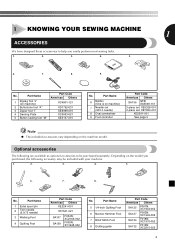
...F034N: XC2165-002 F005N: XC1948-052 No. No. No. Part Name 1 Zigzag foot "J" (on the machine model. Part Name 6 Bobbin (One is on machine) 7 Needle set (90/14 needle) 8 Oval screwdriver 9 Foot controller Part Code Americas Others SA156 SFB: XA5539-151 3-piece set: ... ● The included accessories vary depending on machine) 2 Buttonhole foot "A" 3 Zipper foot "I" 4 Darning Plate 5 Button sewing foot "M" Part Code Americas Others XC4901-121 XD1792-031 XE9369-001 XC6063-021 XE2137-001 No. 1 KNOWING YOUR SEWING MACHINE 1 ACCESSORIES We have designed these ...
...F034N: XC2165-002 F005N: XC1948-052 No. No. No. Part Name 1 Zigzag foot "J" (on the machine model. Part Name 6 Bobbin (One is on machine) 7 Needle set (90/14 needle) 8 Oval screwdriver 9 Foot controller Part Code Americas Others SA156 SFB: XA5539-151 3-piece set: ... ● The included accessories vary depending on machine) 2 Buttonhole foot "A" 3 Zipper foot "I" 4 Darning Plate 5 Button sewing foot "M" Part Code Americas Others XC4901-121 XD1792-031 XE9369-001 XC6063-021 XE2137-001 No. 1 KNOWING YOUR SEWING MACHINE 1 ACCESSORIES We have designed these ...
Operation Manual
Page 6
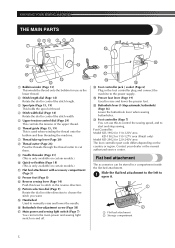
... attachment. Flat bed attachment The accessories can turn the main power and sewing light switch on and off. KNOWING YOUR SEWING MACHINE THE MAIN PARTS 654 3 2 1 7 E 8 9 D 0 A C B 1 Bobbin winder (Page 15) This winds the thread onto the bobbin for 220-240V area The foot... controller part code differs depending on certain models.) A Flat bed attachment with accessory compartment (Page 5) B Presser foot (Page 8) C Reverse sewing lever (Page 14) Push this to...
... attachment. Flat bed attachment The accessories can turn the main power and sewing light switch on and off. KNOWING YOUR SEWING MACHINE THE MAIN PARTS 654 3 2 1 7 E 8 9 D 0 A C B 1 Bobbin winder (Page 15) This winds the thread onto the bobbin for 220-240V area The foot... controller part code differs depending on certain models.) A Flat bed attachment with accessory compartment (Page 5) B Presser foot (Page 8) C Reverse sewing lever (Page 14) Push this to...
Operation Manual
Page 9
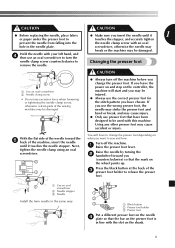
.... CAUTION 21 1 Use an oval screwdriver 2 Needle clamp screw • Do not use excessive force when loosening or tightening the needle clamp screw, otherwise certain parts of the 3 presser foot holder to release the presser foot. 1 1 Use an oval screwdriver 2 Needle stopper 3 Needle Install the twin needle in the same way...
.... CAUTION 21 1 Use an oval screwdriver 2 Needle clamp screw • Do not use excessive force when loosening or tightening the needle clamp screw, otherwise certain parts of the 3 presser foot holder to release the presser foot. 1 1 Use an oval screwdriver 2 Needle stopper 3 Needle Install the twin needle in the same way...
Operation Manual
Page 16
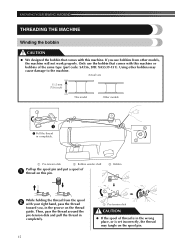
... SEWING MACHINE THREADING THE MACHINE Winding the bobbin CAUTION ● We designed the bobbin that comes with this machine or bobbins of the same type (part code: SA156, SFB: XA5539-151). Then, pass the thread around the pre-tension disk and pull the thread in completely. 15 1 1 Pre-tension disk CAUTION...
... SEWING MACHINE THREADING THE MACHINE Winding the bobbin CAUTION ● We designed the bobbin that comes with this machine or bobbins of the same type (part code: SA156, SFB: XA5539-151). Then, pass the thread around the pre-tension disk and pull the thread in completely. 15 1 1 Pre-tension disk CAUTION...
Operation Manual
Page 26
... thread under the presser foot, otherwise the presser foot may be injured. ● When you are using the machine. Keep your hands away from moving parts. ● Do not stretch or pull the fabric during sewing. If you use the correct presser foot. The needle may break and you may be...
... thread under the presser foot, otherwise the presser foot may be injured. ● When you are using the machine. Keep your hands away from moving parts. ● Do not stretch or pull the fabric during sewing. If you use the correct presser foot. The needle may break and you may be...
Operation Manual
Page 28
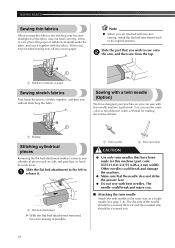
...; Make sure that you can use the same color or two different colors of fabric together, and then sew without stretching the fabric. Slide the part that the needle does not strike the presser foot. ● Do not sew with bent needles. You can sew with free-arm sewing, install the... so you wish to sew cylindrical pieces such as a single needle (see page 7-8). Other needles could break and injure you are finished with this machine (part code: X57521-021:2.0/75 with the fabric.
...; Make sure that you can use the same color or two different colors of fabric together, and then sew without stretching the fabric. Slide the part that the needle does not strike the presser foot. ● Do not sew with bent needles. You can sew with free-arm sewing, install the... so you wish to sew cylindrical pieces such as a single needle (see page 7-8). Other needles could break and injure you are finished with this machine (part code: X57521-021:2.0/75 with the fabric.
Operation Manual
Page 32
Slide the part that the fabric feeds correctly, and then start sewing. 1 1 Arm After selecting a stitch, slowly turn the 8 handwheel toward you wish to sew onto 7 the arm, ...
Slide the part that the fabric feeds correctly, and then start sewing. 1 1 Arm After selecting a stitch, slowly turn the 8 handwheel toward you wish to sew onto 7 the arm, ...
Operation Manual
Page 44
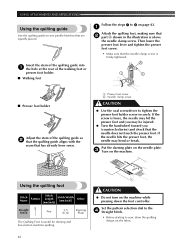
... presser foot holder. ■ Walking foot Follow the steps 1 to sew, draw the quilting design on page 42. 1 Attach the quilting foot, making sure that 2 part A shown in the illustration is firmly tightened. Put the darning plate on the needle plate. 3 Turn on the machine while pressing down the foot controller...
... presser foot holder. ■ Walking foot Follow the steps 1 to sew, draw the quilting design on page 42. 1 Attach the quilting foot, making sure that 2 part A shown in the illustration is firmly tightened. Put the darning plate on the needle plate. 3 Turn on the machine while pressing down the foot controller...
Operation Manual
Page 46
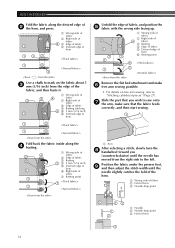
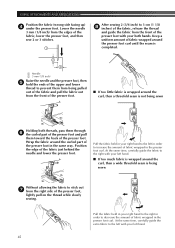
... side facing up) 4 under the presser foot. Keep a uniform amount of fabric wrapped around the curl, then a wide threefold seam is wrapped around the curled part of the presser foot. ■ If too little fabric is being sewn Holding both hands. At the same time, carefully guide the fabric to the... of the fabric just behind the needle and lower the presser foot. Pull the fabric held in your both threads, pass them through 6 the curled part of the presser foot and pull them from being pulled out of the fabric and pull the fabric out from the front of the presser...
... side facing up) 4 under the presser foot. Keep a uniform amount of fabric wrapped around the curl, then a wide threefold seam is wrapped around the curled part of the presser foot. ■ If too little fabric is being sewn Holding both hands. At the same time, carefully guide the fabric to the... of the fabric just behind the needle and lower the presser foot. Pull the fabric held in your both threads, pass them through 6 the curled part of the presser foot and pull them from being pulled out of the fabric and pull the fabric out from the front of the presser...
Operation Manual
Page 49
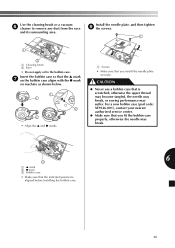
..., the needle may break, or sewing performance may break. 3 6 1 ▲ mark 2 ● mark 3 Bobbin case • Make sure that is scratched; For a new bobbin case (part code: XE9326-001), contact your nearest authorized service center. ● Make sure that you install the needle plate securely. Insert the bobbin case so that...
..., the needle may break, or sewing performance may break. 3 6 1 ▲ mark 2 ● mark 3 Bobbin case • Make sure that is scratched; For a new bobbin case (part code: XE9326-001), contact your nearest authorized service center. ● Make sure that you install the needle plate securely. Insert the bobbin case so that...
Operation Manual
Page 53
... 34 Flat bed attachment 5 Foot controller 7 Free-arm style 27 G Gathering 41 H Handwheel 19 L Light switch 7 , Lower threading 17 quick-set bobbin 18 23 M Main parts 5 Main power 7 Maintenance 47 N Narrow hemmer foot 44 Needle checking 7 combinations with fabric and thread .........24 replacing 7 Needle threader 21 O Overedge stitching 34 P Pattern selection...
... 34 Flat bed attachment 5 Foot controller 7 Free-arm style 27 G Gathering 41 H Handwheel 19 L Light switch 7 , Lower threading 17 quick-set bobbin 18 23 M Main parts 5 Main power 7 Maintenance 47 N Narrow hemmer foot 44 Needle checking 7 combinations with fabric and thread .........24 replacing 7 Needle threader 21 O Overedge stitching 34 P Pattern selection...


